Bamboo Quilt – Finished!

I started this quilt at the beginning of March. I had no idea how long it would take or how many decisions I’d have to make as I assembled the blocks, fit them together, planned the back, figured out how to quilt it….

I finished it this morning (with two weeks away from the work while I was in Italy) so working time on the quilt – about five weeks.
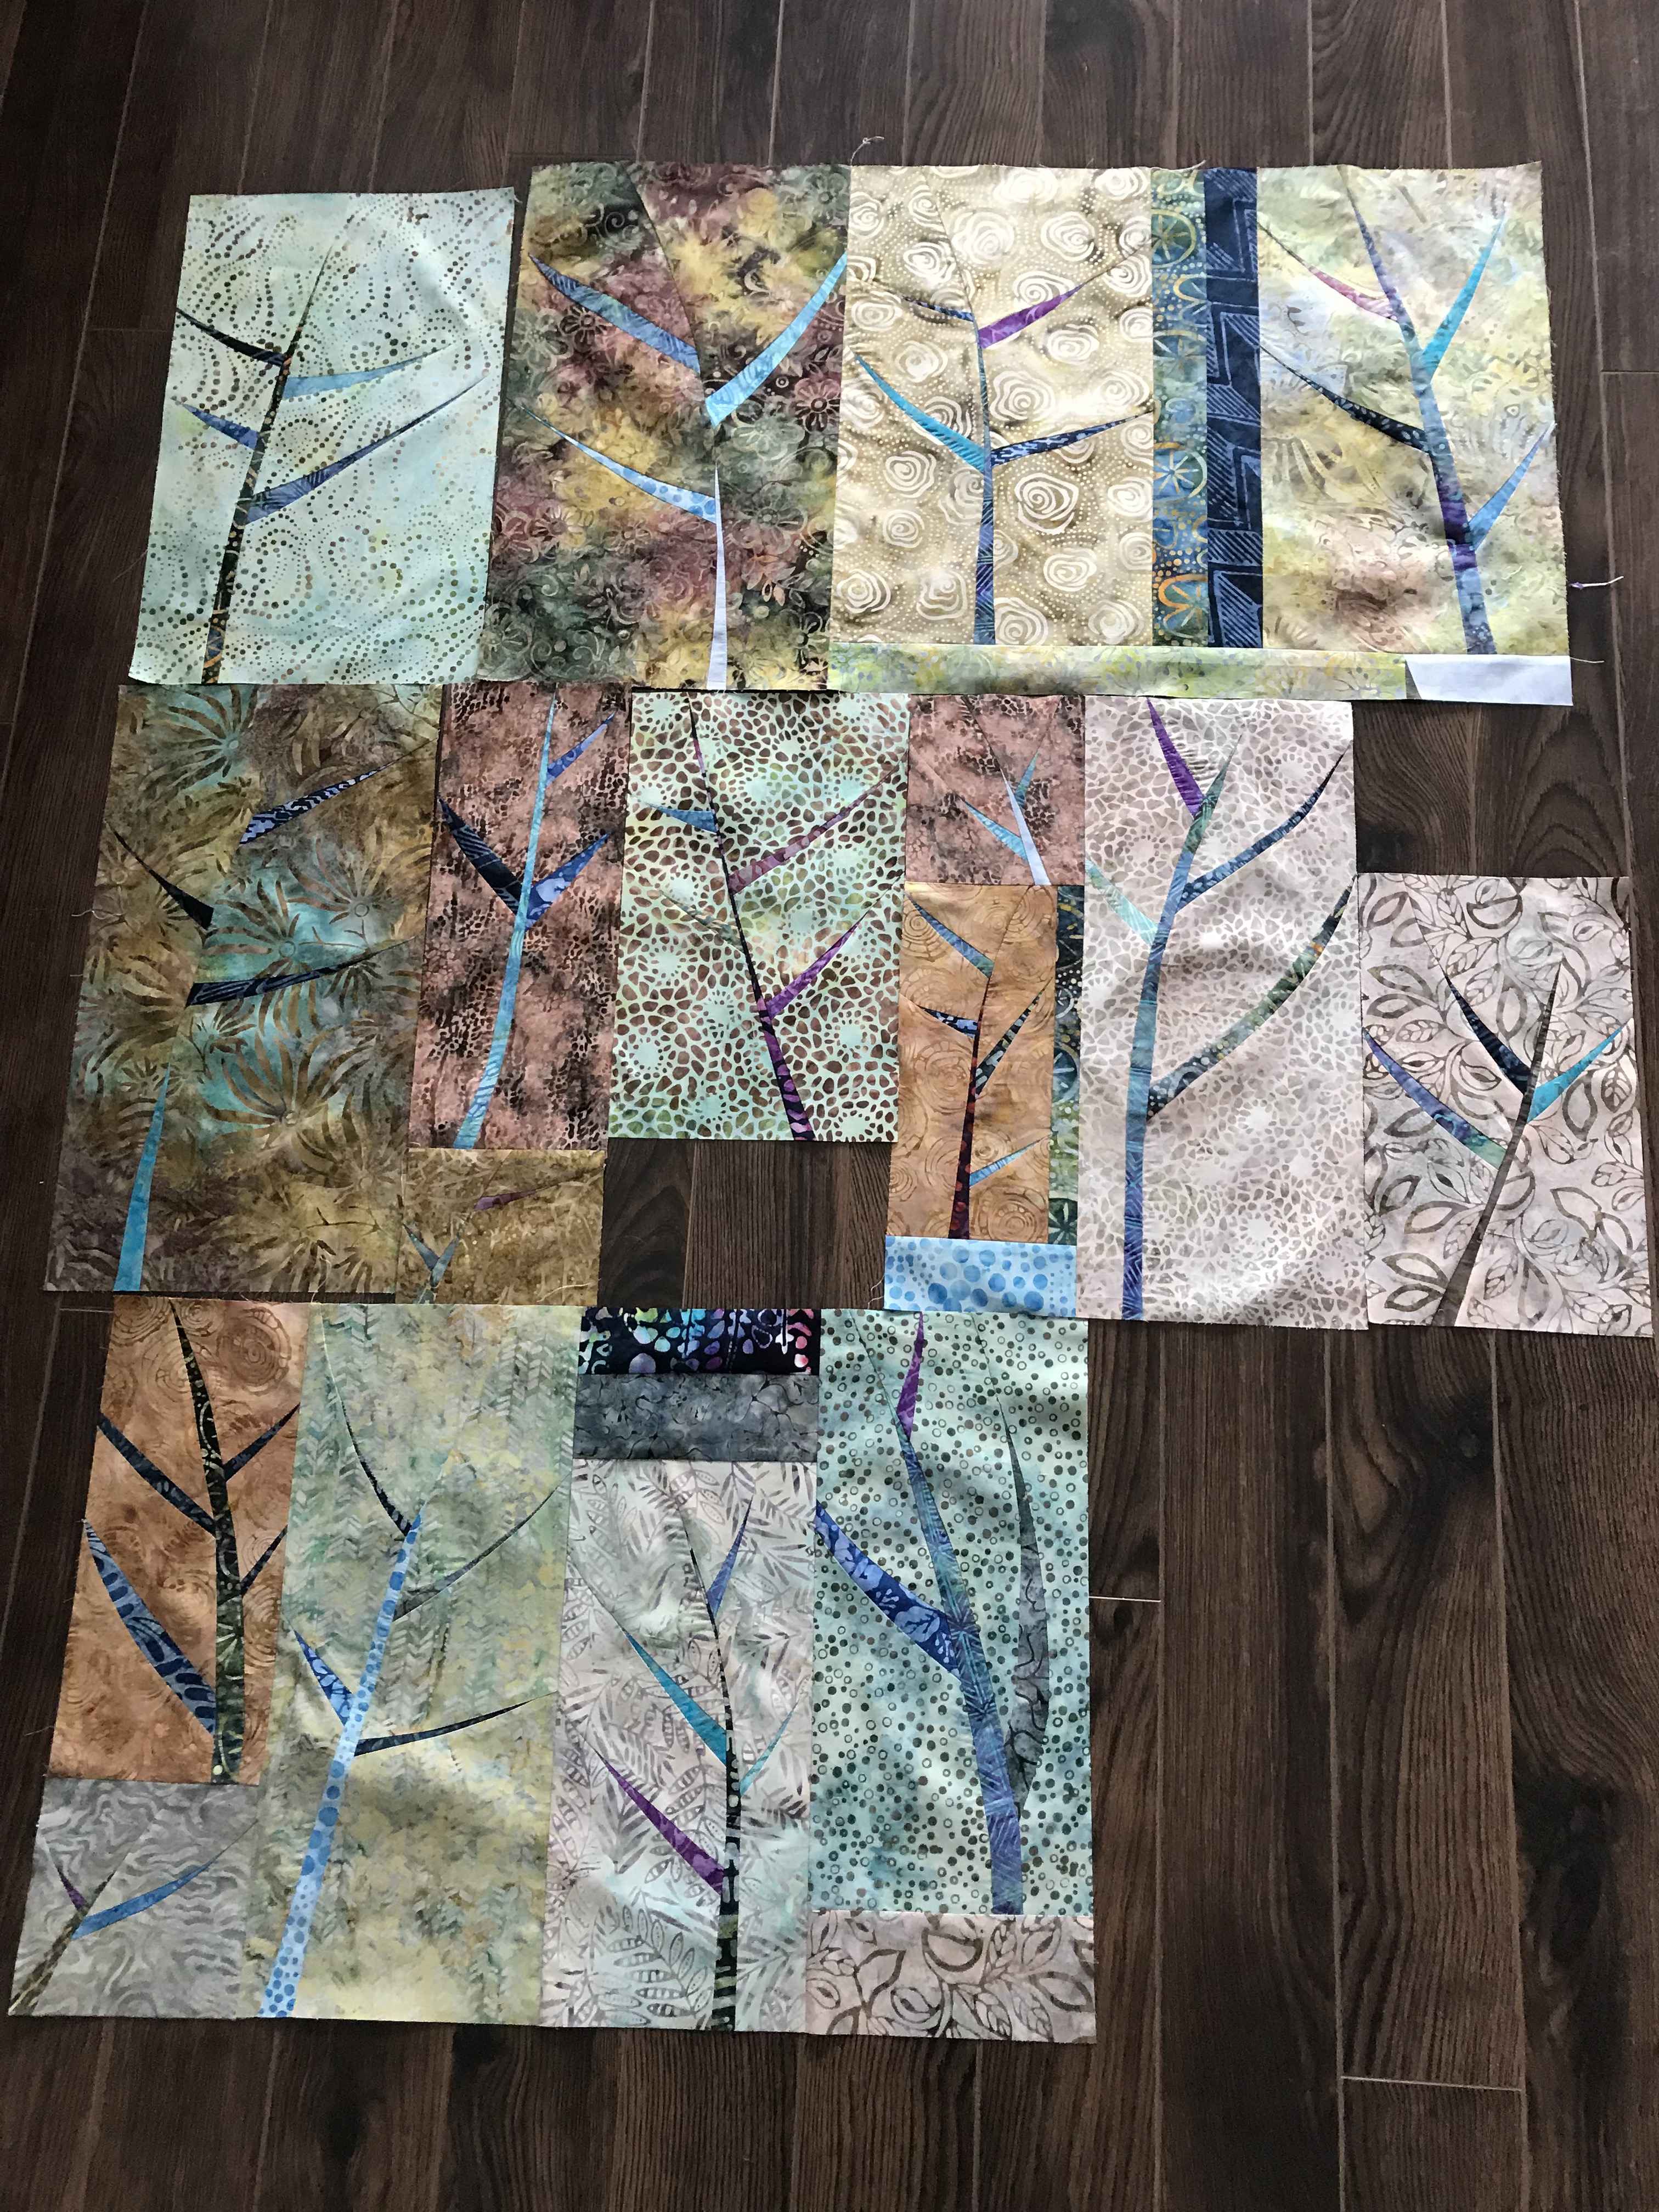
Quilt Top

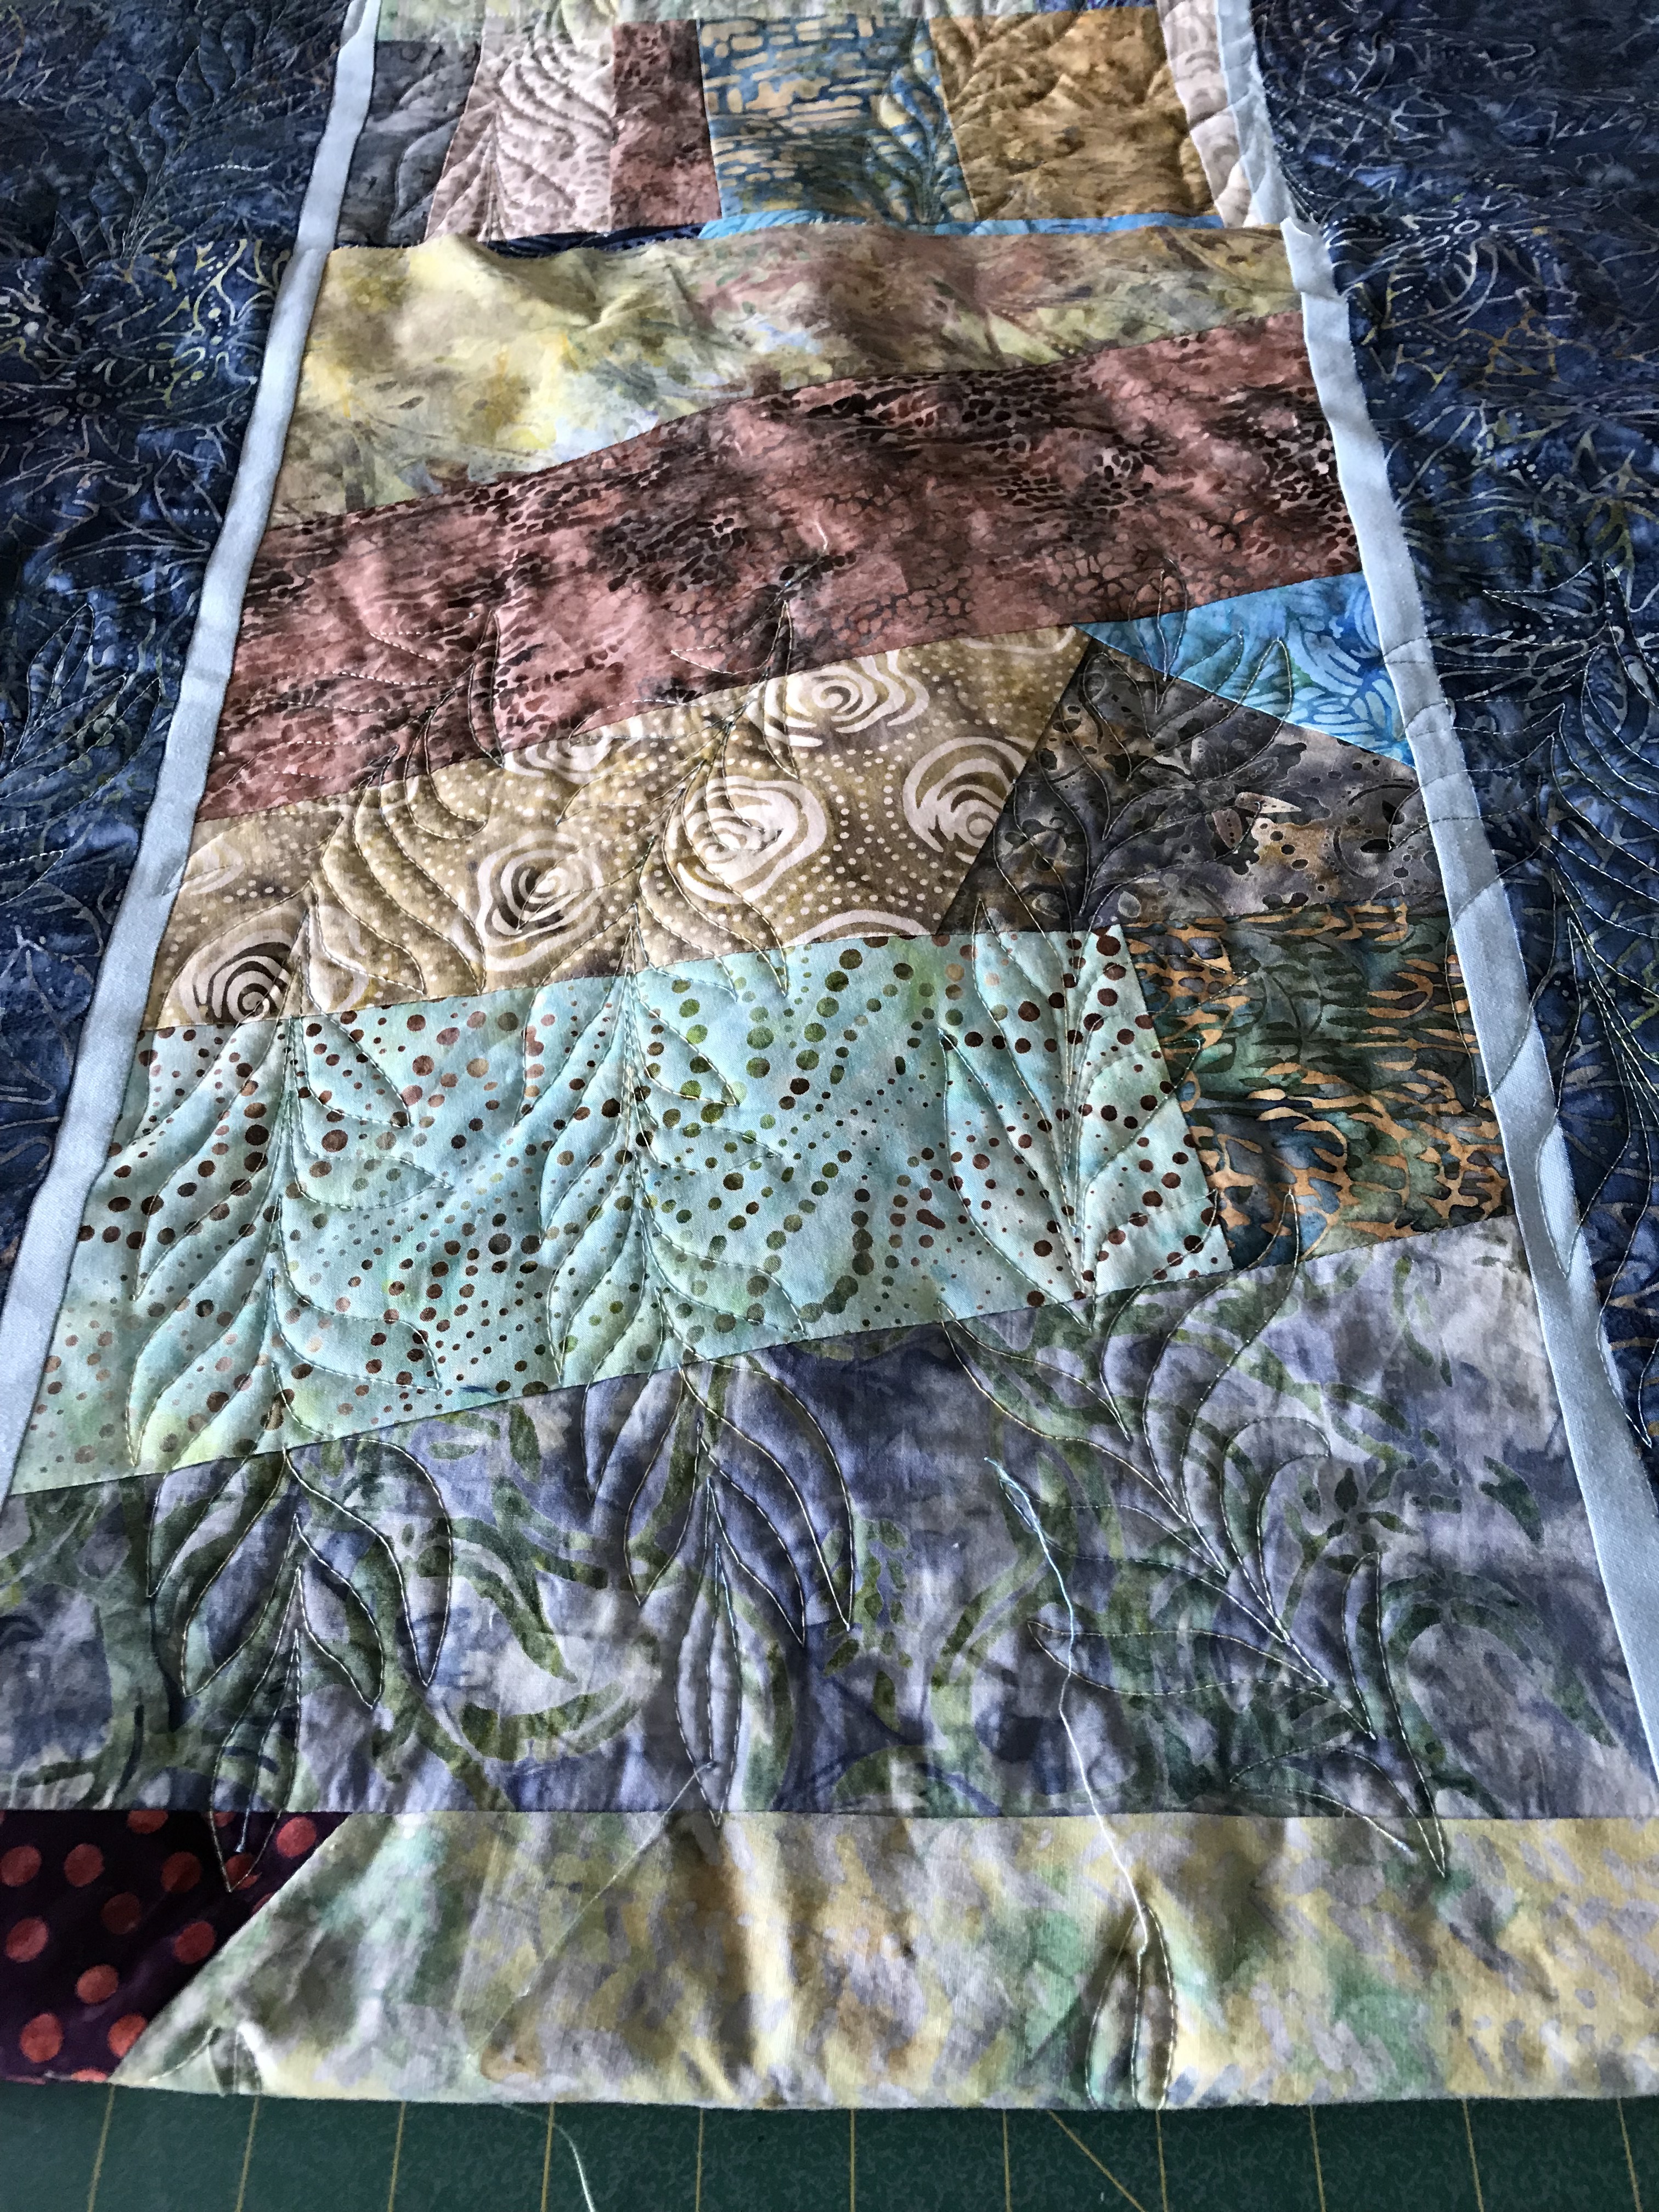
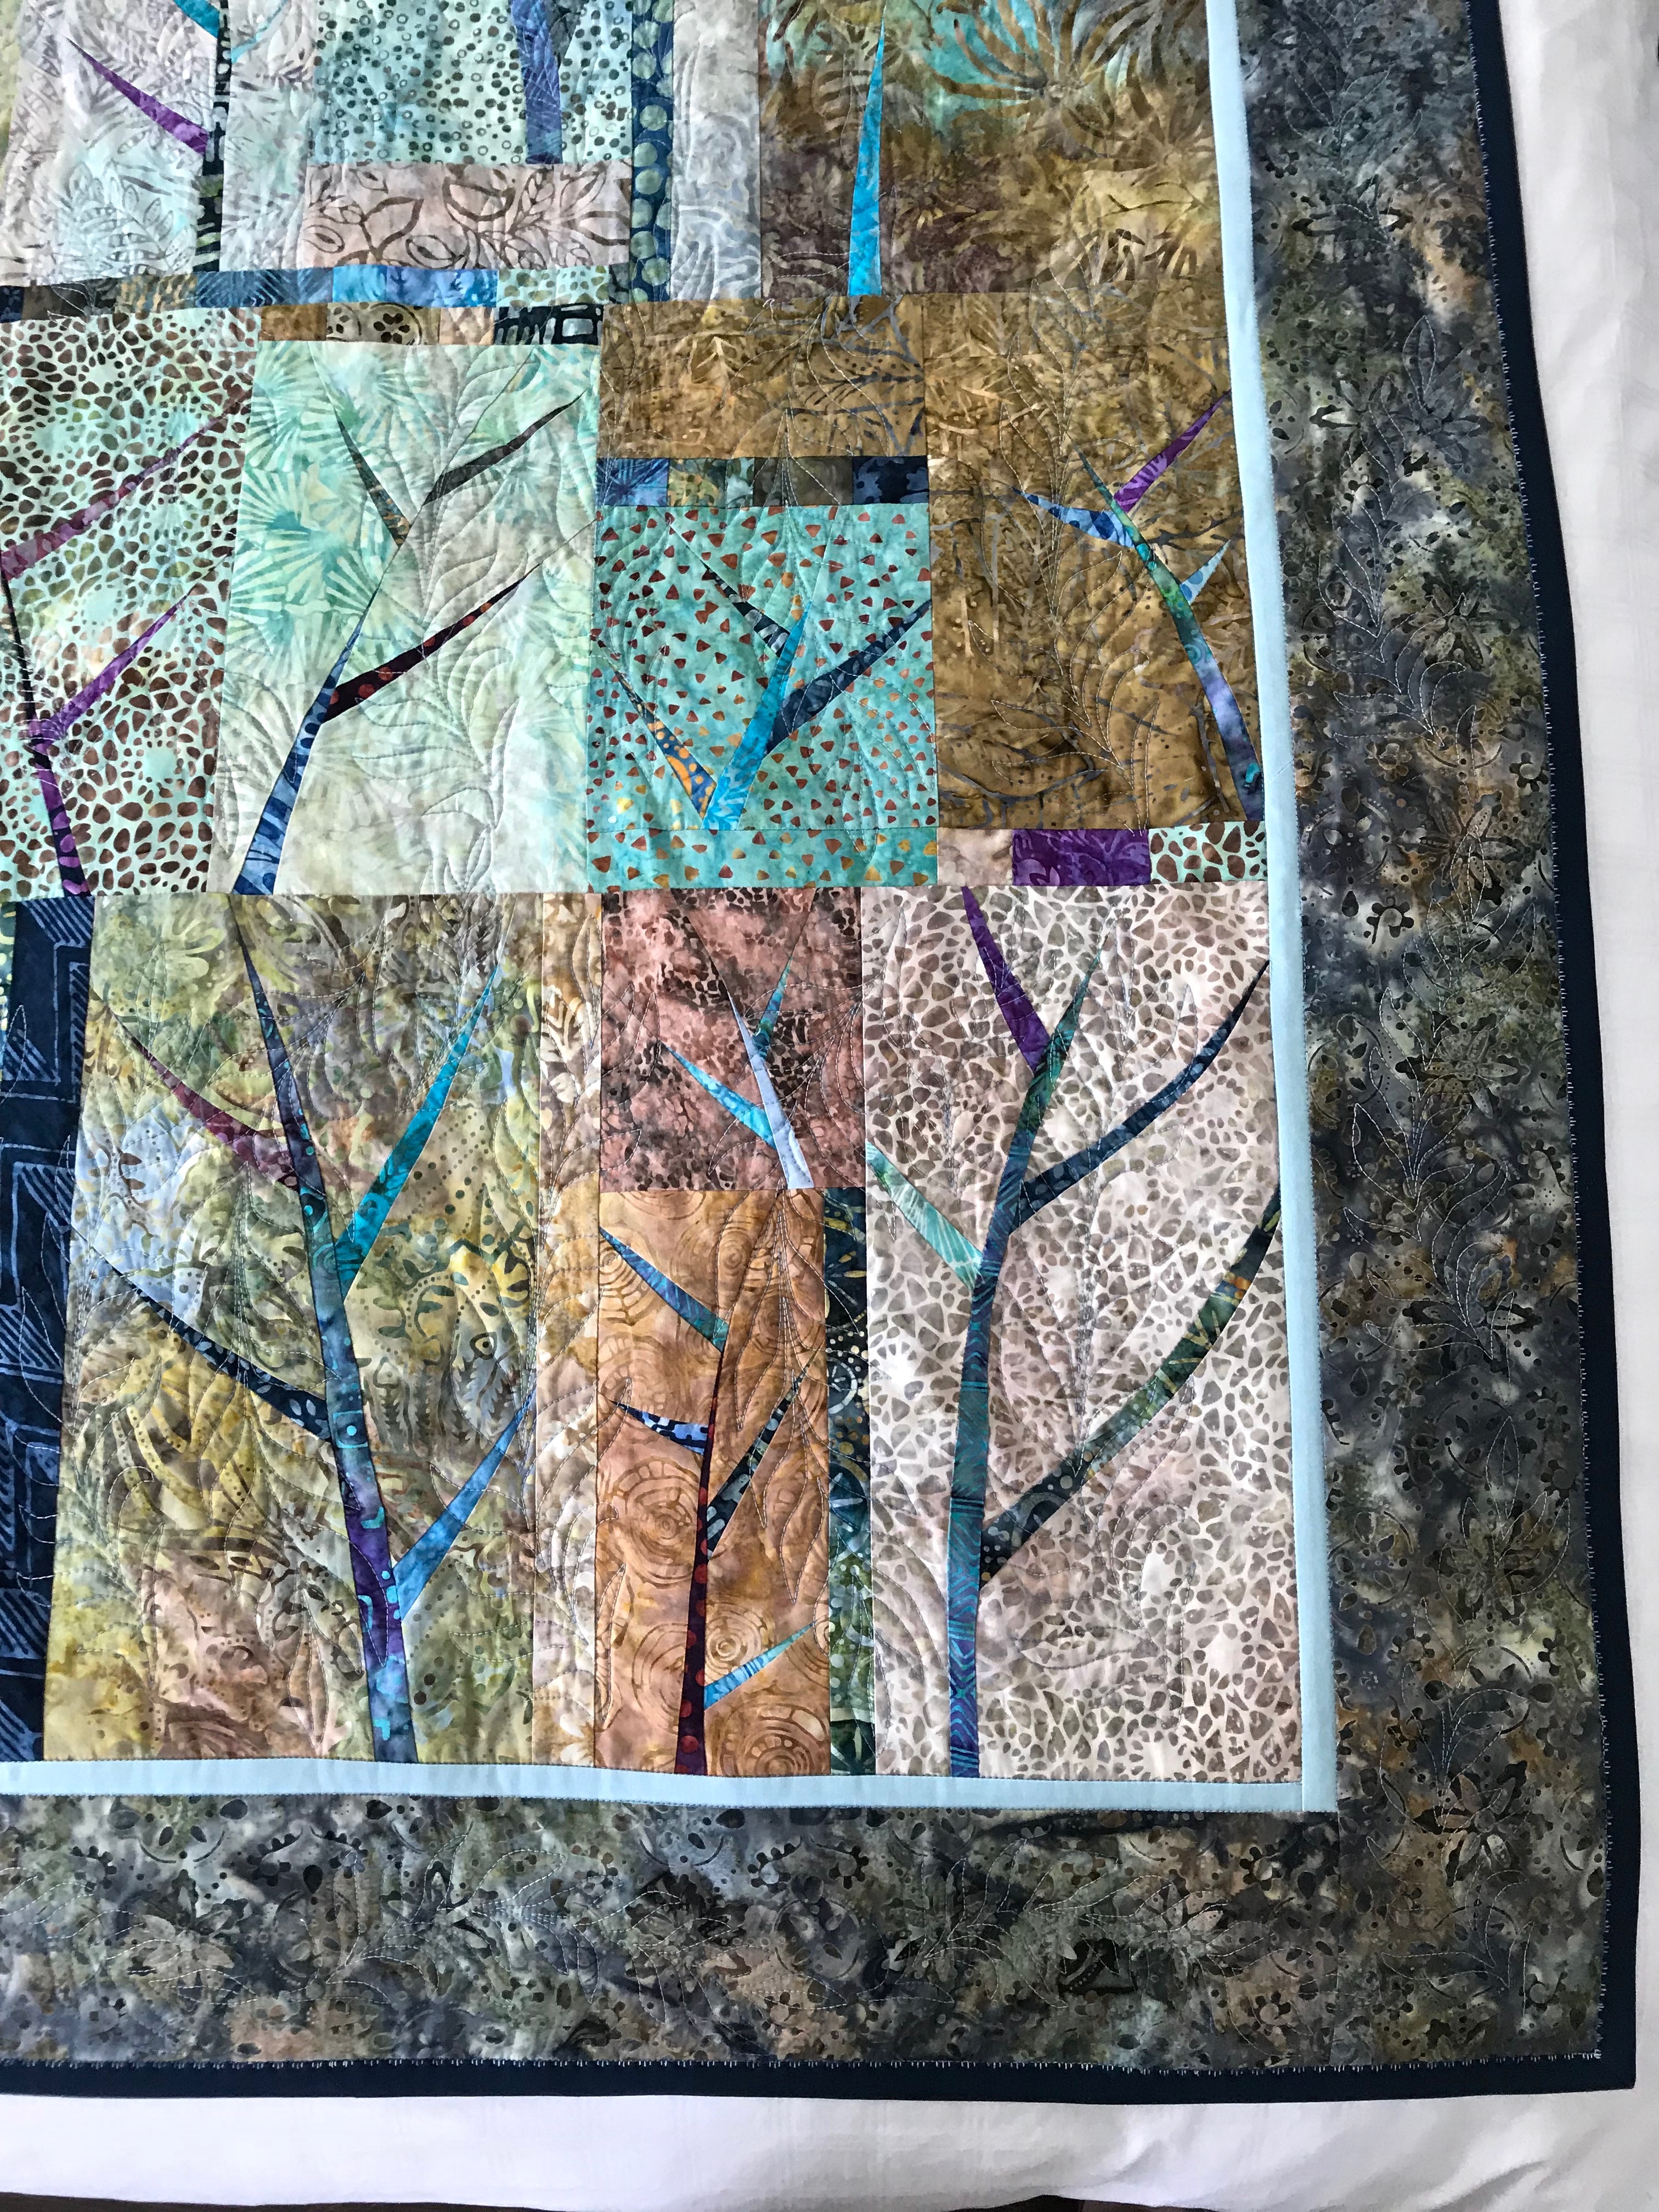
Standing back from it now, I think the decision to use the light turquoise Kona cotton narrow inner border was the right one – it brings out the blues of the inserts which create the stems and leaves of the bamboo. I also like the choice of the border fabric which makes the inner panel stand out and at the same time echoes the hues of the panel just a bit darker.
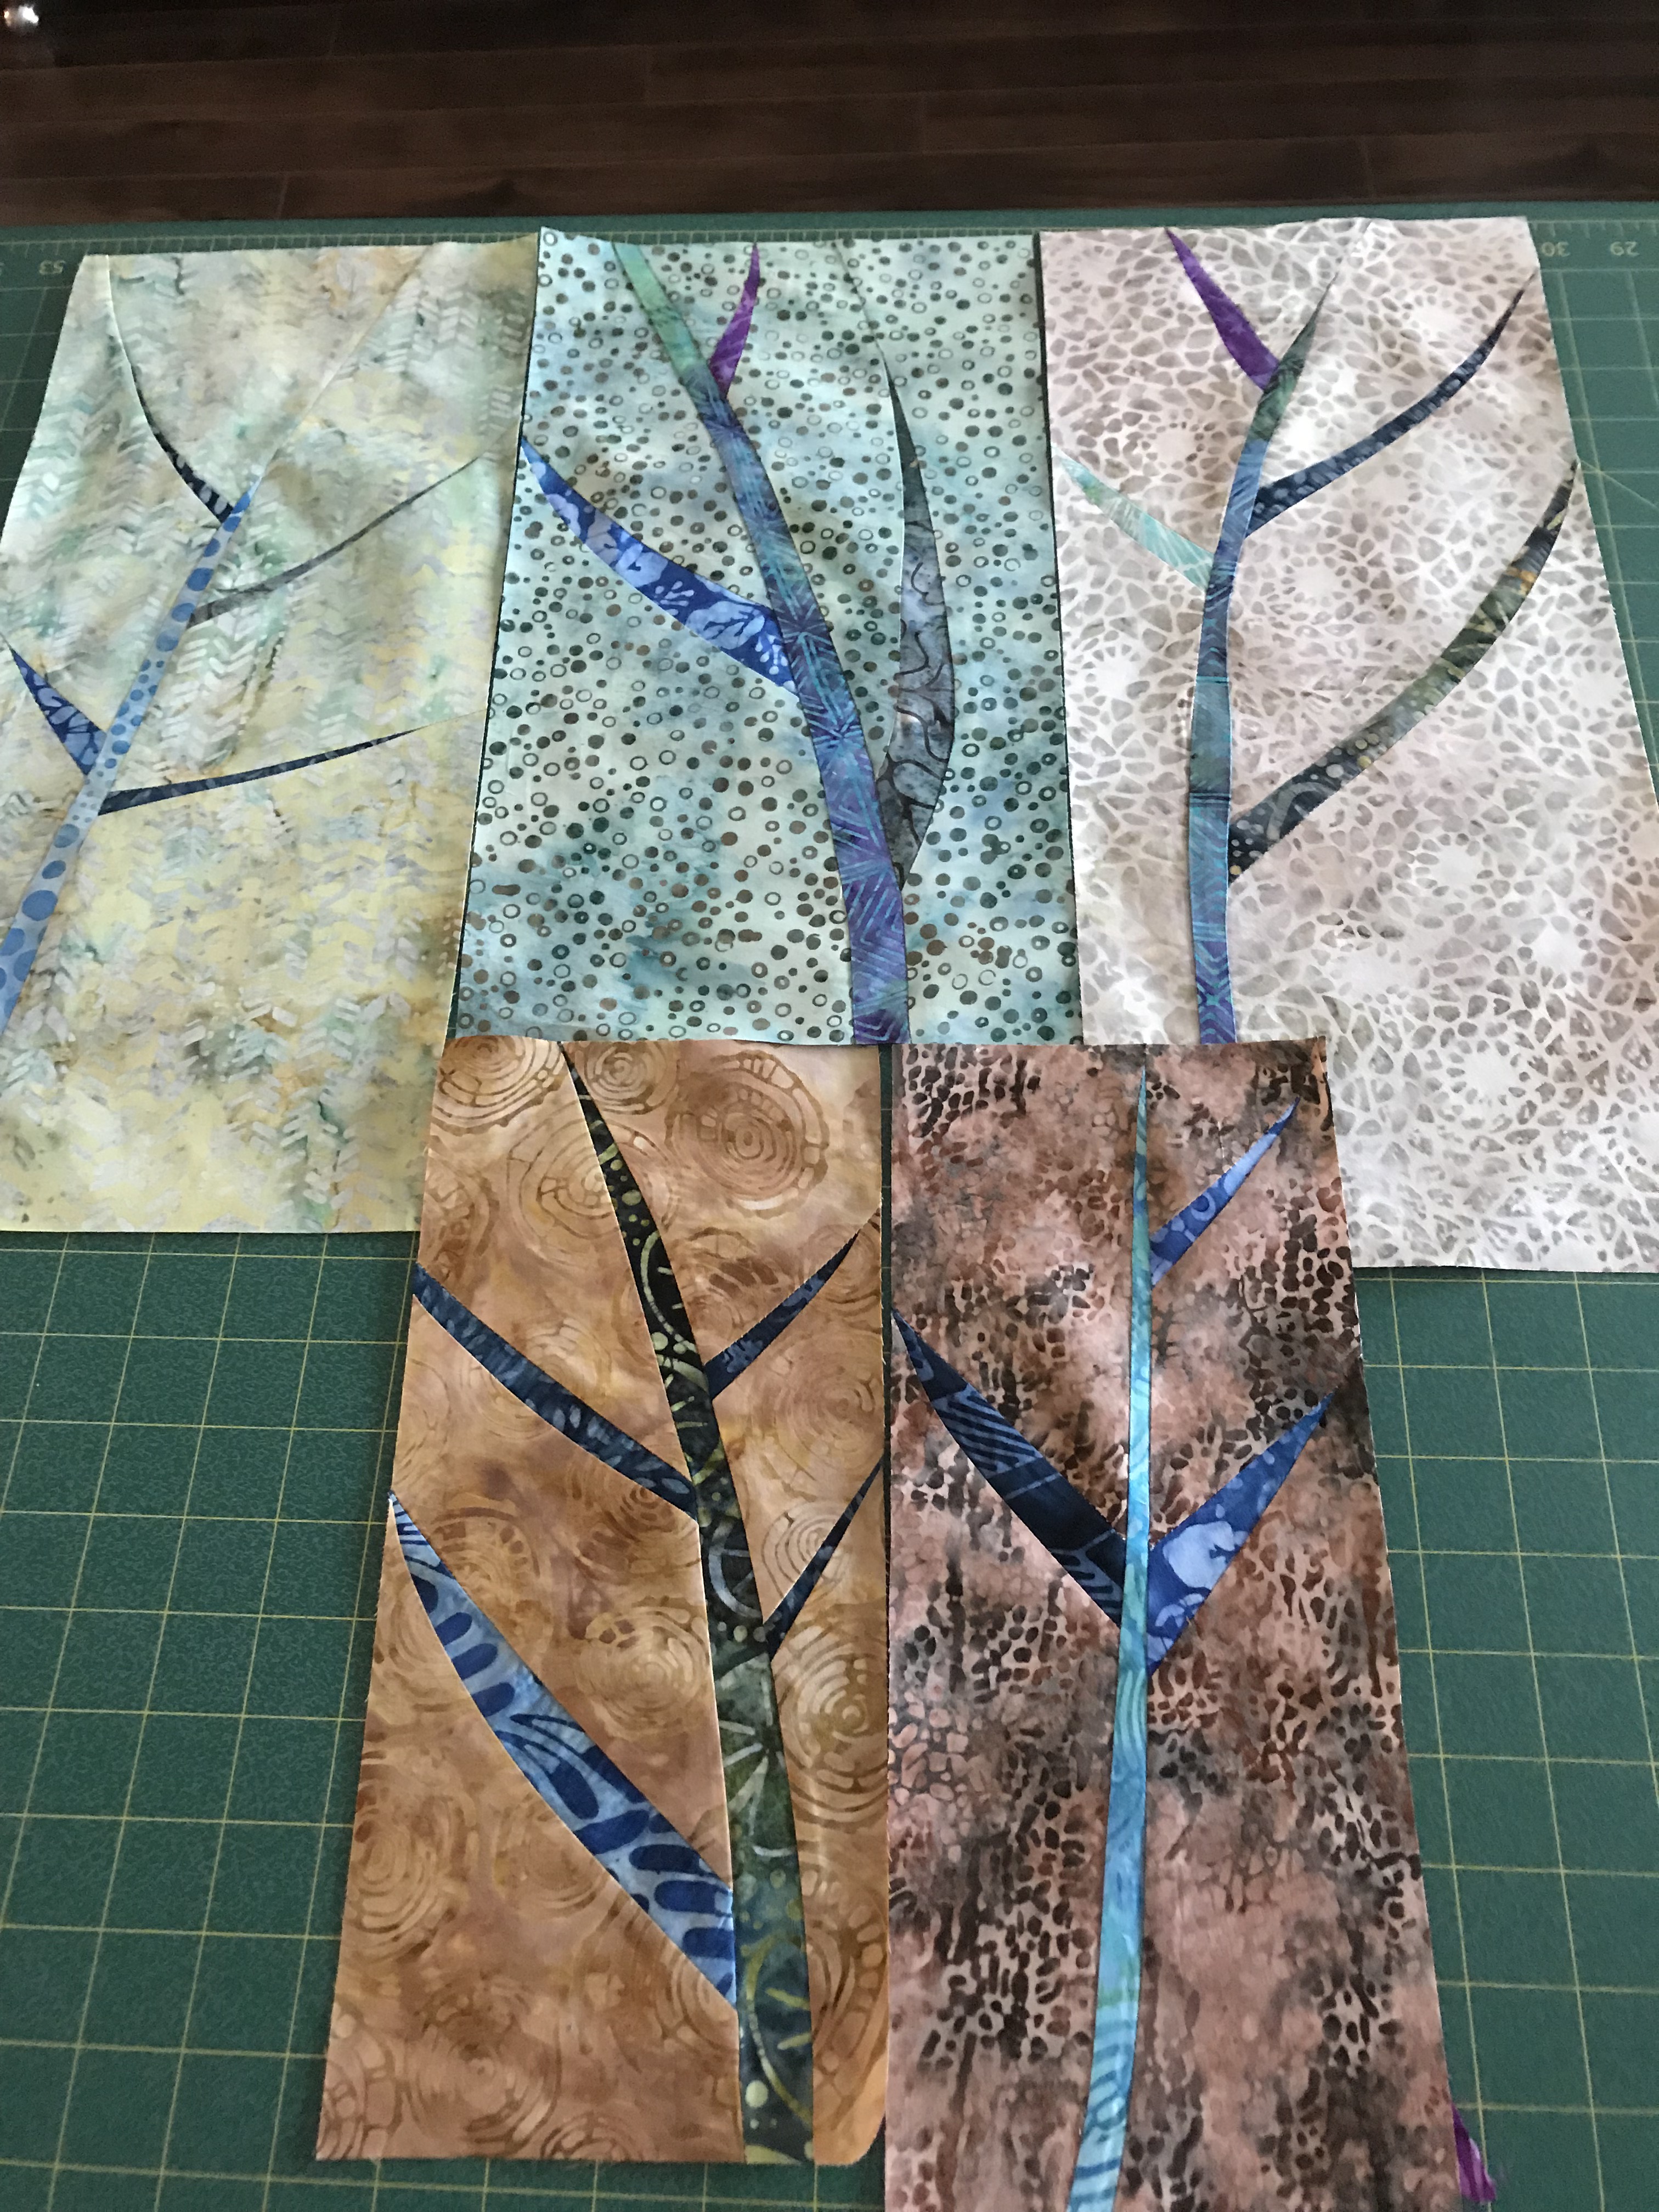
Quilt Top – Detail

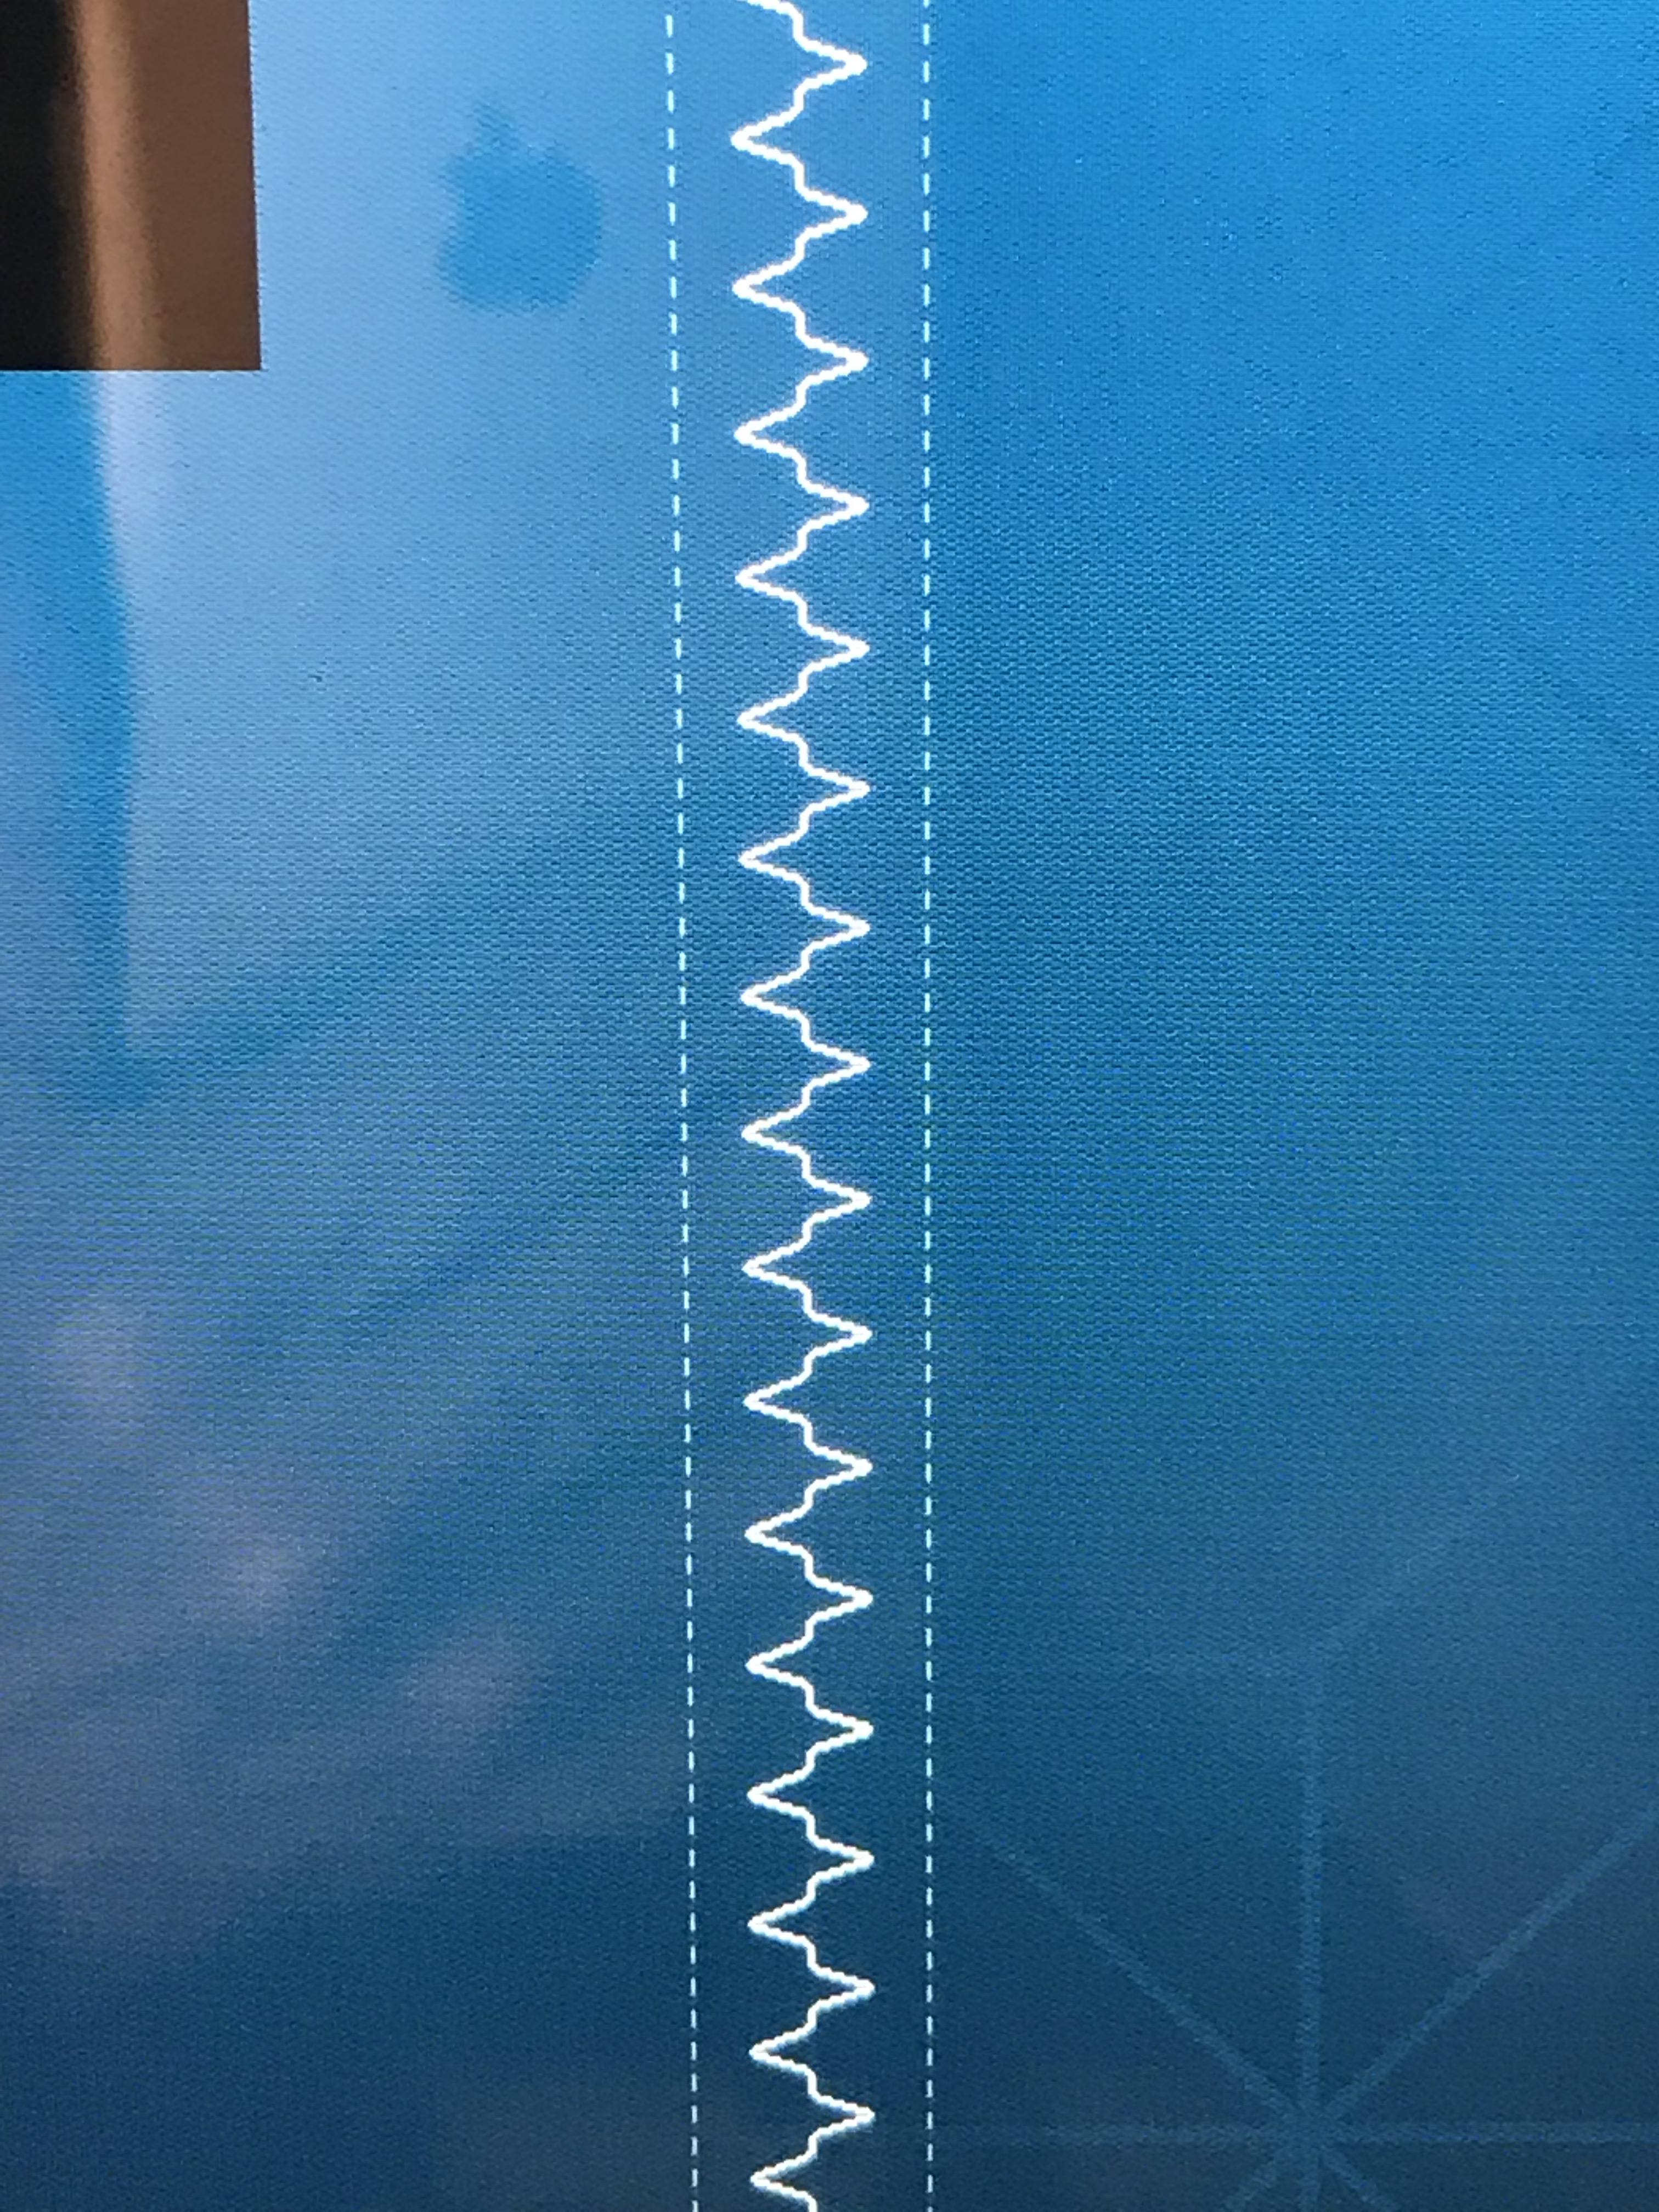
My plan when I started thinking about the quilting was to create some kind of single run embroidery design to fit my 360 x 260 hoop – I set up a double design to run bottom to top on the right, then repeated top to bottom on the left. The design stitched out well but my spacing when doing the hooping wasn’t close enough and I was left with quite a few spaces that still needed quilting. The solution was to create three more designs, narrower and shorter, to drop into those spaces. I wasn’t sure I liked how the quilting was turning out but now it’s done the space is filled pretty evenly. The border quilting turned out as I wanted it to. I’m happier with the quilt than I thought I was going to be!
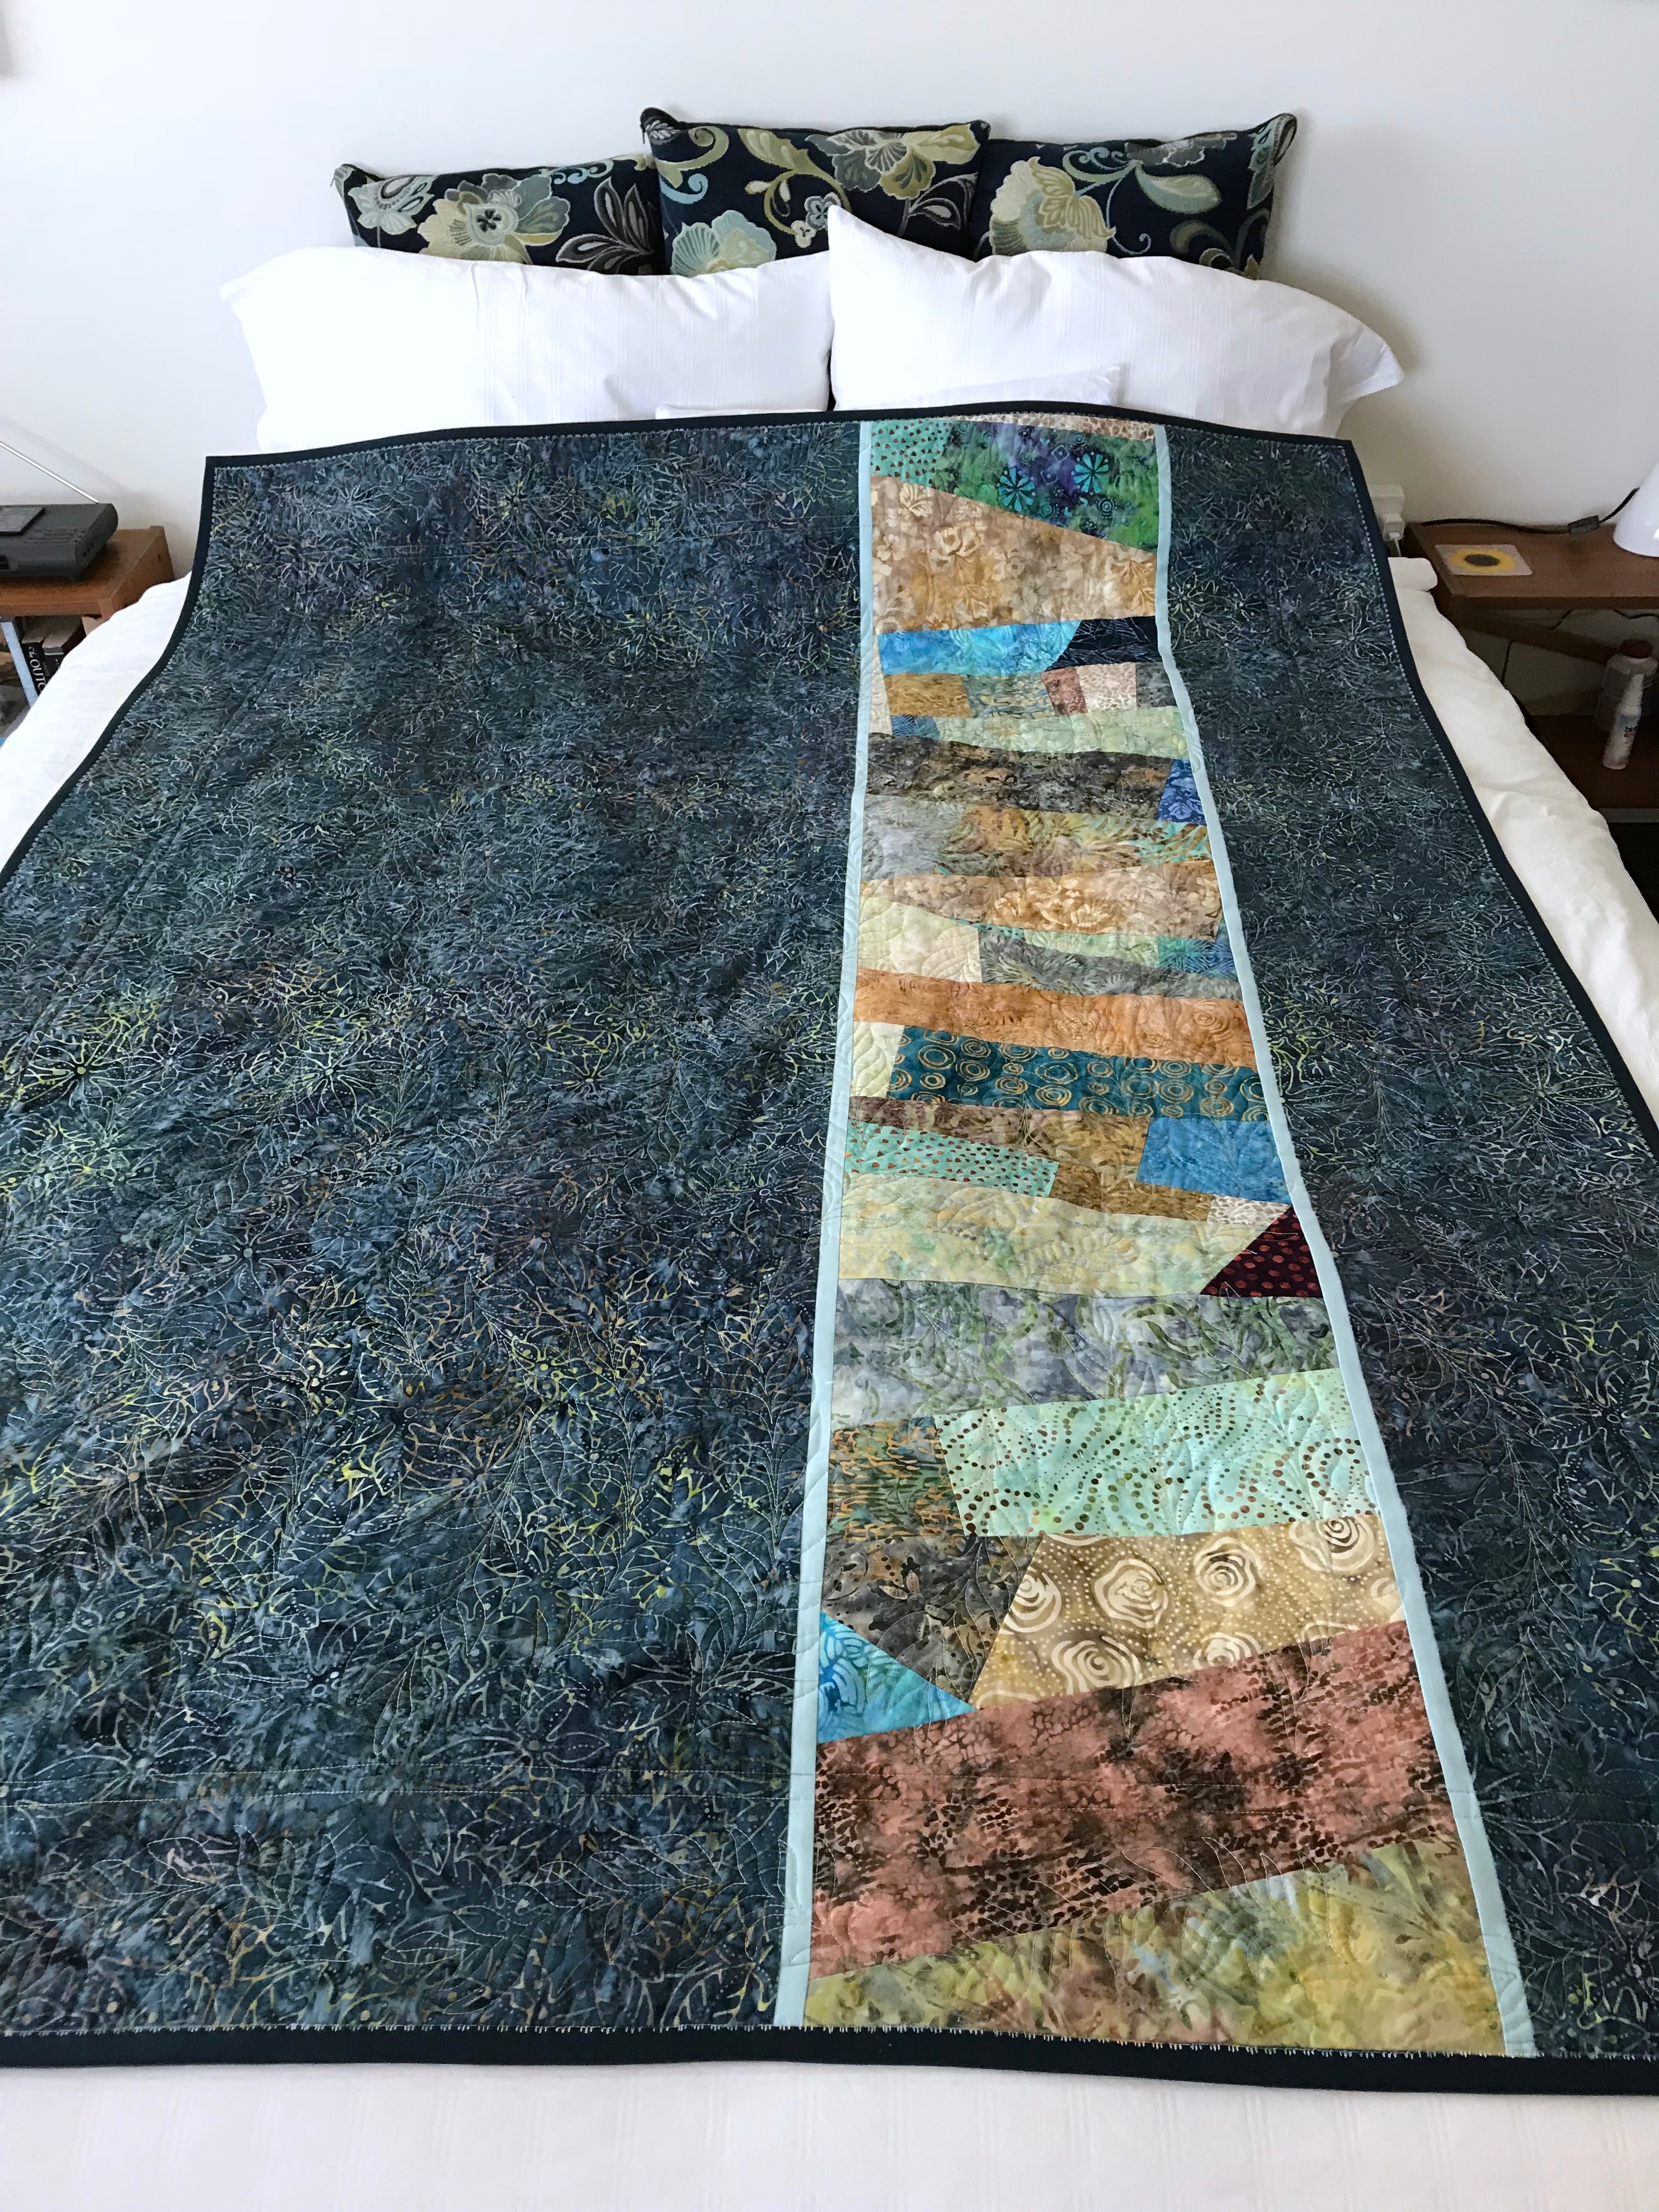
Quilt Back

The back strip is a wide (13″) strip more or less crazy quilt pieced using bits left over from the top fabrics. It carries over the colour feeling from the front.

Binding – dark blue solid Kona cotton.

Update – And Back to Creative Endeavours

Arrived back in Halifax early last evening, dumped everything in the apartment and headed straight to the walk-in clinic. I was able to secure a visit for a couple of hours later. Came home, had some soup, then returned to see the doctor. No pneumonia, no other serious communicable diseases – just a very over-reacting reactive airway due to the many irritants encountered in Italy. The doctor prescribed a 5-day course of prednisone (an oral steroid tablet) to see if that will help reduce the swelling in my bronchi; we’ll see if it does. I started taking it this morning. In the meantime I’m continuing with the pulmicort I’ve been using for the last six weeks (I’ve used it off and on for 27 years). Coughed continuously this morning but I think I’m starting to feel the steroid kicking in (about 5 hours after taking the first dose) – the congestion deep in my chest is rattling less so the uncontrollable coughing is subsiding.

I unpacked this morning, put stuff away – I find putting stuff back much easier than preparing to go away. I’ve done several loads of laundry much of which is hanging to dry.

I’m not feeling up to it today, but tomorrow I plan to return to the partially quilted quilt I had on the go when I departed.

Back of Quilt – Quilting Detail

This, after all, is a blog about my creative endeavours – the knitting, sewing quilting, etc. that I do. I need to get to work again – I have a showing of  small textile wall art pieces already in my collection in June, and a larger exhibition of quilts end of July – beginning of August (I’ve got six new quilts completed and will fill in with two from the quilt stash) and new wall art (which I haven’t even begun to work on).

On Deck – 2008

This photo of the women on the ship deck is one I want to do – removing the lifeboat and putting her on the other side – she will also need to be lightened and sharpened – I worked on that a bit before I left for Italy.

A second work I want to create is of Roger Federer playing at the Aussie Open 2018 – this closeup was taken from the overhead spider cam but shows him practically in the air – both feet are a fraction off the court surface and you can see him tracking the ball.

Federer – Aussie Open

My intention is to have the figure smaller in relation to the court by filling in the background as in the image below – with the timer clock (obscured by Federer in this image) and probably cutting out the spectators.

Court Background

This one needs more playing around but I want to get going on it soon.

So finish quilt and work on these two art pieces – full steam ahead.

Binding A Quilt

A couple of days ago Melanie McNeil described in her blog how she was binding her latest quilt – “For this particular quilt, I chose to finish the binding by machine rather than by hand.”… I wrote her that I always machine finish the binding (for a host of reasons I won’t go into here), except I use a decorative stitch with variegated thread when I attach the binding on the front.

Let me back up here a bit: many quilters machine stitch the binding to the front of the quilt, then blind stitch the turned binding on the back by hand. However, if you’re going to machine stitch the turned binding edge, then you have to sew the binding to the back of the quilt, turn the binding under on the front (I pin the turned binding, then lightly press it), then machine stitch to secure it to the front.

I’m assuming you already know how to apply a quilt binding. If you don’t, Melanie has very clear instructions with videos, etc. explaining and showing you how to bind a quilt. What I’m offering here, is an alternative for the final stitching to secure the binding to the top of the quilt.

Graduated Stitch – Edited

Here’s a stitched binding on one of my quilts (notice the diagonal fabric join in the binding). What I want you to observe is the stitching I’ve used to attach the binding to the top of the quilt – a stitch that stitches adjacent the edge of the binding and incorporates jump stitches to the right and back which permanently attach the binding edge to the quilt (remember, the binding is already machine sewn to the back using a standard 2.5mm straight stitch – Melanie prefers a longer 3.0mm stitch).

This is what the stitch looks like on my machine screen:

Double Graduated Stitch – Edited

This is my modification of a more complex built-in stitch on my embroidery machine. Here’s the original stitch:

Double Graduated Stitch

I wanted the stitching down the centre to be just to the side of the binding with the cross-over stitches just securing the binding so I used the stitch editor built into my embroidery machine to get rid of the stitches on the left and keep just two forward stitches between the grouping of stitches to the right. It attaches the binding securely and I’m not having to worry about whether I’m getting my straight stitch a consistent needle width from the binding edge. (The decorative stitch also is forgiving on the back of the quilt if it doesn’t align perfectly with the binding edge.)

Here’s another decorative stitch I use frequently:

Honeycomb Stitch – Edited

Below is the “honeycomb” stitch on my machine – I’ve reduced the width quite a bit, and extended the length so the stitch doesn’t extend very far on either side from the binding edge on the quilt front.

Honeycomb Stitch

Here are two other decorative stitches that could work:

Graduated Stitch

My point is it doesn’t take long to machine stitch a binding to the front of a quilt with a decorative stitch and it’s visually a lot more forgiving than trying to stitch the binding with a straight stitch!

Bamboo Quilt – Piecing of Panel Done

Finally, I have finished piecing the elements for this quilt top. The next steps will go relatively quickly.

Bamboo Quilt Panel – Finished

Now I have to add borders: a narrow light one, then a wider batik that seems to coordinate with all the other batiks in the pieced panel.

I’m thinking I will do something simple to extend the width of the back – a jellyroll race piecing, crazy quilt strip…. Whatever it turns out to be it will go a lot more quickly than this piecing did. I got tired of creating these elements which took quite a bit more time than I expected when I started which is why the project ground to a halt.

Now I can move again, get the quilt done and added to the collection for the showing in Parrsboro this summer. Whew!

Bamboo – Further Along

Making headway. The width is now about 42″, with the fill-ins being place-held with batik blocks; the panel length will approximate 62″ – with borders added the quilt top will end up a reasonable size for a lap quilt.

Tentative Layout

So it’s looking like I will want between 7-10 more “bamboo” blocks – that’s getting to be within range (it was beginning to feel as if the end of the project was nowhere in sight). I’m giving up on getting any overlap between the blocks – bits of sashing to make blocks fit is going to have to do.

Truth is I’m feeling pressure to get this quilt done. I want to get onto a bit of garment sewing – I need to make a pair of pants and maybe another casual jacket to take to Florence at the end of April – that’s just a month away.

Bamboo – Making Progress

I’m making headway slowly on the Bamboo quilt top. I’ve created some more blocks – they’re getting better even though I’m not getting faster! The tapering of the inserts is looking more like I want it to. I’ve also started joining blocks and fitting in inserts where needed to make row segments. I’ve got 15 blocks assembled – I figure I’ll need between 35 and 40 to make a lap-size quilt.

Bamboo – Beginning To Take Shape

In the picture I saw originally, there are some leaves overlapping from one block to another: 

The only way I think this can be done is if the whole quilt top was constructed using raw edge appliqué. I’m doing this with slashing and inserting contrasting fabric.  I’m stumped about how to accomplish the overlapping across blocks! Nevertheless I’ll keep working away at these blocks.

What I’m Working On…

A couple of days ago I started a new quilt – the previous one really didn’t challenge my sewing skills (I was making it specifically for a friend who didn’t want anything too “fancy”).

This time, I’ve started building something I think I’ll end up calling “Bamboo” – blocks cut freehand with contrasting inserts to look like stems with long narrow leaves. Quite difficult to execute, actually – these first five blocks started out with 9″ wide fabric but trimmed up somewhat less than 6″ in width because of the curvature that occurred with the leaf insertions.

Free-form Blocks

However, after eight blocks I think I’ve finally figured out how to execute the blocks – do the initial slashing cuts, then lay out the pieces and remove fabric from each cut so that when the inserts are stitched and pressed the block retains most of it’s shape and the size will be closer to the starting size. This block is cut, now to add the leaves and stem.

Setting Up The Block

I’m not worrying about keeping block size consistent – they’ll come out whatever size they do; then I’ll fill in with other smaller piecing to make the whole work out.

Amaryllis 

My amaryllis now has 6 flower blooms – four showing and two to come. That’s the most I’ve ever had on a stalk. The third stalk is still peeking out of the bulb – it’s not clear if it will actually grow or not.

Amaryllis Stalk #2 – with 6 blooms!

This set of blooms makes me smile each time I look at them.

Charm Pack Quilt – Finished

It’s done. Quilted and bound with a label. A vanishing 9-patch quilt with borders built from ~80 charm squares.

Charm Squares Quilt – Top

I’m pleased with the scattering of the small yellow blocks – they appeared when the assembled 9-patch block was recut into four – the yellow central block became four small corner squares. The distribution of colour also has worked out well. The pale inner border ties the central pieced panel nicely, the narrow yellow border provides accent and the dark wide outer border balances out the quilt.

Charms Squares Quilt – Back

For the back I selected a few squares from the second charm pack I’d bought (in case) and cut an equal number of batik squares to set up the bordered strips. The backing fabric is the same fabric I used for the borders on the front – didn’t have quite enough to cover the top so had to create a horizontal stripe as well. I reversed position of the two pieces when I added in the vertical strips to add further interest to the back.

The quilt is now in the growing collection of quilts to be shown in Parrsboro in July/August. It won’t be for sale since it already has a home with my physiotherapist. I think it fits the bill for her – she didn’t want it so fancy that she felt she couldn’t just throw it on her sofa.

Help!

In the late summer I offered to finish off, back, and bind a queen-size hand embroidered crazy quilt my friend Ruth has been working on for the past many years. She almost finished, then lost interest and put the quilt away. I know she intended going back to it, but I also knew she probably wouldn’t get there. So I offered to complete it for her – with my sewing machine using decorative quilting stitches where she’s done hand work, but it would work.

Yesterday I dug out the quilt from the closet, this morning I opened it up and started by trimming the quilt edges to make them straight, machine basting flapping bits of fabric – there’s quite a bit of beading near the edges – broke a needle on one. My next task will be to remove beads near edges so I can properly machine sew where I need to.

I also need to add fabric to three corners, and figure out a way to decorate a seam that joins a panel across the quilt near one end – lace, silk, bits of crochet, whatever bits and pieces I can find in my collection of stuff that kind of goes with what Ruth has used.

Hand Embroidered Crazy Quilt

Here’s my problem – the quilt needs a backing. I can set up a backing using a light cotton (the quilt is VERY heavy already and doesn’t need anything weighty on the back). But how am I going to stabilize the top to the back? I can’t stitch over existing embroidered edges because it would look awful and there are beads on lots of those edges. Do I tie top to back with bits of yarn? I have to do something.

If anybody has any idea how to attach a back to something like this, I’d love to hear your suggestions because I’m stumped, I must say. The underside of the quilt does need to be concealed because there are thread ends and raw edges throughout that will ravel and come out if left exposed.

Charm Pack Quilt – 2

Just finished piecing the charm pack quilt. Three borders – two narrow and one wide. The overall finished size will be 47″ x 60″ – a good lap quilt size.

Quilt Top Pieced With Borders

Now my problem is the back. I have 53″ of potential backing fabric (the same fabric I used for the dark wide border). To make that work I have to extend the length by 12″ in order to have enough hang-over to be able to quilt the project. I have enough leftover blocks to create a strip and with borders I can make the insertion strip the required width to give me the length I need for the backing.

The width also has to be extended – I have a workable 42″ in the width-of-fabric – I need a finished width of  51″. I will have to extend the width another 11″ – 12″. That will mean using almost a third of the blocks in the unused pack for an insertion strip.

The easiest way of doing this is just to extend one side of the length and of the width but that  will end up being trimmed and I want the entire inserted strips to be included in the back with the trimming coming from the major background fabric. Those extension strips will need to be inserted approximately 8″-9″ from one edge of both length and width.

That’s for tomorrow. Done enough for today. Got further than I expected.