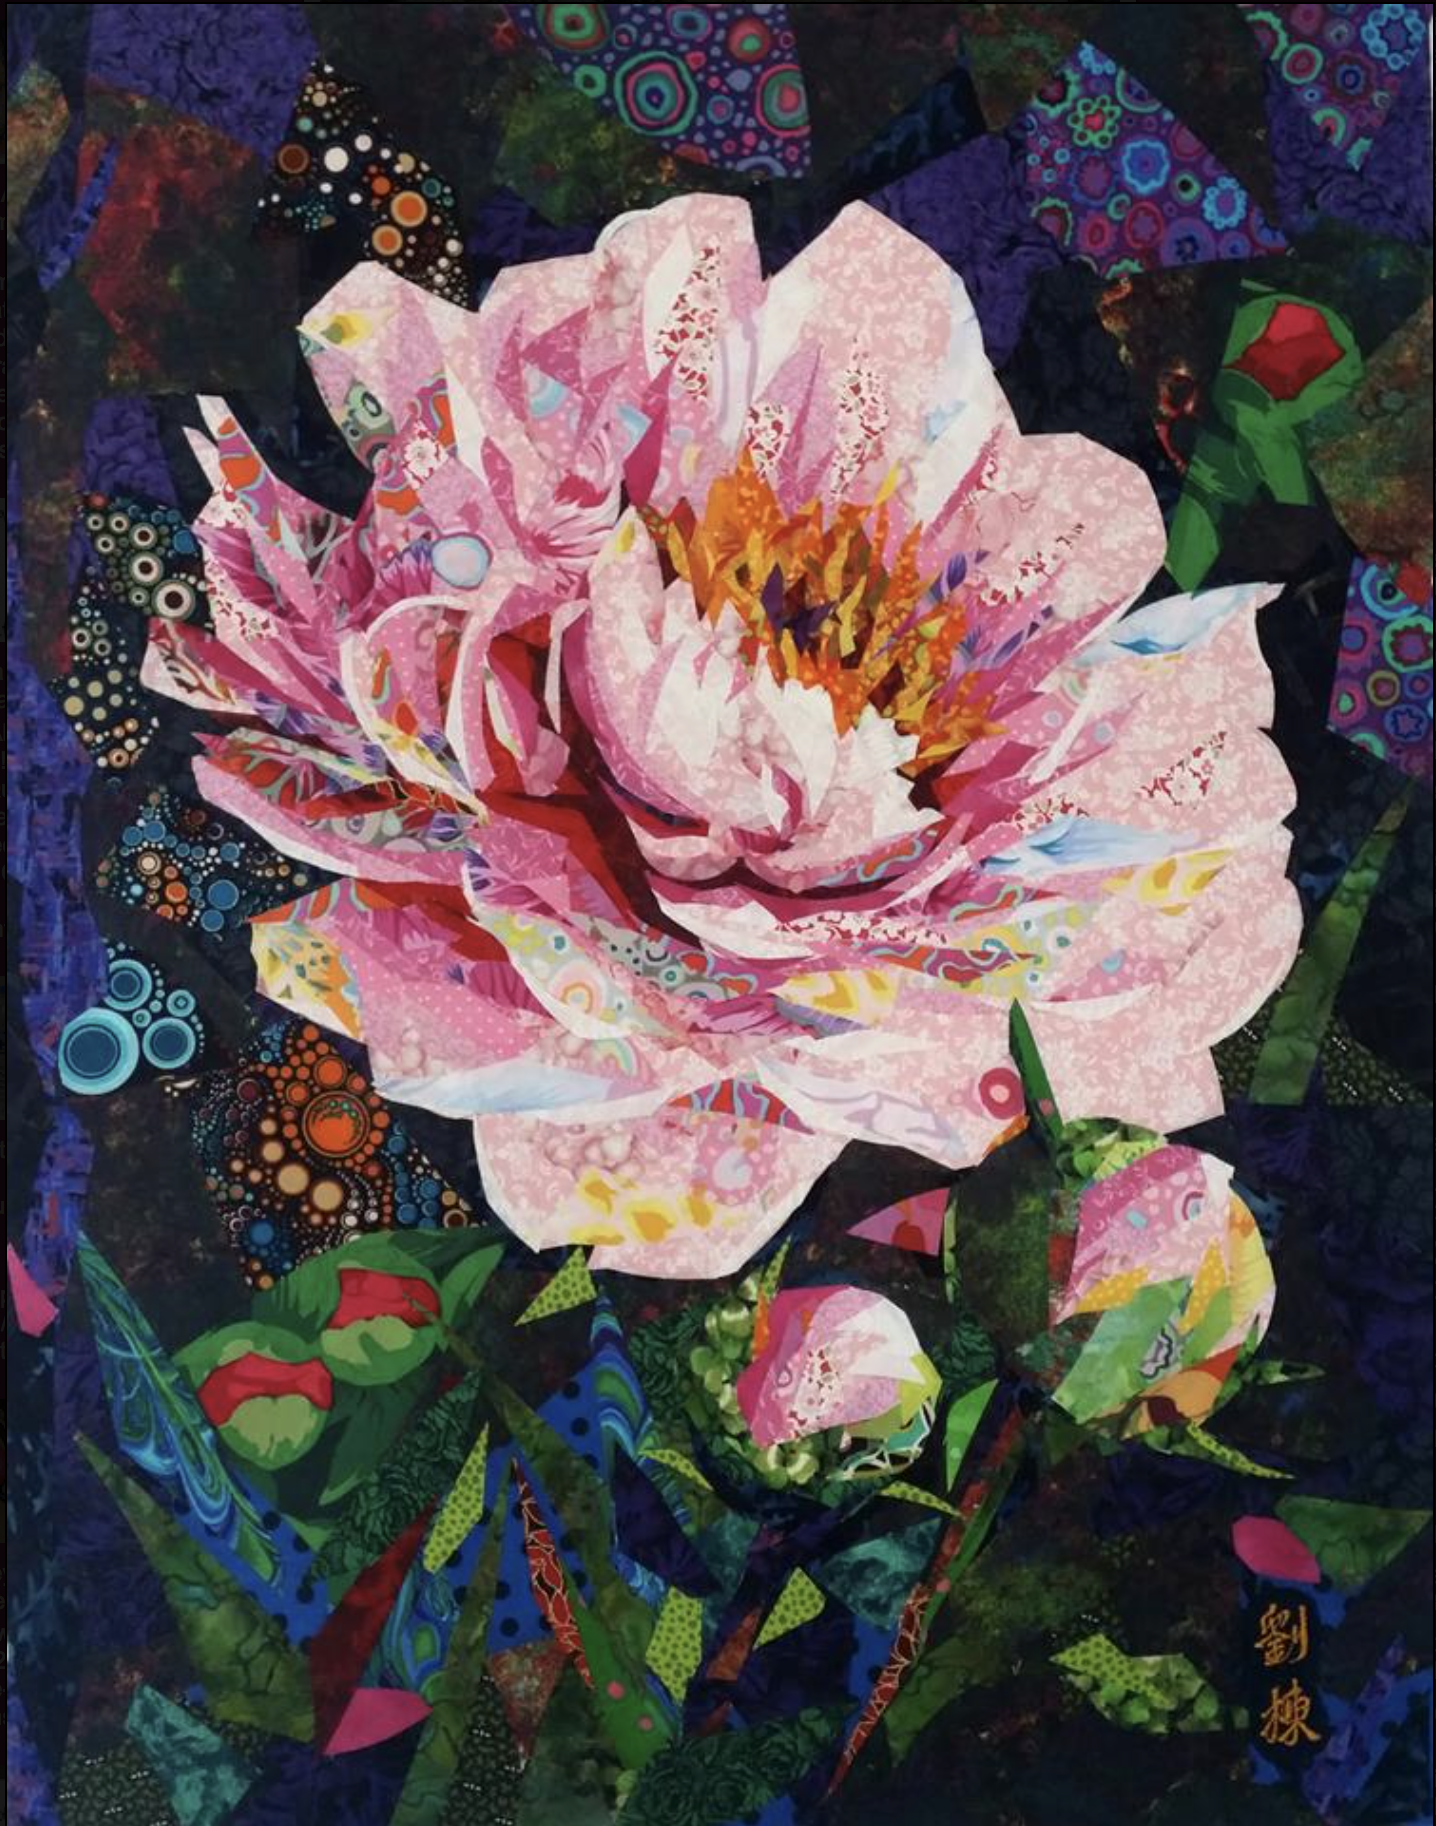
Art Quilts: Flowers

Danny Amazonas is a Taiwanese textile artist who makes amazing art works (many of them quite large!) by sketching an image on blank fabric then using bits of fabric (with fusible interfacing on the back) as if it were brush and paint. I can see how the work is constructed from the background up. What I can’t tell is whether he top stitches any of the elements (although I’ve seen photos of him sewing on a large piece so perhaps he does some stitching). Here’s a recent video interview of Amazonas in Tokyo where he’s describing his art quilts.

The reason for my interest in Amazonas’ work is I’d like to try it on a piece of my own. I’ve been scouring my photo collection for images of flowers that a might make a strong visual image when constructed from many bits of fabric.

Version 2

Sunflower

I took this photo of a sunflower it’s gotta be 15 years ago – I have a copy of the photo hanging in my apartment. But I’d love to enlarge it somewhat and have a go at piecing the image. I love the detail of the flower, but I also love the soft green/mauve background which sets off the yellow of the flower.

Other artists piece their work but also clearly top stitch/thread paint their creations:

black-eyed-susan

Kate Themel – Rudbeckia

zinnia950

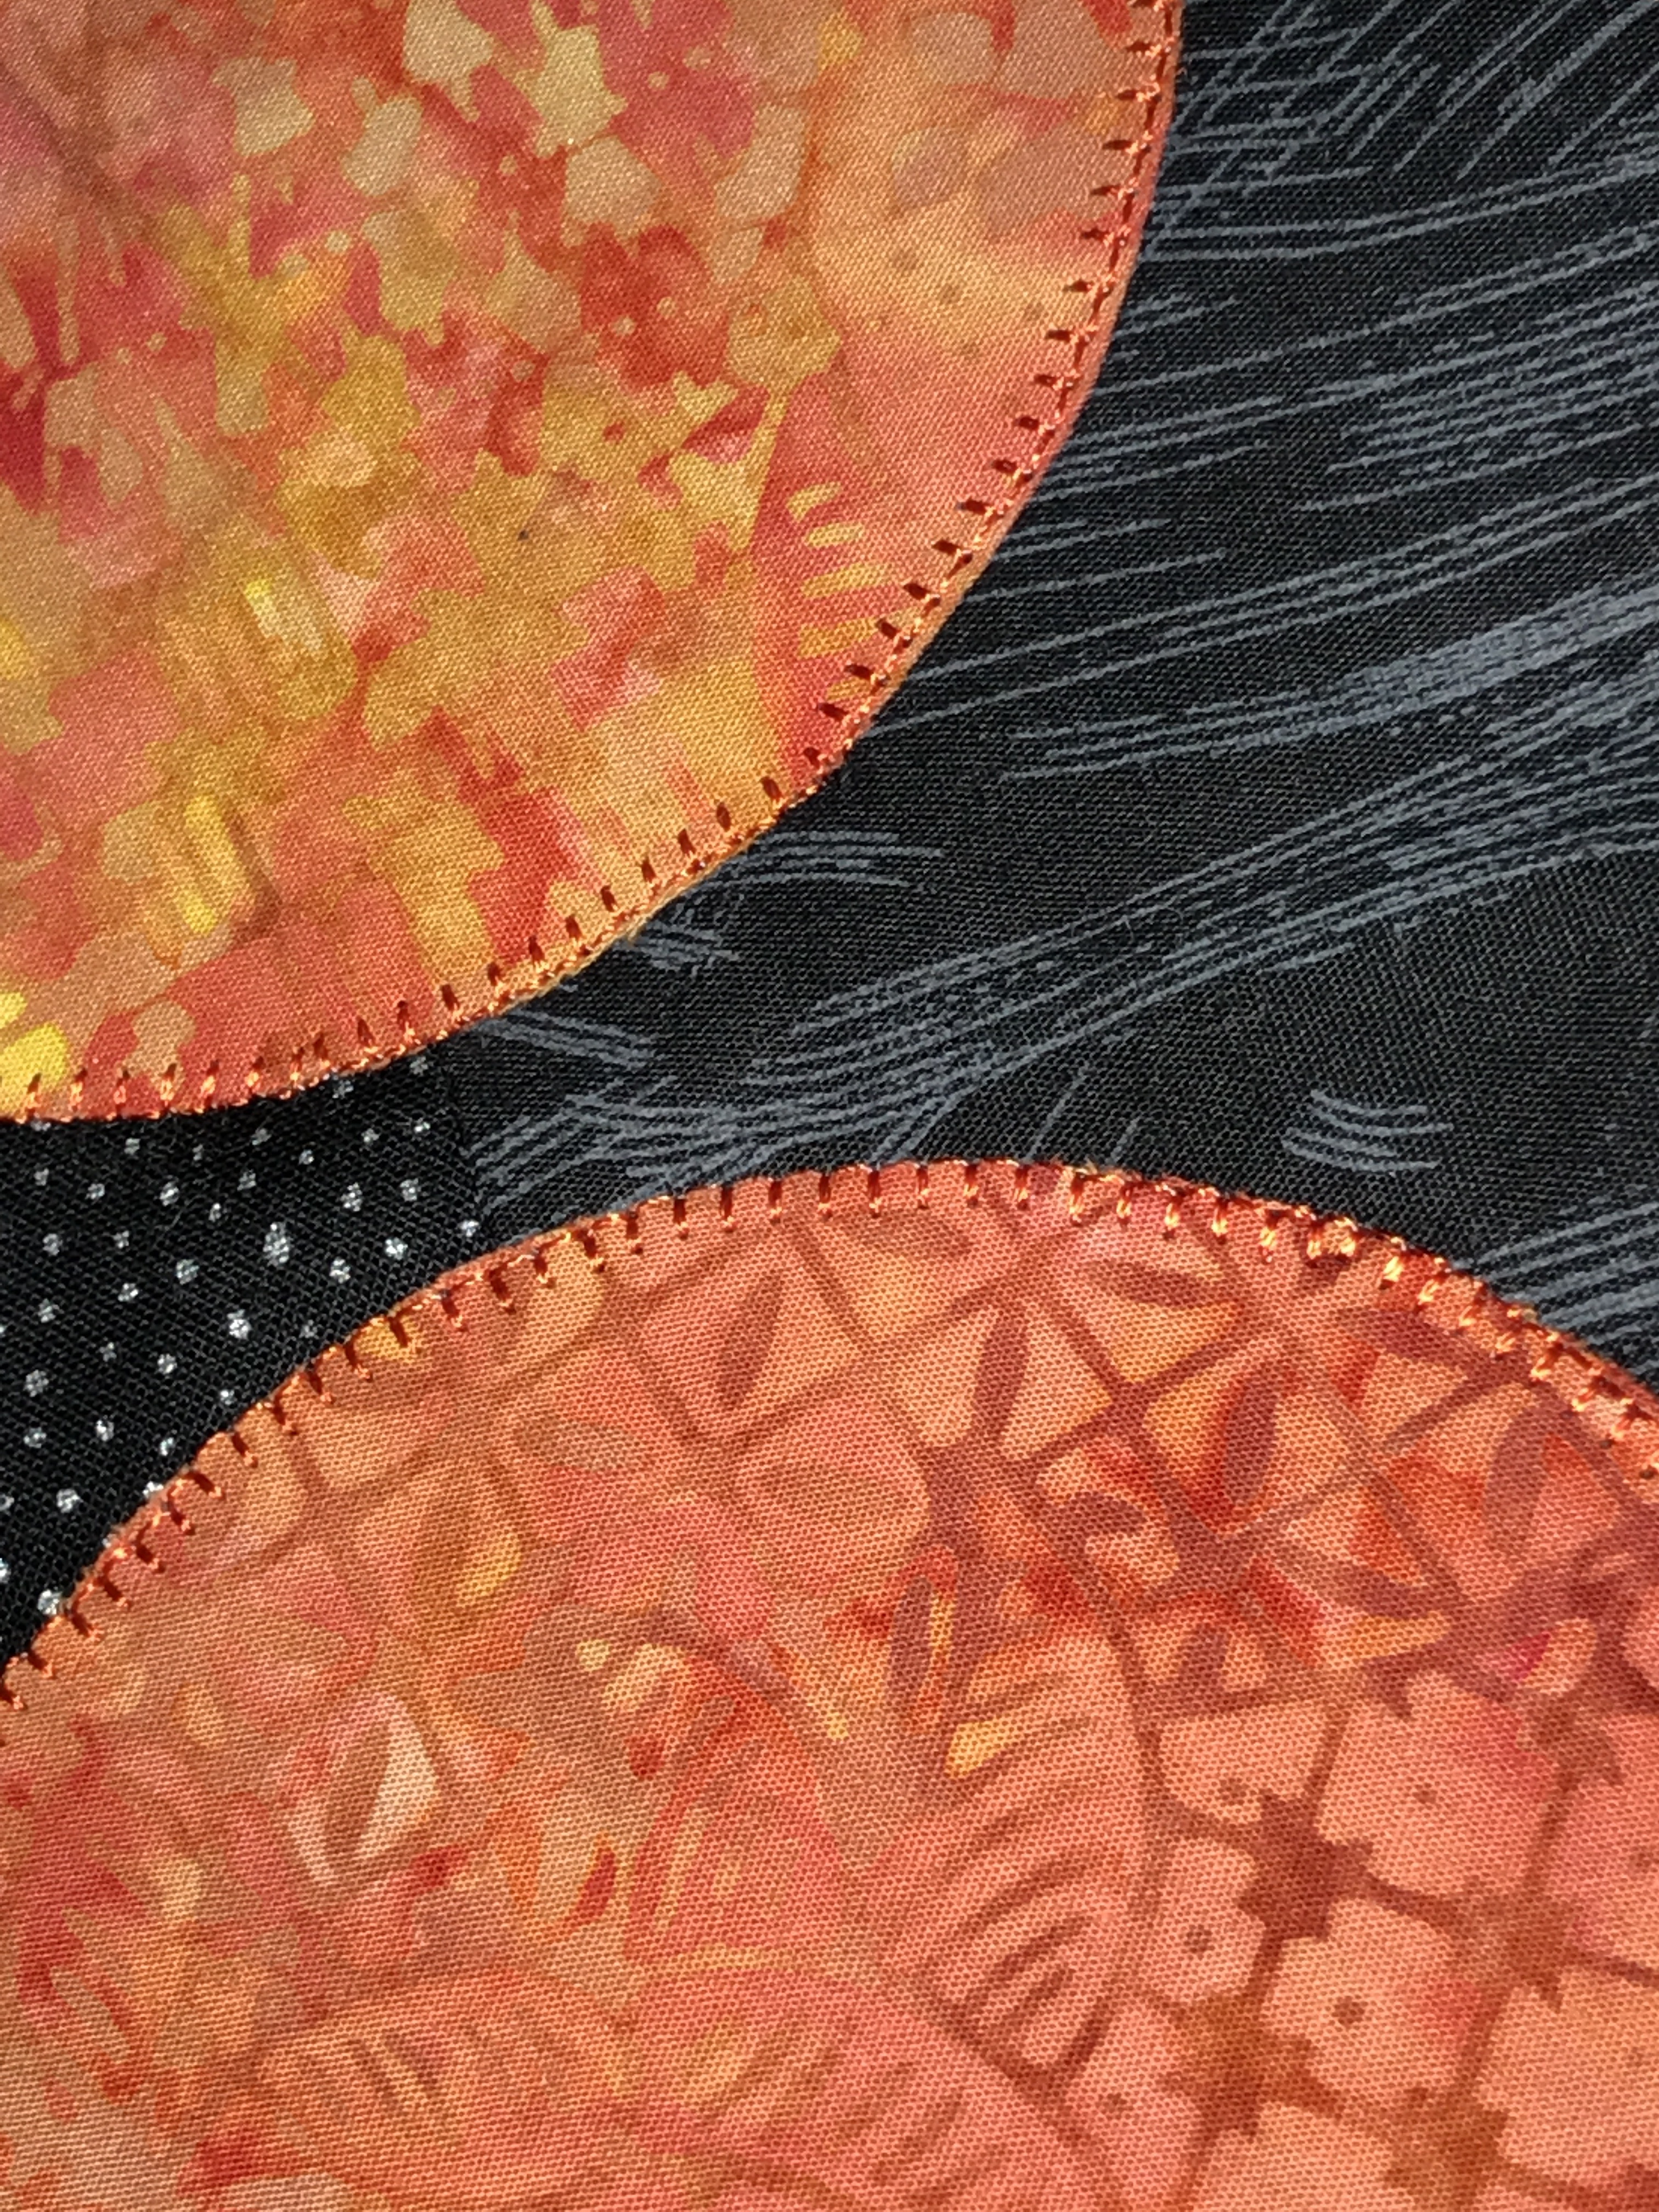
Barbara Olson – Zinnias

zinniadetail1

Zinnias Detail

I have a couple of other images that would work as floral panels as well – I guess I could always do a series of hangings:

phael3

Phaelanopsis

img_2072

Strelitzia reginae

both of which would make spectacular images. I’d crop both to make the bloom more prominent. If I were to try panels 14″ x 10,” a series of three would be interesting.

In any case, my next step is to cut a piece of muslin about 20″ x 20″ (to give me lots of area to work with), sketch out elements of the sunflower, go through my stash pulling every bit of yellow/orange/brown I have (small scraps are going to be useful), collect some blues/greens/pale mauves/ for the background. I will need to add fusible interfacing to pieces of fabric then start cutting, placing and pressing…

It’s like facing a blank canvas with some paint on my palette, taking a deep breath and just starting.

Starburst Quilt – Finished

It’s called “Starburst” (pattern from the Missouri Quilt Company)  but with this combination of fabrics in this particular layout you don’t really see the starburst, unfortunately. I’ve also mentioned earlier that the background fabric didn’t set up enough contrast, particularly with the paler batiks to highlight the starburst effect.
img_8184
However, I’m happy with the finished quilt. The dark narrow border and binding help strengthen the contrast and the quilting design used draws a bit of attention to the diagonal lines.

The back, on the other hand, I think has stronger contrasts:

img_8185

While the dark elements blend into the backing, the lighter “framing” makes the whole design come alive. So on the whole, I’d say the quilt worked out quite well. It’ll get added to the collection.

Now back to “Wind Waiting” – the pilots need quite a bit of thread painting – that’s up next.

Starburst Quilt Back

Yesterday I collected a bunch of fat quarters and large leftover pieces in the colour families used on the front of the Starburst quilt. I bought two dark navy fabrics planning to use one on one half of the back, the second on the other side. I found an image of a simple quilt, planned it out so it would fit the dimensions of the Starburst top. Today, I cut out the pieces, sewed them together and stitched up the back.

Starburst Quilt Back

Starburst Quilt Back

I also managed to assemble the quilt sandwich – top, batting, back – and now I’m ready to create some kind of simple single run design for quilting the whole thing. The blocks on the top are 6″ square – I’d like something that fills each block and brings out the diagonal of each half-square triangle. Don’t know what that is, yet. But I’ll come up with something tomorrow, I’m sure.

Starburst Quilt

Friday, I attended a day-long quilting/sewing session with 19 other women to raise money for an ailing quilter in Newfoundland. The quilt kit was for a HST (half-square triangles) quilt – Starburst. I just finished piecing the top with borders.

The quilt uses 16 batik/print fabric 10″ squares and 16 “background” 10″ squares as contrast. My problem was the background fabric in my kit didn’t offer enough contrast – a very pale blue, I think would have worked better than the mid-turquoise batik I had.
img_8178

I did one quadrant on Friday then stopped. On Saturday I took apart what I’d sewn and rearranged the squares trying to get a better flow of colour because I didn’t like the colour distribution I’d started with. I also trimmed all 64 squares to 6 1/2″ hoping that would make my points all work without a lot of fuss. However, I finished piecing the squares only to discover the bias edges produced a “wobble” at the outer edge – I needed to remove about 1″ from the length of each edge. Today I began by taking 1/8″ off quite a few of the joins at the outer edge in order to make the top lay flat. Then I measured all the outer edges to make sure I ended at 48 1/2″. Finally I cut the binding fabric in the kit to 61″ length (to be sure I had enough to mitre the corners).

Just finished adding the binding – a fight to get the mitred corners to press flat but in the end I won that battle. I warned the top it was going straight into the garbage if it didn’t cooperate! It finally acquiesced.

So now I need to come up with an idea for the back and I will need backing fabric to complement the pallet used in the top. Off to the fabric shop to see what I can find.

Double Vision Quilt IV – Completed

Finally done – the binding turned out to be a very fiddly job – I decided in the end a single fabric binding would clash with the border no matter what fabric I chose because the gradation from the dark burgundy to golden yellow was so great. The solution: to have the binding mirror the border with the joins aligning as closely with the border slanting seams as I could manage it.

Finished Quilt Top

Finished Quilt Top

It’s taken three days of measuring, sewing, unpicking, re-sewing, to make the joins look continuous. I’ve done a pretty good job although close scrutiny would show I missed by a wee bit on some of the connections but hey, this is a quilt after all, so I decided to live with the minor imperfections that showed up when I was stitching the binding on the right side.

Binding - Detail

Binding – Detail

In the end I decided to piece a simple back since the front is so complex and for some reason (which I can’t explain) I thought placing the strip on one edge was what was called for. The binding I knew would also add some interest to the back.

img_8116

Finished Quilt Back

I quilted using straight vertical and horizontal lines midway between the circles. So far, I haven’t quilted the border although that is still a possibility. It’s probably a tiny bit wide to leave unquilted. For now I’m putting the quilt aside to move on to other projects.

Wickedly Difficult…

I’ve begun edge stitching around the circles. Today I managed to get 15 or so done (plus some semi-circles at the edges).

Stitching Around The Circles


What’s making the process so difficult is the amount of bulk I’m having to contend with and the fact that the fused circles are lifting from the quilt surface as I bunch and twist the pinned top and batting in order to get all the way around each circle.

Stitching Detail

If I go slowly enough I can keep on the edge more or less but it’s a tedious task (and it’s tricky stitching where a circle has lifted since the fabric has a tendency to slip). I stopped after 15 circles this afternoon because of the tension building in my shoulders.

Actually it will get easier as more and more circles are stitched because once they’re in place I won’t be having to contend with as much fabric lifting. But oh, there are a lot of circles still to do! 

It is going to take days and then I have to figure out a back and actually quilting all three layers together. What I’m doing right now is just stabilizing the circles.

Who’d Have Thought…

Yesterday I pieced and attached the border for the circles panel. I had originally intended bordering the top using an almost black and an off white printed fabric. But when I opened out the border fabrics and laid out the panel on them, it looked all wrong. So I decided to try a border of graduated colours.

I auditioned the fabrics and thought it could work. Next I cut 3 1/2″ strips and placed them adjacent the panel. I cut pieces, mitred them together (including the corners) and attached the border to the quilt panel. But something didn’t feel quite right. I took some photographs. And when I looked at them I could see my problem: the bottom border had the mitres going in the wrong direction – your eye is pulled immediately to the yellow bottom left corner:

img_8096

First Bottom Border

I was going to live with it, but this morning when I got up I decided to fix that border. I knew I couldn’t just realign the joins – my border would be too short. So I started from scratch, cut new strips (or used what I had leftover from the first border), sewed them together and attached the border to the quilt,

img_8099

Second Bottom Border

It’s really quite interesting how that mitre direction makes such a difference. Now the colour story flows from top left to bottom right and the eye moves around, sees the shades of pale greys fading into the medium greys, into the darker greys/black at the same time the yellow blends with the oranges and reds rather than standing out.

Wouldn’t have thought it would make such a difference.

I have my embroidery machine set up with rayon thread (I have selected several shades of red), a new embroidery needle (an embroidery 75), my sewing star foot (which has an open toe), and a narrow blanket stitch. The quilt top has been pinned to batting and I’m now ready to stitch around all the raw appliqué edges. I won’t get to that until Thursday – tomorrow I have to return to Parrsboro to pick up the two quilts I left behind for the art exhibit featuring all the artists who had shown during the season.

Wind Waiting

I’ve begun my next project – this is a photo I took at least a dozen years ago when I was still paragliding. Retired, I had time to spend in Parrsboro (a two hour drive from Halifax) hanging out wind watching with these three paragliding pilots.

On this particular fall day we’re at Fox River (I think it was) on the Bay of Fundy across from the Valley Coast (able to see from Blomidon to Cape Split) feeling the strong wind whipping up the waves and inflating our jackets. It wasn’t a flying day! Wind much too strong.

Paragliding pilots are patient people – we spend a lot of time chasing wind which is either too light or too blustery. We hung around this location for quite a while before deciding to try further down the shore where we might find conditions a bit calmer.

What I love about this image is the three guys on the edge of the bank (about 100′ above the beach which is where we’d have landed had we been able to launch), patiently and calmly contemplating the weather. They’ve been here before with weather like this. Brian, the one on the left hasn’t even bothered to take out his wind gauge to check windspeed.

pilots1-2

Wind Watching

So this fabric wall art piece will consist of the background of white-capped waves with the bank in the foreground extended downward a bit further than it is in the photo. And then there are the guys. A week or so ago, I isolated each pilot and enlarged him. Last evening, I converted each image to black/white so I could see the contrasts more clearly. Last evening I outlined each photo so I could get an idea of how many different fabrics I might be looking for to construct this image – a lot of bits of closely related colours are going to be needed. This will necessitate a careful going through my scrap boxes and pulling out everything I think might work.

pilots-detail

Pilots rendered in black/white and outlined

I will have to print these images and outline them a second time – to give myself a copy I can cut apart, using the bits as templates for fabric pieces. The men are close to 11″ tall – they’re going to be quite large. I’m going to have to use that height to calculate the dimensions of the finished piece – I haven’t done that yet.

I’ve had the original printed photo at the right side of my desk for the past two months. I’m beginning to actually work on it. Next choosing fabrics, then bringing out my half sheet of styrofoam insulation to use as a pinning board.

This project is definitely underway. I expect it will take a couple of months to complete.

Double Vision Quilt III

My initial plan was to border the central element with a black-grey-white border. I laid out the fabric (before cutting the 3 1/2″ strips, thank goodness) and it looked awful!

img_8094

Auditioning a border

I stood back for a bit and walked around the pieced centre and decided to try a border in reds – that’s gonna work just fine!

So tomorrow I will cut out my strips from the fabrics assembled, piece them (using mitred joins) and apply the border to the quilt – also mitring the corners.

“Double Vision” Quilt II

“X” pieces and circles all cut out and fused onto the black/grey/white background panel.

I’ve just picked up some black with grey and white on white fabric for a 3 1/2″ border all around. I have to add the border before stitching all the “X”s and circles in place because I may want to pin stitch the elements in place using the batting instead of using a layer of stabilizer. I will have to run some samples with/without batting, rayon embroidery thread/Sulky variegated thread to see which combination works most easily and gives the look I’m after.

So tomorrow – the border (with mitred corners).