Last Two Tunics Finished

Finally got the remaining two tunics done. My friend Janet suggested I add a cowl neck and it would have worked nicely but for the fact that I’d already cut these tunics out and didn’t have enough fabric to make a cowl neck scarf to wear with either. So crew necks I’ve got.

“Feathers” Flared Tunic #3

This is the same printed pattern as the second one I did, just in shades of black/grey/white. It’ll look good with a black turtleneck and pants.

“Grey” Flared Tunic #4

That’s it for garment sewing right now. I still have corduroy for a couple pairs of pants and I need to make another bedspread jacket for a friend but it’s back to quilting right now.

Flared Tunic II

Fabricville was having a sale a couple of days ago for “elite club” members (I’ve been one for years since I often drop into the shop for fabric, notions,…). The poly/viscose fabric was half-price so I looked at the other bolts they had. I chose three more lengths to make tops – here is the second one completed. I liked the bright colours.

Second Flared Tunic

I have the other two lengths cut and ready to stitch up. I am aiming to do one today and probably the second tomorrow.

Two Flared Tunics Cut Out And Ready To Sew

These will replace the tunic tops I made last fall – the fabric pills badly (I have to shave it after every wearing) and they are just a tad snug in the bum. So they will go to Hand in Hand – the St. Vincent De Paul thrift shop in the area. These days my rule is: something new in the wardrobe means something out! My wardrobe is still embarrassingly large I’m just trying to keep it under control.

Flared Tunic

Came across a pretty poly/viscose knit the other day at Fabricville. Thought it would make up into an attractive flared tunic top.

Flared Knit Tunic

Very simple garment to make – a front, a back, sleeves and a band to finish the neck edge. It’s based on a Marsha McClintock pattern – “T-Shirt Trifecta”

Safe-T-Pockets Pattern

Marsha’s patterns are all about hidden pockets everywhere for travelling. I made up View 2 originally but subsequently attached the diagonal top piece to the bottom and made a single front piece which I later flared a bit more than the pattern since the couple of tunics I made up were just a bit snug through the bum. I sewed the flared single piece front tunic in a black sweater knit last year. It fit well over a pair of jeans.

I’m happy with this latest tunic top which is comfortable and colourful. No pockets, though. To put them in the side seams will drag down the sides once anything is put in them. Same with pockets on the front because the fabric is soft and stretchy. So I have to wear this garment with pants that have pockets so I can carry all the stuff I carry in my pockets!

PS – I bought three more lengths of this poly/viscose fabric (different prints) today ( a half-price sale). Just finished cutting them out. Intending to replace the solid tunic tops I made last year with a fabric that pills like crazy – it needs to be shaved after every wearing. This fabric didn’t pill when I wore the tunic yesterday.

New Clothes

You might think I’ve not been doing much sewing/knitting but I’ve been busy with additions to my wardrobe.

First, a boiled wool jacket using Marcie Tilton’s V8430 jacket:

Marcie Tilton V8430

The boiled wool came from Blackbird Fabrics in Vancouver. I bought the aubergine which I thought would make a warm addition to my wardrobe.

A simple pattern with just two fronts, a back and sleeves which went together easily and because it’s boiled wool I didn’t need to finish edges! In fact there’s a dart at the bottom of the sleeve which is stitched by abutting the two edges and zigzagging it closed – doesn’t show but gives shape to the lower sleeve. I’m still debating whether to do something similar in the middle of the back at the neckline – I’ve a slight rounding of my back at the neck and I think the jacket would fall better in the back were I to make that tweak.

I chose the pattern because I thought the soft folds for the lapels wasn’t something I usually wear and would look “new”.

New Jacket/Sweater and Corduroy Pants – Front

With a new jacket/sweater I thought dark purple cords a good choice – I whipped those up two days ago.

New Jacket/Sweater and Corduroy Pants – Back

Taking pictures myself is extremely difficult – to position the camera involves twisting which causes the pants to show a bit of pull. I had to take the side seams in after I’d finished them – I didn’t take them in as much as I possibly could because I was afraid I wouldn’t be able to sit. I’ll see how they are after I’ve washed them – the fabric was washed before I used it but it will shrink a bit more, I’m sure, with further washing.

I have three more lengths of corduroy to make pants – I’m intending to get to at least one of those this weekend.

Christmas Scarves

Follow my blog with Bloglovin

I know Christmas is still two months away but a couple of weeks ago I was thinking about a simple-to-make something for the knitting ladies and other friends. I was looking at Ann Williamson‘s blog – she does beautiful garments and accessories using kimono silk which she buys from Ichiroya in Japan. She had some lovely pieced scarves in her shop – I remembered the kimono silk fabric I bought a couple of years ago. I have nothing specific in mind for the fabric – a while ago I attempted a simple silk jacket but it didn’t turn out well and I tossed it. I decided to use some from each bolt to make silk scarves.

This project isn’t meant to create an expensive, elaborate gift like Ann’s scarves are – just something simple, yet useful. Last year it was shoe bags, the year before zippered bags. Two weeks ago I cut 5′ lengths from each bolt – kimono bolts are 14″ wide by 10-12 yards in length. I split each length down the centre to give me two 7″ scarves.

Yesterday I set up my serger to stitch a narrow rolled hem and got to work – I did ten scarves. Today I completed the second batch of ten.

Silk Scarves

The scarves are long enough to wrap around my neck twice and tie in a loose overhand knot in the front. The silk is soft and smooth and will be warm to fill the neck of a winter coat. I’m pleased with how they turned out.

My next step is to figure out how to make “envelopes” using parchment paper as wrapping for each scarf.

Federer – Completed

Just finished the panel. (It’s actually squarer than the photo shows – its all about the angle I’m holding the phone at).

Australian Open 2018 – Federer’s 20 Grand Slam Win

Finished size: 20 3/4″ x 16 1/2″.
Techniques Used: Raw Edge Appliqué, Thread Painting, Machine Embroidery.

In the end I did less thread painting than I originally intended – I did none on the court walls other than to secure the edges. The grunge fabric provided quite a bit of texture which I decided I didn’t want to disrupt so I left the dark backing alone after embroidering the Jacob’s Creek name and logo. I did the barest amount needed to hint at the shadows of Federer created by the overhead lighting. I did densely stitch the white lines on the court to hold those narrow pieces securely. But that was it.

That’s all the wall art for now. This is #9 of the pieces I wanted to complete for the showing at the Art Labs in Parrsboro end of July to mid-August. Added to the 8 quilts I have ready, the gallery walls will be full.

I have two large projects I agreed to do for other people that have sitting around for more than 6 months – I have to get them done and out of the apartment. Then I can turn to making some clothing for myself and think about how to use a couple of fabric collections I bought for quilts a couple of months ago.

So lots more sewing/quilting waiting for me.

Federer

This is as far as I’ve got with this wall art panel at the moment.

I had set up embroideries for the Jacob’s Creek winery logo and the serve speed readout. I tested each embroidery on fabric scraps, made adjustments and tested them again. Then I took a deep breath and started to embroider directly on the panel. One error and the whole project is a goner. I was very lucky – the Jacob’s Creek logo embroidered nicely each time and the serve speed readout turned out crisp and a good size.

Before doing the embroideries, I’d shaded the court and thread painted the surface adding the shadows beneath Federer’s feet (both feet are about 1″ above the court surface – he’s actually in the air in the original photo) as well as the lighter shadows cast by light coming from another direction at the end of the court.

Australian Open 2018 – Federer vs. Cilic

I’m still thinking about whether I want to put in any shading on the court walls or not – if you click on the image you’ll see I used a shaded fabric (Grunge by Moda) – I’m not inclined to follow the random pattern of the fabric; were I to add thread painting, I’d mirror the shading I used on the court.

I’ve stopped for now. I’ve stitched around Federer himself using a fine clear (invisible) monofilament thread. I will likely stitch the shadows on his clothing and body and indicate the colour changes on his shirt, socks, and shoes. Tomorrow. I’ll look at it again tomorrow and see what I think then.

I also have no idea yet what to use to bind/border the panel. When I get the thread painting done, I’ll trim the panel, add the narrow silk inner border, then see what I have in my stash that might complement the panel itself and bring out the colour in it.

Abstracts From Scraps – III

A fifth (and for now final) Abstract From Scraps piece — this one assembled from turquoise-ish scraps. I really have kept quite a few small scraps of fabric, boxes of them (all coloured coded: red/yellow/orange scraps, blue/green/purple scraps…). This is definitely a good way to use up a few of them.

Fern 5

I’m enjoying the process of selecting bits of fabric, piecing them (trying to use each fabric just once – although there are a few repeats where I decided to splice two fabrics in more than one spot), building a 10″ x 12.75″ block, then added a few appliqués, finally setting up and stitching out an embroidery.

For some reason, the “fern” seems to have worked quite well as a focal point for these pieces. I could see flowers, or other leaf shapes working quite well, too.

Anyway, this is it for now – although a grey/neutrals panel is kind of whispering to me. However, for hanging purposes 5 is probably a better number than 6, but maybe after I’ve finished the bark cloth appliqués I may come back to this idea and pursue it a bit further. Maybe….

Fern 1

Fern 2

Fern 3

Fern 4

Abstracts From Scraps – II

Just finished – the pink background wall art panel with appliqué and machine embroidery.

Fern 4

I added in a bit more pale fabric to lighten the whole, reconstructed the embroidery so it would be different from the previous two. All of the panels still need a signature which I’ll get to tomorrow. For now, that’s it. I did look at the turquoise fabrics but I haven’t pulled any from the boxes yet. I will probably do a fifth to fill out the set.

Abstracts From Scraps

Last week I started work on an idea I had for creating abstract wall art from fabric scraps. I pulled small pieces from the red/yellow scrap box, pieced them, added in a few soft blues/greens to complete the block (~10″ x 12″), added a few bits of appliqué, fused, then stitched them into place, added an offset machine embroidery of a fern.

Fern 1

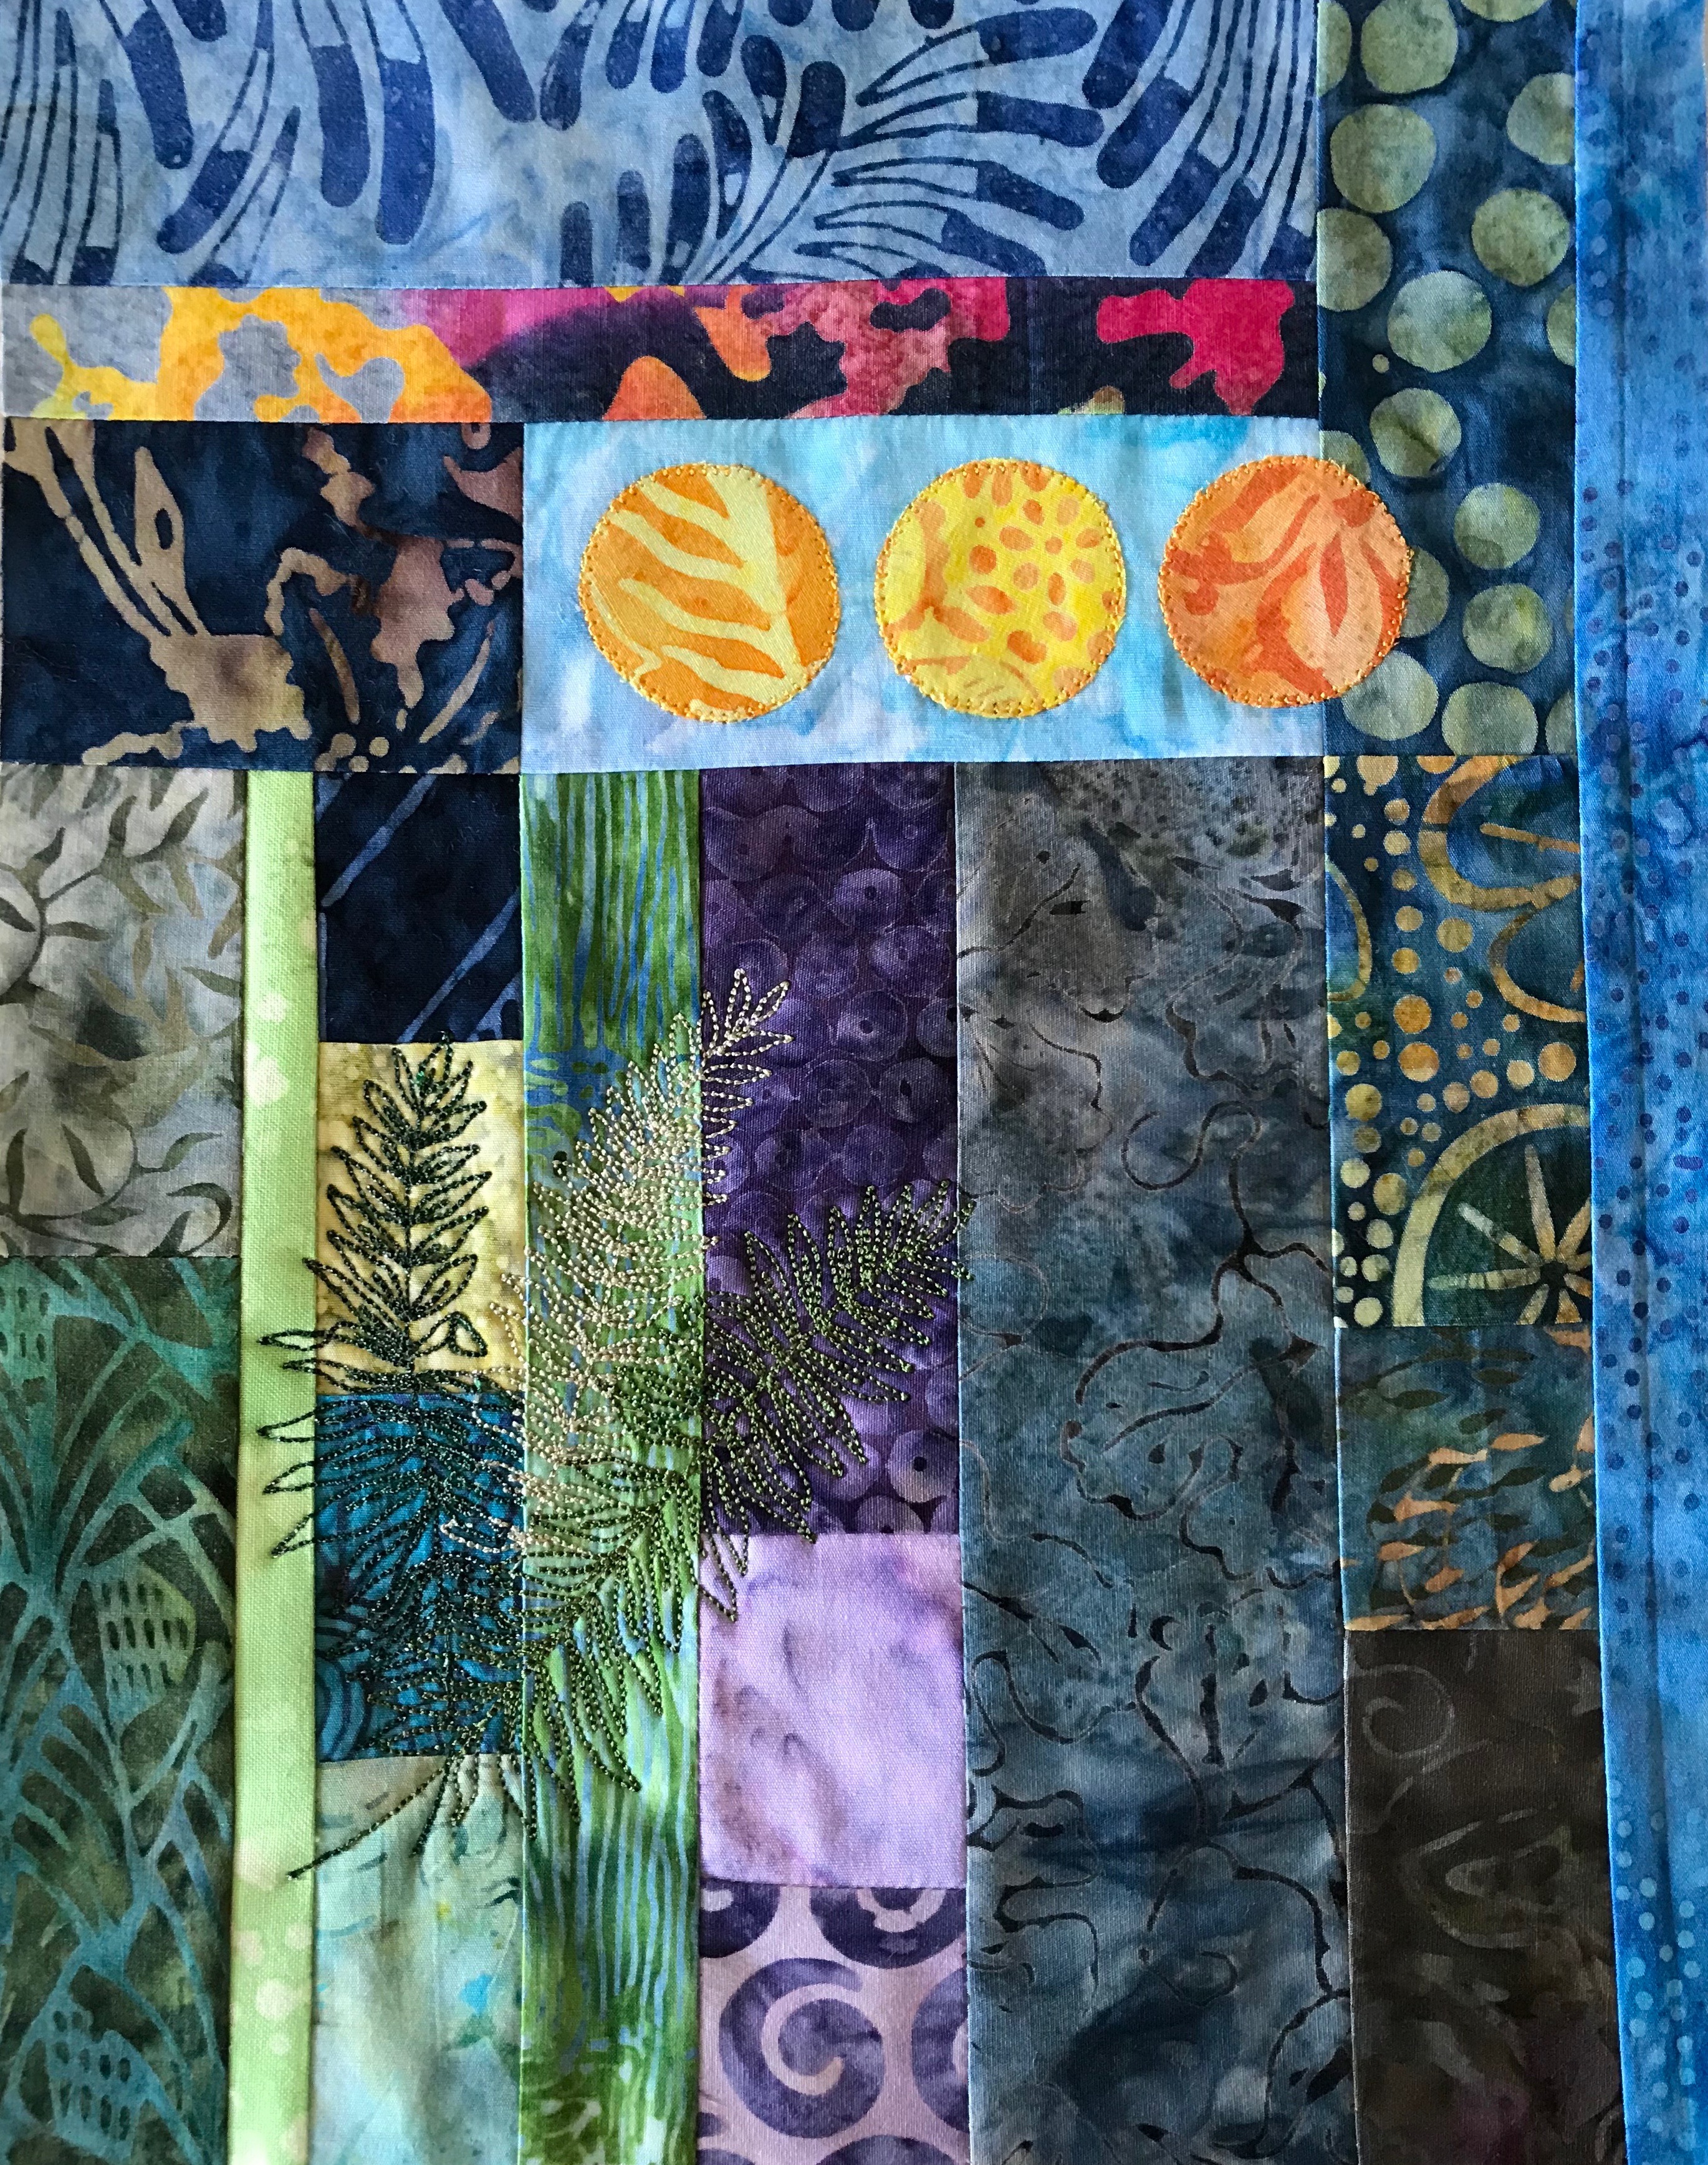
The second piece uses predominantly blues with a bit of purple/green, three appliqué circles and, again, a machine embroidered fern.

Fern 2

The third piece uses green batik scraps with a few appliqué circles and a fern machine embroidery in the bottom left.

Fern 3

Those three are completed – now I need to decide whether to finish them with a quilt binding, or an invisible binding, and a backing fabric (probably natural muslin, of which I have quite a bit in a drawer).

I’m about to assemble a fourth piece in shades of pink with a few other accent colours. I can see from the photo I need to interject a few more light elements, particularly in the lower right, to make this background work. Again, there will be some small bits of appliqué and another “fern” embroidery to complete the work.

Fern 4 – in progress

I may still do a fifth using turquoise scraps….

[These wall art pieces are an extension of something I started with a single piece a year ago “Dots” – where I pieced scraps, then added a bit of appliqué. This time I seem to be focusing on colour as an organizing principle.]

I also want to do a few pieces which I refer to as “faces” –

A Very Sad Face

Baboon

The Scream

Definitely A Cat

For these pieces I plan to print the images on fabric, create a background, carefully cut out the essential “face” elements, appliqué them in place and thread paint the background a bit. I see these as relatively small pieces — ~9″ x 12″.

I’m still working, as well, on the bark cloth floral cut-outs. I hope to make progress today on the flowers. One thing I’ve learned (I guess I really knew it but didn’t act on it) is I need to have a similarly coloured bobbin thread to have the thread painting come out successfully! Otherwise, when I use a white embroidery bobbin thread, it shows and I’ve been forced to carefully darken the stitching with permanent markers. I finally made the switch when I did the “fern” pieces above. I took the time to set up quite a few bobbins filled with different coloured rayon thread so the embroidery and thread painting looks like I want it to without bits of white showing.