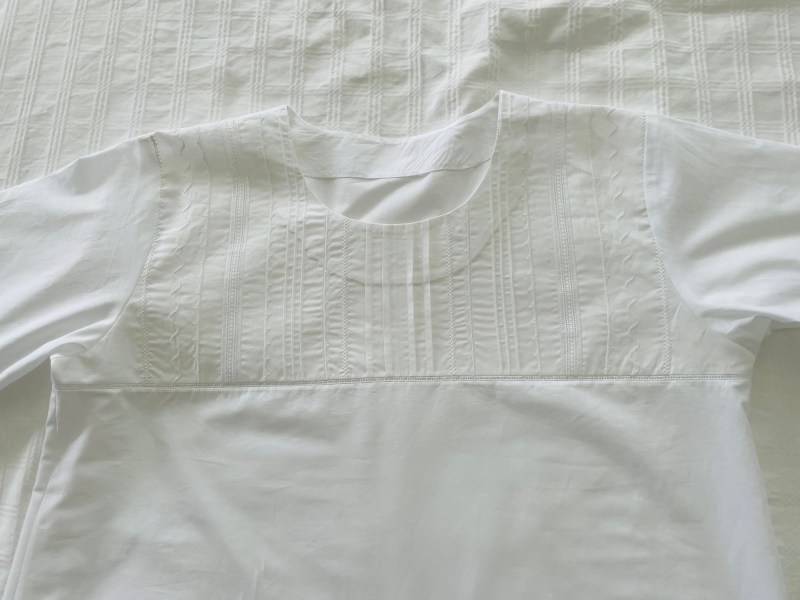
I also finished the latest pair of socks (added to the give-away stash) and the pull-on shirt I made using the heirloom panel I created a couple of weeks ago. I’ve since added five small mother of pearl buttons to the centre of the heirloom embroidery to draw attention to the stitching. It’s a light, loose hot summer day shirt. The only problem – the fabric I used for the heirloom panel is a slightly yellower colour than the rest of the shirt. Nobody will notice it. And I’m hoping a washing or two with oxyclean will whiten so the panel will blend with the rest of the shirt!
My patience and perseverance were tested yesterday. The other day, I pulled out some Marcy Tilton t-Shirt fabric I’d bought last year – time to use it to make up a couple of shirts. I went through my collection of t-Shirt patterns and decided to try out the Connie Crawford’s “Perfect Knit Sloper” that I’d picked up a couple of months ago. When the sloper arrived, I opened it, and drafted a sloper on Swedish cloth, using my measurements. This is the first time I’m trying out this sloper so I know I’m making a muslin.
I cut out a t-Shirt – using Janet Pray’s technique for turning a t-Shirt into a “swing” shirt (a shirt that is flared at the bottom)(15:25 – 21:55 on the video). Cut a couple of pieces of grosgrain ribbon a bit longer than the shoulder seam (to stabilize the shoulder), then serged the shoulder seams. So far so good. Next comes the neckband. I cut out the neckband the size suggested in the sloper pattern and serged it to the neckline. First problem – I had a couple of spots where I didn’t have the neckline and band aligned perfectly – I opened those spots and restitched them.
Tried on the garment to see how the neckline looked – dreadful – the band stuck out in the front – the band was too long. I thought the neckline was a bit higher than I liked, so I carefully removed the neckband (being extremely careful not to cut or pick the fabric), recut the neckline 1 1/2″ lower in the front, then reattached the neckband. The band was still too long, so I carefully removed it (being extremely careful not to cut or pick the fabric), shortened it by 2″, distributed the fullness of the garment neckline (stretching the band as I attached it to make it fit), basted the two together this time, then once I was sure I had the band and neckline aligned, I serged the seam! Finally the band laid flat and the fabric edges matched. I pressed the band seam toward the garment and top stitched it (to hold the seam allowance flat on the t-Shirt) 1/8mm from the seam using a narrow-edge foot.
Now to attach the sleeves. I carefully aligned the right sleeve with the sleeve opening on the t-Shirt, sewed it in place – didn’t like the sleeve header – the top of the sleeve stood up rather than lay flat. I unpicked the serged seam, flattened the top curve of the sleeve an inch, reattached it (this time basting it first) then serging the seam. I recut the second sleeve and serged it.
I serged the side seams; they were fine, until I tried on the shirt – too much flare! So I removed a wedge from bottom portion of the side seams.
Last, I used my coverstitch machine to do the bottom and sleeve hems (stitching a wee bit narrower than the fold and trimming back to the seam using my handy duckbill scissors.
Wearing the Finished t-Shirt
“Why?” you might ask do I bother making t-Shirts – because I can’t buy t-Shirts with sleeves long enough to cover my old lady arms.
This t-Shirt turned into a L-O-N-G project. I was determined not to give up and throw the whole thing in the garbage! But constructing it – a muslin, I kept reminding myself – definitely pushed my patience and perseverance to the limit! I wore it today and got complements on it.
Sewing the second t-Shirt was simple and straightforward – I made the adjustments to the sloper pattern, cut it out, basted, then serged the seams. The neck band lays flat, the sleeves headers are smooth, it’s not too full at the bottom.
I still have to stitch the hidden binding on the back but other than that, this project is finished. Yesterday I’d finished applying the piping and border only to realize I’d forgotten the light inner “matte”! Having cut the piece to size I wasn’t going to take it apart and rework it. Besides, the contrast between piping/border makes the image itself pop quite nicely.
I’m definitely happy with how the gals worked out on the bench and that I was able to show their bums on the seat. Not obvious in the photo is the shadow under and behind the bench which grounds the gals – it’s much more obvious in the piece itself.
I’ll work on the hand stitching later this afternoon. That’s it for “portrait” wall art pieces for now. Time to move on to more garment sewing.
I said to myself, before I started these alterations, if I ruin the dress, I’ll replace it! That gave me the courage to proceed.
The GownThe Front OpeningThe Cut Inner Skirts (2)
I started with the front opening. Michelle is tall, very thin, with a small bosom. So when she moved, the front gaped and she felt exposed. I wanted to stitch the opening closed but she was adamant the opening remain.
I shopped for a bit of nude mesh which I found at Fabricville. I cut a triangle long enough to support the gap further toward the neckline, pinned it in place then hand stitched it (very small stitches with Aurifil 50wt thread in white). Can’t see my stitches. I stitched the edges of the triangle on the inside as well. Then I added a sheer white polyester bias tape across the top edge to prevent the mesh from stretching much. That should do the job.
Second, I took up the shoulder straps an inch. I though I’d have to carefully remove beads and pearls, but I got away without having to do that – I was able to fold the strap 1/2″ and stitched the fold securely to itself. You have to look very closely to see where that join is. That adjustment should help with how the neckline fits as well.
Finally the two nude inner skirts. First, I had to figure out the length of the innermost skirt at the front, mark that length around the whole thing then cut it being VERY careful not to cut the lace and tulle layers. Next, measure the second skirt 2″ longer and cut it. I think the two skirts are still bit long in the centre back (that’s because at the waist the inner skirts dip down about an inch and a half below the centre front) but I was afraid to cut the skirts too short – we can always cut more – I can’t add back what I cut off!
I’ve decided not to hem the bottom edge – this dress will be worn once, the fabric doesn’t fray, and no point in doing a turned hem if I have to cut off more.
So far, I don’t think I’ve ruined the dress. I’d say, it’s done until Michelle tries it on. If I’m lucky she’ll be happy with my alterations – my wedding gift to her.
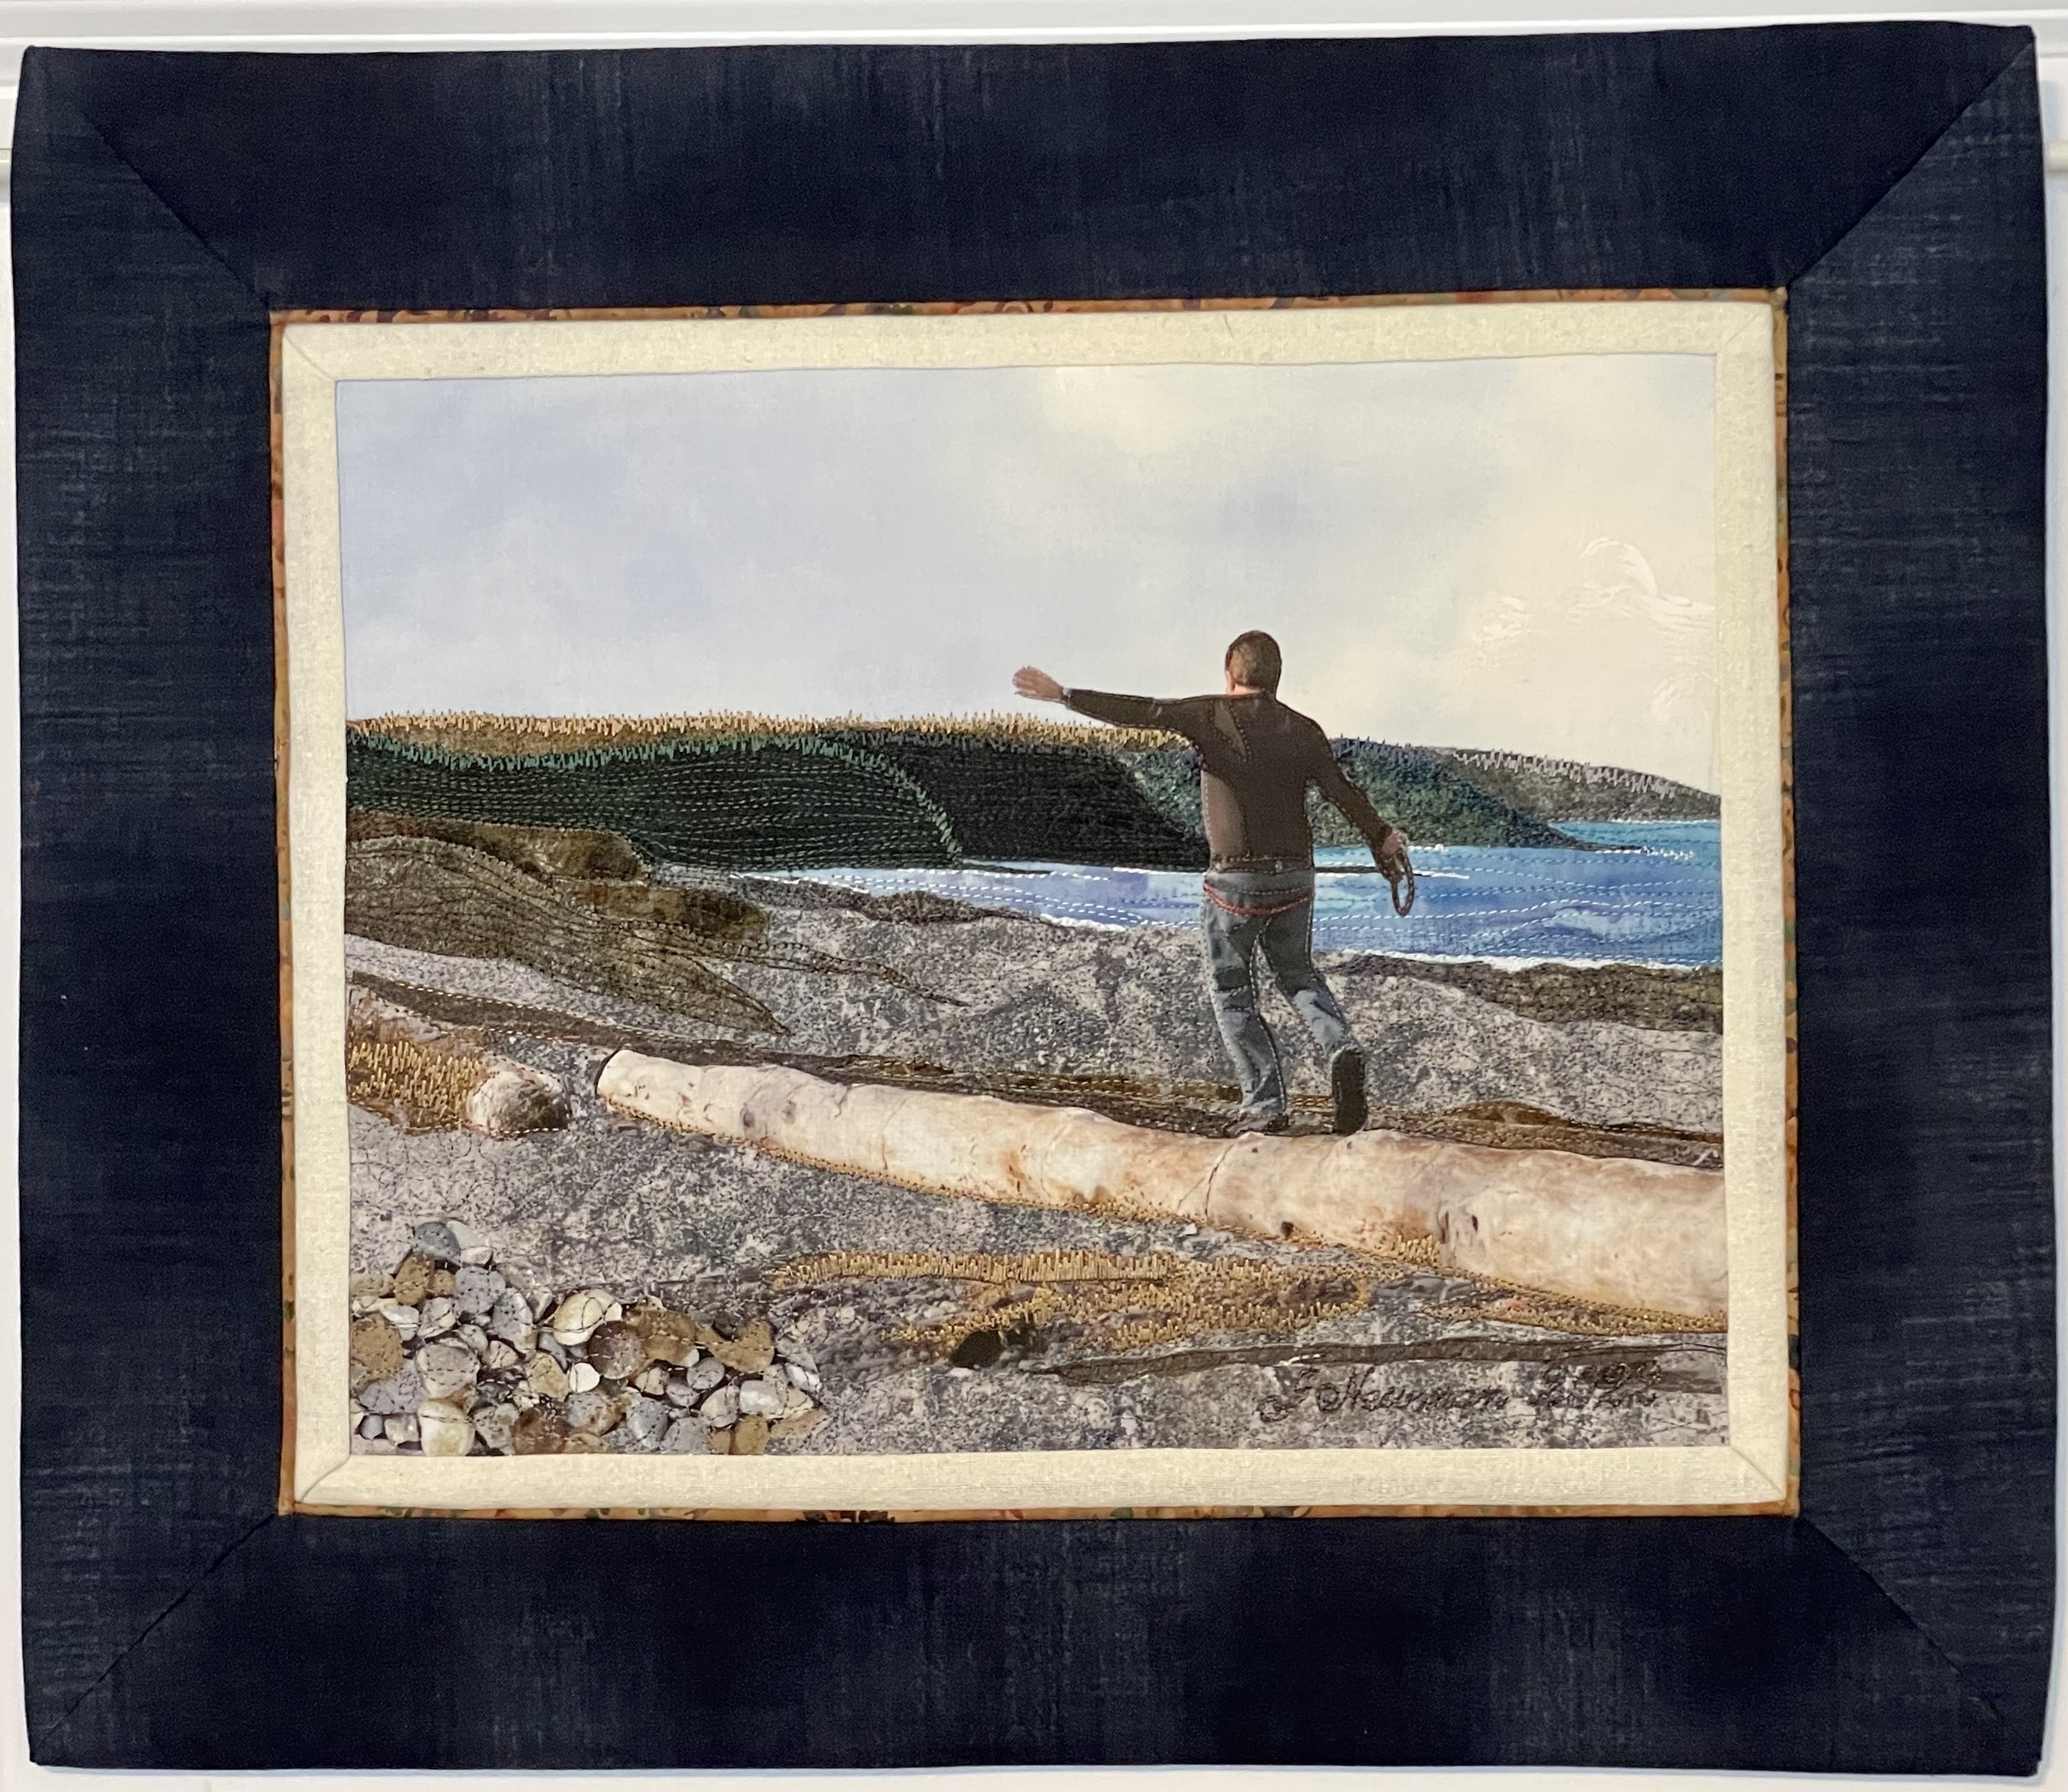
This is the second piece I decided to work on. I photographed the bench on the beach at Huntington Point in 2007. I’ve always wanted to turn it into a textile piece but it needed people sitting on the bench.
A couple of summers ago I was doing the day trip thing with a friend. We stopped at the Tangled Garden near Wolfville and I people watched. There were a couple of young women sitting on chairs near a picnic table. I asked if I could rearrange their chairs and photograph them from behind. I’ve been playing around with the relative size of the gals and the bench to get the proportions in balance. I’m close. Although now that I’ve mocked up the sky, the bay, the faint line of shore in the distance (needs to be much narrower than the strip I’ve got place holding it), the rocky beach and the grass, I think the bench and the women need to be a bit larger for the image to work as I imagine it.
Next steps: add fusible web to the pieces of fabric, trim them to size; thread paint the setting, print the gals and the bench to size, fussy cut them and place them in the scene. To make the image work, I need to build the shadow cast by the women and the bench coming toward the foreground (the direction of the shadow dictated by the position of the sun on the young woman’s hat). I don’t know whether to do that with permanent markers or ink pencils – I’ll have to experiment before I decide.
Now I really need to get on with that wedding gown!
The piece is finished — well, almost. I think I want to take apart the bottom right corner and see if I can straighten it just a wee bit. I may not be able to, but I think I have to try.
I’m pleased with how the work turned out. You have the impression of the dried seaweed blown against the driftwood log and the dried grasses on the gravel beach itself. You can see the headlands recede into the distance with the sun illuminating the top of the nearest ridge.
The colours in the piping bring out the blues and golds from the image and the very dark navy frame lightens it. From a distance, the log glows because it’s sun bleached.
My next job is to make some adjustments to a beaded lace wedding dress — take up the shoulder straps a tiny bit, replace the skintone mesh in the front cleavage slit with a longer piece (bringing the two edges a smidgeon closer together), finally cut the train from the two underskirts leaving just the lace and tulle train at the back and hemming the underskirts. That’s for tomorrow.
I’ve spent the entire afternoon trying to piece this image. The distant background – the hills leading down to the bay weren’t so difficult, but trying to get the foreground assembled in some meaningful way has been difficult. What I see in the foreground is a lot of thread painting to simulate the grasses and seaweed on the beach; I’m not trying to emulate the gravel beach entirely with the fabrics.
David (and the log) are still paper, but it’s almost time to print him on fabric and carefully cut him out so I can add what’s needed to the foreground.
The surf is a bit of lace but it will still need to be overstitched to make it more realistic (I need to stitch some surf in each of the inlets, as well – same with the water – I need to stitch some horizontal wind lines to suggest movement in the bay.
I made these socks from a ball of Opal yarn using the colour pallet from the famous van Gogh painting “Vase kit Sonnenblumen.” I liked working with these colours. I happened to find a golden solid that blended almost perfectly with the yellow in the variegated yarn.
Into the giveaway stash.
I’ve started the next pair – this one Opal Rainforest 17-4 Ply Sock Yarn – a nice combination of greys/whites/yellow/turquoises. The repeating pattern is a bit shorter than the Van Gogh pattern above.
As I sit knitting I have the TV on to one of the US news channels but I’m going to have to turn it off! Even though everybody’s known the result of SCOTUS abortion decision since it was leaked a month ago, it’s angering. What’s so terrible about that decision is where it takes women – not only in the US, but we will feel that decision ripple through Canadian politics – particularly since several of the Conservative leadership candidates are promoting the same arguments as far-right Americans are.
Today I read an article in The New Yorker that shows just how far-reaching this decision is. “We’re Not Going Back to the Time Before Rove v. Wade. We’re Going Somewhere Far Worse“. We are entering an era not just of unsafe abortions but of the widespread criminalization of pregnancy. That’s the subtitle. It’s a lengthy read but here’s the gist:
“We won’t go back”—it’s an inadequate rallying cry, only prompted by events that belie its message. But it is true in at least one sense. The future that we now inhabit will not resemble the past before Roe, when women sought out illegal abortions and not infrequently found death. The principal danger now lies elsewhere, and arguably reaches further. We have entered an era not of unsafe abortion but of widespread state surveillance and criminalization—of pregnant women, certainly, but also of doctors and pharmacists and clinic staffers and volunteers and friends and family members, of anyone who comes into meaningful contact with a pregnancy that does not end in a healthy birth. Those who argue that this decision won’t actually change things much—an instinct you’ll find on both sides of the political divide—are blind to the ways in which state-level anti-abortion crusades have already turned pregnancy into punishment, and the ways in which the situation is poised to become much worse.
Everybody’s tired. I’m tired. But we’re all going to have to summon the energy to become involved in various political activities if we’re to retain a modicum of civil society and push back against the dystopian reality of “The Handmaid’s Tale”!
Yesterday, I spent the greater part of the day teaching a class about heirloom sewing; passing on what I’ve learned about creating delicate Victorian detailed embroidery techniques using my sewing/embroidery machine by helping others create a sampler which they can now use as part of a garment (likely a nightgown) or some other decorated textile project.
Heirloom Sample #1
It’s that time of year – I had a class of one. While my student was working, I had a bit of time to work on a sampler of my own – not particularly precise since I was distracted showing her techniques to help her with the precision that makes this work so lovely. I’ve put my sampler aside as an example of what you’re trying to avoid – my rows aren’t straight, the spacing isn’t exact and the panel is too narrow for the garment I want to make.
However, I still intend to make a light weight, flowing summer top embellished with heirloom work. So after aquafit this morning I started another stitched piece to serve as the yoke for this garment.
Finished Heirloom Panel – 24″ x 12″
Today, I decided to use a crisp paper as stabilizer, pulling it away from the stitching as I finished each row. I also took the time to draw lines with a heat-erasable pen to follow as I stitched. Unlike yesterday, my rows are evenly spaced and straight.
I began with 4 rows of tucks in the centre, since the neck opening of the top I plan on making has a slit I want to replicate, I decided not to put a lace piece down the centre. Now that I’ve drafted a pattern for the front yoke from my existing top I have a feeling I may not have left enough space at the centre to make the slit and face it properly (Oh, well). Next some hemstitching, followed by a row of decorative stitching, a grouping of pin tucks, another row of decorative stitching, an entredeux insert, ending with more decorative stitching and an outside line of hemstitching. The panel is symmetrical and the lines do match up on both sides.
Over the next few days, I’ll cut out the garment and begin assembling it. The top on which I’m basing this creation has an embellished front without a seam joining top and bottom. I’ll have to add a strip of entredeux to join top front to top bottom. I’m still thinking about style here and may in the end just use the same pattern I used for the nightgown and simply sew a hip-length top from it. I’ll make that decision tomorrow.
I’ve time to get another wall art piece made before the exhibit in Parrsboro at the end of July through to August 19. I went through a bunch of photos I’ve set aside in a wall art folder on my desktop and decided to try this one – David walking on a driftwood log at Huntington Point Beach (West Hall’s Harbour/Simpson Road) taken Nov 1 2007.
My plan is to make a 12″ x 9″ image by piecing the background – sky, Bay of Gundy, hills, beach, seaweed – then printing the image on lawn fabric of David on the log (enlarging it about 115%), adding a fusible web, fussy cutting David and the log, and fusing the cutout to the background.
I started yesterday gathering fabric scraps from my many boxes of small fabric pieces. I now have a pile of stuff sitting on my cutting table. I hope to get to it tomorrow.
As you can see, I’ve sketched out the basic elements of the image on a muslin backing fabric. I won’t need large pieces of fabric to fill the area. I’ll start by trimming the scraps to an approximate size, adding fusible web to the back, then start to assemble the panel.
I’m also toying with another idea.
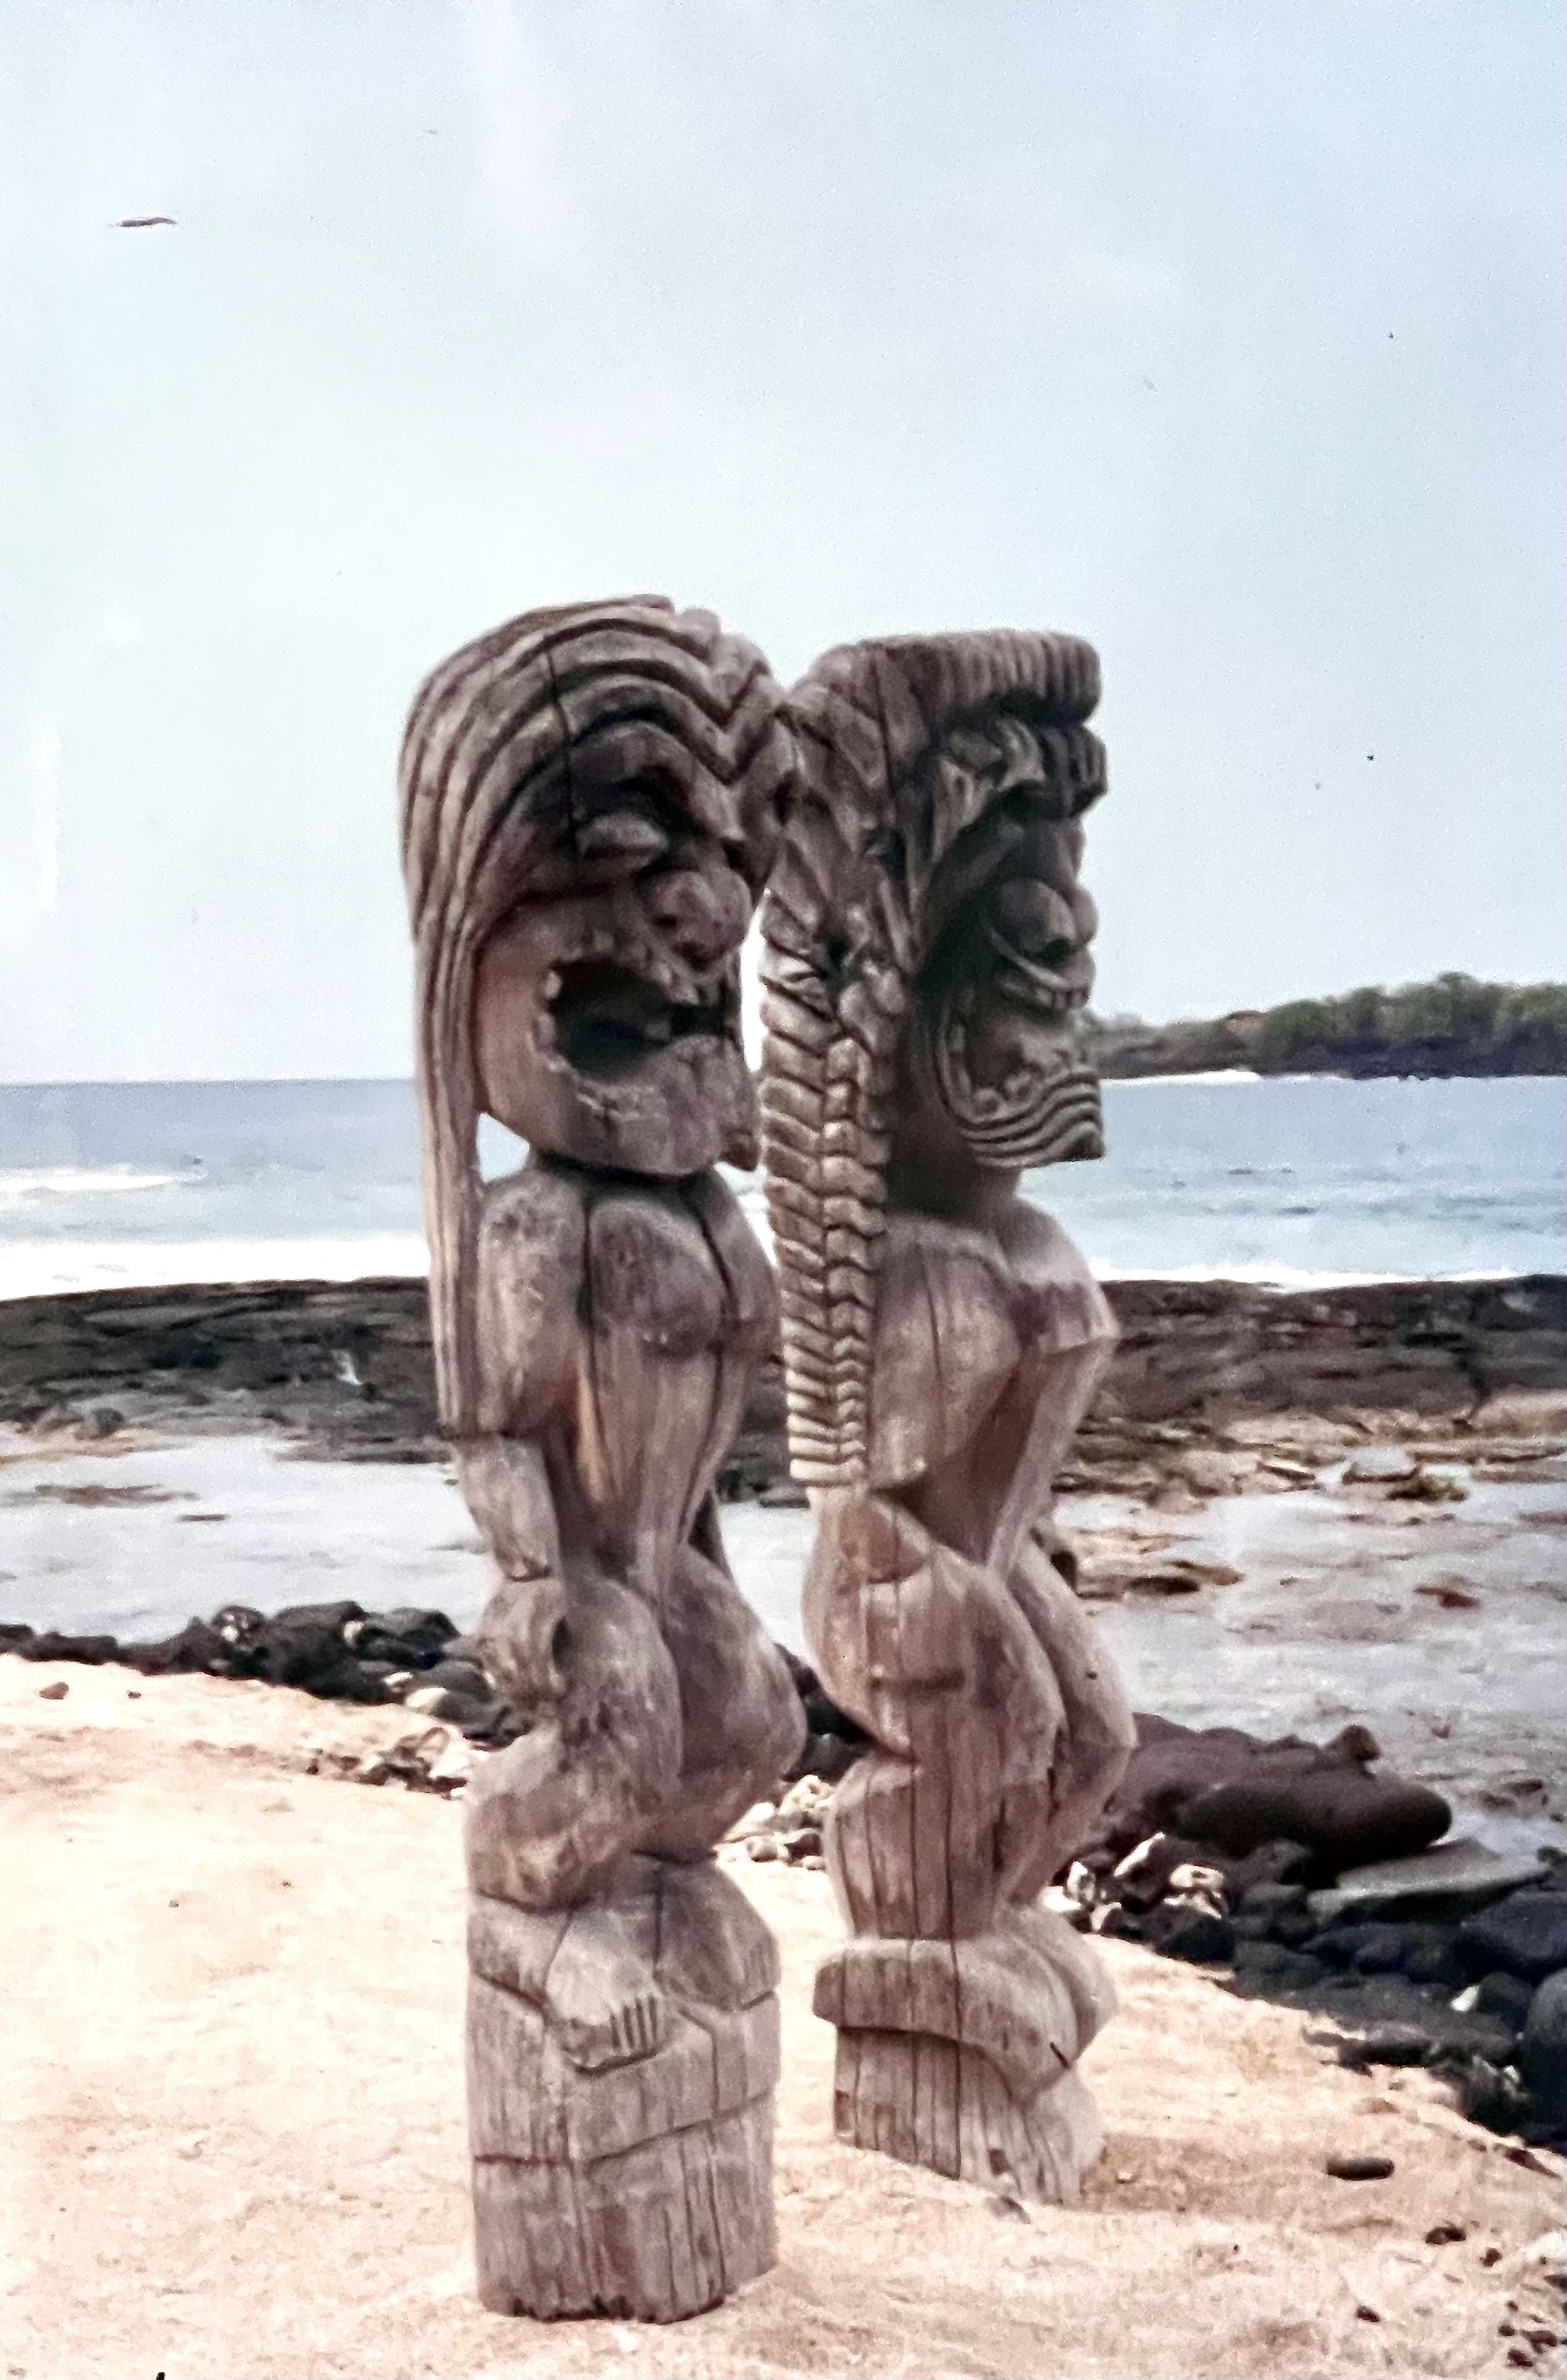
Hawaiian Tiki on Big Island
I took this photo at Puʻuhonua o Hōnaunau National Historical Park a gazillion years ago! I was fascinated by the Tiki on the beach there. So obviously connected to the totem traditions of Canada’s west coast Haida people. I have this photo hanging in my sewing studio. It’s in portrait view. I think these two wooden sculptures would make a great focus for a coastal landscape view with them off-centre on the left. I’m just trying to figure out how to sharpen the image so I can highlight the demarcations with stitching.
Another photo I keep coming back to is the one of Charlie’s first visit to a beach when he was maybe a year and a half.
Charlie at the Beach
I made a wall art piece from this photo in 2017 using appliqué and thread painting but I’ve always wanted to extract him from the photo and do the piece again.
The problem is the photo I have was send in small format from his dad’s iPhone and I can’t enlarge it and get any sort of sharp image! I’ve played with the photo endless times to no avail. I went so far as to call his dad, my nephew, and asked him to try tracking down the original. No luck, probably long gone. I may have to enlist some help from the iPhone Photography School people to see whether anybody can help me out.
For now, it’s David at Huntington Road beach and possibly the Tiki.