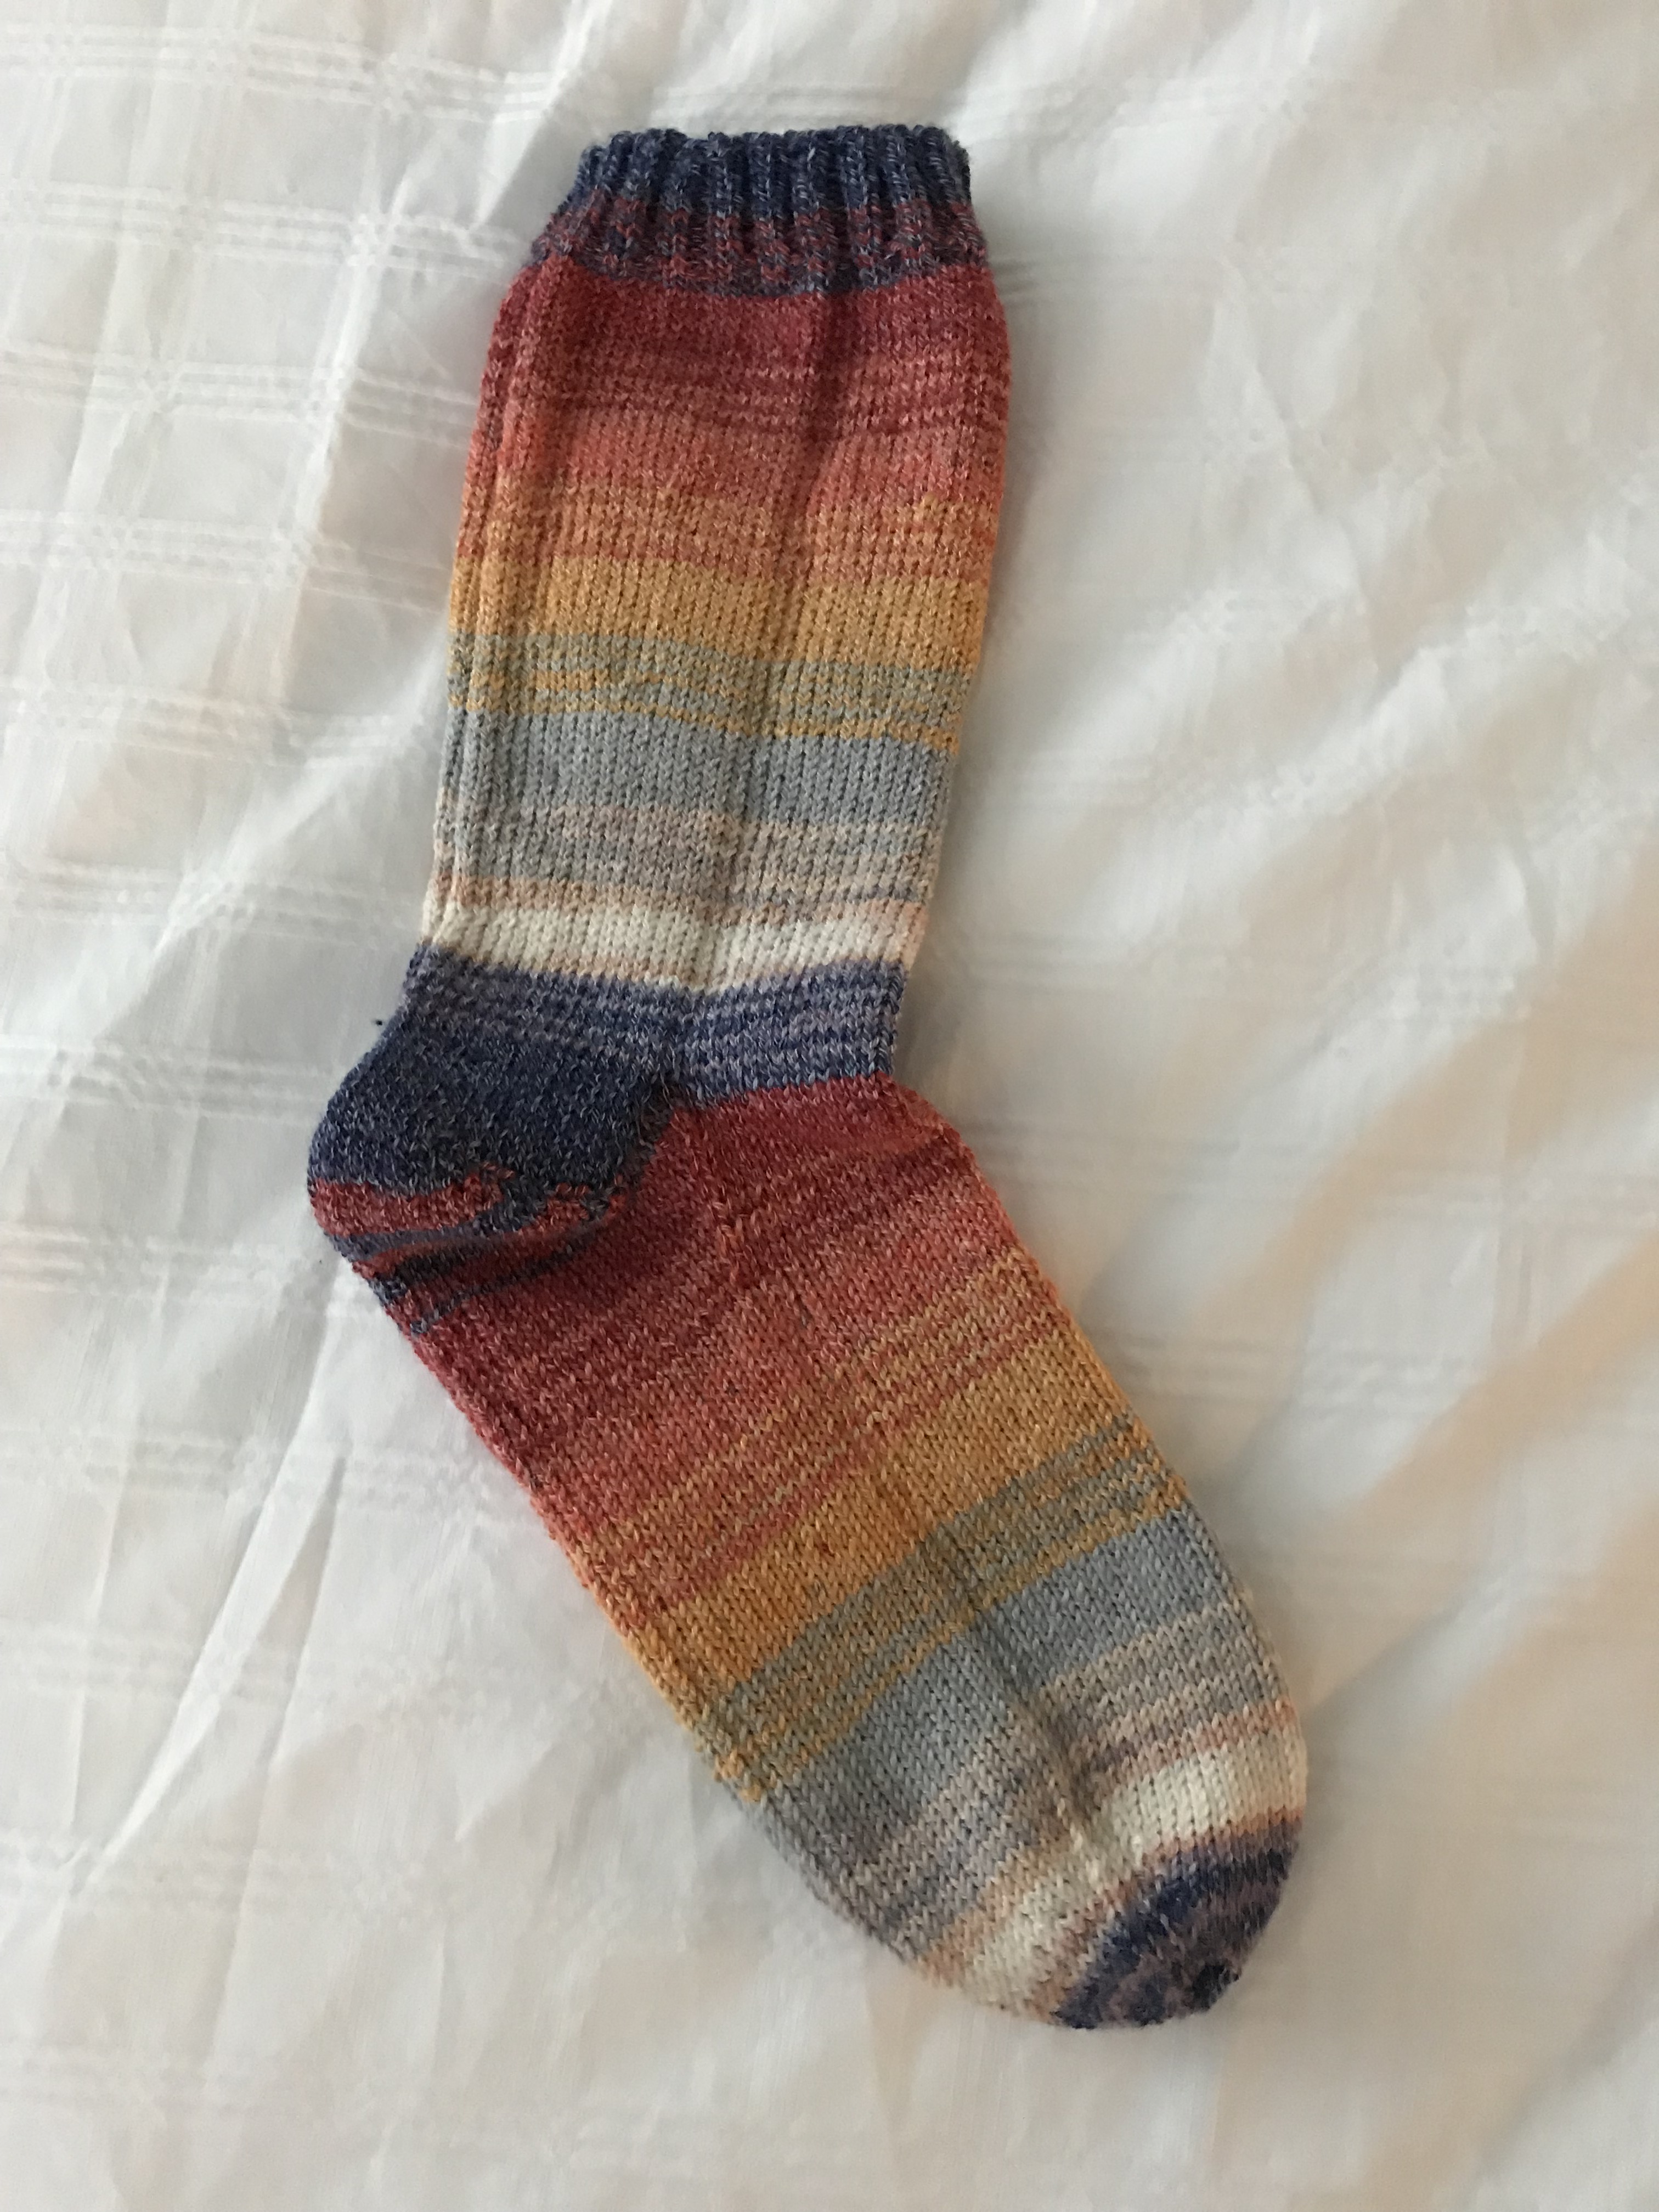
Last month shopping for yarn at Have A Yarn in Mahone Bay NS, I came across this wool/cotton blend yarn. I’ve seen the yarn before and was hesitant about the feel of it and potential lack of stretchiness because of the cotton blend. However, I thought the colour combination was interesting so I decided to try a pair of socks.
Made with Pro Lana – Alicante 7 Yarn
The yarn is 45% wool, 35% cotton, 13% polyamide, 7% polyester. It’s plied in such a way that there’s quite a bit of stretch when you pull on the yarn. However, the socks, now knitted using the same number of stitches and same needles I use for wool socks, have come out with a looser fit than my regular wool socks. It will be interesting to see what happens when they’re washed. My wool socks return to their original fit when machine washed in cool water and air dried. I’m hoping the same will happen here – maybe even a bit of shrinking because of the cotton content.
Don’t think I will use the yarn again, though. I had no comparable yarns to use as contrast for cuffs, heels, toes, although this particular colour selection turned out a lively sock without contrast. I only bought the single ball of this yarn. I’ll be returning to using my usual wool (75%)/polyamide (25%) superwash yarn.
Just done – the piecing for Blushing Peonies is completed. Fiddly! More than once I opened seams and rotated/repositioned small 4-patch blocks because a colour was next to the same colour in a larger block. I took apart large sections of the middle portion of the top in order to center the large bordered block. At this point, I have to say I’m please with the colour flow and can live with the symmetrical layout.
Blushing Peonies – Piecing Finished
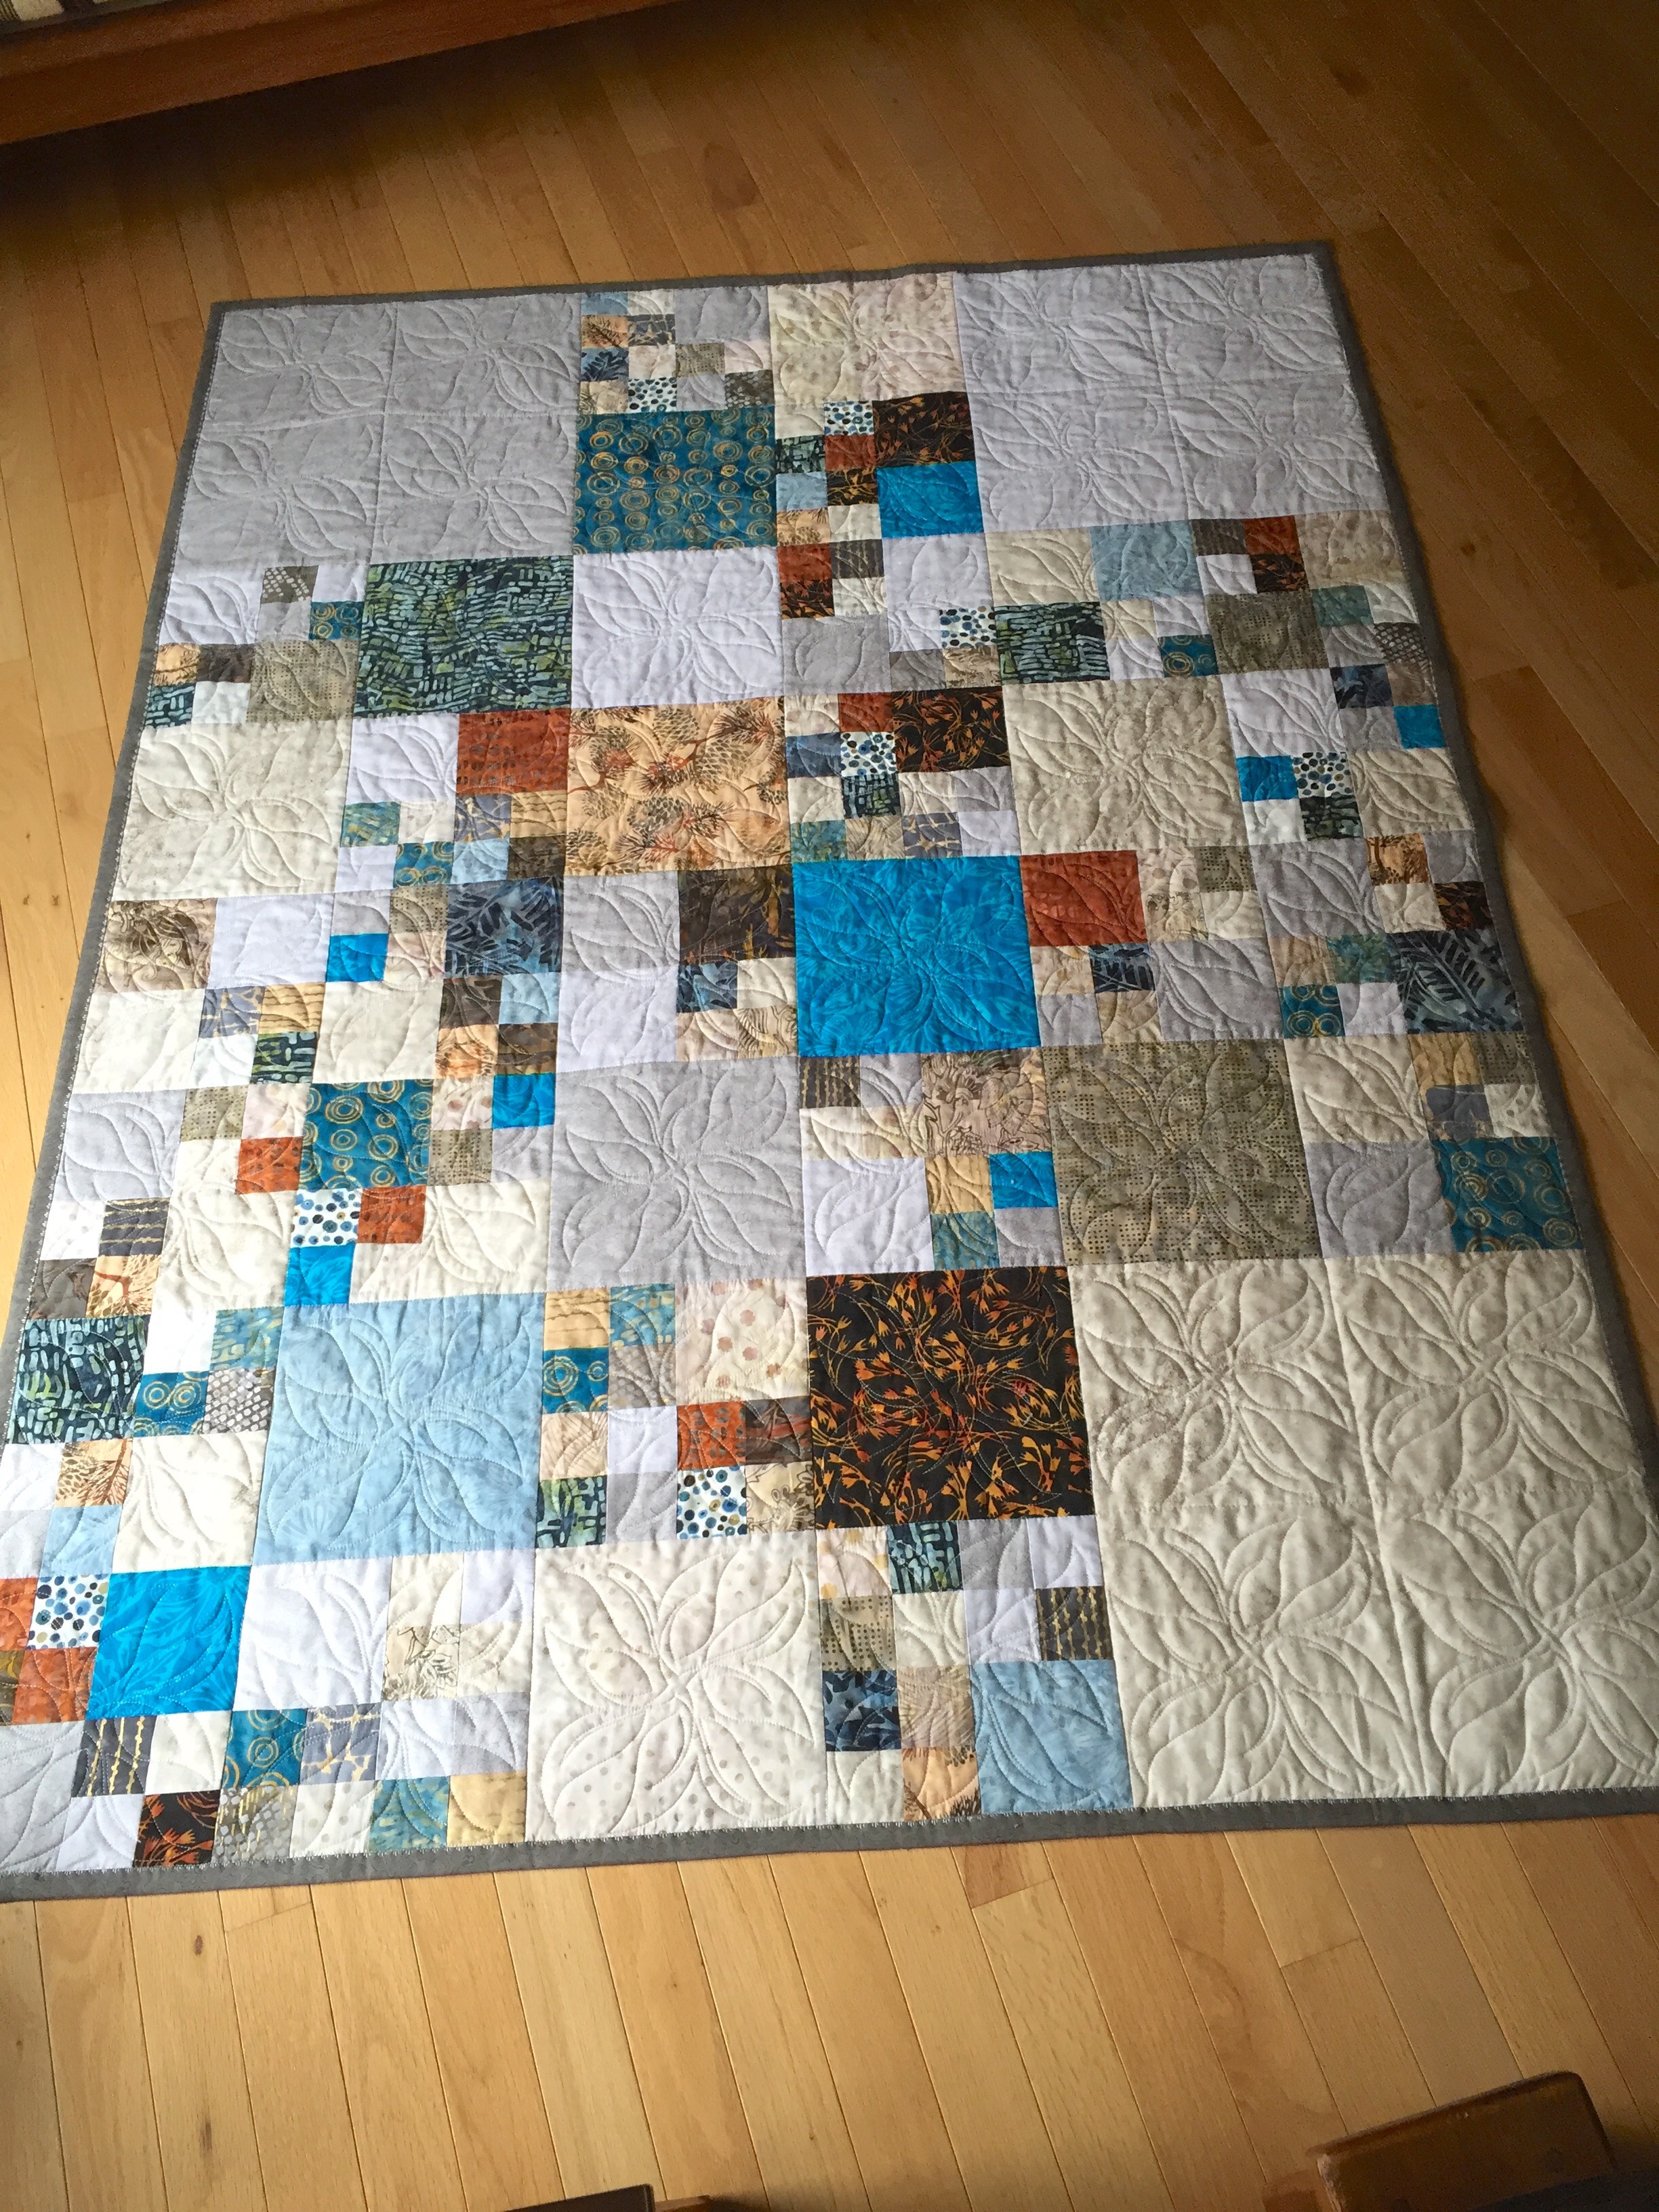
I now understand why I ended up stuck with the symmetry after looking again at the first 2, 4, 8, 16 quilt and comparing it with this one:
Original 2, 4, 8, 16 Quilt
Same block size – same number of blocks (more or less) – but in this first version, my 16″ blocks were background, neutral, used to showcase the bright 8″ blocks. The strong turquoise block draws the eye to the central portion of the quilt and the large blocks in three of the corners fade away. Your eye moves to the other 8″ blocks in turn and then picks up the colour flow of the small blocks, but not really ever landing on the three large corner elements. So in this quilt asymmetry allowed me to make the 8″ blocks the focus of the quilt.
In Blushing Peonies, having decided to border the three 16″ blocks and make them the focus of the quilt I was forced to arrange them in a diagonal with symmetrical placement. The 8″ blocks don’t capture your attention, and the smaller 4″ and 2″ blocks just fill in colour around the three large blocks.
I could have gone with my original idea:
Quilt Top Laid Out – Sort Of
In this case I managed a viable asymmetry – but the final quilt dimensions were wrong – it wanted another 4″ in the length and if I had put a 4″ row on one end, I would have wanted a complementary 4″ column on the right side – which would have distorted the width/length ratio. So I opted for inserting the 4″ between the middle and the bottom and centering the large block.
Now the question is – do I frame the piecing with a narrow border (in which fabric)? Do I bind it conventionally, or use a hidden binding and allow the pieced edges to border the quilt?
I have enough each of the red mottled and grey mottled fabric to construct a backing with some kind of insertion – not sure yet which to use – it will likely turn out to be the grey to tone down the back in relation to the top. I need to sleep on all of this before doing anything more.
It’s been an interesting exercise – I’ve learned a lot more about colour and design by doing this quilt. I did not anticipate the decisions I’d run into before I started out.
(someone) asked today about a “scant” quarter-inch seam allowance. A variety of responses were given, from “it doesn’t matter as long as your seam allowance is consistent” to “it DOES matter if you want things to fit.” The best answer included a link to this video, which explains exactly why a good seam allowance matters.
This Blushing Peonies quilt top is an example of when it does matter – in order to get all the small 4-patch blocks to fit the 4 1/2″ squares, etc. I needed careful scant 1/4″ seam allowances. There have been instances where I haven’t needed to be so vigorous about the seam allowances but here (and with the Wandering Geese quilt) I had to be meticulous.
Watch the video if you’re interested in what this discussion is all about.
I’ve just completed 2/3 of the assembling of the Blushing Peonies quilt top and I can see I’m not going to be happy with the asymmetrical position of the middle large block!
I wanted to offset it from dead centre but it’s going to annoy me if I go any further and don’t reposition it so that it’s balanced in relation to the other two large blocks. (I wish I could think of another way to create asymmetry in this quilt top, other than the random placement of the 2, 4, & 8″ blocks, but I can’t. I tried eliminating the 4″ horizontal row between the top and middle sections and didn’t like how that looked. Pushing the middle block to the left as I have today feels unbalanced as well. So I guess I will have to go with a symmetrical placement of the three 16″ blocks and live with it. Those large blocks definitely stand out and draw your attention – they need to be in an aligned diagonal.)
Blushing Peonies – 2/3 assembled
So first thing tomorrow I will open sections of the pieced middle so I can move the large block over 4″ to center it in the panel. Then I’ll piece the top 1/3 – that will go fairly quickly once I have the elements in the middle 1/3 moved around.
Well, these socks turned out nicely. Finished them last evening. They were fun to knit because the bright colours changed often and resulted in a pleasing pattern.
Peach Socks
Into the stash they have gone. While I do have sweaters in peach and shades of purple, I have enough socks in those colours I don’t need another pair.
I’ve just finished laying out the elements for the quilt top – sort of. The area adjacent the top left large block has been pieced – the rest is on the floor waiting to be stitched. I need to walk around this layout more – I need another 4″ row (at the moment sitting, partially filled in, at the bottom of the photo) which will be inserted horizontally between the bottom two large panels but that’s going to want moving those panels laterally some more. And then I want to look at the photo to see where there are clashes I don’t like. It’s all too busy right now to make final decisions.
Quilt Top Laid Out – Sort of
Nevertheless, I’ll keep stitching elements together in small sections that I can keep moving around until I’m satisfied with the arrangement. Need to cut a few more 2.5″ blocks to finish that 4″ row.
I’ll do that tomorrow. It’s over to the US Open Tennis this afternoon.
Some time ago I did a quilt based on 2.5, 4.5, 8.5, and 16.5″ blocks. What I was after in that quilt was to establish a pleasing colour flow using blocks of these varying, but proportional sizes.
Lap Quilt 2,4,8,16
Sometime this past year I purchased pieces of the Moda “Blushing Peonies” fabric. My shop didn’t have all in the collection (and many I wouldn’t have wanted to use, anyway) so I went hunting for complementary fabrics. I ended up with 14.
I wanted to do something similar with the Blushing Peonies showcasing the large print with beautiful flowers and fill in with the complementary fabrics in the smaller sizes.
Here’s where I have so far:
2, 4, 8, 16 Bushing Peonies
Unlike the original quilt, I don’t want the large peony blocks in the corners, but indented. The large, framed panel will finish at 16″. To fill in around it, I developed 4″ rows of 2″ and 4″ blocks to fill in below and on one side of the large block that will be in the lower right corner. I also want a 4″ row between this block and the next one which will be offset closer to the center. That means assembling more blocks that will create that row and a combination of 8″, 4″ and 2″ blocks to fill in above this first block and the offset second one.
Cut Fabrics
This is an improvisation – I should have enough blocks cut to assemble a quilt top. I’ve done enough for today. I’ll work on this quilt top again tomorrow.
I’ve posted this before but it’s worth posting again. The topic came up yesterday with a sewing friend visiting from Toronto. I had to do some looking around to find the video. Once found, I mailed myself the URL so I could find it once again. Click here to watch this guy iron a shirt in three minutes flat!
Ironing A Shirt (in 3 minutes)
Not kidding – he makes the whole process understandable and very easy to do. Pay particular attention to how he does the collar/collar stand. The way he does it eliminates the ends of the collar sticking out.
Seriously, check out the video then try it out. I have lots of shirts I’ve made for myself. I’m about to make another couple using some wonderful Liberty cotton I bought at Britex in San Francisco a couple of years ago. I no longer avoid wearing and washing my shirts because I know how to iron them easily.
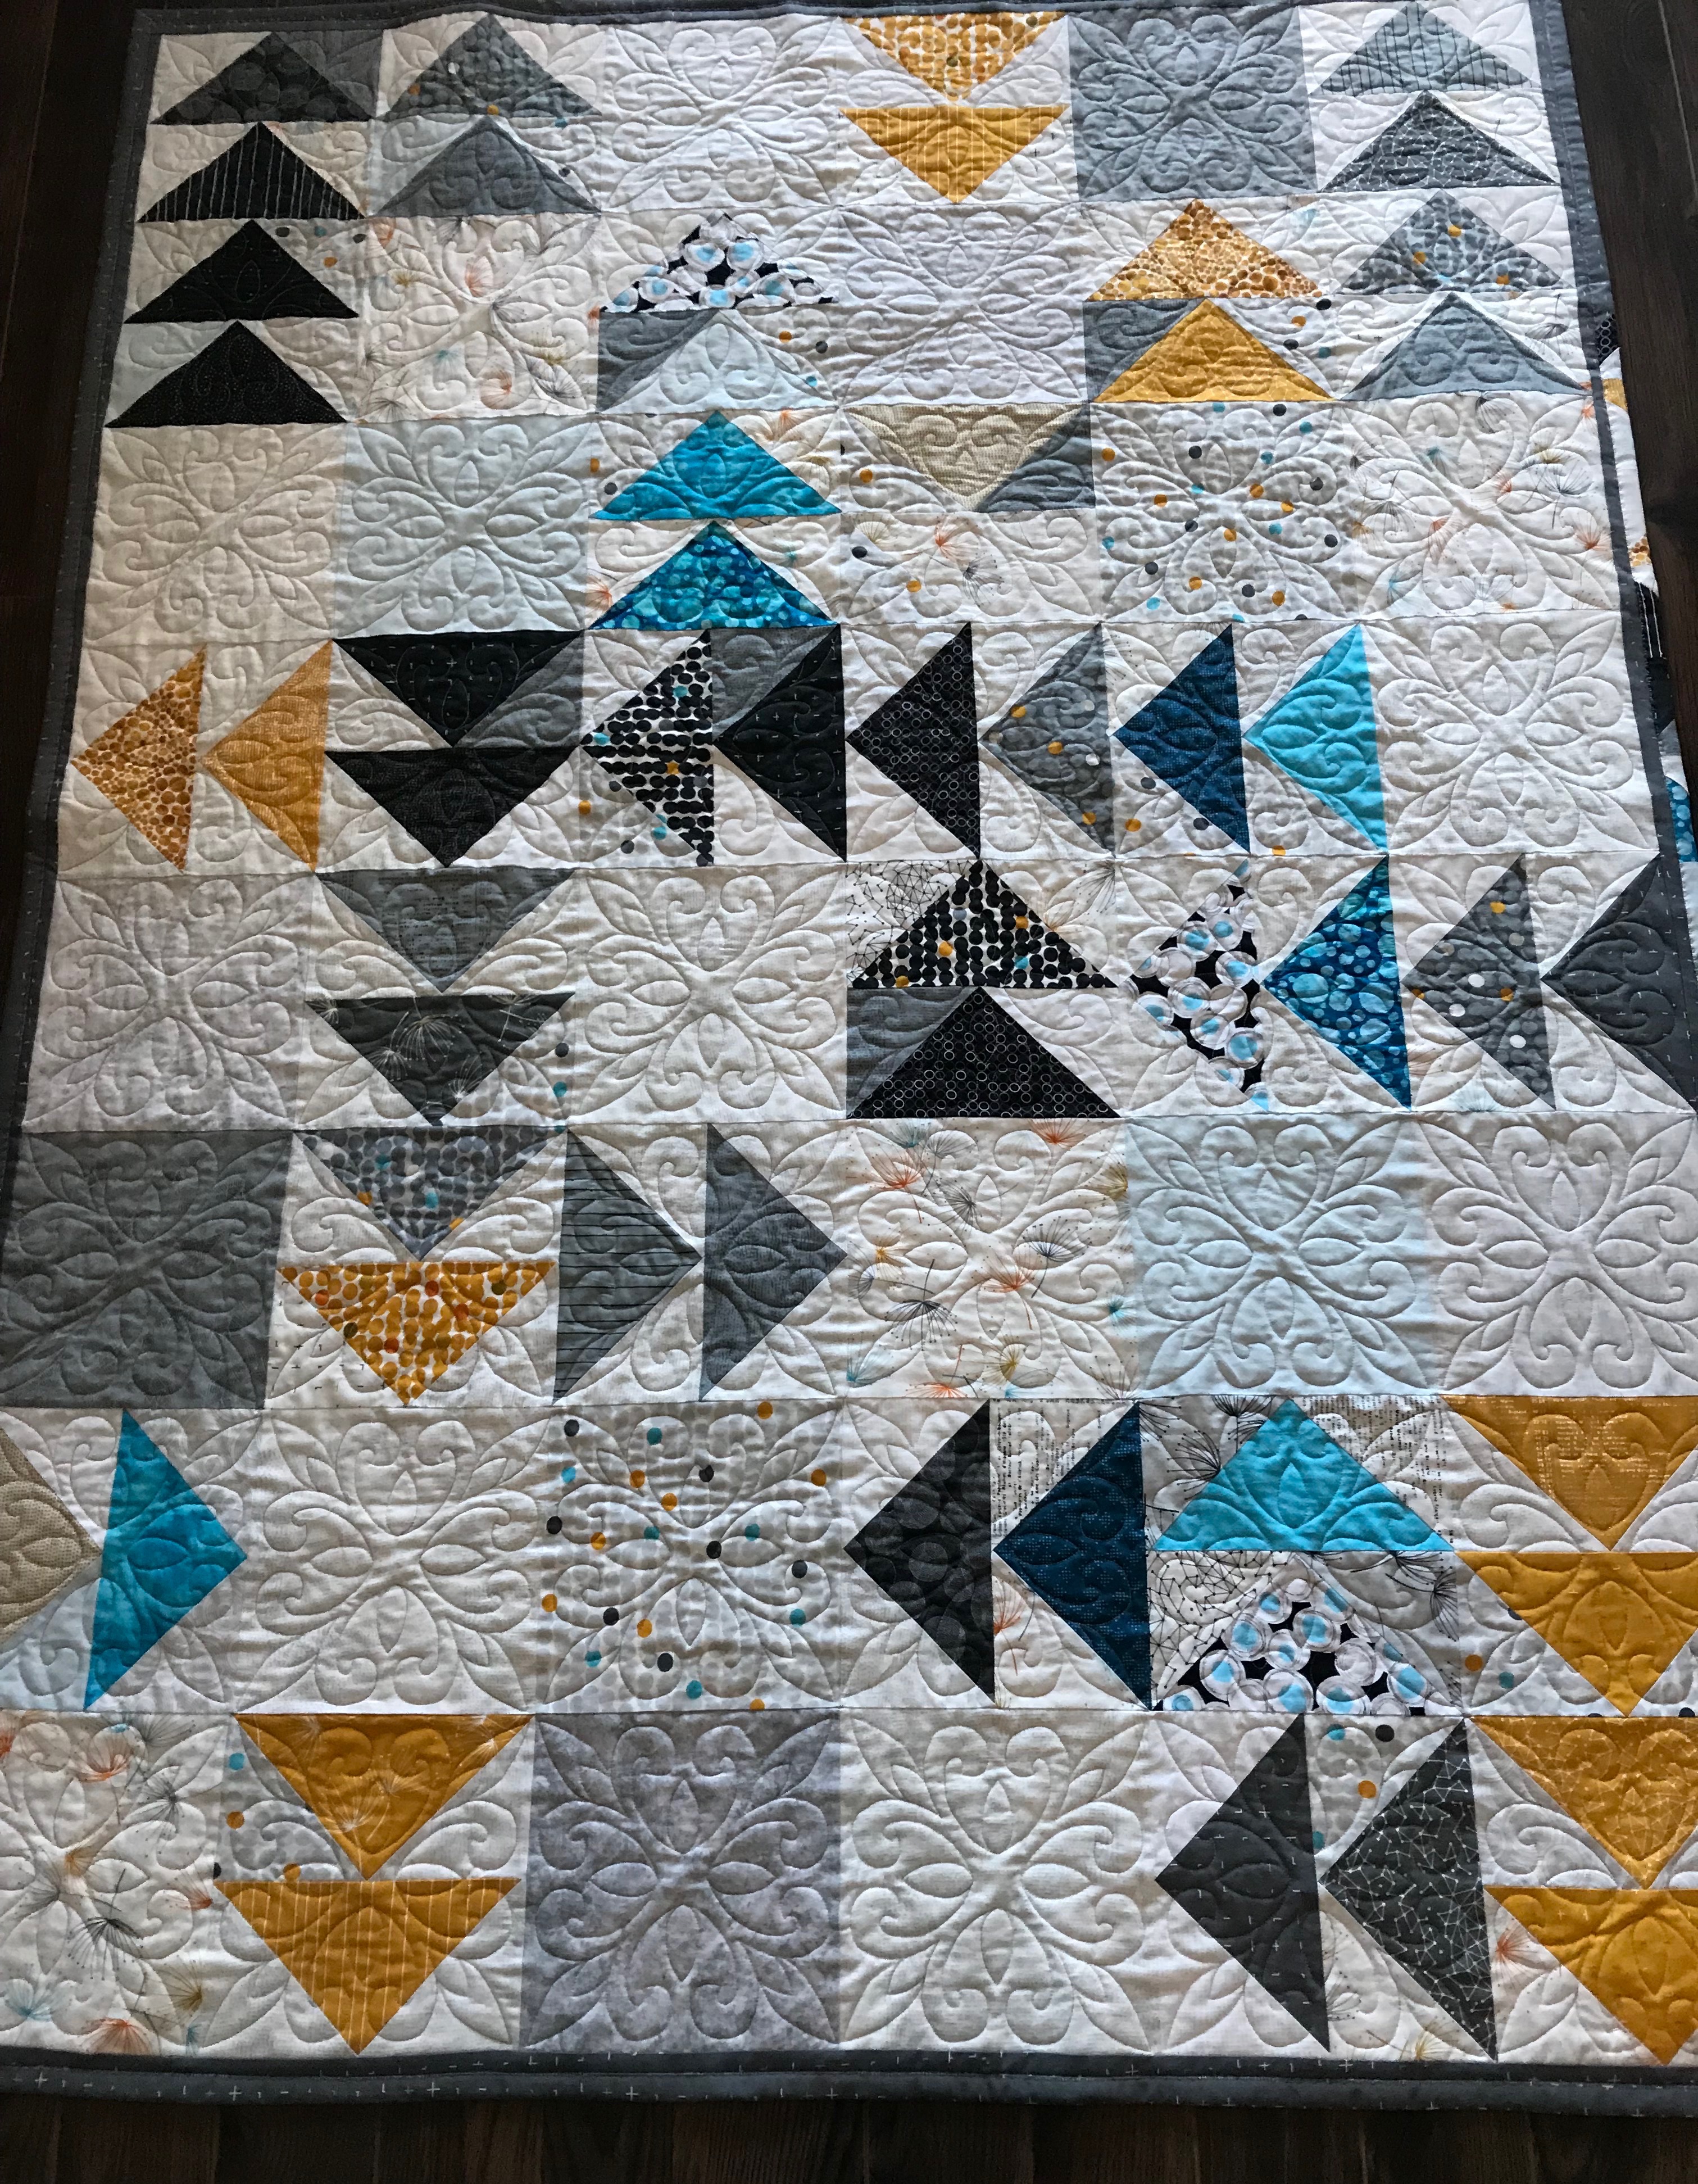
Just finished quilting and stitching the binding on this “Wandering Geese” quilt. I’m happy with how it has turned out. My decision to use a narrow dark border was a good one – the points of the triangles are intact and not hidden beneath the binding.
The back has more piecing than I usually do, but I had so many half-square triangles as a result of the way I constructed the flying geese I thought I should use as many as I could.
Two weeks ago I started knitting this pair of socks – had a solid blue for cuffs, heels, and toes that blended nicely. I didn’t think anything in particular about the colour combination until I was knitting in the group last Friday afternoon and someone commented they looked like Nova Scotia tartan. Since then several people have remarked on these “Nova Scotia Tartan” socks.
Similar colours for sure: the royal blue and yellow with hints of white. The tartan has both medium and dark green along with a fine red stripe. But I guess you could say the socks do have the flavour of the NS tartan.
Nova Scotia Tartan
Anyway, the socks are now finished and in the sock stash. I have lots of blue socks in my drawer so these will be passed on to a deserving recipient for a birthday or holiday gift.
I have an amusing story to share. Last week I happened to visit the new Structube furniture store that opened not far from where I live. I bought some furniture from the Dartmouth Crossing shop when I moved into the apartment and I’ve been happy with it.
I wasn’t looking for anything, just schmoozing, really, when I spotted this lounge chair. I hate the lazy boy chair in my bedroom – my legs aren’t comfortable, the seat is just a wee bit too high, my neck wakes me if I choose to snooze, my head is in the wrong position to see out of the distance portion of my multifocal glasses when looking over my knitting to watch TV….
So I sat in the lounger, and thought “This might work!” But no point in buying without REALLY testing it out. I need a comfortable chair for knitting, reading, watching TV, and snoozing. I have to be comfortable doing all four before it’s worth thinking about buying.
Lounge Chair For My Bedroom
I went back two days ago ready to give this chair a serious workout – I brought my knitting, my book was on my phone, there was a TV on a wall at an appropriate height near the chair, and I had a pillow for under my neck. I settled in for a couple of hours of try-out. The store manager thought it was a good idea when I explained what I was doing, “We’re open until 9” she told me; so no rush to cut this testing session short.
I knit for an hour finishing the heel turn on a sock and beginning the gusset, glancing from time to time at the TV nearby – that worked fine. My arms were comfortable, my head position good. I tried reading – that was comfortable, too, with my pillow in the small of my back. Snoozing I found was best done without any support behind my head and neck; the shape of the lounger was just right.
As I was knitting away, eyes on the TV, didn’t a friend of mine come by with a huge grin on her face. She said she’d come into the store and thought – what a good idea to have a mannequin to display the furniture – when she looked more closely and saw me knitting. We had a good laugh about what I was doing. But no point, I told her, in investing in the lounger without knowing it was better than the lazy boy I owned.
After another twenty minutes I packed up and headed to chat with the store manager about buying the chair. I’m expecting it to arrive in town in about a week. Looking forward to knitting and reading and watching TV and snoozing in comfort, finally!