Normally, when you apply a zipper, the zipper tape is hidden within the garment or bag or whatever. But lately I’ve been using a decorative zipper which has interesting tape I want to showcase. How do you apply a zipper in that situation?
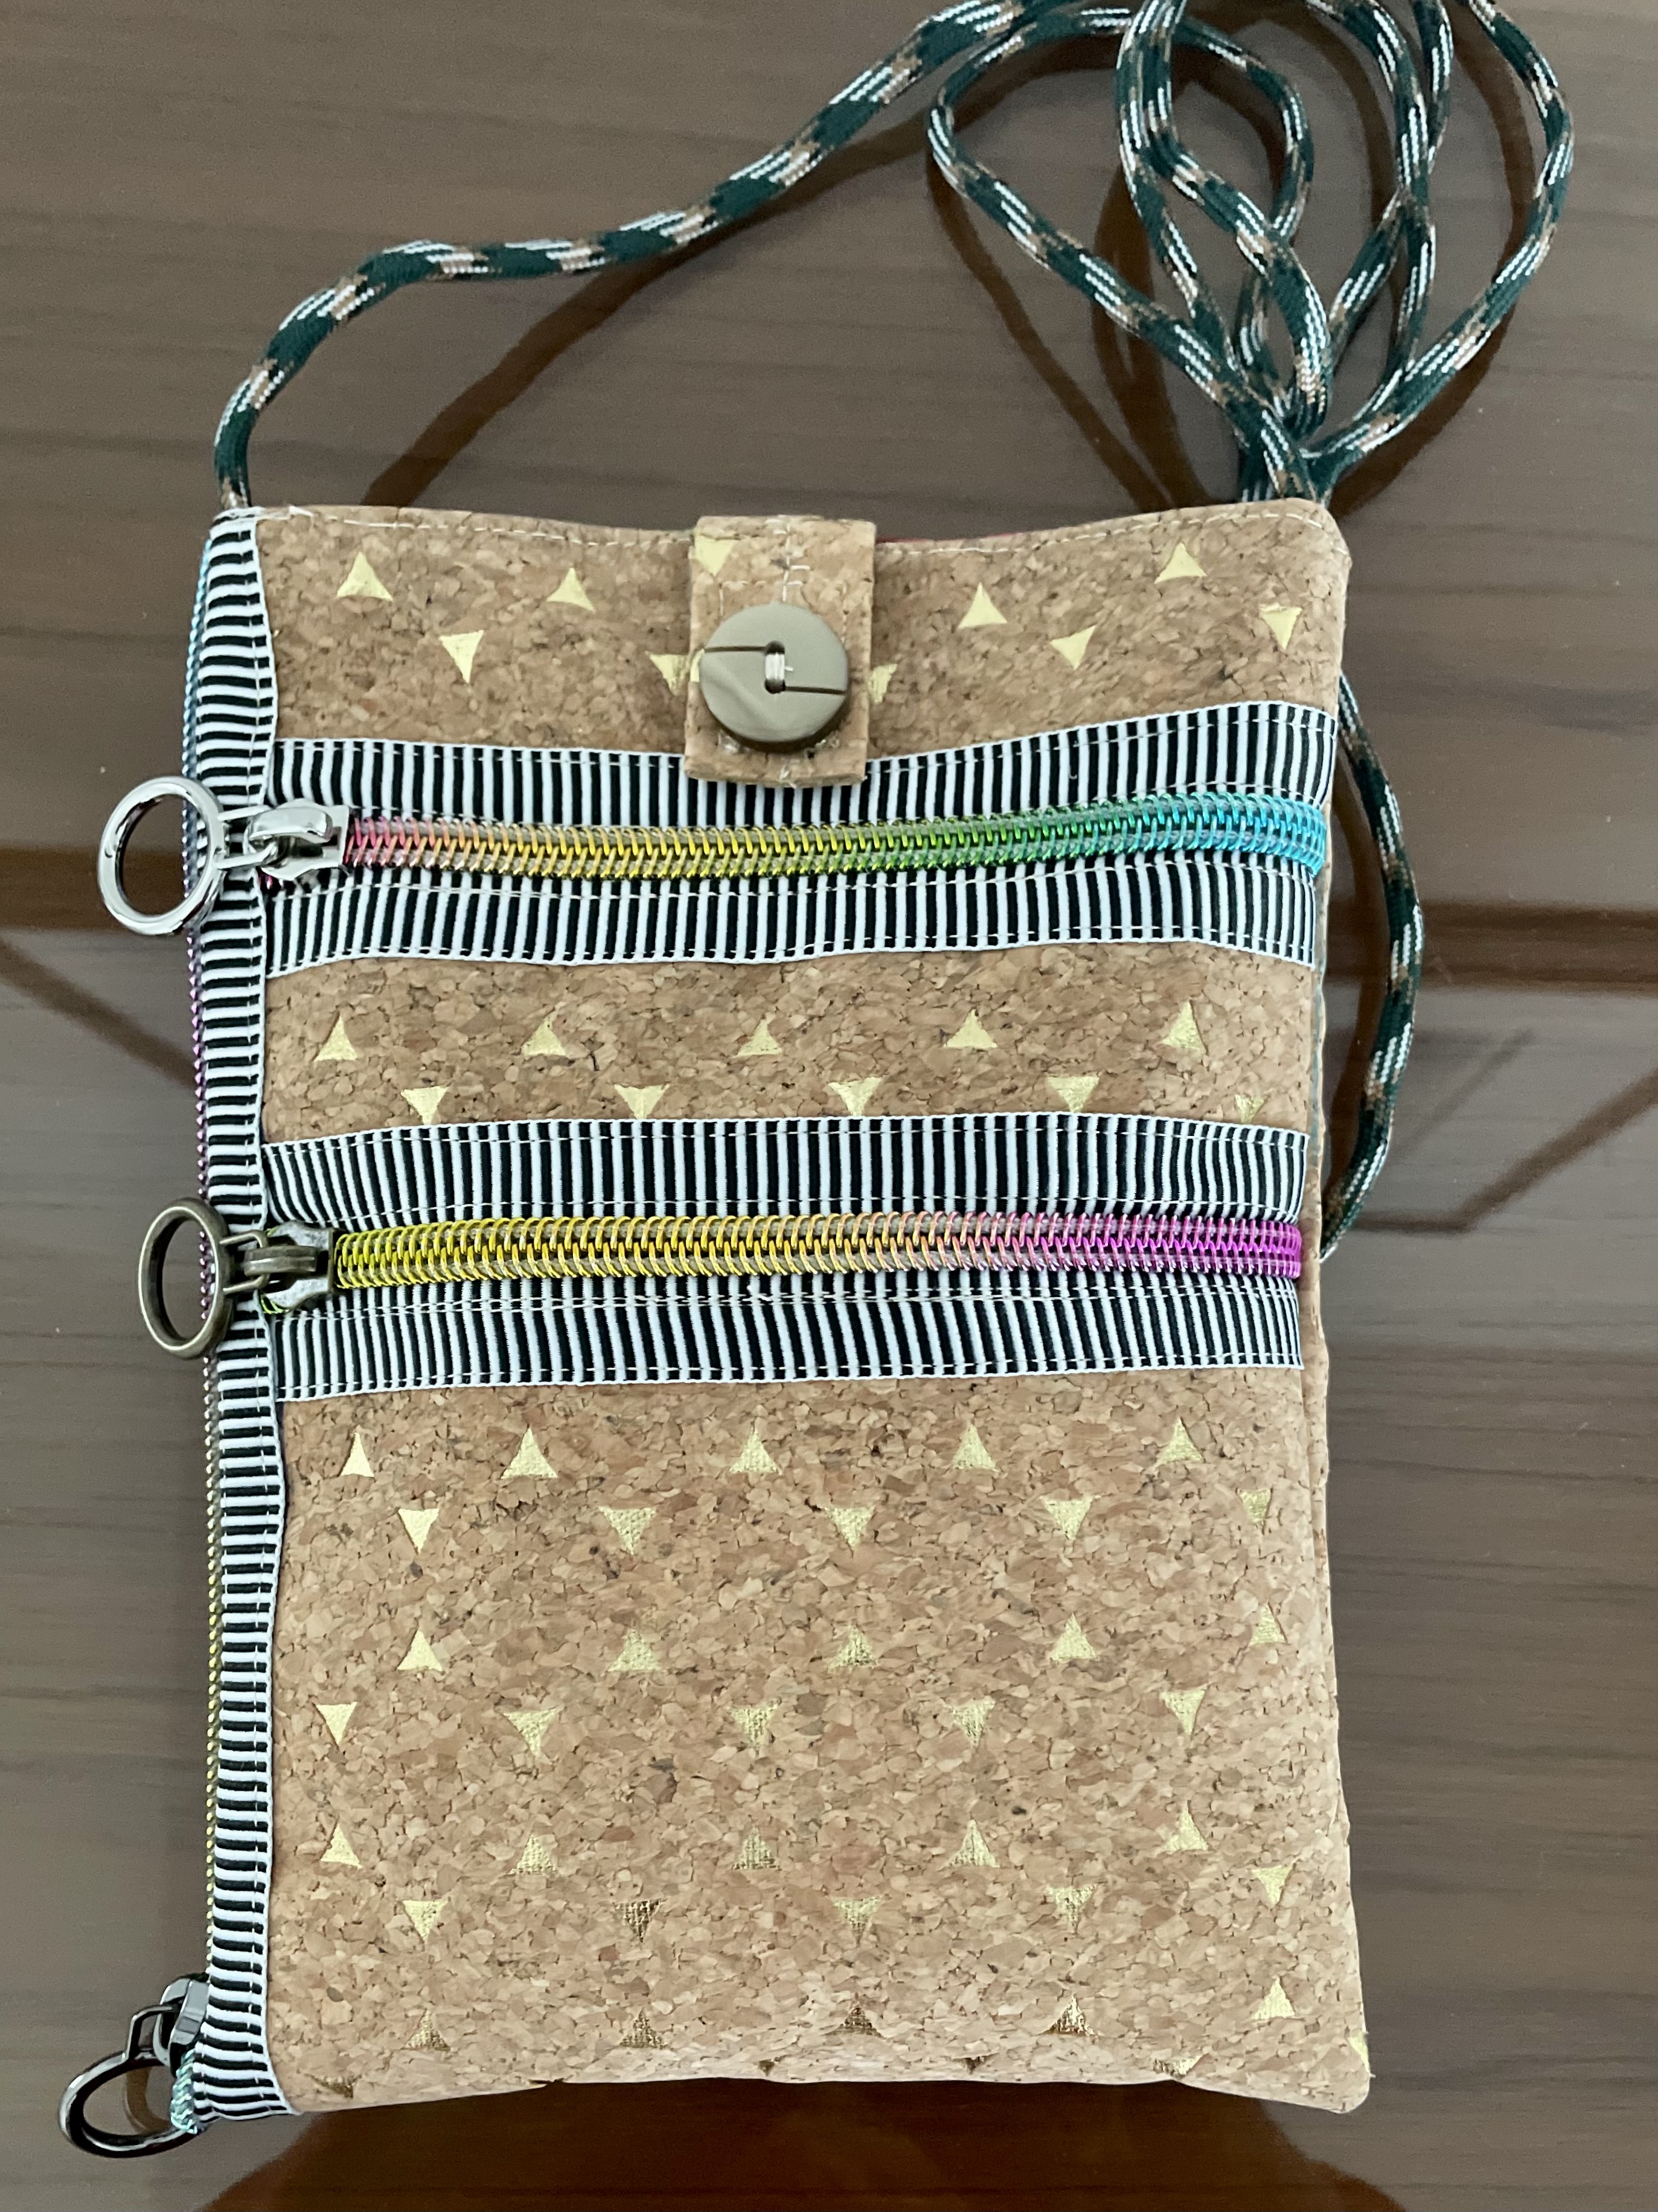
Here’s my cork iPhone case which I finished a couple of days ago using the zipper tape as a focal detail:
iPhone Case using Cork and Decorative Zipper
Now, that I have finally figured out how to apply decorative zipper tape, I’m about to make another bag – I will take photos at each step so I can prepare instructions.
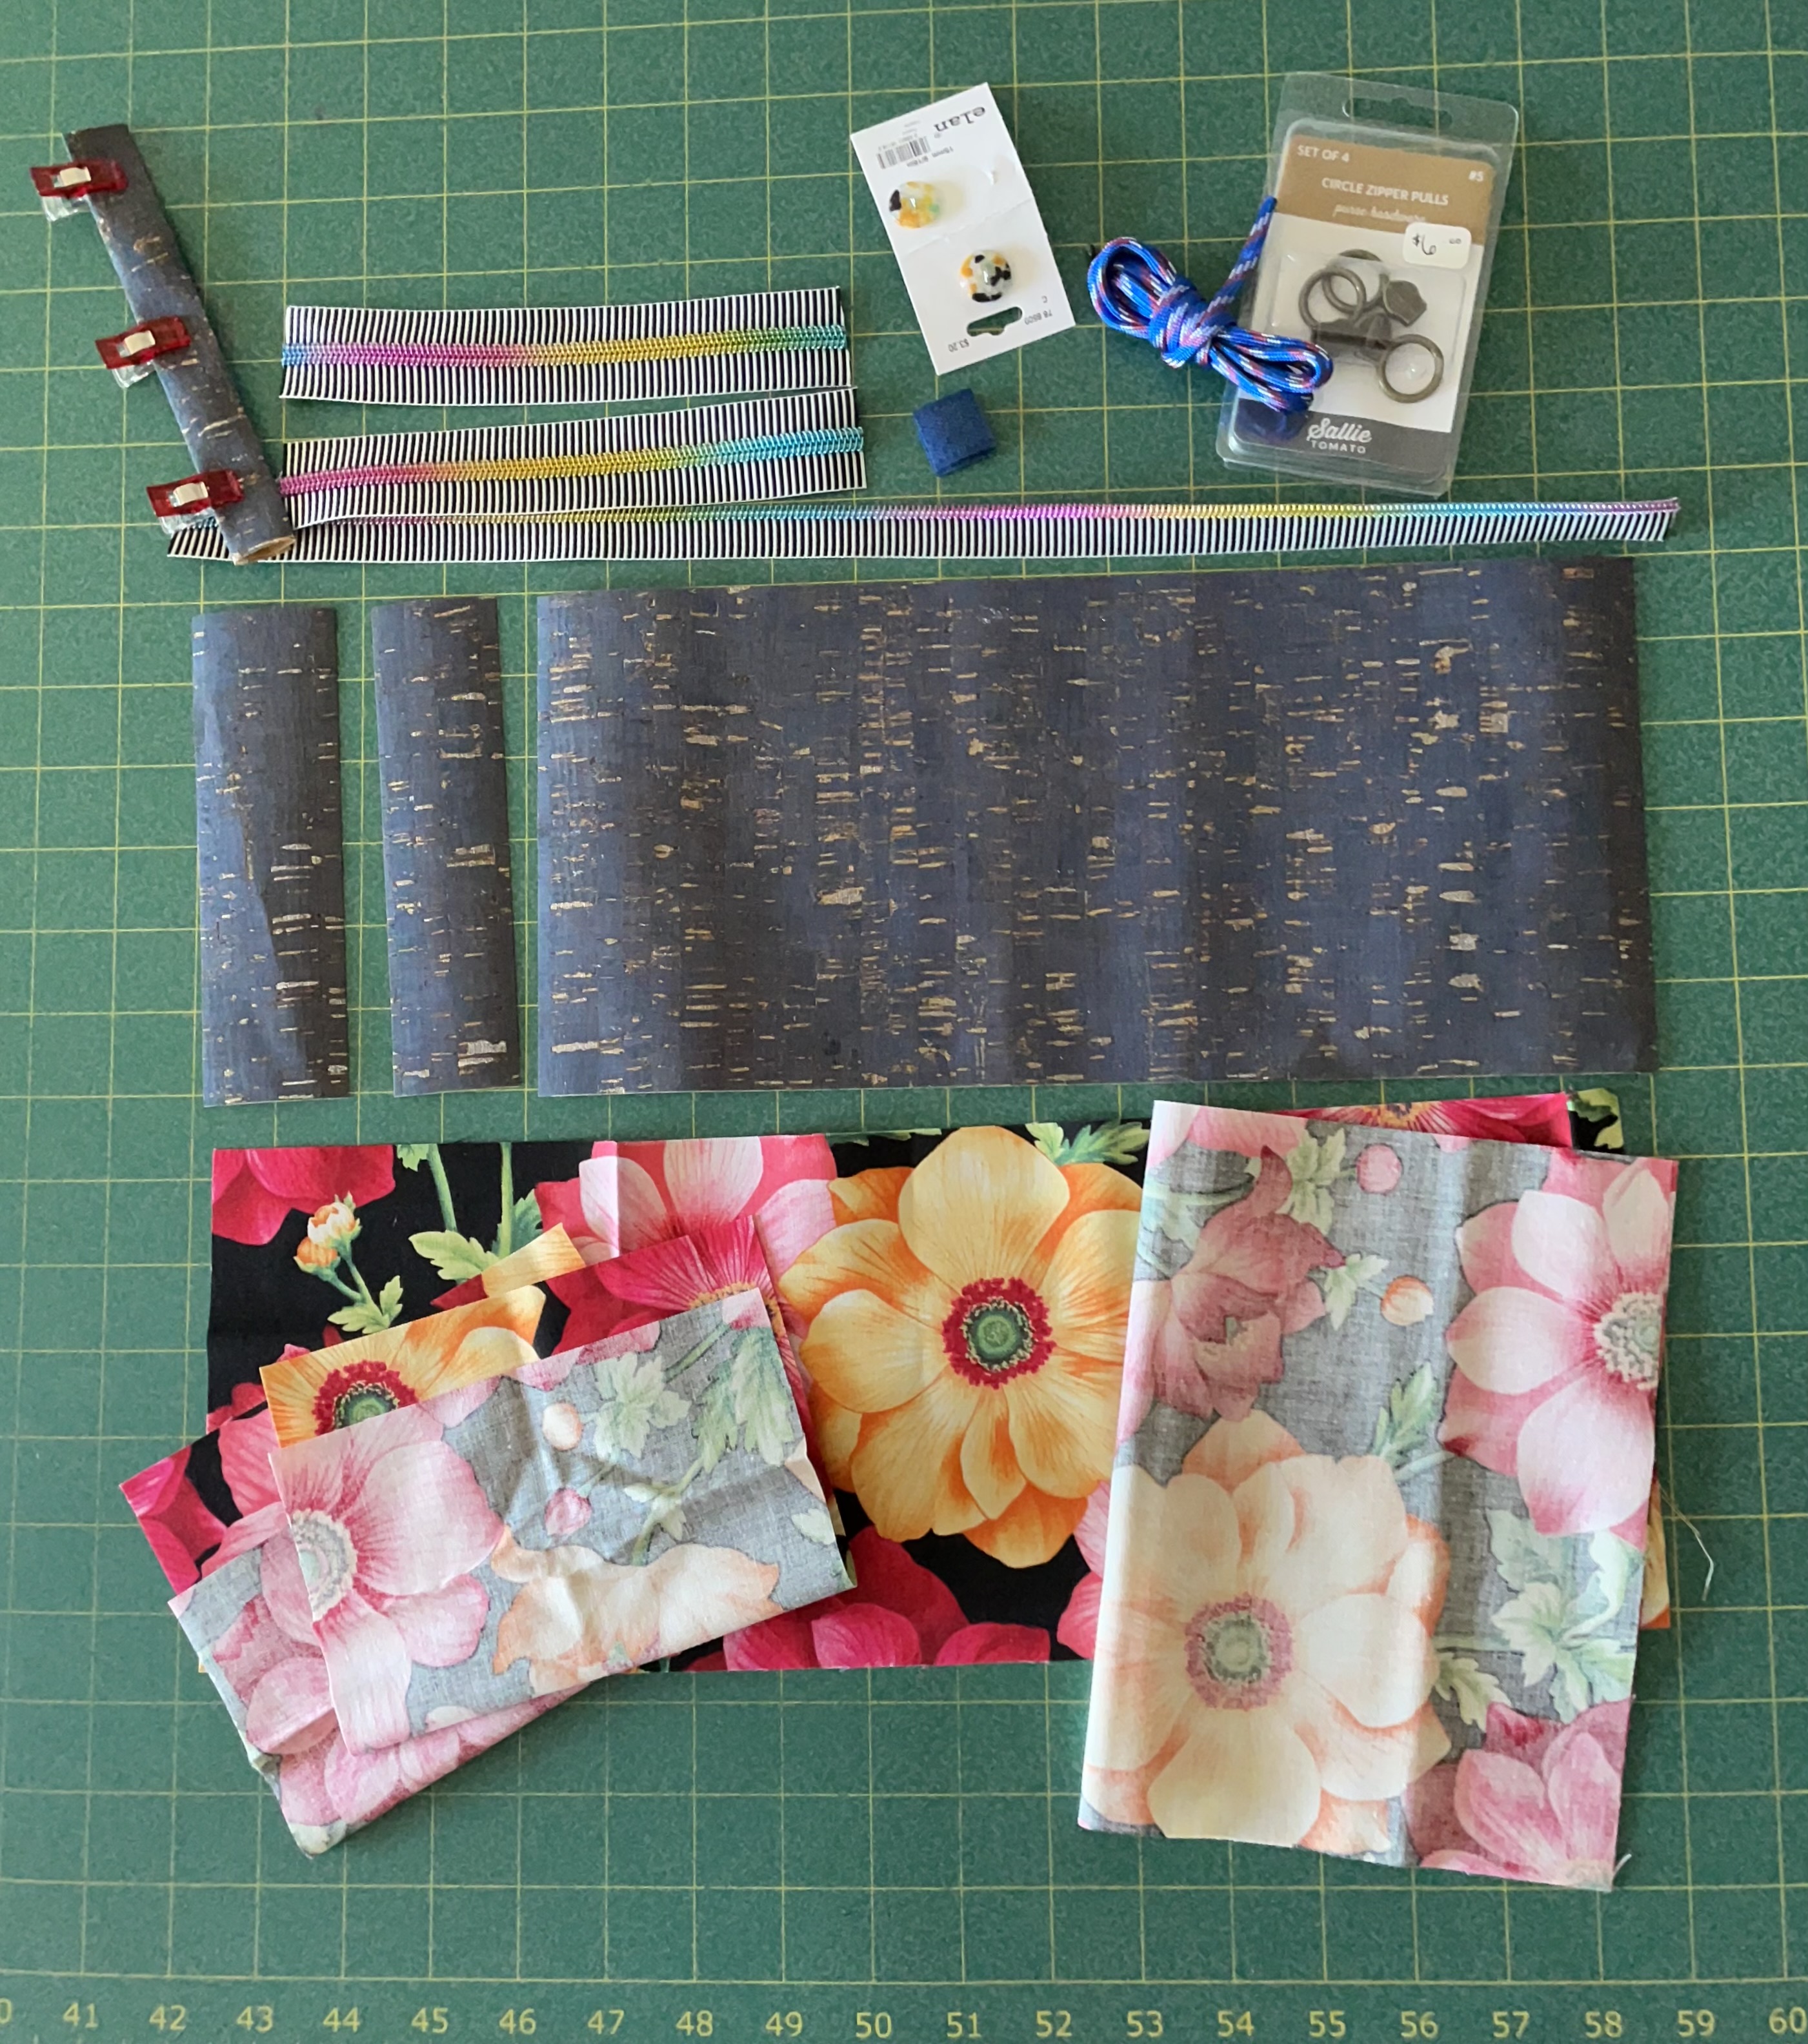
Step one – prepare all the elements:
Supplies for iPhone Case
What do I have?
I’ve cut a 6″ x 16″ wide strip from some denim cork fabric; I cut 1 3/4″ and then 1 1/2″ pieces from one end; I had a leftover 2″ x 6″ piece which I’ve folded in thirds for the tab (upper left with clips).
I had one 17″ length of zipper tape (the other half of the tape I had used on the completed bag above), I cut two more 7″ pieces of zipper tape (longer than the width of the bag so I have some wiggle room to add the slides); I have three slides.
I cut four pieces of lining fabric: one piece of 6″ x 16″, one piece – 8″ x 12 1/2″, two pieces 6″ x 8 1/4″ (to accommodate the size of a credit card)
A piece of velcro An interesting button 48″ of parachute cord
With everything prepared, I’m ready to sew.
I will start by constructing the tab – the cork strip is folded in thirds, I’ll use a decorative stitch to hold it together; next, I’ll add the “hooks” part of the velcro to one end; last, I’ll stitch the button to one end (as a decoration).
Step two – the body. I’ll start by applying zipper tape between the small strips, then along one side….
Now – on to actually making the case. I hope to have the photos by later this afternoon. I’ll write instructions tomorrow and add them here when they’re done.
May 3 2025
I made the second bag two days ago, taking pictures as I worked, only to discover when I went to document the process that I’d created the pockets “top-down” (which works but is too difficult to describe and follow because you’ve got to keep your pocket linings out of the way as you work your way down!).
I should have worked from the “bottom-up” – adding zipper and pocket lining to the “bottom” pocket first, then the upper pocket second. So now I have to make another bag, take pictures as I work, so I can describe what I do.
I’ll get to that when I can. (Here’s where I’d put a “sad” emoji).
Here’s the finished bag:
You can’t tell how I constructed it once it’s done. However, it would have been much easier to describe the process had I installed the bottom pocket first.
I wrote this piece on Oct 19/24 – after reading Lozada’s piece. I thought I’d share it today because the excerpt from Obasan is even more relevant than it was in October!
This is my own my native land.
I wonder whether others are feeling the same ambiguity I am about what being Canadian involves, particularly as election day draws closer and we are facing perhaps a life-shaping decision between the divisive, trumpish, anger of PP and the well informed, experienced, financial expert to lead our government. We don’t vote for a Prime Minister, which makes the decision more complicated but ultimately that’s the decision influencing how I will mark my ballot. As things stand, I can’t vote Conservative no matter how capable my local candidate may be.
An immigrant from Peru, Lozada details the conundrums he faces daily regarding his immigrant identity. I was deeply moved by his writing. Moved enough to write a personal note to him at his email address at the NYT. (I don’t expect him to answer.)
His opinion piece evoked a memory of what Joy Kogawa had to say in Obasan, her novel written in 1981. I felt compelled to find those words again and share them with Lozada.
Here is the letter I wrote him:
Carlos,
As I was reading your piece, I can’t tell you how it resonated for me. What’s interesting is I was born here in Canada, my mother was born in Canada, my father was an immigrant as were all my grandparents; I personally feel more “immigrant” these days than at any other time in my life (I’m heading toward 82!). In today’s actively antisemitic world I feel my token “jewishness” separating me from my “christian” friends and neighbours. The conundrums you describe are present in my life in such subtle ways but they are there.
I feel my “immigrantness” weekly when I visit two young Afghan families recently come to Canada. I spend a couple of hours a week with each family chatting in English, reading children’s books in English, to help them learn a language they are working so hard to learn. I visit weekly for these young women to help them overcome the isolation a lack of common language forces upon them. These new permanent residents to Canada have become like grandchildren/great-grandchildren in the almost two years I’ve known them.
I can’t imagine their decision to leave Afghanistan and their families behind. I know the facts of their escapes through Iran, arriving in Turkey as illegals, the unimaginable luck of making contact with a Canadian citizen sponsorship group who helped bring them to Canada. I’m not an official part of that group (my youngest sister is), but through my investment of time these past two years, I have come to feel a small bit of what my grandparents must have experienced, who knew they would never see those they left behind, many of whom a few decades later would have ended in Nazi crematoria. Both sets of grandparents left Lithuania and Poland/Ukraine respectively and arrived in Canada in the early 1900s. I have no names of those left behind but I am absolutely certain many relatives did not survive WWII.
Canada, like the USA, is a nation of immigrants, yet so many people seem disconnected from that reality. In Canada, we’re a bit more aware of our crimes against the First Nations people – our halting attempts at reconciliation keep reminding us that we displaced them, disenfranchised them, demeaned them and that everybody else has immigrant origins from all over the world.
We are experiencing in Canada a growing sentiment that we don’t want more immigrants, we need to keep “these people” out – they’re taking “our” jobs (in spite of the fact that Canadians don’t want to do the jobs they are willing to do), making housing impossible to find (that’s really the fault of those of us who made development decisions fifty years ago), overrunning our healthcare system (who actually made the decisions to cut back spending on medicine, education, dentistry, social work, … forty years ago?). We need these new people for their willingness to work hard, for the cultural diversity they bring to us, for their talents and skills which enrich our community.
Shortly after it was published (1981) I read Joy Kogawa’s novel “Obasan” – there’s a passage in it that has stayed with me these 40+ years – written words of the Aunt (Obasan) who had been born in Canada but sent with her family to a Japanese internment camp during WWII:
—————————————
“The entire manuscript was sixty pages long, I skimmed over the pages till I came across a statement underlined and circled in red: I am Canadian. The circle was drawn so hard the paper was torn. Three lines of a poem were at the top of the page.
Breathes there a man with soul so dead Who never to himself hath said: This is my own, my native land!
The tanned brown edges of the page crumbled like autumn leaves as I straightened out the manuscript.
The exact moment when I first felt the stirrings of identification with this country occurred when I was twelve years old, memorizing a Canto of “The Lay of the Last Minstrel.”
So many times after that I repeated the lines: sadly desperately, and bitterly. But at first I was proud, knowing that I belonged.
This is my own, my native land.
Then as I grew older and joined the Nisei group taking a leading part in the struggle for liberty, I waved those lines around like a banner in the wind:
This is my own, my native land.
When war struck this country, when neither pride nor belligerence nor grief had availed us anything, when we were uprooted, and scattered to the four winds, I clung desperately to those immortal lines:
This is my own, my native land.
Later still, after our former homes had been sold over our vigorous protests, after having been re-registered, fingerprinted, card-indexed, roped and restricted, I cry out the question:
Is this my own, my native land?
The answer cannot be changed. Yes. It is. For better or worse, I am Canadian.”
—————————————
Securely Canadian having been born here myself, I still feel Obasan’s struggle as somehow my own.
Your NYT piece has evoked all those same feelings about country and belonging that I found those many years ago in Kogawa’s writing,
Thanks for such a passionate piece.
Judith Newman
I finally made it back to my sewing machine. This week I finished a housecoat (no photo since I’m wearing it!) Today I made an iPhone case for a friend – she asked me to make her a new one since her new phone is too large for the old one. I just finished it:
I’m conducting a workshop on Saturday with a group of women interested in learning how to do heirloom sewing. In preparation for the day I made a new panel myself (in part because I need a couple of new nightgowns to replace two that are just about to rip apart from long wear).
I started the panel with a lace insert, added pintucks to each side, followed by a row of decorative stitching, then tucks, some hemstitching, more decorative stitching, finishing with a final row of hemstitching. I added an entredeux to the bottom where the skirt of the nightgown will be attached.
This panel is ready to be made into a nightgown.
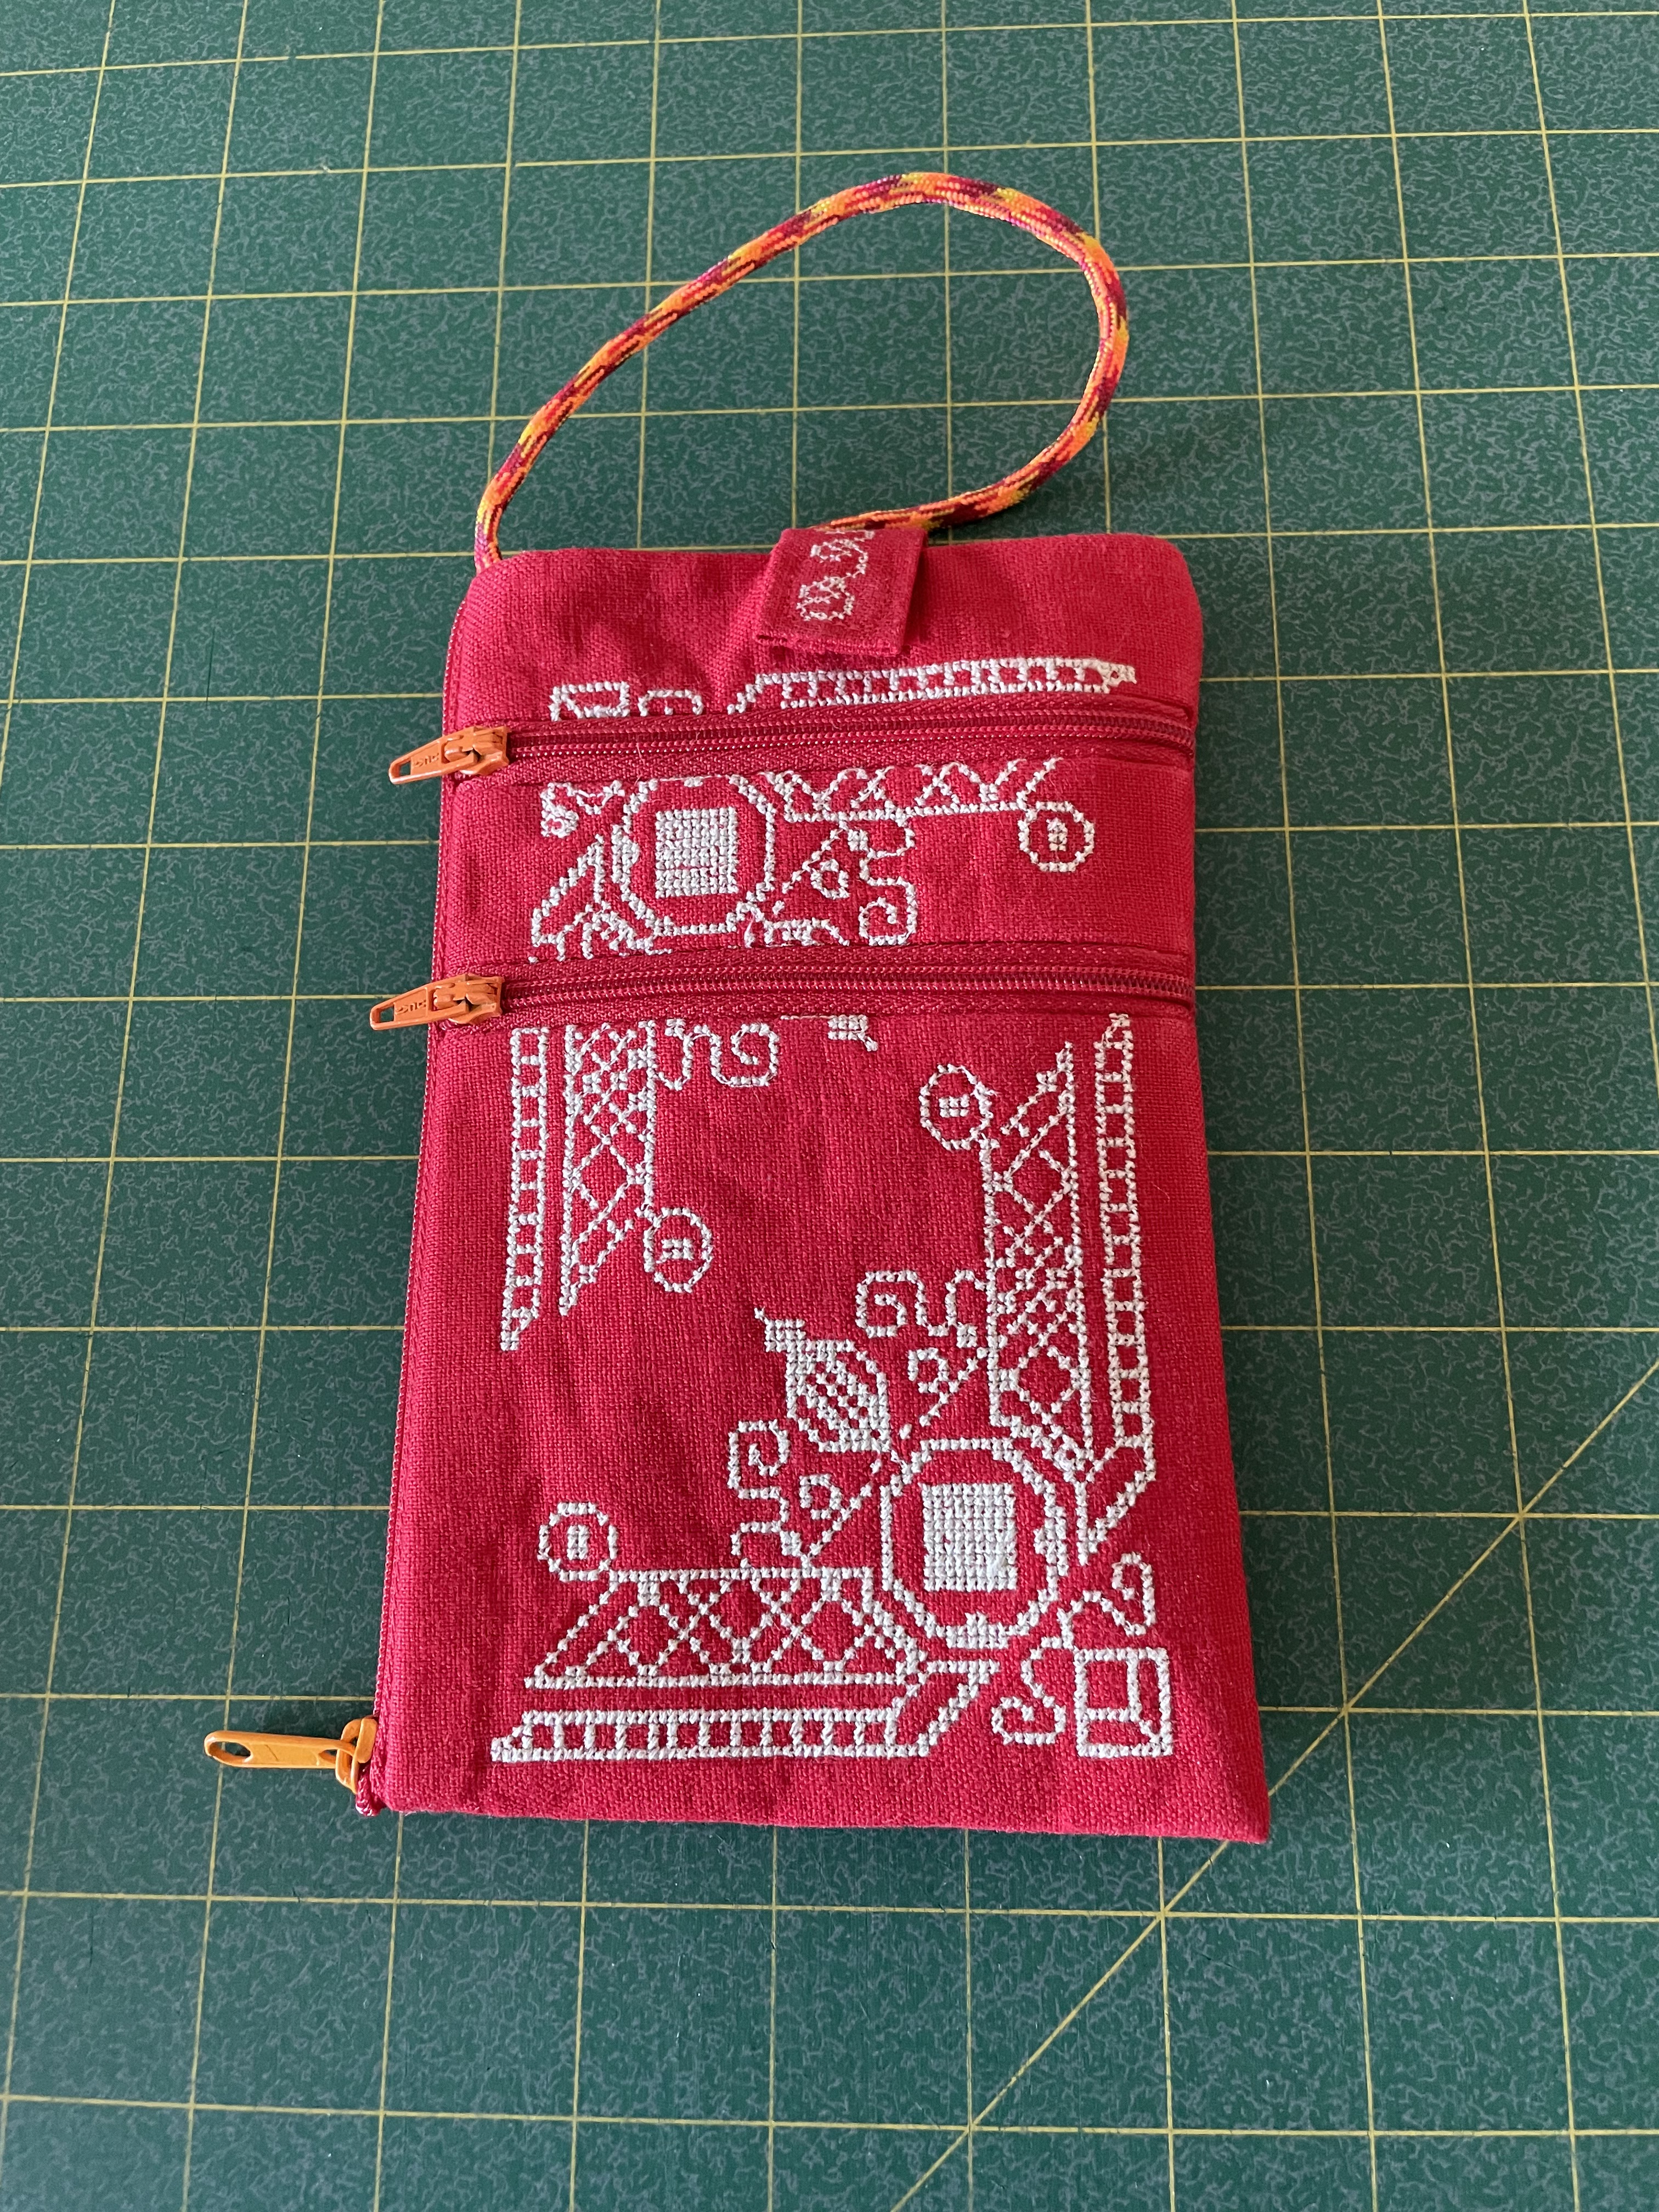
A couple of weeks ago, in preparation for a workshop on constructing a small bag with lots of zippers, I made this embroidered iPhone Case. I used a scrap of linen I had on hand, did a cross stitch embroidery in a contrasting thread, then made the bag. I chose zipper tape that blended with the fabric colour, but added contrasting zipper pulls. Because I have made so many, I can whip up a zippered bag in under a half hour!
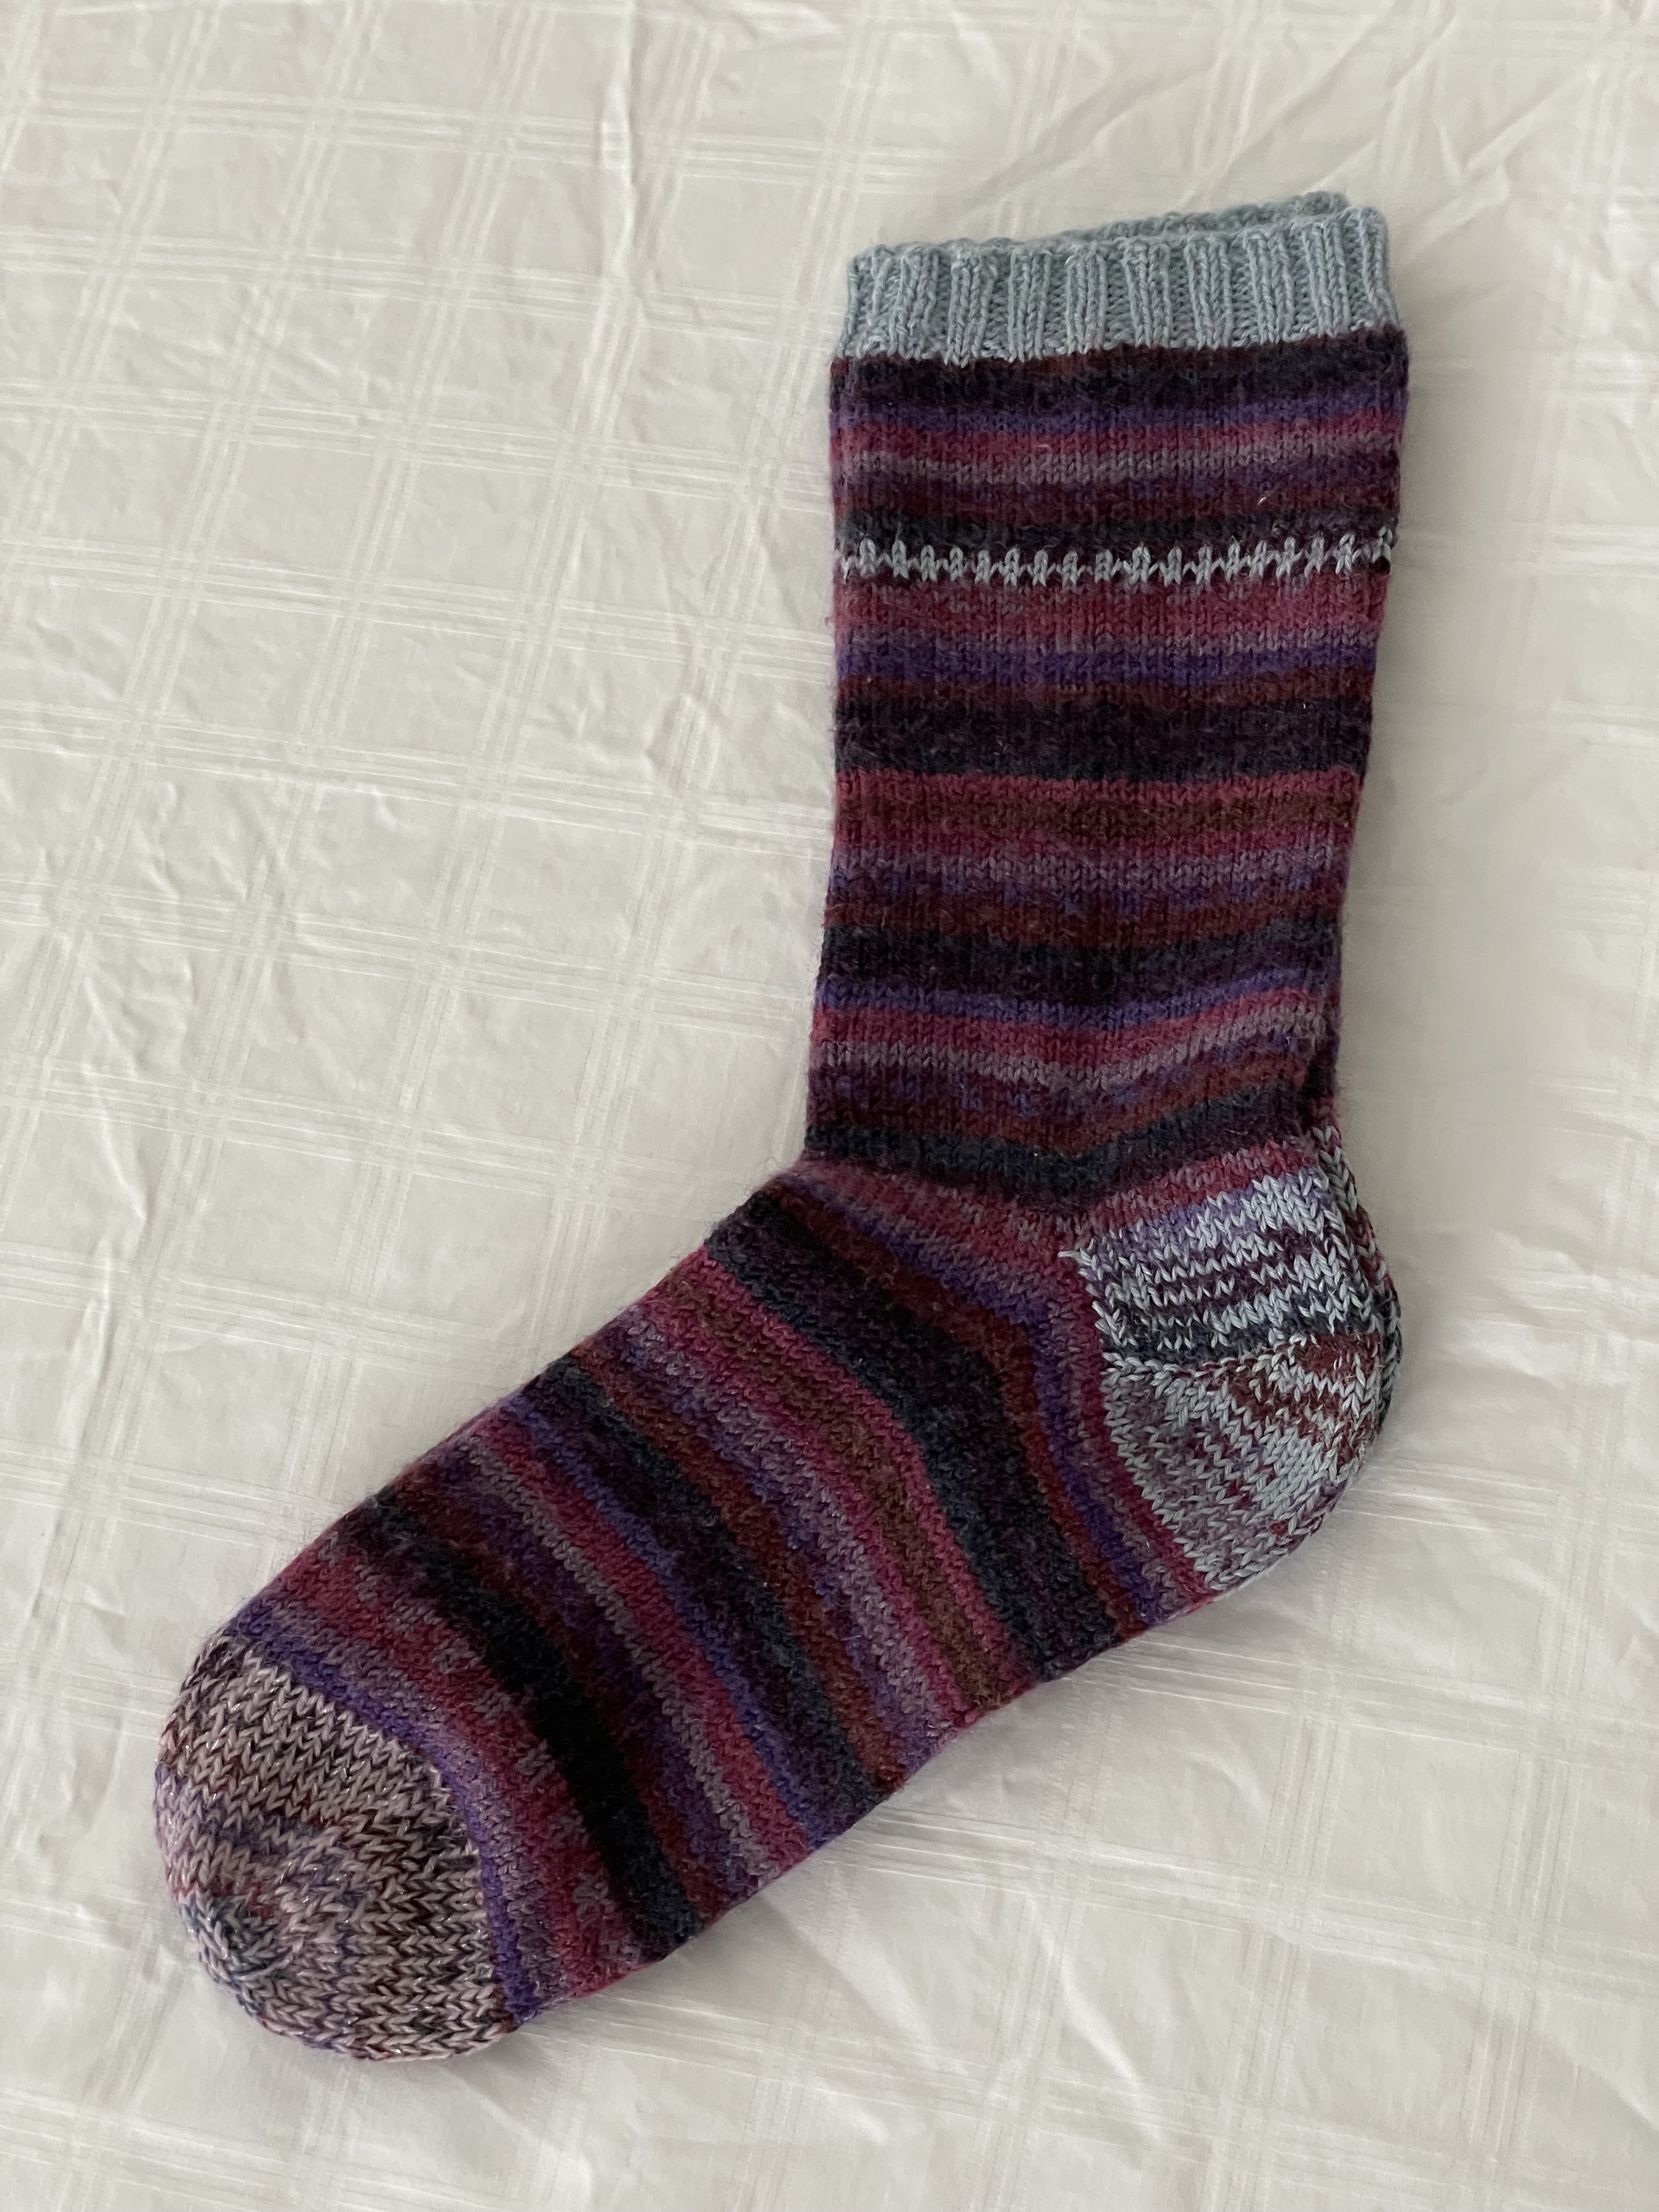
Also, I always have a pair of socks on the go. This pair took at least a week longer than usual because other things kept getting in the way of my knitting time. They are now done.
And last, I had two pair of socks with holes in the toes – first time in 25 years – since I started knitting socks!
New Toes!
It takes me an evening to knit a new toe. These socks are repaired – like new – and back in my sock drawer. I’m working on the second pair – they needed more radical attention – both toes and heels were seriously weakened – I decided to salvage the legs and knit new feet. The first of that pair is getting close to finished.
So Saturday I will be helping the gals with their heirloom sewing. On Sunday I hope to cut out a tailored shirt from a very wild linen print I’ve had in the stash – my intention is to wear it as a light summer jacket.
I’m getting nowhere on the quilt project – I know I’m not going to be happy with the finished outcome and that what I’ll end up doing is making a quilt, then cutting it up to construct a jacket of some sort. So I keep walking away from the strips of fabric sitting at one of my machines.
My avoidance project today, after having put strings of lights on my driftwood sculpture and along my balcony railing, was to make a new iPhone case!
The Old iPhone CaseThe New iPhone Case
As you an see, my old iPhone case which I made over a year ago has become very shabby. The lambskin (which I bought locally) was very soft and didn’t wear well. I’ve been meaning to make a new iPhone case but haven’t made time to do it. It’s not a big project, I can make one in under two hours. It’s just getting to it. Today was the day.
I used some leather I had bought in New York City in the spring of 2012 at the Leather Skins warehouse. (Check out the lambskins! Yummy! Irresistable! Not outrageously expensive!)
Leather Skins Warehouse
The place was small, on the 11th floor, Suite 1101, 261 W 35th St. The walls were filled with skins from ceiling to floor, sorted by kind, not so much by colour! I was taken with the lamb skins – I bought one in a purple-ish blue. There were actually six matching skins enough to make a jacket and pants – I only took a single skin. I also bought a printed leather skin (rather inexpensive – because a piece had been cut from one end – didn’t matter to me because I was intending to use it used for trim and there was a lot of leather in what remained of the skin). I’ve used small bits and pieces of that printed leather from time to time but most of the skin was still intact. Today I decided to cut a 5 1/4″ strip to make the iPhone case!
Didn’t take long to put the iPhone case together. I grabbed some zipper tape and slides. I dug through my zippered bag fabrics and found one to use for the linings, cut the three pieces I needed for the small pockets, the side pocket and the phone pocket. I looked through my parachute cord stash and picked out one. Finally I cut a small amount of velcro, and chose a button to decorate the closure tab.
I made this bag just a bit wider than the old one – to make room for the credit cards and the cash and the few items I carry in the side pocket. In under two hours I was finished. It’ll be interesting to see how long this one will last. I’m expecting the painted surface will rub off, but the skin is a bit sturdier than the blue leather was so the case may hold up somewhat longer.
In case you’re interested, you can find my instructions for this version of the iPhone case here.
I’m scheduled to teach a class at Sew With Vision in a couple of weeks on constructing a smartphone carry case. I’ve written about the simple version I started with that had a single zippered side pocket. This version has two zippered front pockets as well to hold credit cards and other cards like health card, driver’s license, car insurance – the stuff you need to have on hand (not just photos on your phone). With these two additional pockets I no longer need carry a purse.
Leather CaseLinen Case with Bi-colour Zippers
I made this case 3/8″ wider than the previous version to make it easier to slide cards into the zippered pockets. Both of these cases are “right-handed” – that is the zippers are positioned to be easily opened using your right hand. To make these cases “left-handed” reverse the closed position of the front zippers and place the side zipper on the opposite side.
I fully intended documenting the process while making the leather case but the process took over and I didn’t have the photos I needed to describe how to make the case. I made a second from linen (using fusible batting to stabilize the linen). I thought about adding embroidery but because the case is for demonstration purposes I decided it wasn’t worth taking the time. The only “decorative” feature are the bi-colour front zippers (the side zipper is a single colour because I used zipper tape and a pull).
The basic construction is still the same as the earlier version with the added work needed for creating the zippered front pockets. Here’s a link to the instructions for
Give it a try. Let me know how it goes. My measurements are for an iPhone 12 Pro (3″ x 6″). Measure your phone and modify the specifications to work with your phone.
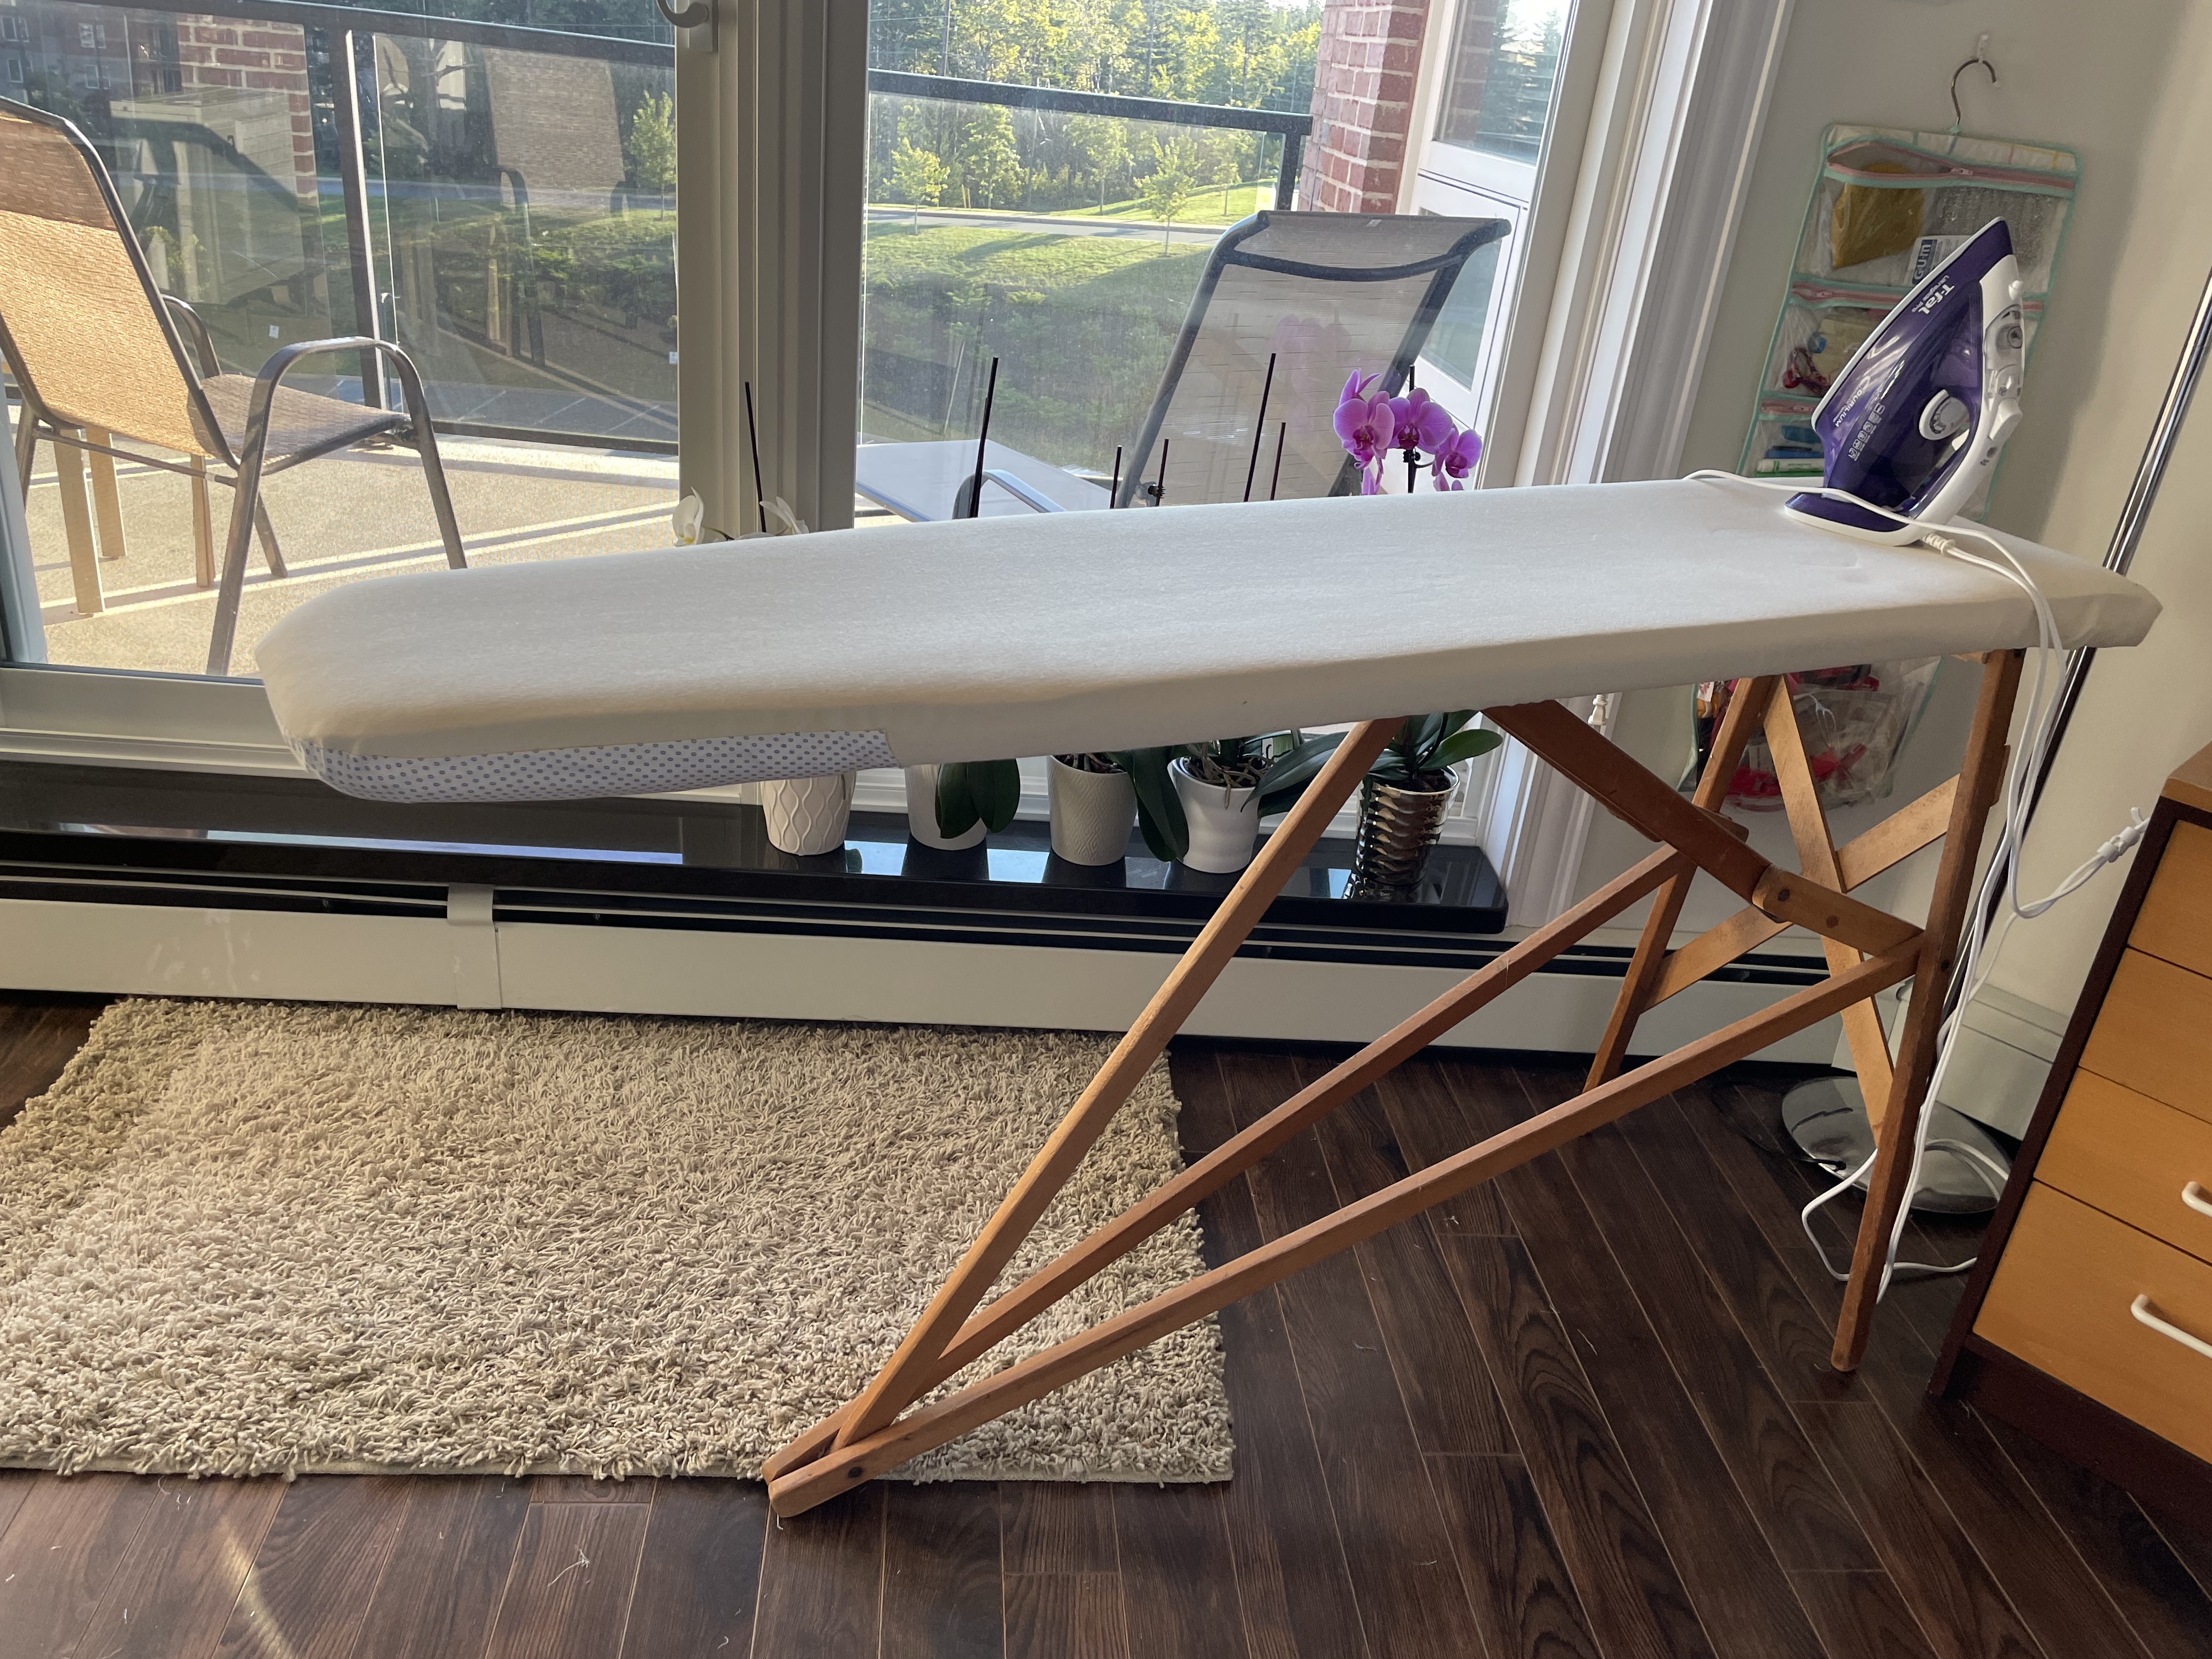
While I’m waiting for the white/black fabric I ordered from Newfoundland to arrive so I can finish the Delft #2 quilt top (should arrive sometime this week), I’ve caught up on a couple of other things: I made a new iPhone carry case and I recovered my ironing board.
I’ll start with the ironing board.
I don’t recall how I stumbled across an ad for a wool ironing board pressing mat but it was advertised for half-price. I’d never have paid full price, I’d have used batting leftovers under a new cover but the price was reasonable so I ordered one. It arrived promptly, I trimmed the 18″ x 54″ wool felt piece to fit my board (had to use some trimmings to lengthen the pad, I fused the pieces together using fusible tape for joining batting pieces), then recovered the board with an unbleached twill. A nice clean ironing surface with that terrific wool pressing mat underneath it. It works very well – glad I bought it.
It took about an hour to recover the board – I had the piece of unbleached twill tucked away from the last recovering – I serged the edges of the twill, and used my heavy-duty staple gun to attach it to the bottom of the plank (I left two previous coverings beneath the wool pressing mat – that extra padding can’t hurt).
My Ancient Ironing Board
My ironing board has history. I bought it somewhere around 1964 from the Salvation Army Store in downtown Toronto for $1.50. Even then it was a relic – I’m guessing at least 50-70 years old but still solid and serviceable. The board itself was a shaped plank covered with several layers of flannel underneath a cotton covering nailed in place. At the time, I left that original covering in place and recovered the board with fresh fabric. I have recovered it many times since – at some point I removed all previous coverings and started new. The time before this recovering was when I moved into the apartment in 2016 – five years ago. The accumulation of Best Press (a pressing starch) had scorched the twill and I felt it was time to recover the board.
I’ve tried metal ironing boards but they don’t compare with my antique. This board is a comfortable height, slightly wider, and close to a foot longer than a standard metal ironing board. Now that my board has a fresh twill cover with the wool pressing mat beneath I’m in business for at least another five years.
The ironing board itself is an heirloom – it should be passed down in the family; for sure, I should itemize the wool pressing mat in my will – it’ll last generations. However, I don’t imagine anybody will realize the value of this treasure and it will be taken to the dump when I’m finished with it. Sad.
I wanted the case a small amount wider than the one I was using. I’ve stopped carrying a purse of any kind – I’ve consolidated what I carry with me so that it all fits into this small zippered pouch. In its original iteration the case had a single side pocket. I’ve added two more zippered pockets to the last couple I’ve made.
The previous version was a good size for my iPhone with cough candy and gum in the side pocket but when I decided to carry my essential ID – drivers’ license, car permit and insurance certificate, health card, a credit card, as well as a small amount of cash, I needed to add a couple of pockets. However, as I stuffed in those new additions the whole thing was just a bit too small to easily get the ID and other cards in and out. It was time to make a new case.
I had enough leftover kid leather from a skin I bought in New York at a leather warehouse in 2012 to cut a 5 1/4″ x 15″ rectangle. I cut two narrow strips from one end so I could insert zippers for two shallow pockets. It took less than an hour to assemble the pockets, and complete the pouch, but it turned out just a bit too wide, so I opened the lining bottom, and trimmed about 3/8″ from the seam side. Should have been a shade less than 1/4″ – the credit cards and other ID fit in the pockets better, but there’s no comfortable spot for my chapstick! The phone catches on it when I slip it in. Looks like I have two choices – make another just that slightly wider, or leave the chapstick behind!
It’s a lovely day today – another of those bright sunny hint of fall days we get in late August/early September (Alistair MacLeod refers to it as “The Closing Down Of Summer”). Taking a ride with a friend to the Parrsboro shore to pick up farm fresh eggs. Looking forward to the day.
It’s not that I went anywhere – I’ve just been working away at several things and not finished much to write about. But I’ve not been idle!
I’ve been working on a linen Jean Jacket (Out of print pattern by Sandra Betzina)and slowly making progress. It’s a lined jacket, with lots of top stitching and I’ve added two inner zippered pockets at the front facing/side lining seam so I can actually carry something in a pocket. The jacket pockets are no good for even carrying a Kleenex – they’re too shallow and anything I’d put in there would just fall out.
Partially constructed Jean Jacket
I’ve made three of these jackets over the years – a cotton/linen blend, a wild printed fabric, and one in denim – the problem is they’re TOO small – they don’t fit – I can’t button them up. I needed another one in a larger size. I’d bought the linen to make a dress but after a couple of washings and dryings the fabric was still too stiff to use for a dress or pants so I decided to make a jean jacket.
I’ve got the lining constructed, the sleeves (which have quite a bit of detail) are done. I’ve set up the sleeve facings having added a Hong Kong finish to the open edge. Now I’m working on putting the rest of the lining together. I expect I might be finished the jacket tomorrow or over the weekend.
In the meantime, I decided I needed a new iPhone carrying case – not much larger than the ones I’ve made before but larger enough that I can carry a credit card, my drivers licence, health card, some money in addition to the cough candy and chewing gum I always have on hand (because of my pesky cough – which BTW has subsided substantially recently – not gone but much less of a problem). My first try wasn’t quite wide enough and the top pocket was too deep. So I made a second.
iPhone Case 2.0
What I did was figure out how to add two zippered pockets to one side in addition to the zippered pocket along the length!
I haven’t written any instruction for how to do this version. When I get around to making another one and taking photos as I go along I’ll set up some instructions to share.
It’s still not large enough to fit my keys in but I have a hook on my key ring which I can hang on the strap if I don’t want to carry them in a pants or jacket pocket.
And I’ve almost got a sock finished from the new pair I’m working on – that will probably be completed this evening.
But since it’s been just over two weeks since I reported on anything I though I should update what I am working on.
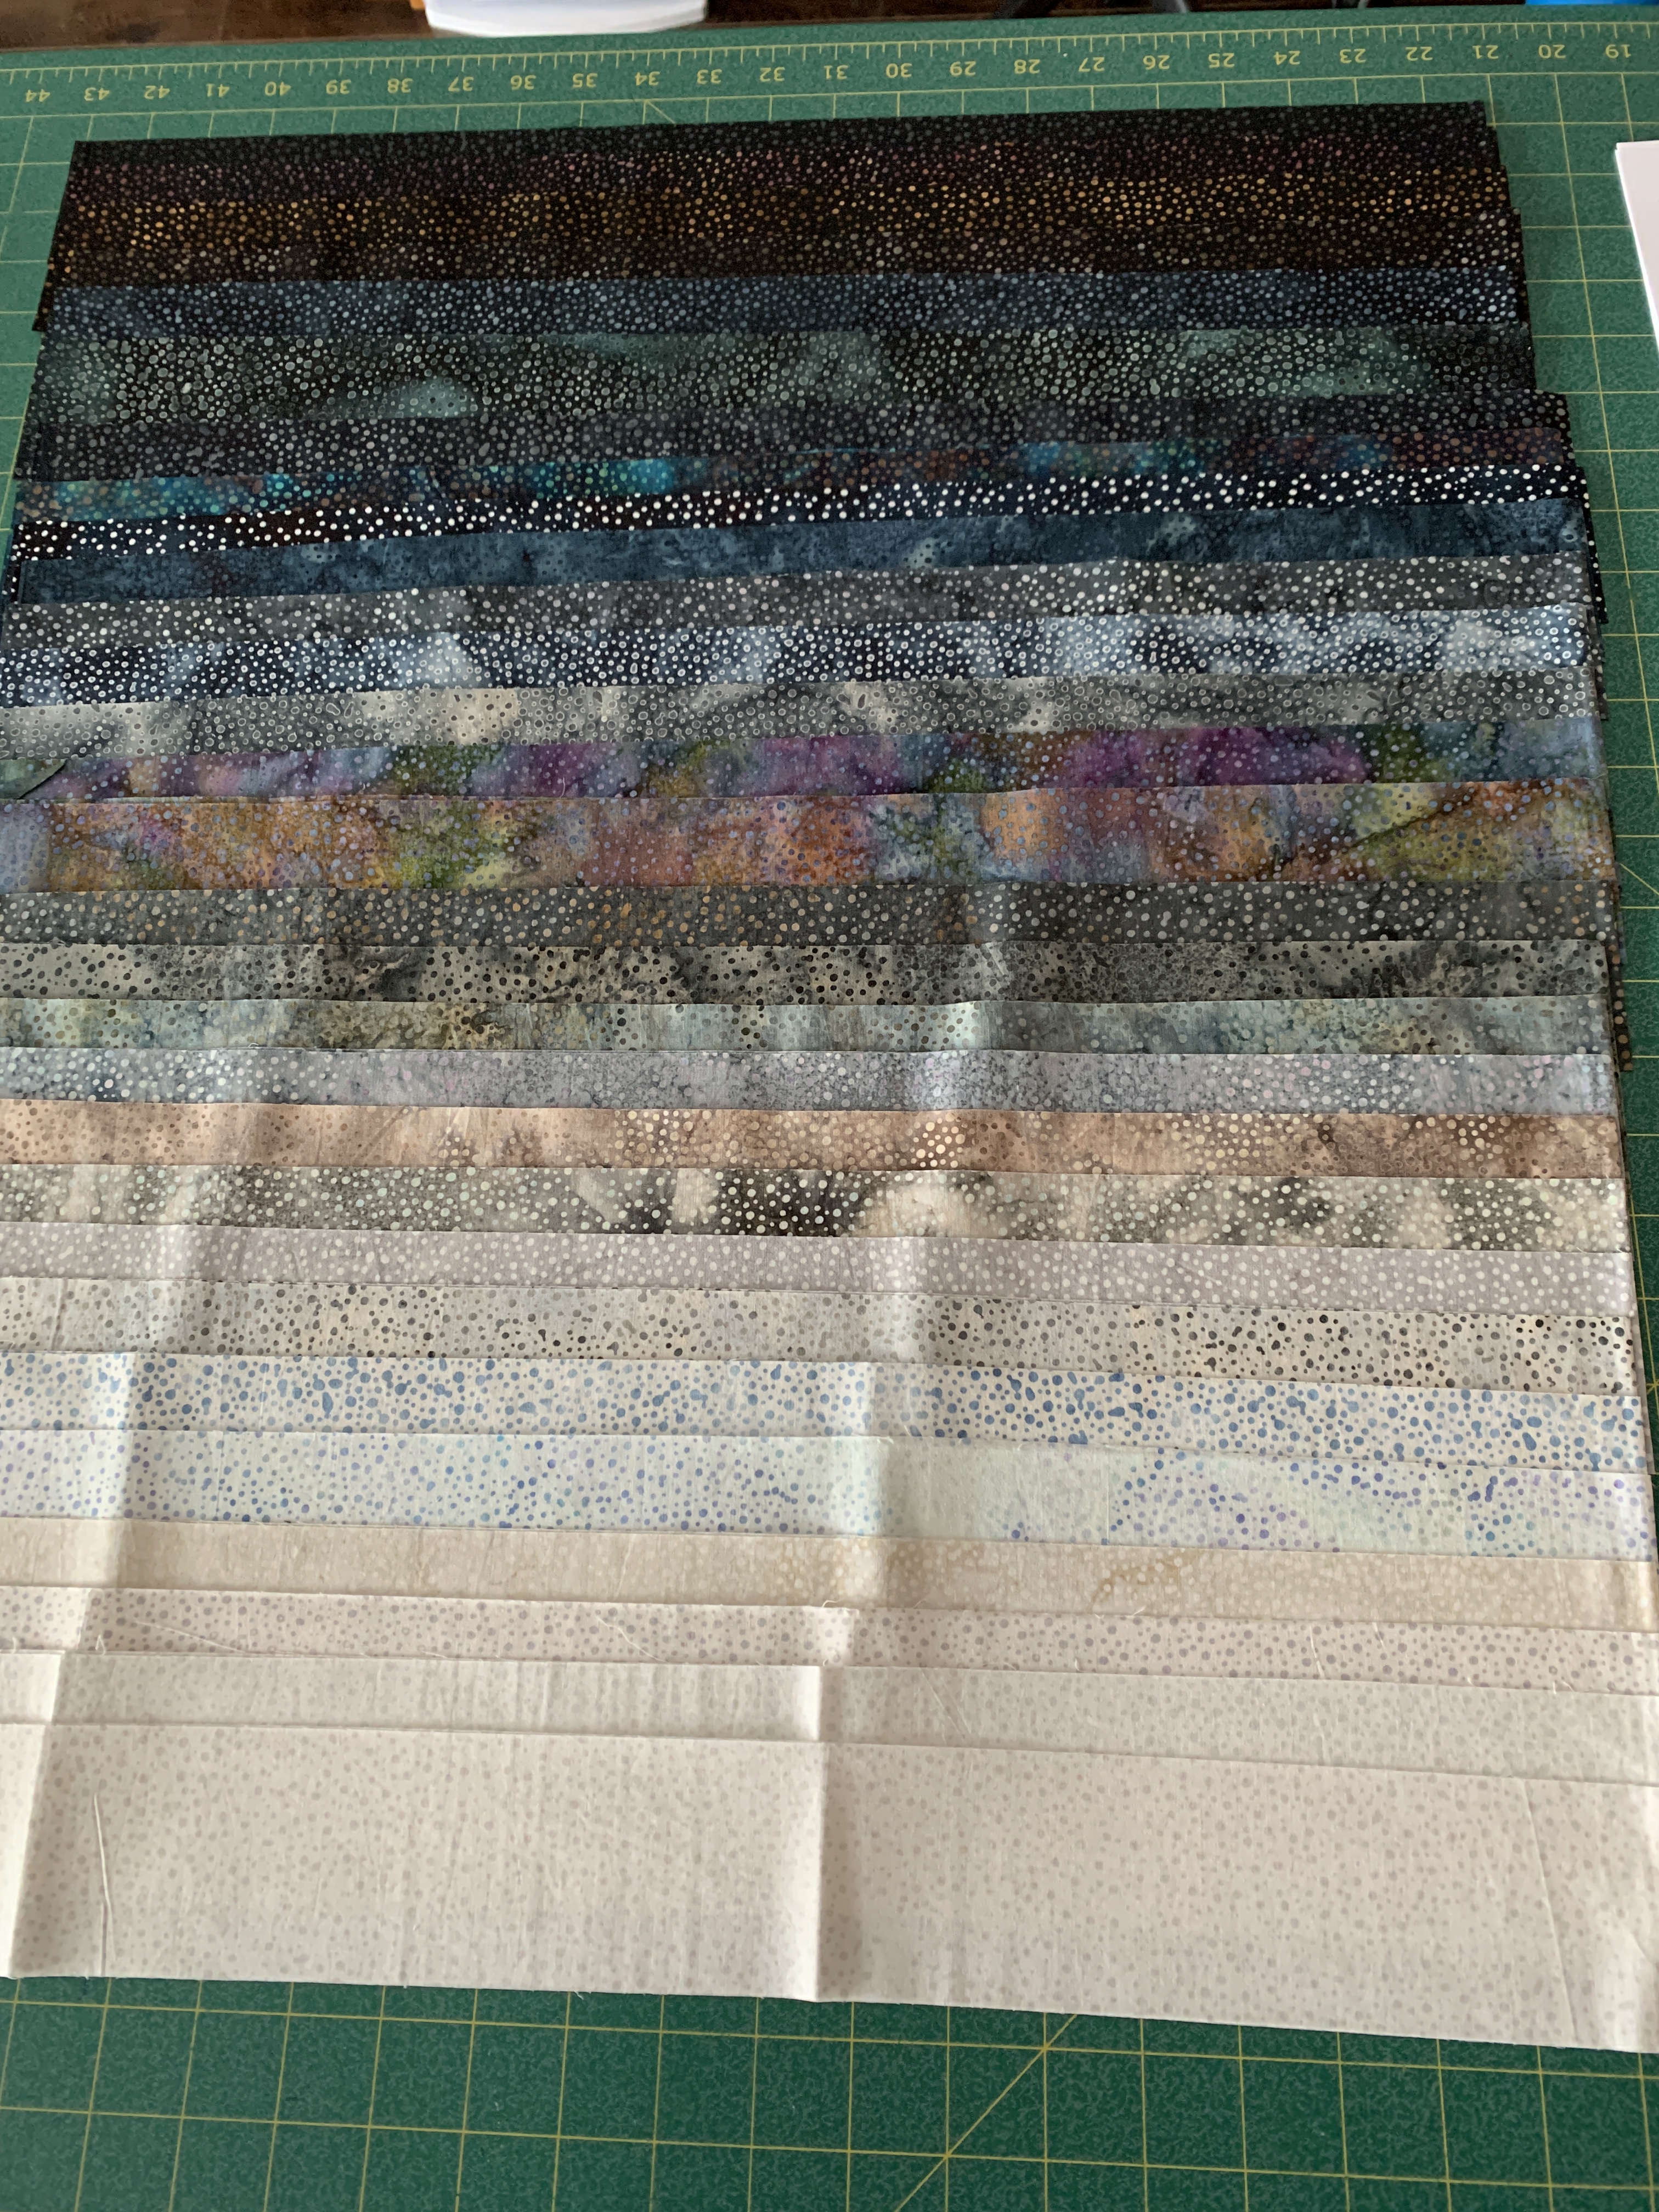
It’s close to two weeks since I posted anything. That’s because I’ve been stuck on the latest quilt – I have this lovely collection of jellyroll strips – I’d like to do something with them using diamonds – and the 2 1/2″ strip width limit has me blocked!
Jellyroll Collection
I’ve tried sorting the strips in pairs (which is one way I could assemble diamonds by cutting each vertical half diamond from the strips and pair them up):
Jellyroll collection with contrast
However, I lose the flow of colour I’m looking for if I pair them this way, and I can’t see a way to bring in the perfectly contrasted turquoise grunge fabric. So I gathered up the strips and set them aside for now.
I returned to my photograph of Ruby and played with it – enlarging her 50% and then extrapolating to a final panel size. I’ve cut out the backing muslin but got no further than that. What’s stopping me with this project is trying to figure out how to make the mud flat look wet – not there yet.
I needed something I could accomplish – I made 10 iPhone cases to give away. I’ve passed on three of the ones I made for myself so I decided I should make some to have in my gift stash.
iPhone Cases to give away
And then I finally got to the corduroy that has been sitting on my serger table for well over a year and decided to make pants.
I’ve capitulated – pull-on pants is what I need to make, not pants with a fly front and fitted waistband. I’m tired of wearing pants that are too tight in the waist (in spite of the elastic gussets I’ve inserted in the sides of many of them). So I went searching for a pattern online.
I started with the Jalie Pattern 3243 for pull-on pants. I bought the PDF version which sends me two files – one I can print on my home printer – that means 25-30 pages that I then have to organize and tape together to create a pattern array before tracing the size I want to make; and one I can take to a print shop and have printed on blueprint size paper.
I did the latter. I went to Staples and after much discussion with the gal (who clearly has never sewn anything in her short life) I decided to print the sheet based on the very limited information I could find on the pattern (all it said was “copy shop 36″). I asked for a 36″ x 48” sheet. When I measured the test block, what I ended up with was a pattern at 88% of full size! At $14 per printed sheet I wasn’t going to try printing it again, so I took it home and started doing some math.
This is one of those pattern with 27 sizes printed as one. I checked the pattern size info and decided my hip measurement was a size V (US size 9), my waist was a size Z (US size 13). To get those measurements on this 88% printout, I needed to upsize those measurements to a Z and a CC.
I marked the pattern accordingly using a bright highlight pen, used my French curve to make the adjustment from hip (size Z) to waist (size CC). I traced the resulting pattern, cut it out, placed it on my corduroy, and looked at it for a day before cutting the fabric, forgetting that corduroy has to be cut all in the same direction! (I didn’t realize I’d done that until I went to press the side seams and could see the colour difference).
Because this is my first attempt at this pattern, it really qualifies as a “muslin”. I’m not expecting it to work out perfectly but the changes I make will inform any adjustments I need to make to the pattern and the project might just turn out to be a wearable garment. So I carry on.
I don’t like the pocket shape and size they provide; I substitute my jeans-shaped pocket instead and make it deep enough to hold my iPhone. I also want back pockets – I have enough fabric to include a pair. I also cut out the waist facings in corduroy, realizing I may want to change that for a batik in the end.
I make one other adjustment. No pants pattern is going to fit my body with scant bum and thin thighs. At one of my visits to Sandra Betzina I learned how to get rid of the excess fabric under my bum and down my thighs by sewing a fisheye dart down the centre back of the pants. What I didn’t anticipate was how that adjustment would affect the centre back crotch length – more about that later.
I make the front pockets; I construct the back pockets. I stitch the centre front and back crotch seams; next the side seams – although when I held up the constructed front and back against my body I was pretty sure the pants were going to end up too small to get on! But I carry on, anyway – this is a “muslin” I tell myself – see what it turns out like.
I add the waistband, put the elastic in, and try the pants on – this is a “muslin”, right?
I can actually get the pants on over my hips, I need to tighten the elastic quite a bit. I hem the pants but I have a problem – the back crotch length is about 1 1/2″ too short. I wear the pants anyway and my turtleneck shirt keeps pulling out when I sit and the pants slip down in back.
So the next day, I take off the waist facings, add a yoke to the back of the pants increasing the centre back length by 1 1/2″. Here’s where I decide I don’t want to reuse the corduroy waist facings so I cut out and attach a new set in a complementary batik (not as heavy a fabric so the waist should gather more easily). Inserted the elastic and zigzagged a seam down the middle of the elastic to keep it from twisting – but in order to do that I had to stretch the elastic to fit the waist and in the process the elastic is stretched making the waist loose.
I wear the pants again, anyway – just a “muslin”, right? I find myself constantly tucking in my shirt again.
So this morning I painstakingly took out the zigzag stitching, opened the inside side seam to gain access to the elastic, shortened it quite a bit more, then instead of doing a zigzag down the middle, I simply vertically stitched across both side seams, the centre front, the centre back and in the middle of the back on each side – that will keep the elastic in place and avoid stretching it.
The Pull-on Pants after adding a back yoke
The waist of the pants is now definitely tighter. I plan on wearing them again today to test out the fit. Furthermore, I send the PDF file to a friend with access to a blueprint printer. I should have a new 100% printout of the pattern to work from and then I will make up a second pair using the navy corduroy I bought a couple of days ago.
Finally finished the face masks two days ago. Those last 20 were difficult to do – I’d reached my boredom threshold and could barely force myself to work on them. However, I got them all done and washed, and I delivered them yesterday.
The Final 30 Face Masks – Delivered
Now on to some other sewing.
I’ve been wanting to make a small carrying bag for my iPhone. I find the version of the phone (XR) I have now is just a bit too large to carry comfortably in a pants pocket. So I’ve taken to using an embroidered glasses case (that has a side pocket with a zipper in it). I was given my first one by a friend. I added a cord to the open end and turned it into an iPhone case.
Cross Stitched iPhone Case
I have a second one – also a repurposed glasses case to which I’d added both a cord and a zippered side pocket.
Remodeled Glasses Case
But that one, too, is beginning to get a bit worn. Time to make a new one. The challenge was figuring out how to assemble the double pocket case. A small zippered bag is no big deal. An opening ended case is also no big deal. But doing them together in a single carrying case took a bit of trial and error.
I made one yesterday which didn’t work out but in the process I figured out how to construct the iPhone case.
First put the zipper in the side of the case (complete with lining) as if I were making a zippered bag, but leaving one side and end open. Then tack the zippered bag lining to the outer bag and now (with the zipper partly open to facilitate turning the bag right side out out later) attach a second lining to the open end (remember to place cord between bag and lining with ends included in this seam). Top stitch the bag/lining seam. Then sew the side seam of lining/bag. Turn bag/lining right side out, finish by folding in the open “bottom” end of the lining, stitching closed. Push the lining inside the bag between zippered bag lining and bag outer layer.
Trial Carrying Case With Zipper
Once I had figured out I had to partially make the zippered bag, then the open-ended bag, the process went quickly. I used a scrap of quilted batik fabric I had on hand as a test piece. Worked fine. Phone fits.
Now, I’m in the process of embroidering a cross stitch design on a piece of linen so I can make a fancier case.
New Case – In Progress
Here is the iPhone case finished (Click here for instructions):
Finished iPhone Case
[Click here for a more detailed set of instructions.]