Quilting In The Hoop

If you search online for “quilting in the hoop” you get lots of projects which actually piece appliqué quilt blocks within an embroidery hoop, or you get very dense embroideries which are intended to be quilt blocks in and of themselves. What I haven’t been able to find are directions for actually using an embroidery machine instead of a long arm quilter for doing the final quilting. Lots of information on free motion quilting, quilting with a walking foot on a home machine… I’m sure people use their embroidery machines to do the actual quilting but I’ve not found any descriptions.

I have developed a technique for using my embroidery machine in lieu of a long arm quilter because that’s the machine I have. Long arm quilting machines are very expensive and it makes no sense for me to own one – first, because I have nowhere to set one up (except in my basement which has no natural light) and second because I don’t make enough quilts to justify the expense. And I certainly don’t want to use it for a business – the joy of quilting would be gone.

So here’s how I do it. The technique involves creating an embroidery to fill whatever size block I’ve used to construct the quilt. I don’t like a heavily stitched quilt so I set up a single run (the design is stitched just once), open flowing design with a stitch length of 2.5mm. I make the design about 10mm narrower and shorter than the finished block size (to allow for slightly different finished block sizes). I can adjust the size up or down a small percentage once I have it on the embroidery machine.

I start the process by choosing a hoop that’s a bit larger than the block I’m quilting – I want to allow a some wiggle room so I can adjust the position of the design within the block. Step #1: I put a double sided non-permanent craft tape on the underside of the hoop (peel off the protecting paper). I get from 10 – 15 hoopings before I have to renew the tape. The tape is essential for making hoop placement easier – it keeps the top of the hoop in place while I slide the hoop bottom beneath the quilt block. (Non-permanent scrapbooking tape sticks nicely to the fabric but can be a bit difficult to remove from the hoop back. The best tape for the job I’ve found at my local Dollar store – the last time I saw it there I bought 20 rolls to last me a while! It sticks to the fabric very well and peels off the hoop reasonably easily. Double-sided scotch tape doesn’t work at all.)

IMG_7265

I position the hoop around the block doing my best to center the block vertically and horizontally. Notice the tape markings on the hoop – they show me where the top and bottom seams ought to align horizontally (I found their location by using a Frixion erasable pen to draw both horizontal and vertical lines through the center of a block then positioning the hoop and marking the seam lines – this makes it possible to position the hoop without having to locate the center for each block); in this quilt the vertical center falls in the middle of the vertical joining strip so I didn’t need to mark the vertical alignment. (I put small permanent black marks on the hoop to mark the positioning for an 8″ X 8″ block. All other block sizes I mark with tape.) (I have used my 120 x 120 hoop, my 150 x 150 hoop, my 360 x 350 turnable hoop, my 360 x 200 hoop… any hoop will work; the process is the same for all of them.)

IMG_7260

Next I place the hoop in the embroidery unit, bring up the embroidery design on the screen and use precise positioning to check the location of the corners making sure they fall within the block. Notice the cross hairs in the lower right of the embroidery design.

IMG_7261

I check all four corners to make sure the design fits the block. Because the hooping is at best approximate, I use the precise positioning on my machine to fine tune the location of the design within each block. I adjust the position of the design (up/down, left/right) making sure it’s as centered as possible.

IMG_7262

I set the machine to embroider, but before I start, I bring my bobbin thread to the top of the quilt (later I will embed the two threads using a self threading hand sewing needle – picture later). I hold the two threads out of the way so as the machine executes the embroidery it isn’t stitching over these threads.

IMG_7263

I stitch out the design,

IMG_7258

When the embroidery is done (I include a tie off and automatic thread cutting in the embroidery design), I remove the hoop from the machine, and before removing the hoop I pull the starting threads into the quilt. I also embed the cut tie-off threads on the underside of the quilt. I find it easier to handle the self-threading needle in the quilt when it’s still taut in the hoop.

IMG_7264

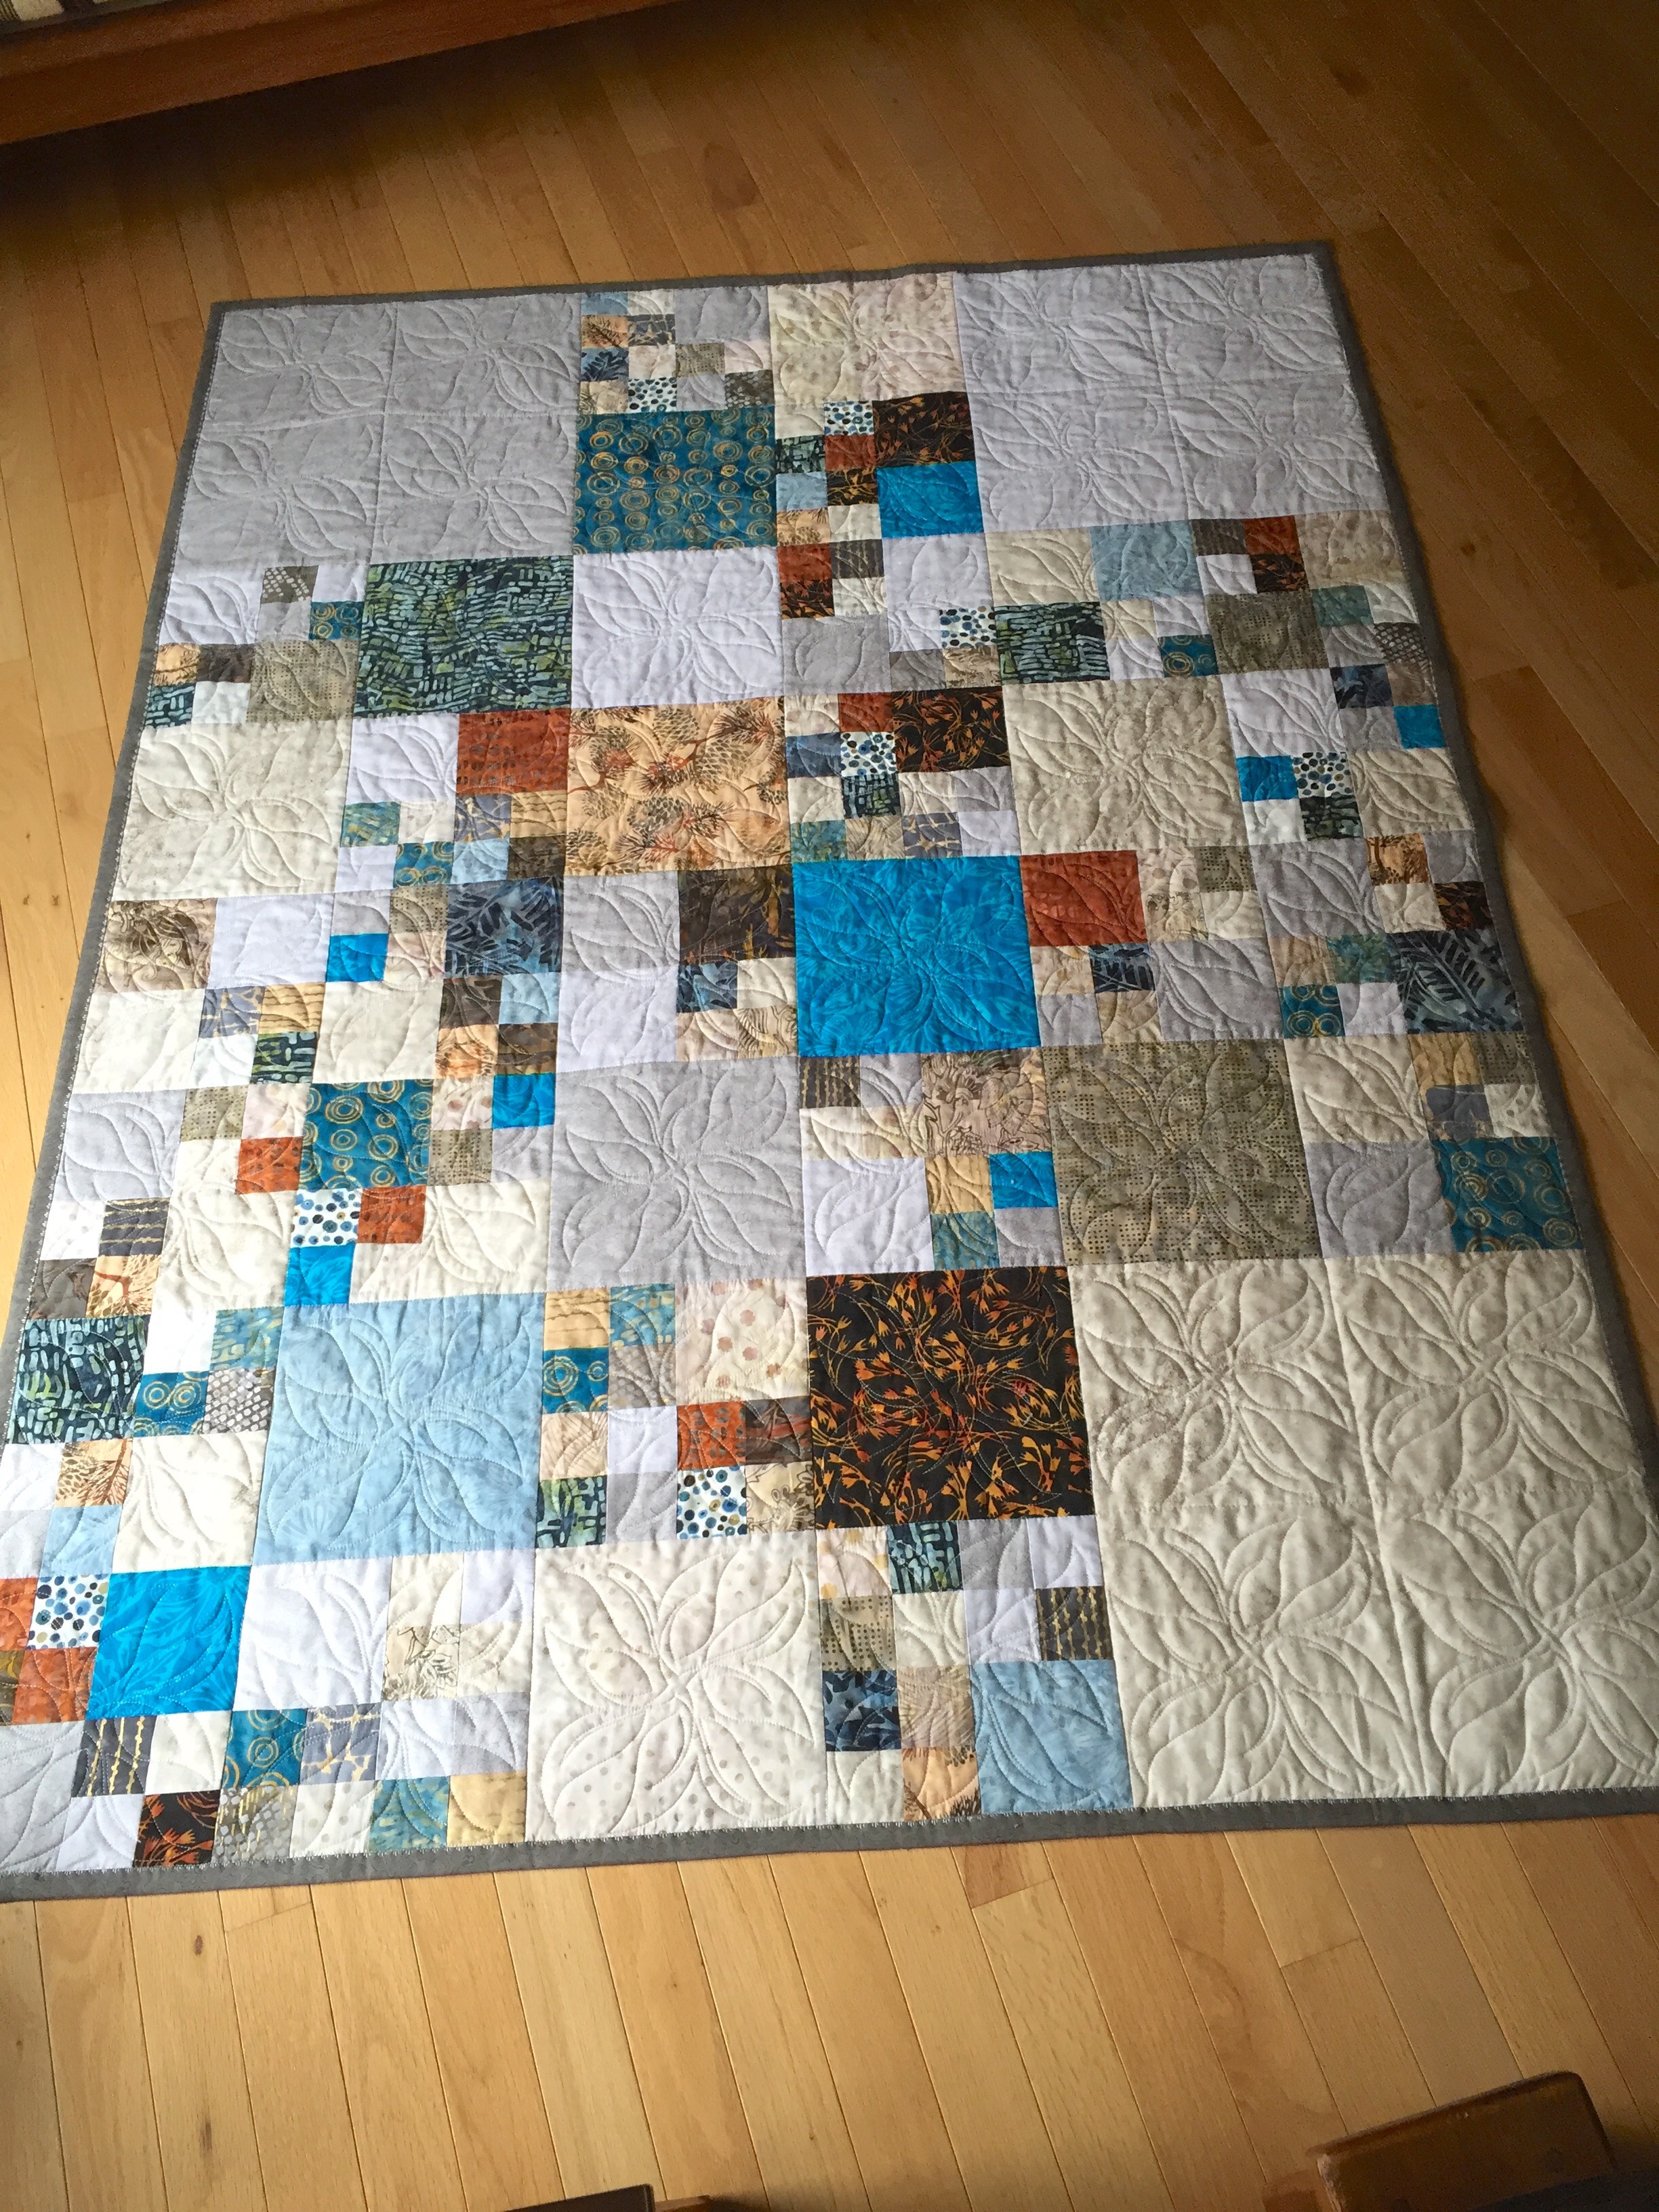
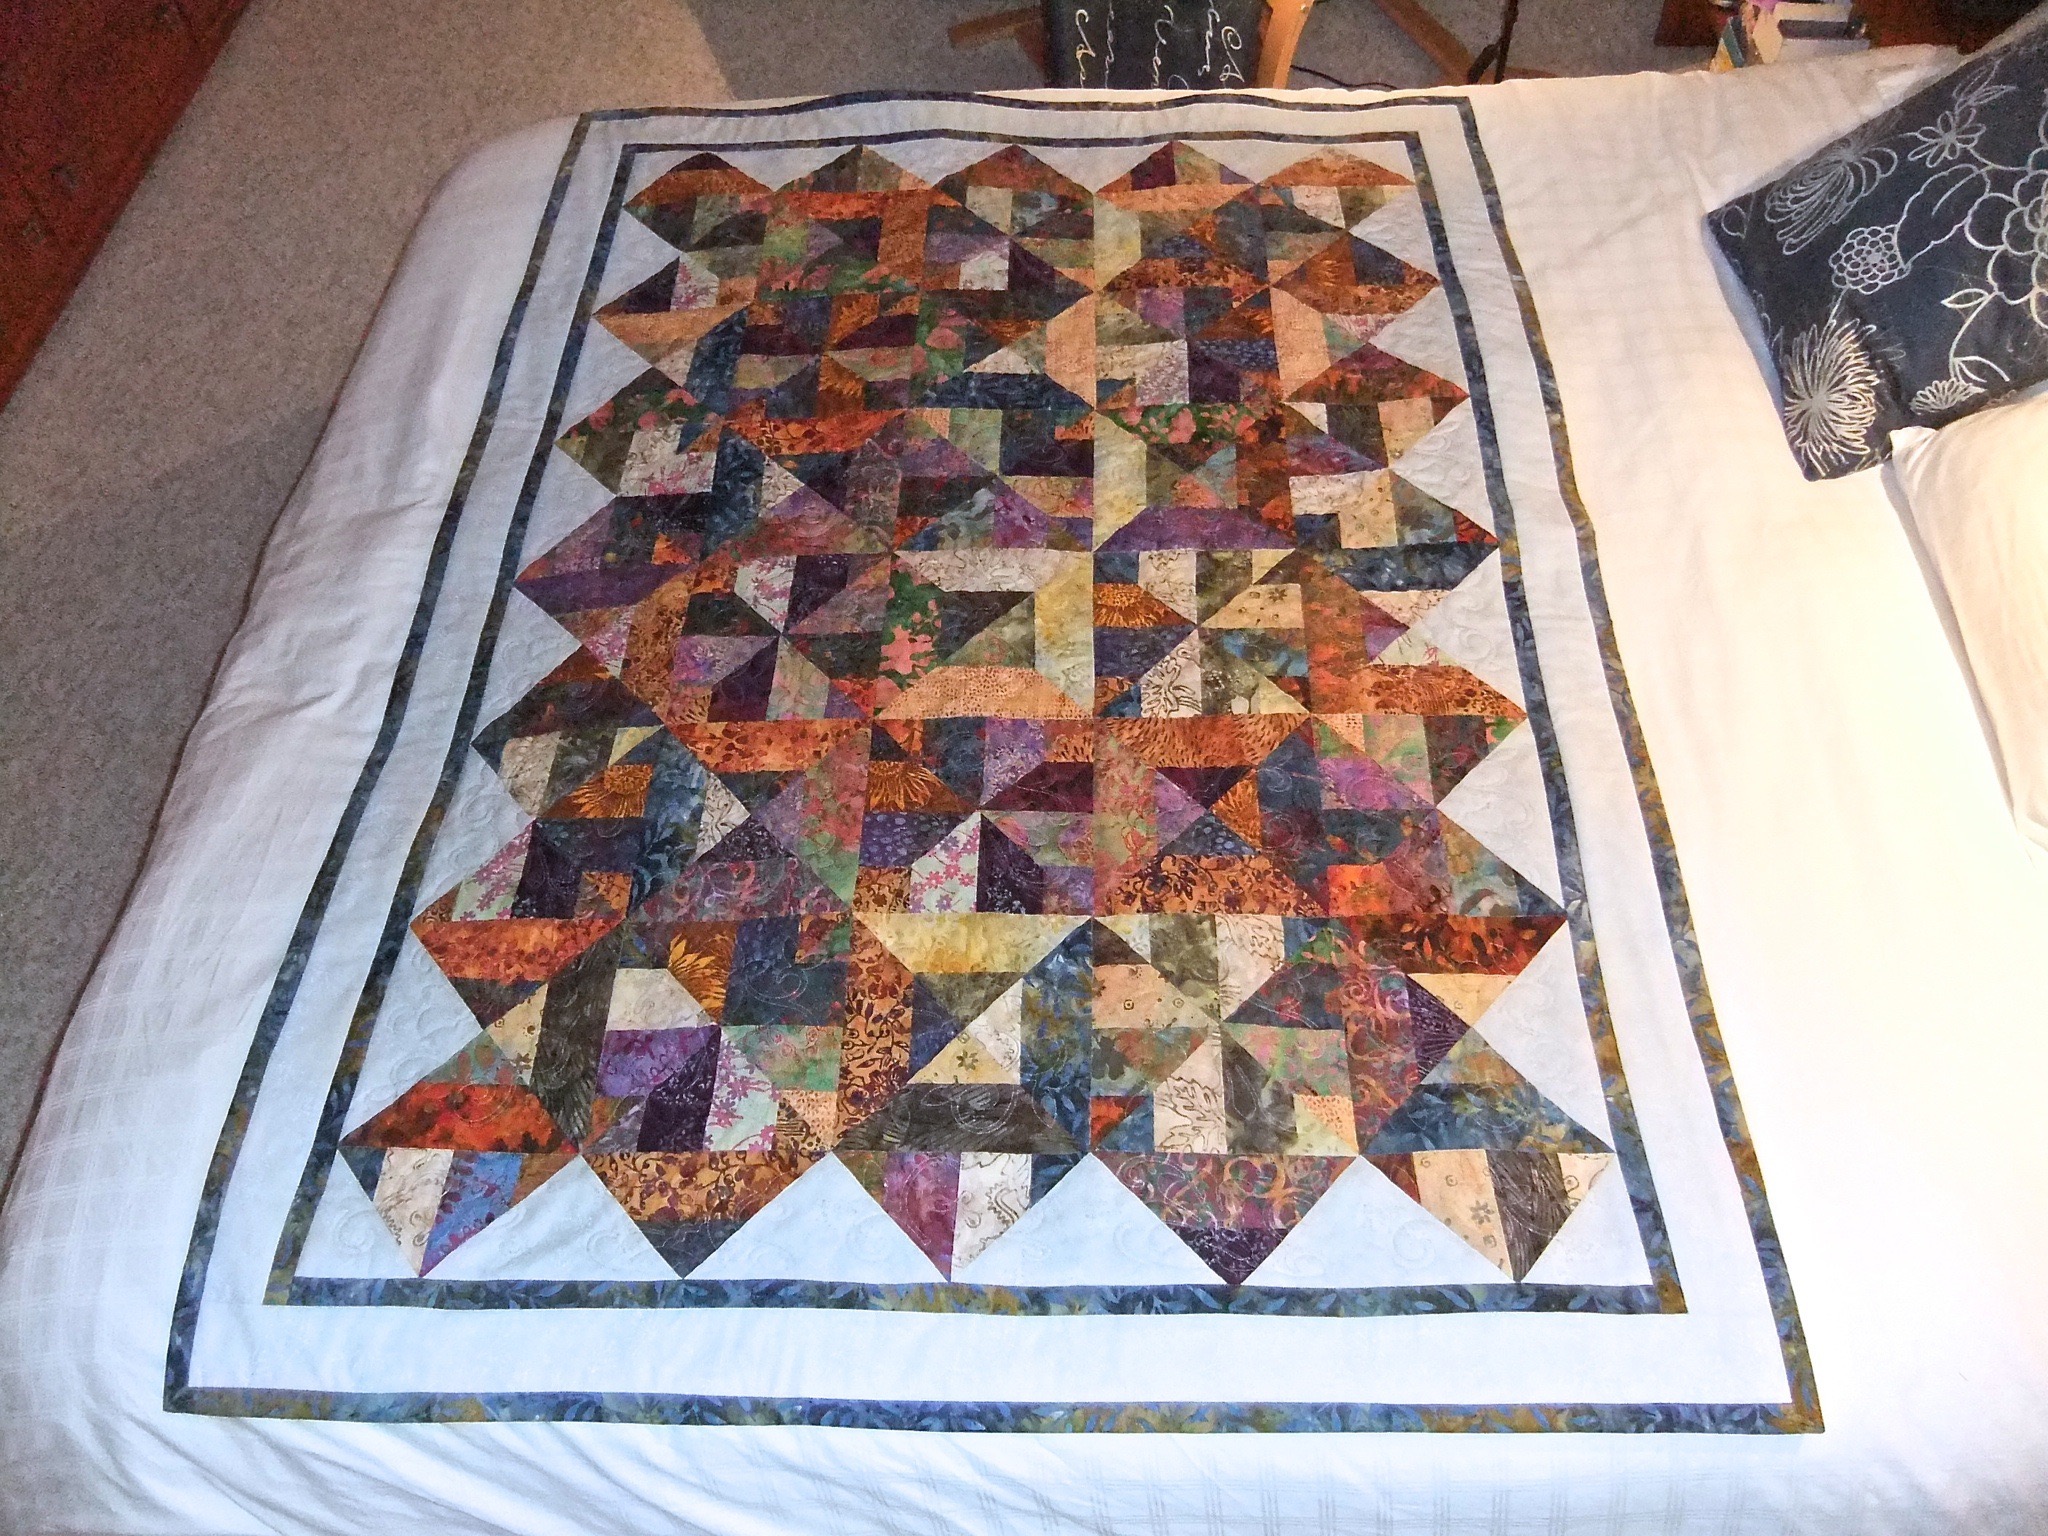
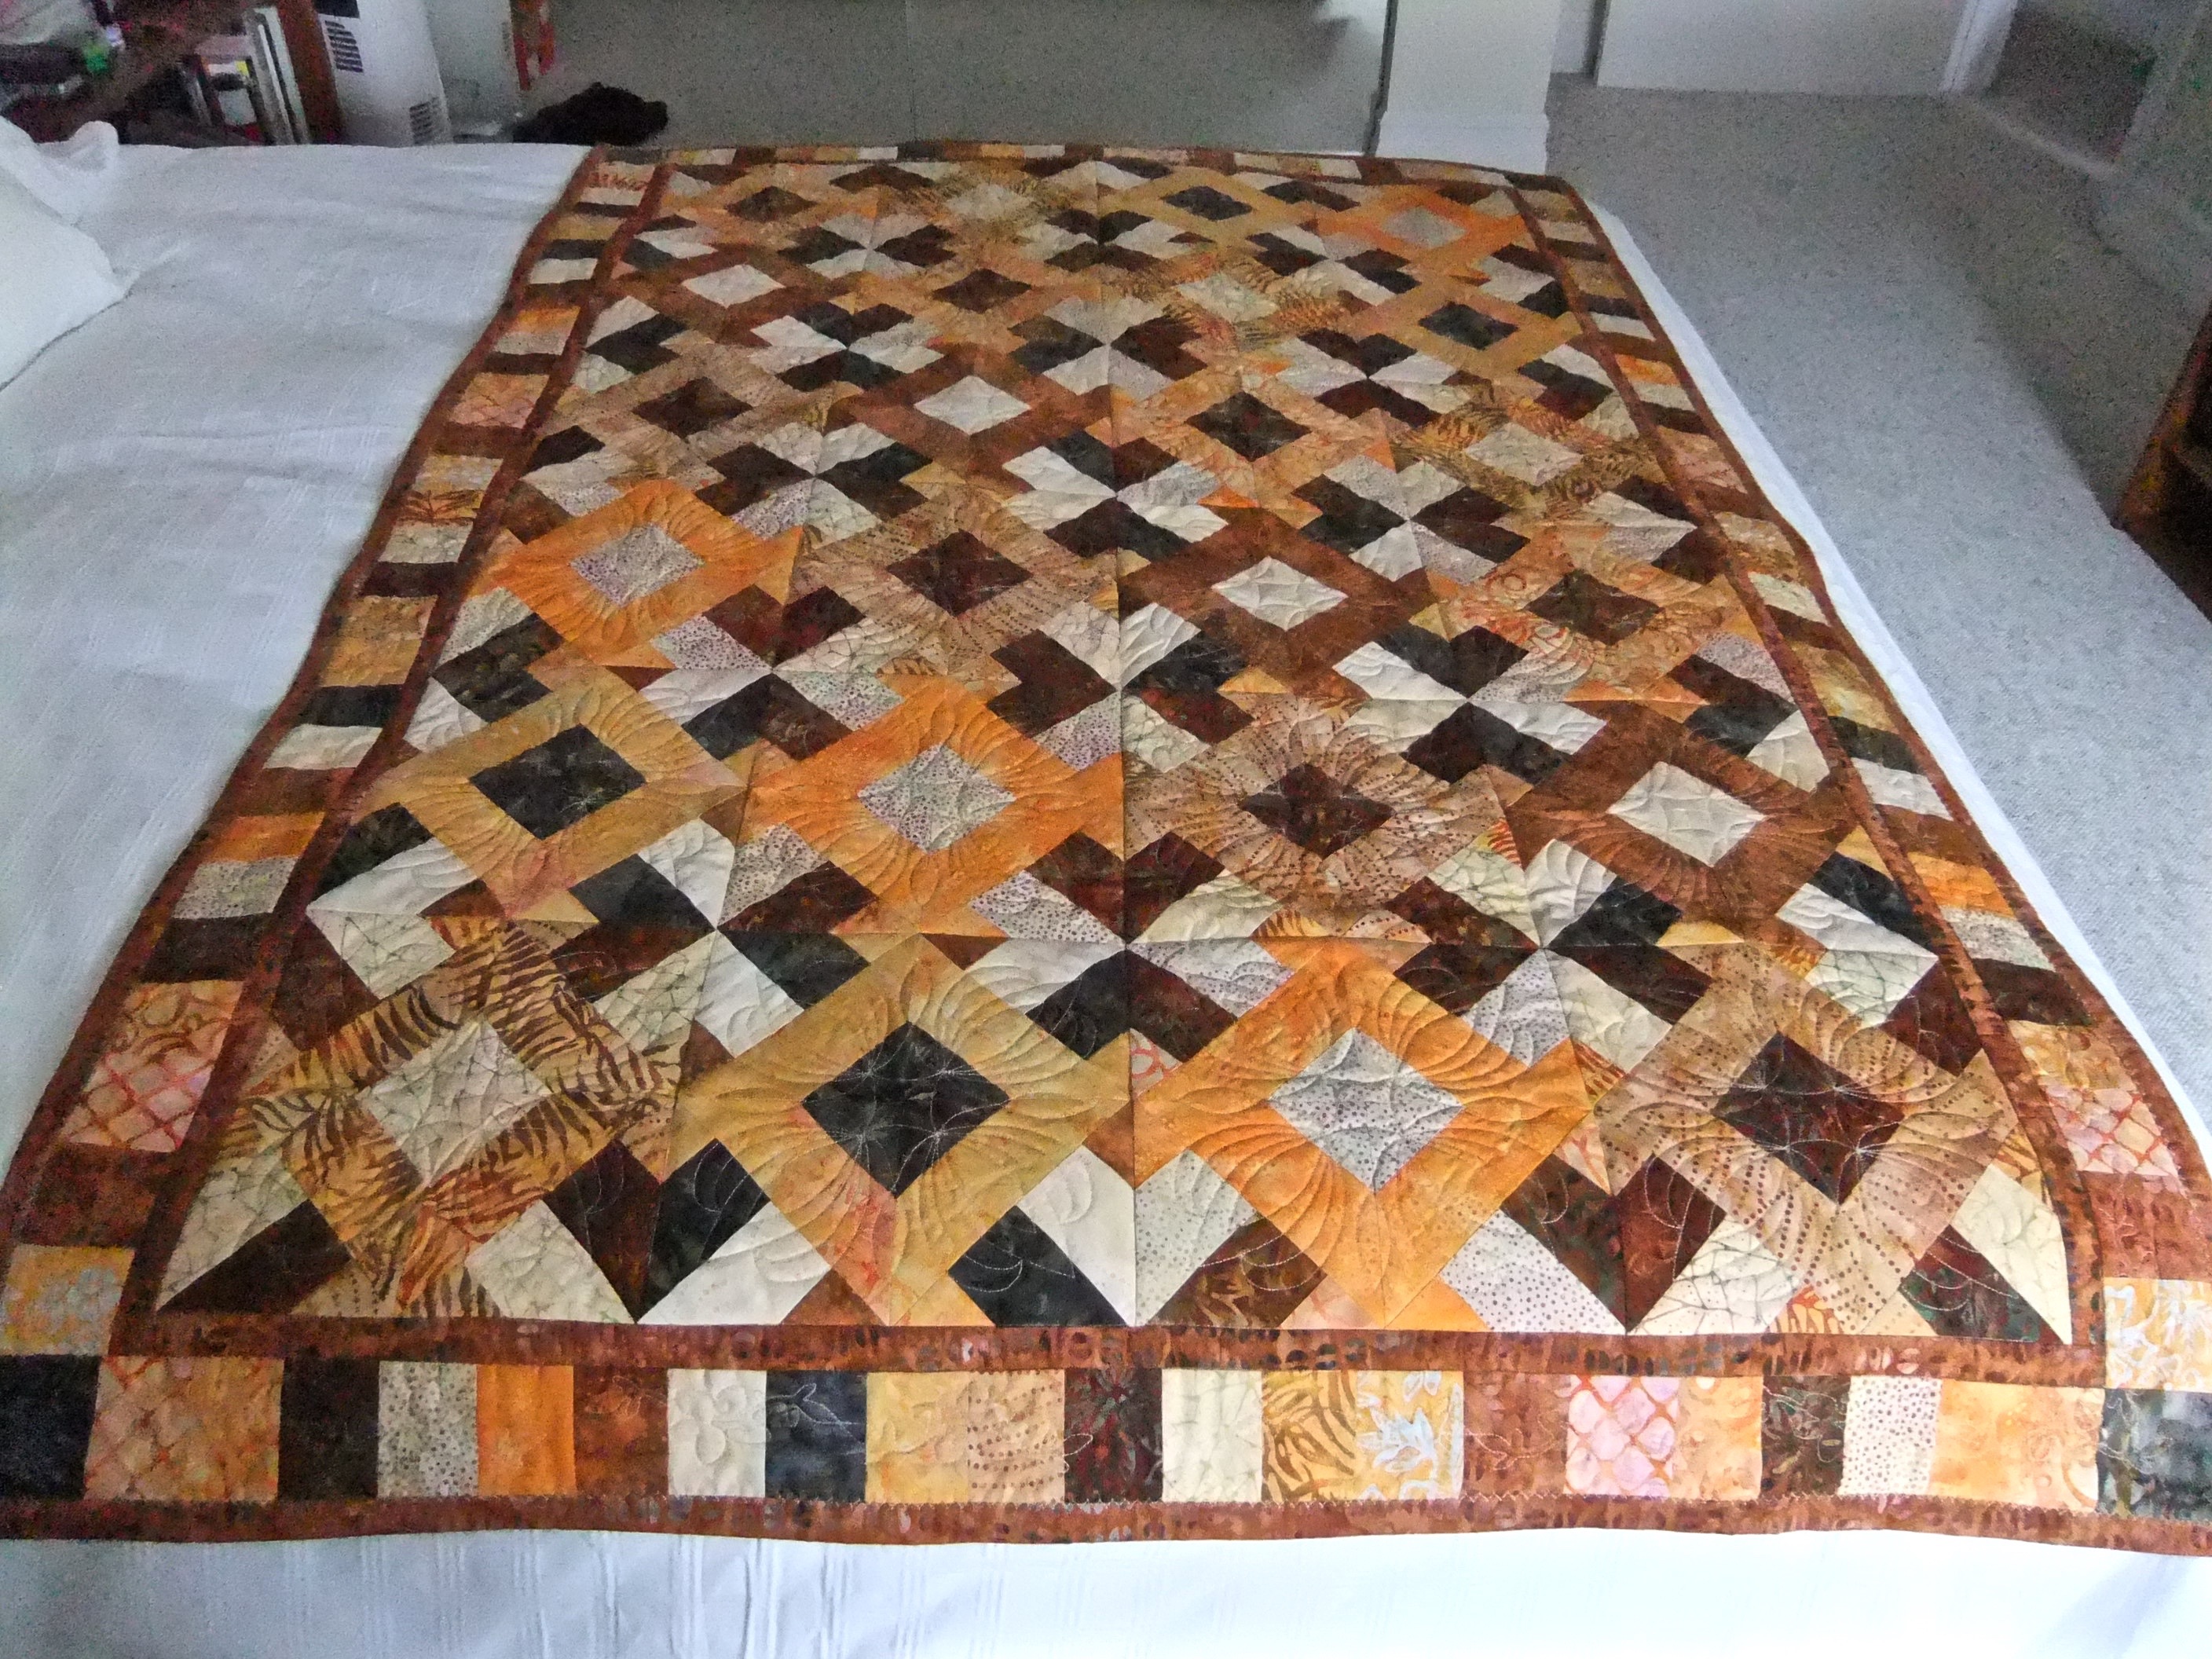
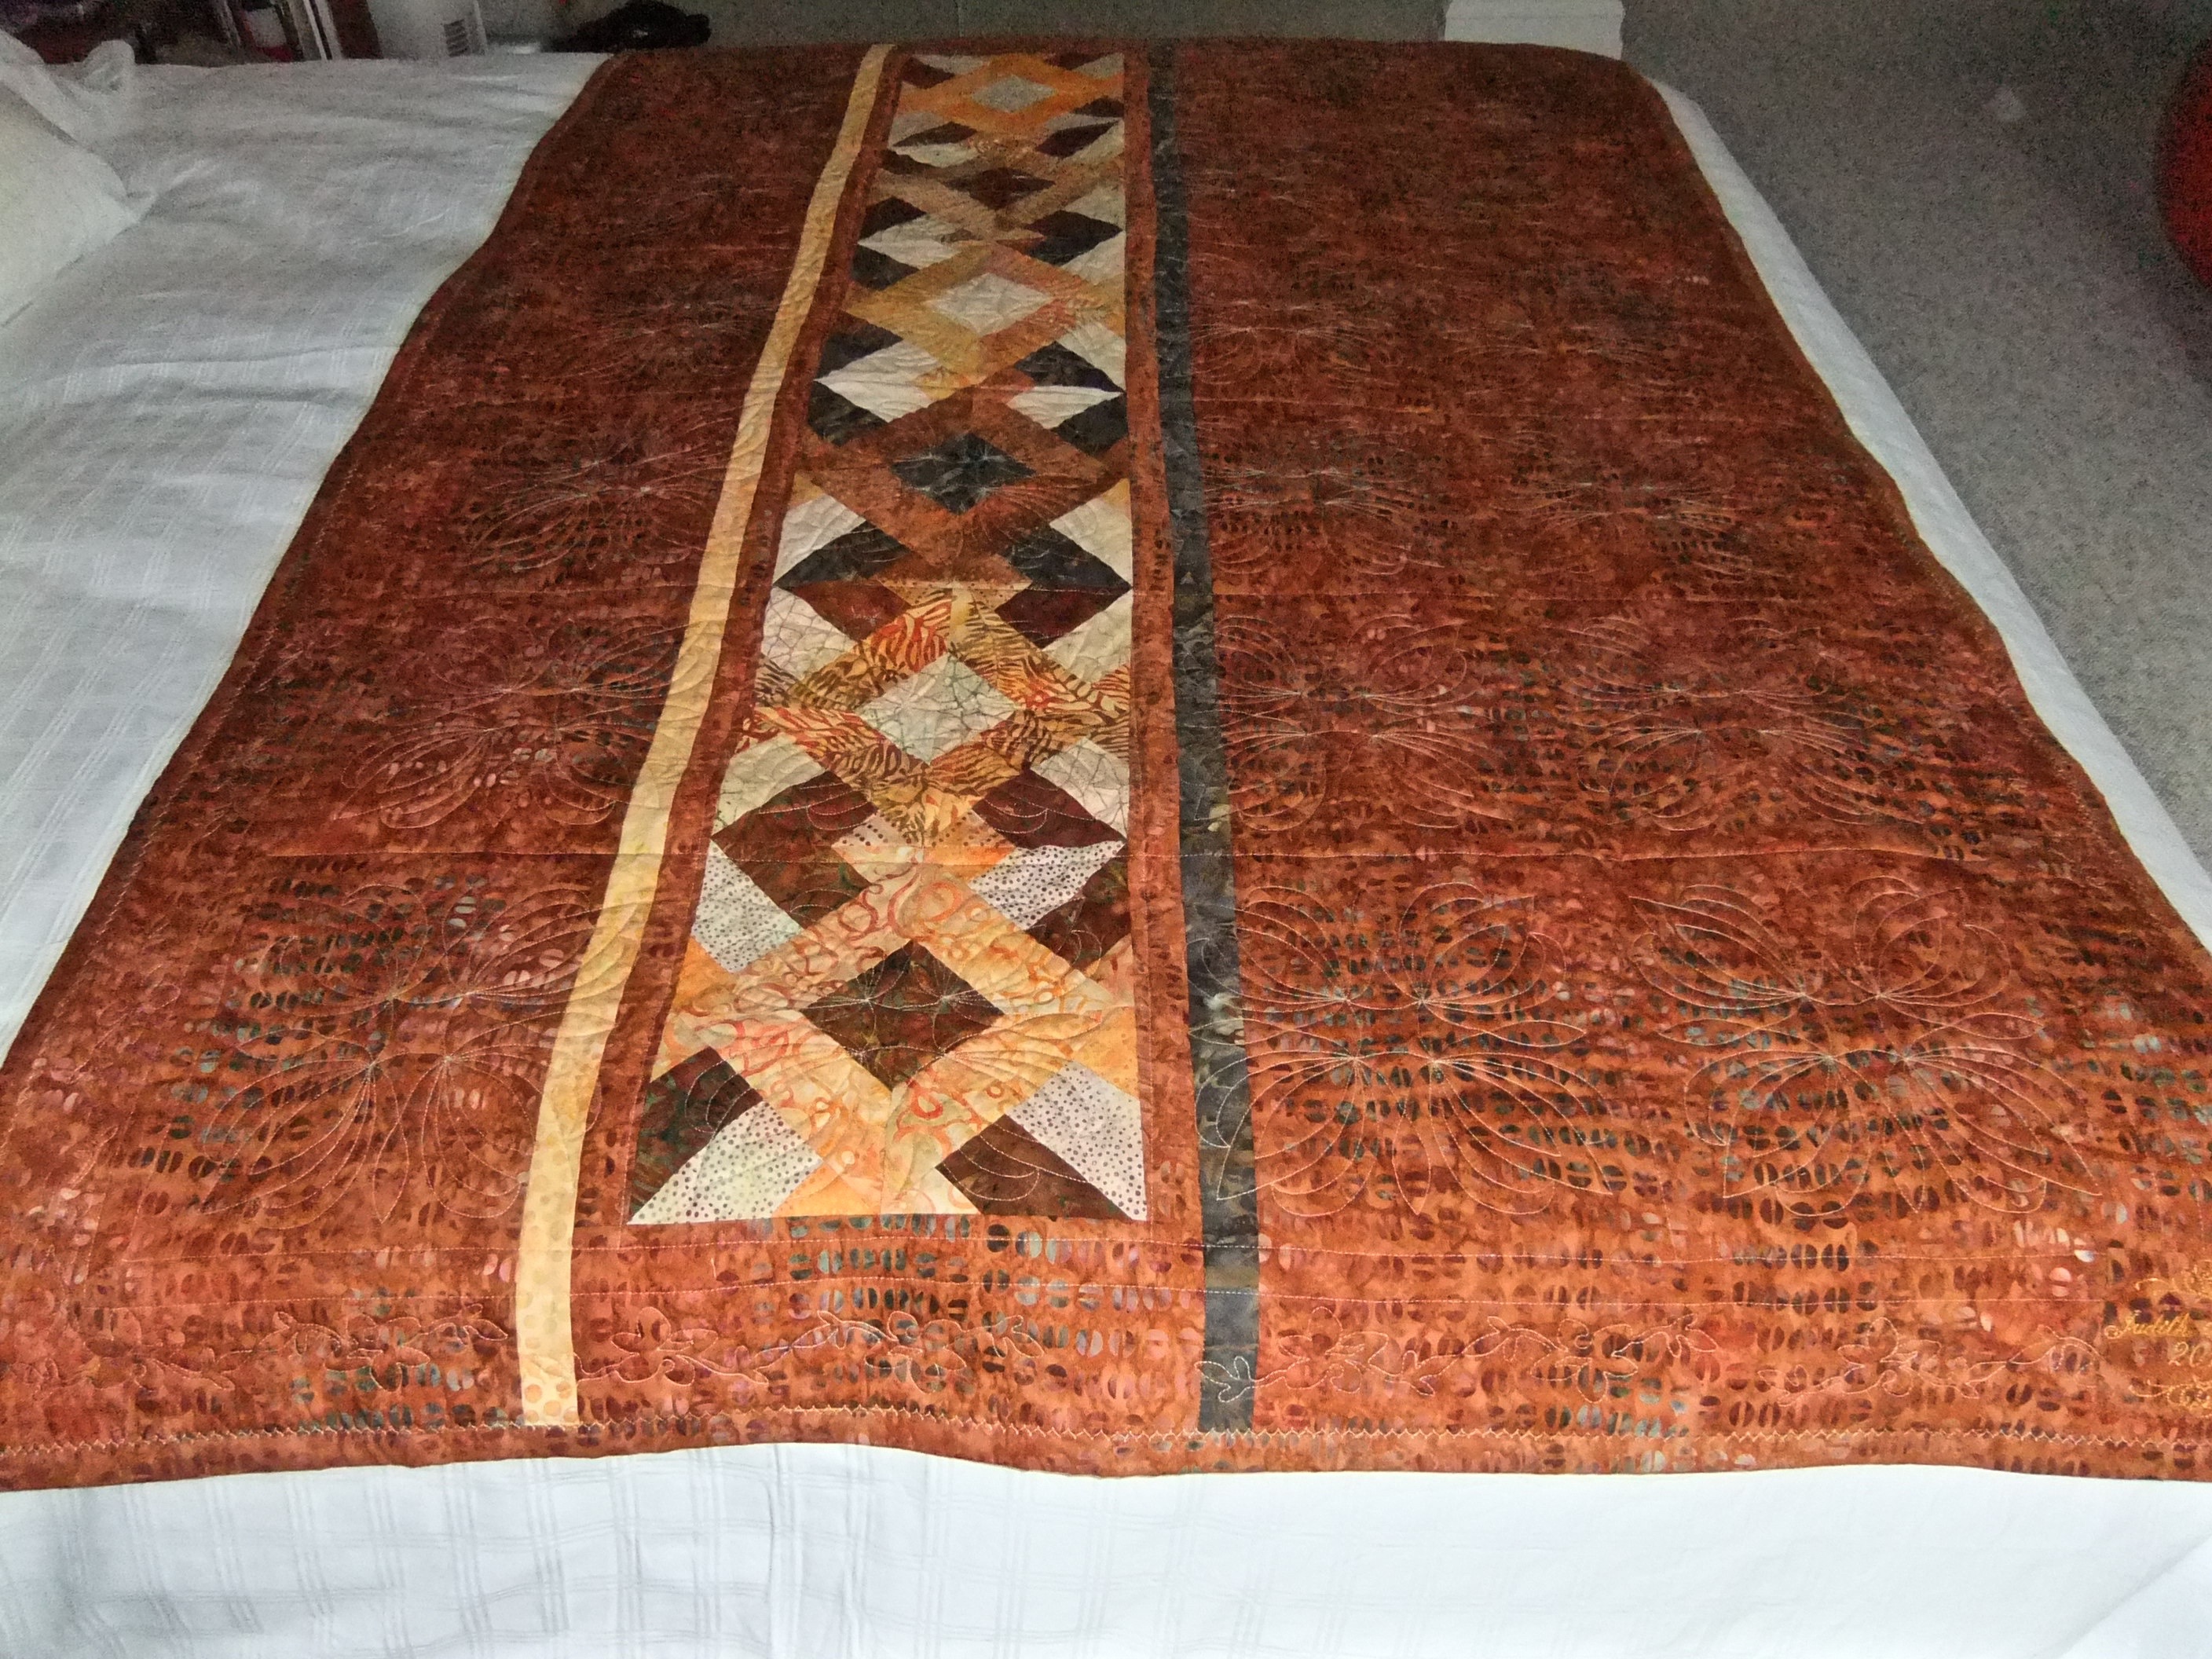
This quilt required 50 repeats of the embroidery design, plus eight half block designs (set up as a separate design) four on each side. It took me a couple of hours a day over three days to complete the quilting of this 48″ X 62″ quilt.

IMG_7268

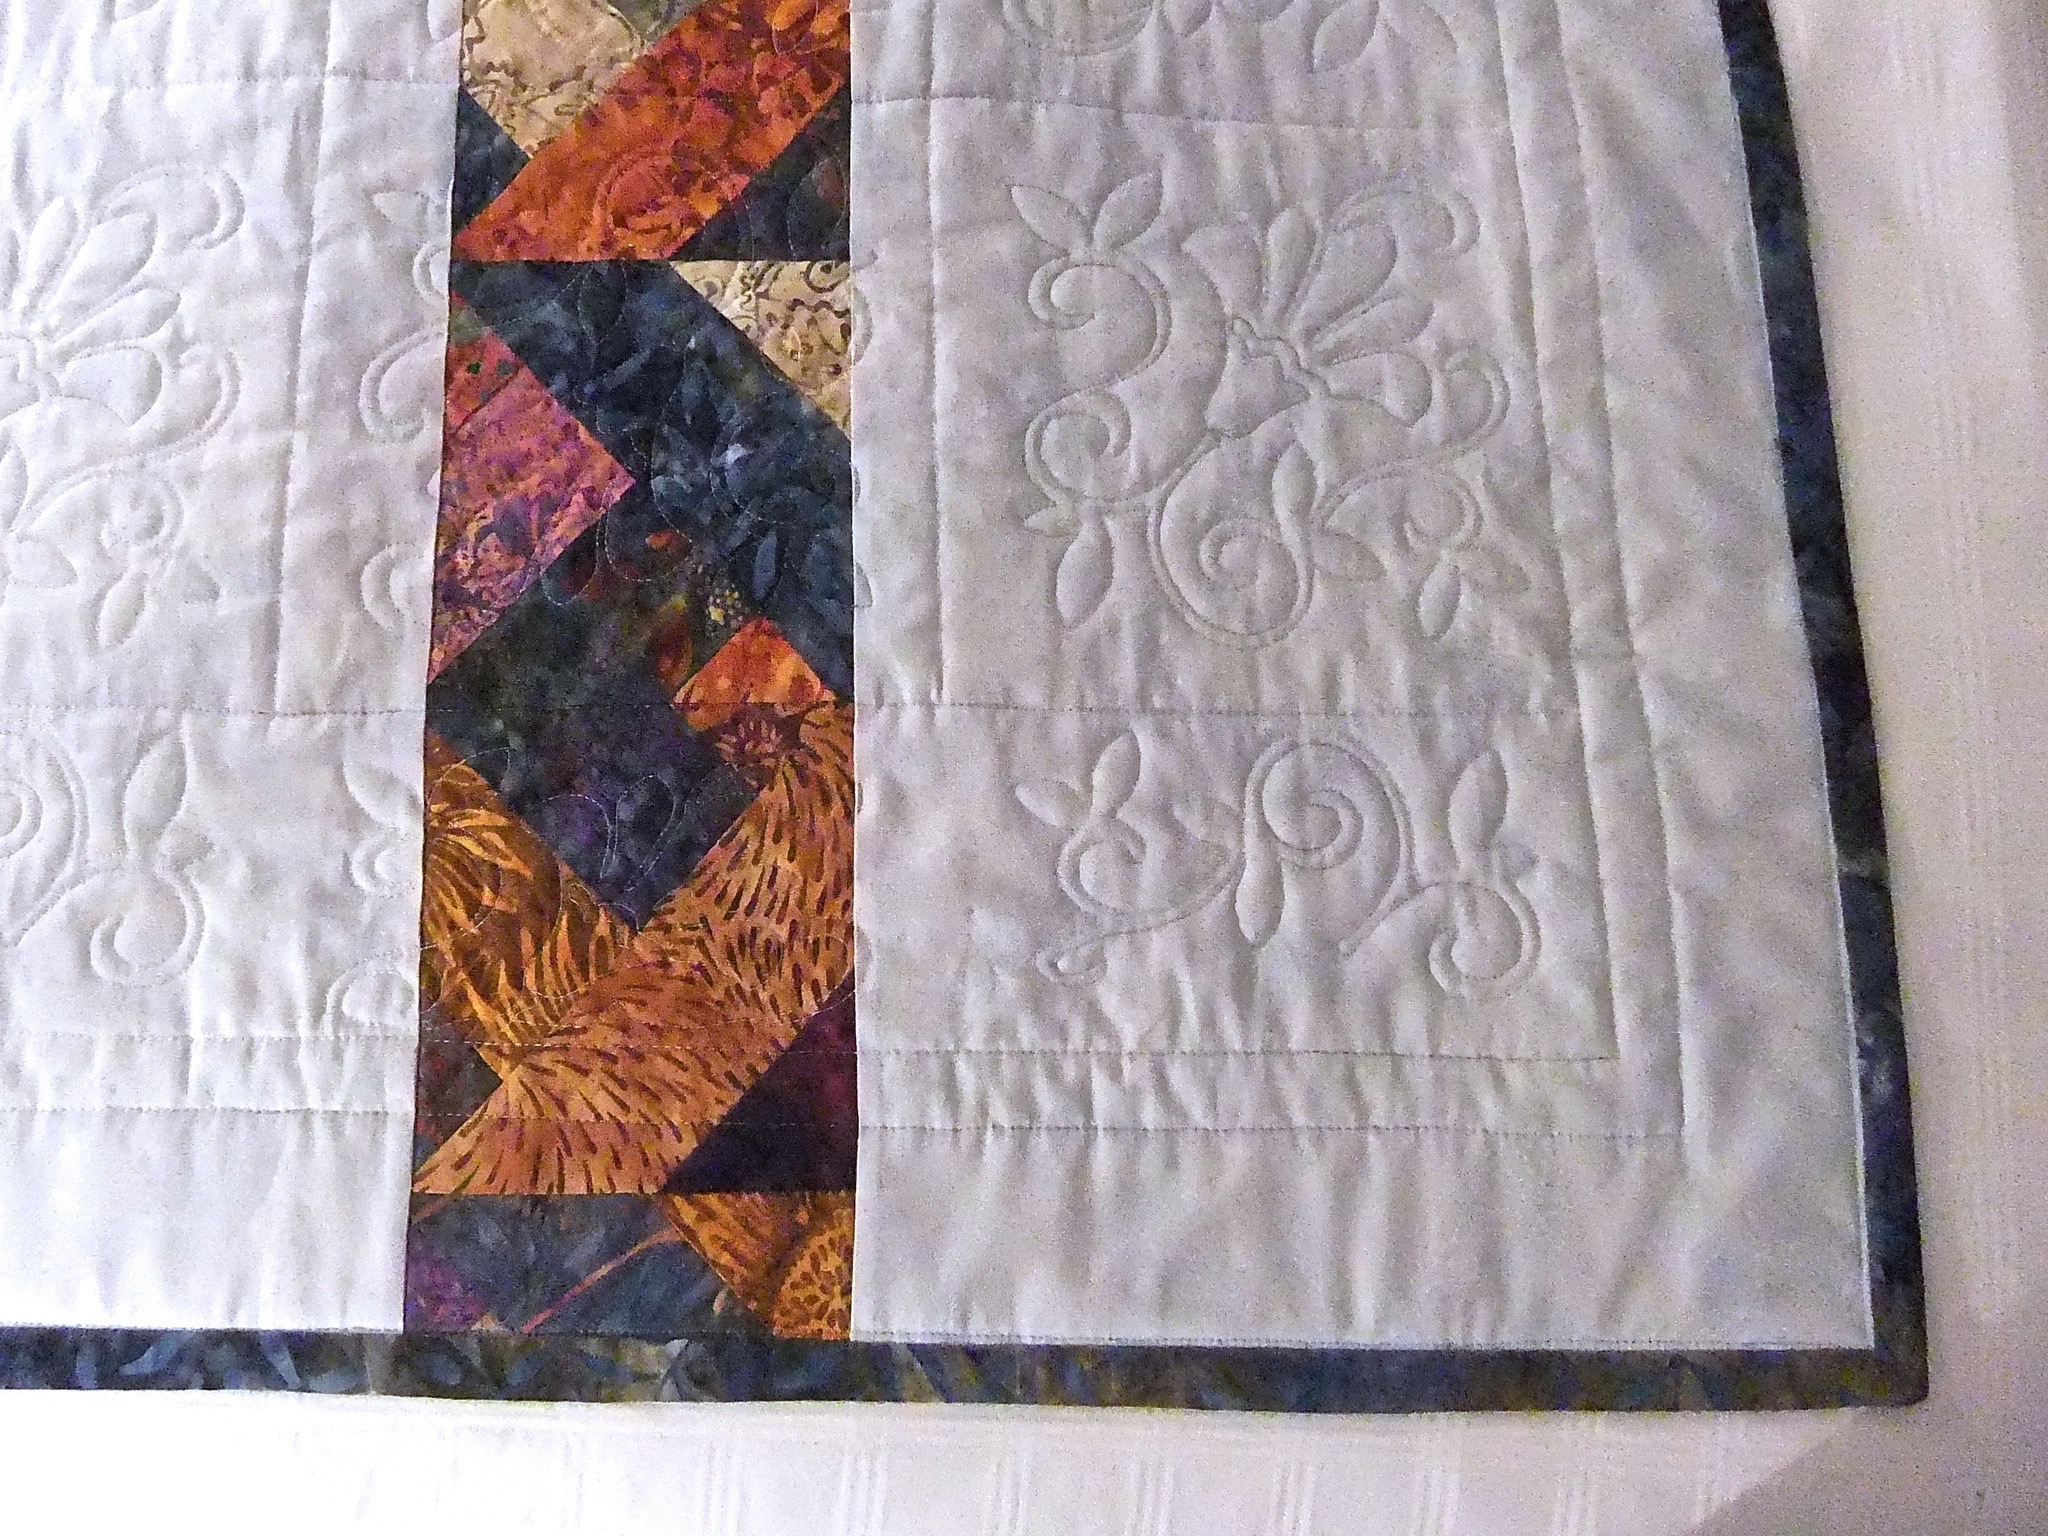
I used my large endless hoop to stitch out the border (another design I created using the elements of the design I used for the blocks). The vertical joining strips were narrow so in the end I left them unquilted. Before beginning this quilt I stabilized the layers (backing, batting, top) by stitching in the ditch along the horizontal lines – I didn’t do vertical lines because I didn’t want vertical seams through the blocks.

I haven’t tackled a larger quilt – I think the boredom factor would do me in; in addition, I don’t have table space to hold that much fabric while the machine is doing the embroidery. My lap quilts are small enough that I can position the quilt fabric beside and above the embroidery hoop while the machine is doing the embroidery. It’s important not to have too much drag on the hoop – if the quilt hangs down the weight interferes with the hoop movement and the design doesn’t stitch out accurately.

So there you have it: Quilting In The Hoop – a technique for quilting a quilt using a home embroidery machine instead of a long arm quilter! Need more information? Ask for help using comments.

Improvisation #4


The inspiration for this quilt was simple – start with three predominant neutral colours, then mix in a bunch of coordinated batiks and improvise based on a few (3) large 16 1/2″ blocks, a dozen or so (in the end I had 13) 8 1/2″ blocks, two 4 1/2″ blocks from each fabric, and a large number of 2 1/2″ blocks.

I began by laying out the three large neutral blocks, next the 8 1/2″ coloured blocks, the 4 1/2″ blocks, then the small blocks which I’d created by sewing short strips of two batik fabrics then cutting pieces 2 1/2″ wide block pairs. I couldn’t sew long strips together because I wanted more colour combinations than that would have given me. So I mixed and matched shorter strips to get 4-5 pieces from each. The few small block pairs I had left over were incorporated into the back.

I quilted the whole using a 200 X 200 embroidery hoop with an open flowing embroidery design that just about filled the hoop. Before I did that, though, I gave some thought to simply stitching randomly spaced vertical and horizontal lines across the quilt surface. It may look simple, but stitching those lines is a manual task, quite time consuming, and hard on my neck and back. So in the end I opted to embroider the quilt blocks with an 8″ X 8″ design.

Final dimensions: 48″ X 64″. A good size for a lap quilt. I bound the quilt using the same fabric I used for the accent strips on the reverse side. As usual, this is a reversible quilt.

Quilting Class – Jelly Roll Quilt

So here they are – the jelly roll quilts the gals have been making – stitched in the ditch – next to be quilted in the hoop. We got started on that today.


Great quilts, all! I’m looking forward to seeing the finished quilts.

Here are the backs – equally interesting:


Great work.

Jellyroll Quilt Class II

I wanted to construct a quilt using the same techniques that the class participants were using but I wanted to see what the quilt would look like in just two fabrics.
image

A half a dozen blocks later I could tell I needed some added colour so I inserted coloured centres in three blocks.image

The quilt laid out looked like this – not enough colour…image

So I added more until I was satisfied with how the coloured flowed within the quilt.image

I prepared an insert strip for the backing (in the photo it’s laying on the backing fabric) and sewed the backing together.IMG_7143

When I put a quilt together I tape the backing to the floor wrong side up, place the batting on the backing (right side up – who knew there’s a right and wrong side to batting but there is!), then finally the top (right side up). Then I get down on the floor and pin the three layers together.

This time I decided to try an idea I’d seen on pinterest using pipe insulation. I didn’t have pipe insulation but I did have three pool noodles!

I rolled the backing on one (so it would unroll wrong side up), the batting on a second (so it would unroll right side up), and the top on the third. This allowed me to assemble the quilt on my dining room table! I rolled out a small amount of all three and pinned them together, folded over the pinned part, rolled out a bit more, pinned, folded over until I had the quilt pinned.
IMG_7165

So now the quilt is ready to stitch in the ditch and be quilted in the hoop – I’m ready for class which begins in about 15 minutes so I better close up and get moving!IMG_7166

Placemats

IMG_7062

Just finished the set of eight placemats for Andrea’s kitchen. I don’t have a picture of her kitchen but the tile floor is grey/white, cupboards are dark brown, countertops also white/grey granite, and there’s a dark red sofa in the family room. Hence my colour selection.

This set of placemats used eight fat quarters (a fat quarter is half of a 1/2 m of fabric rather than 1/4 m from the width of the fabric). They are stacked and cut into pieces (the pieces from each fabric are all the same size and shape), then you mix and match to create the placemat. Very efficient use of fabric – very little left over.

Finished dimensions: 17″ x 13″ – a good size for a placemat. I used a brown/brown printed fabric for the reverse.

I could have completed the placemats with a binding but used a “pillowcase” finish instead – stitched the quilt sandwich in the following way: back fabric wrong side up, pieced top fabric right side up, batting. The edge stitching starts part way along one long side, and edge side, second long side, second edge side, and finally part way on the other end of the first side leaving an opening to turn the placemat right side out. The small opening (~ 4″) is blind stitched closed. I just like the look of the placemats unbound.

The quilting: stitch in the ditch along all seams both horizontal and vertical; very quickly done.

“Whale Watching” Now Hung

Having the piece stretched on a wooden frame was a good idea. The framers were able to pull it flat – the “bubbling” disappeared. When I got the piece home I added a muslin backing with a label. Then I walked around the house looking for a place to hang it. It ended in my living room replacing “Asparagus Field” which now hangs in the spare room. 

I’m pleased with how the finished piece turned out.

Ideas – Next Art Quilt

I’ve been wanting to do a floral piece for a while now. The Cana lilies on my back deck are gorgeous again this year and against a dark foliage background would be striking.

Or a rendering of a phalanopsis also against a dark background would be eye catching.

And my Echineacia have been wonderful again this year (even if I can’t get them to return in the pot). And this one has an insect visitor!

I took this photo of the three pilots “wind waiting” many years ago and it’s an art quilt asking to be made.

And I’ve have this dark image of the cloud funnel we saw from Kirk Hill in Parrsboro with Blomidon across the bay and the glider in a heap on the ground barely visible – it would also make an interesting piece.

I have a lot of great photos that would lend themselves to textile art pieces – choising which to work on next is the challenge!

Whale Watching II

Over the weekend I managed to do a lot on this art quilt – last week I had completed the piecing of the foreground, but there remained all the stitching to be done. I worked at a bit on Saturday and again on Sunday keeping in mind that “less is more”! Then I applied the narrow inner white border topped by the dark blue wide outer border – the mitres at the corners were as close to perfect as I could get them. However, as carefully as I was attempting to keep everything flat, I ended up with a bit of a buckle in the piece itself.

Before taking both borders off and starting over, I decided to take the piece to the framing shop for their thoughts on how I might deal with the problem. They suggested I could stretch it on a frame which would definitely help smooth the piece out – so that’s what I’ve decided to do. When I get the piece back from the framers, I’ll add a backing and a label (by hand, of course). I can’t put an embroidered signature on the front of the work because the piecing is too dense for the close stitching of a machine embroidery (I broke two needles applying the borders at the corners) – so a label on the back it will have to be!
I should have the art piece back in two weeks.

Now on to something new.

Whale Watching

IMG_5683

Just finished piecing the foreground for this wall art quilt. At the top you see the photographic collage built from three photos and an insertion to widen the panorama; below is the quilt. It took a lot of trial and error to establish the “layers” in the foreground – green fabrics that look like grass, shrubs, etc. is impossible to find – I’ve had to hint at the different vegetation by using various green fabrics in my stash. Once the stitching is done, the whole foreground will blend better.

So next comes the stitching to make sure each piece of fabric is permanently attached, and to represent the horizontal flow of the vegetation. Once that is all done, I still have to figure out how to add piping (probably in white) as mat; and finally a wide binding (I’m thinking 2″) to frame the picture. I picked up some dark fabric a couple of weeks ago which may work well. But I think I still want to audition something else — so a trip to Atlantic Fabrics early this coming week to see if there I can’t find something better for the job.

Magic Squares Quilt

Having just finished the half square triangles quilt I wanted to link to the “magic squares” quilts – I did three of them but it seems I only wrote about one of them. So I thought it would be interesting to juxtapose all three of those quilts.

Here’s the first:

magic squares 1 front

This quilt was made from leftover jellyroll strips (I had a collection in shades of blue/turquoise and rust/gold/beige)- sewed 4 strips together not paying much attention to the colours I was picking up as I went along, cut the panels into 8 1/2″ blocks, put two blocks right sides together (strips at right angles), sewed around the outside, cut along the two diagonals – resulting blocks were 4 1/2″. I arranged them on the diagonal being careful to alternate the orientation of the blocks to get both pinwheels and squares. Added background triangles to square off the edges and two borders – a narrow one and a wider one.

The quilt back was the same fabric used for the background on the front with an added strip created from leftover blocks so the back would be wide enough.

magic squares 1 back

While I was finishing this quilt I could see quite a few other possibilities for layout and contrast so I did a second quilt using the same technique – cutting 2 1/2″ strips from a “scrap bag” I’d bought from Keepsake Quilting (each scrap bag contains twelve 9″ width of fabric strips in complementary fabrics).

Here’s the second:
magic squares 2 front

In this quilt the fabrics are subdued, all in a single pallet, with two fabrics of a bolder pattern giving some contrast. This time, I stitched the 4 1/2″ blocks on the straight which gave quite a different overall effect.

magic squares 2 backOn the back, in addition to the pieced strip, I added a narrow contrast strip just to create a bit more definition on that side.

Here’s the third:

magic squares 3 front

This quilt was made from another “scrap bag” – the fabrics this time were in shades of rust, brown and beige (I did have to swap out a couple of the fabrics from the scrap bag for something else in my stash that coordinated better with the set). Again, I arranged the 4 1/2″ blocks in straight rows (9 blocks in a row) taking care to stagger the resulting larger blocks, which formed squares, in rows that created a noticeable diagonal – you can see that in the photo if you follow the orange squares from the middle left to the bottom.

To make the quilt the final size I wanted I added a narrow border of the backing fabric, and a wider border pieced from the fabrics used in the blocks.magic squares 3 backThe back consisted of a wide strip created from leftover blocks, a 1″ sashing of backing fabric on each side and two contrasting stripes. The way in which the blocks were constructed is obscured by the final layout – so a simple technique produced a rather complex design!

I can think of many more possibilities with this “magic squares” technique – just depends on the range of colours used for the strips and the layout of the resulting blocks. I haven’t tried it, but I wonder what the design would be like if instead of cutting along the diagonal, after sewing two 8 1/2″ blocks together, I cut unequal blocks on the horizontal and vertical?

I need to look at the jellyrolls I have and think about what I might do with them.