Monpei – Revisited

The Start Of A Drafted Pattern

I decided to take the Monpei idea further and create a “pants” pattern from it – two rectangles – one each for the leg front and leg back. Instead of the triangular gusset I grafted the crotch triangles onto the rectangles (10 1/2″ x 40″), curved the crotch additions using a French curve, raised the centre back by 1″, took the centre back in by 1 1/4″. I also added “jeans” pockets. The waist I finished with a facing and elastic at the top.

At some point in the past I had bought this Sandwashed Cupro Blend fabric online from Blackbird Fabrics.

Cupro is a ‘regenerated cellulose’ fabric made from cotton waste. It is made using the teeny tiny silky cotton fibres, known as linter, that stick out of the cottonseed and are too small to spin. The linter is dissolved into a cuprammonium solution, which is a mixture of copper and ammonium, dropped into caustic soda, then spun into fibre. Much like Tencel and Modal, cupro is a plant-based material that is chemically processed to produce the resulting fabric.

Cupro is said to have all the positive qualities of silk: it’s silky-smooth and drapes just like the luxurious material. 

https://goodonyou.eco/what-is-cupro-fabric/
Top Tucked In

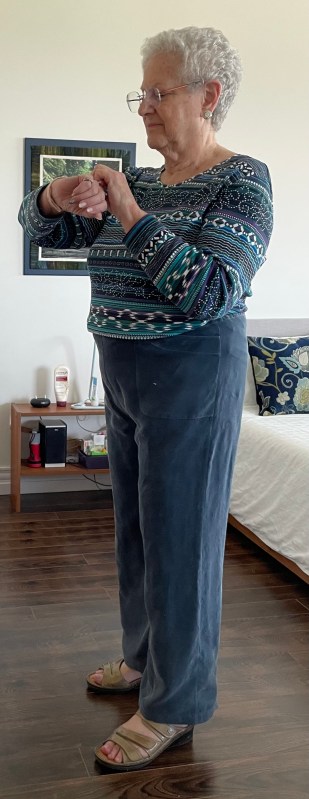
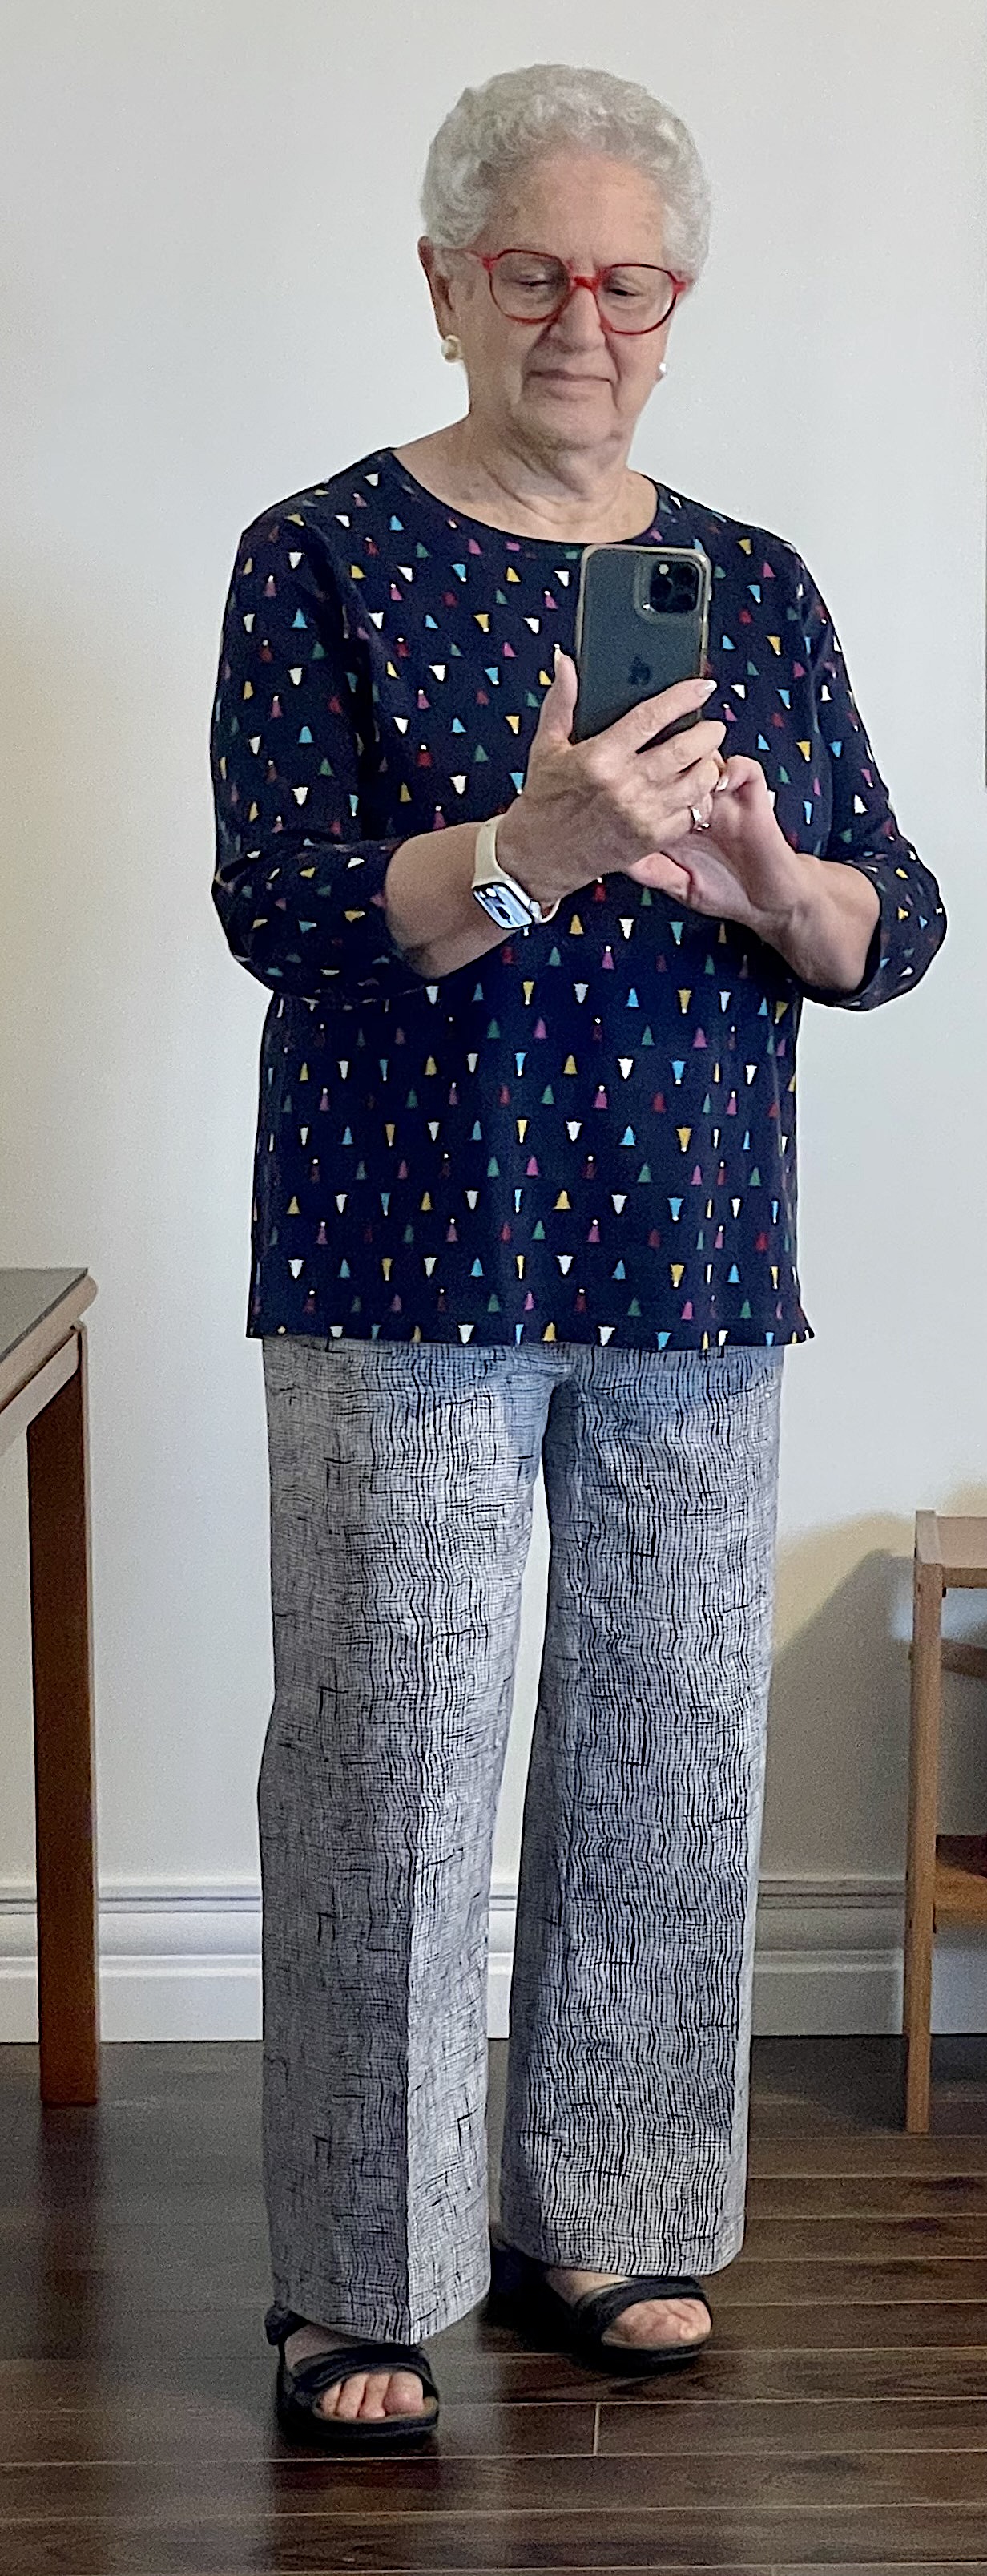
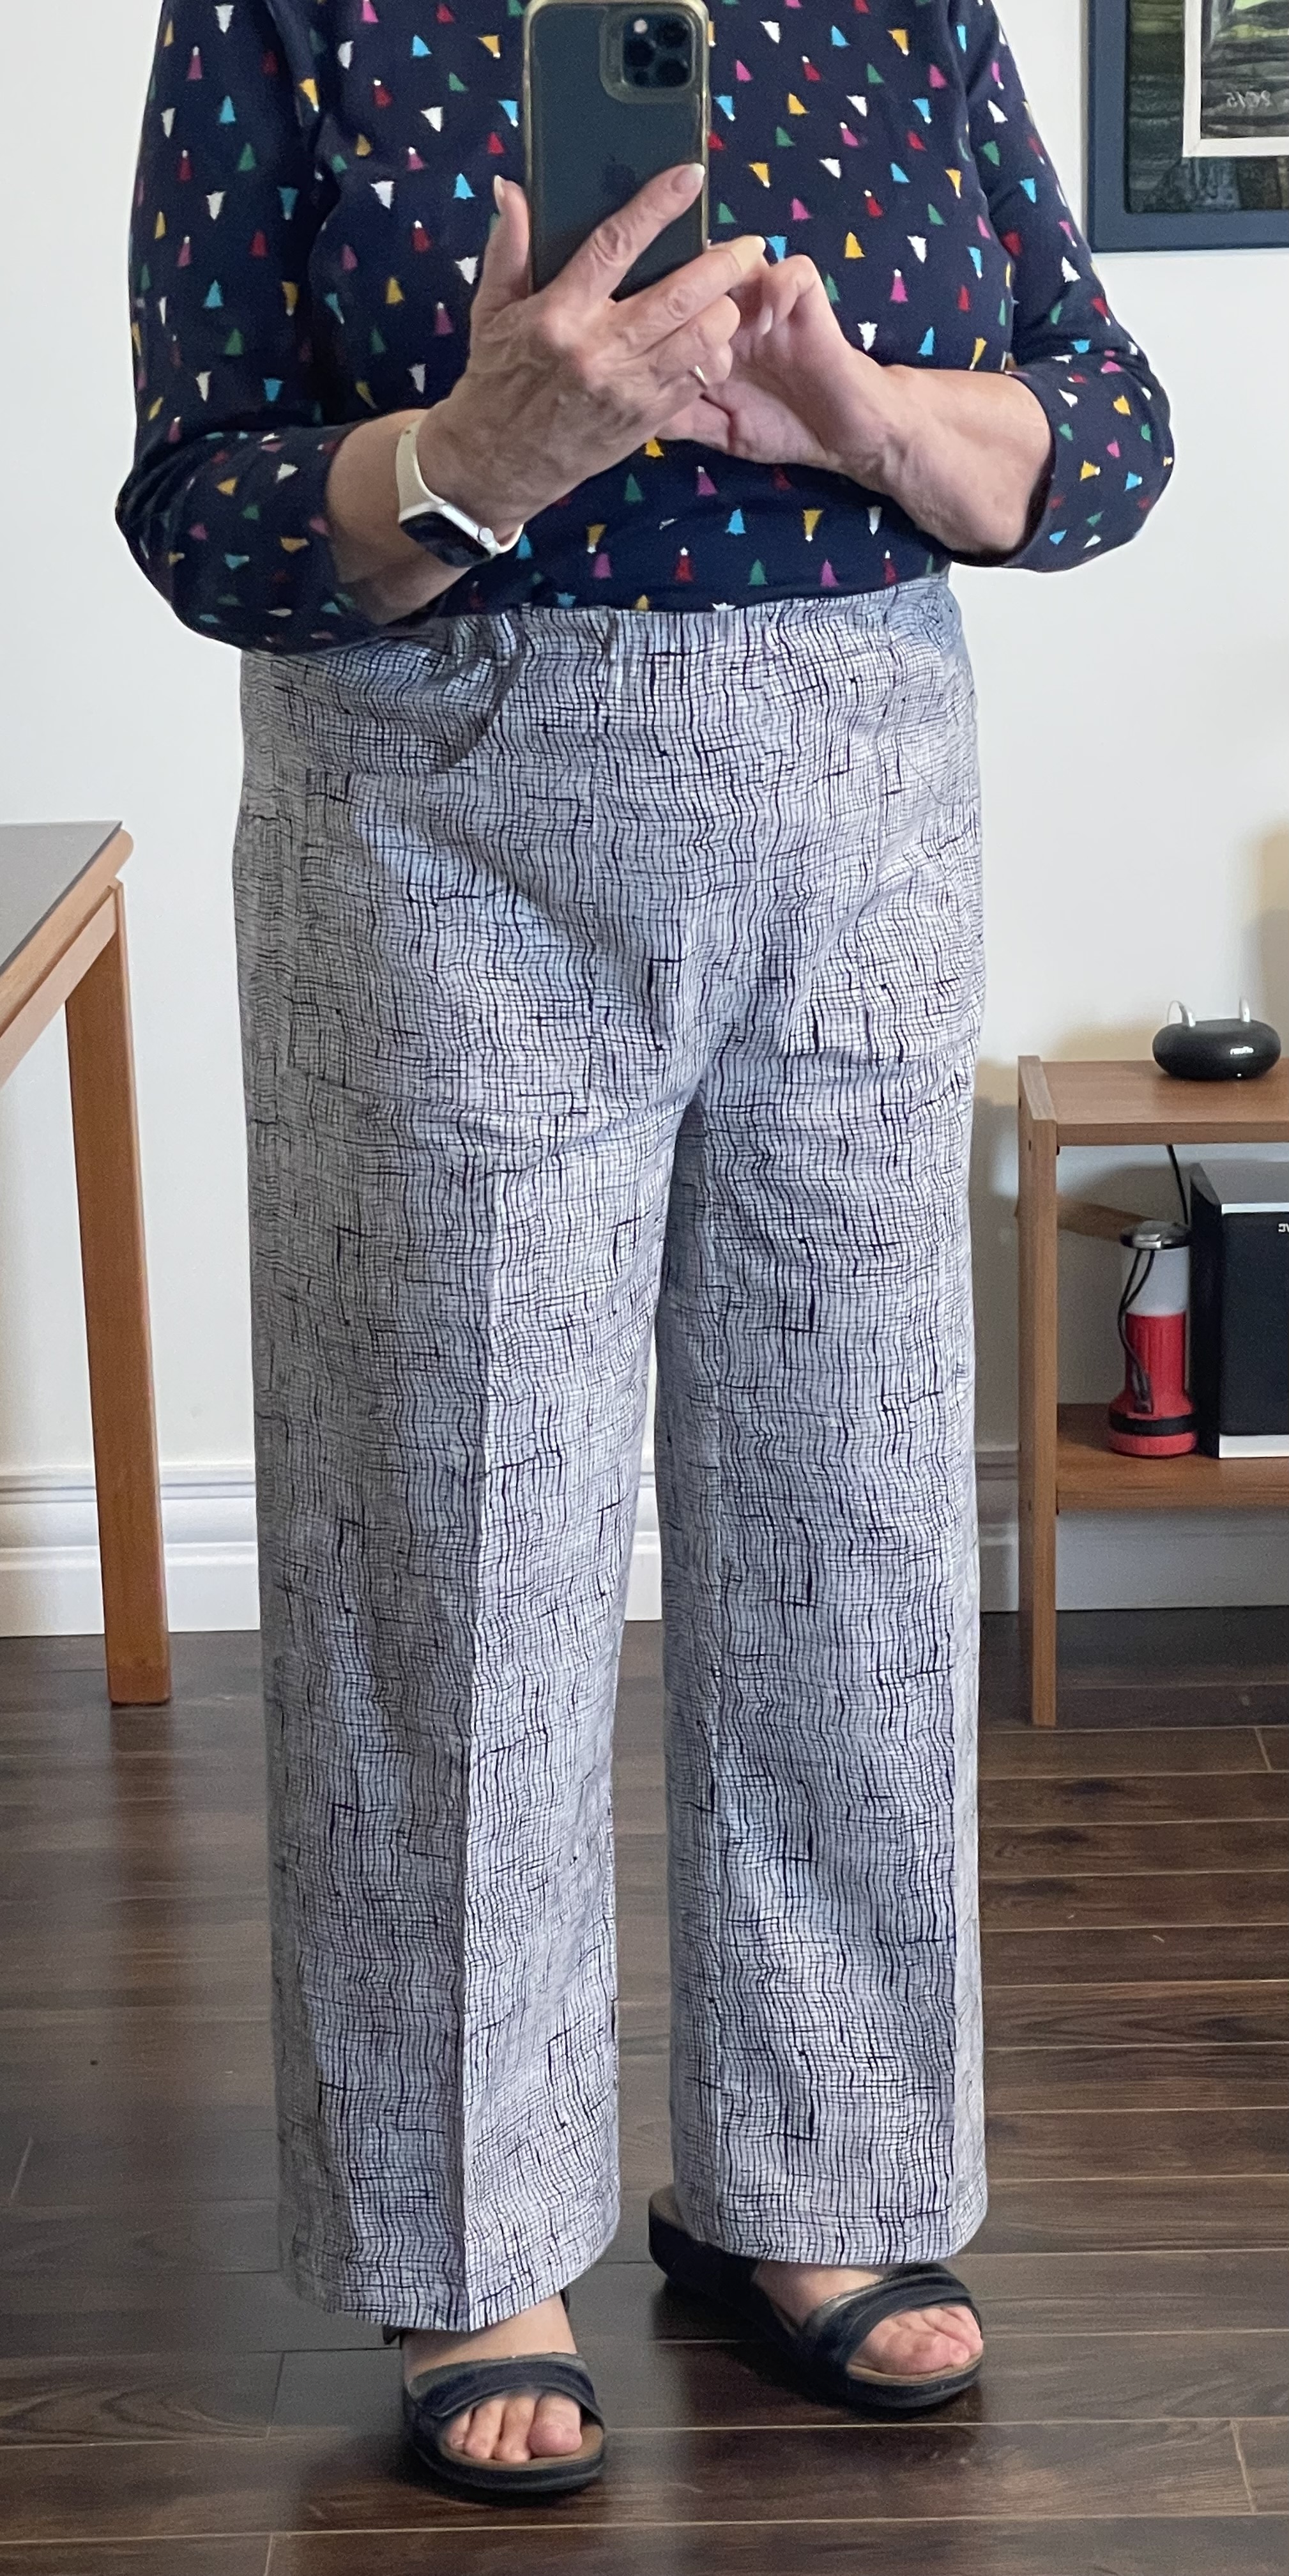
Not the most flattering photo but I wanted to show more of the top of the pants and how they fit – I tucked in the t-Shirt. The pants fit rather well both front and back.

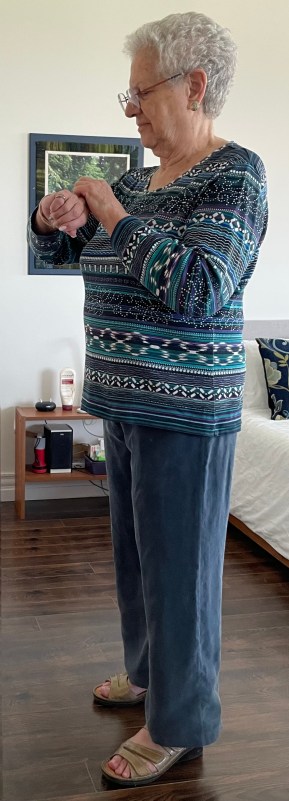
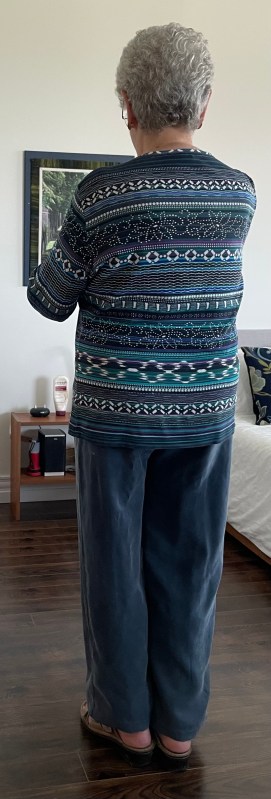
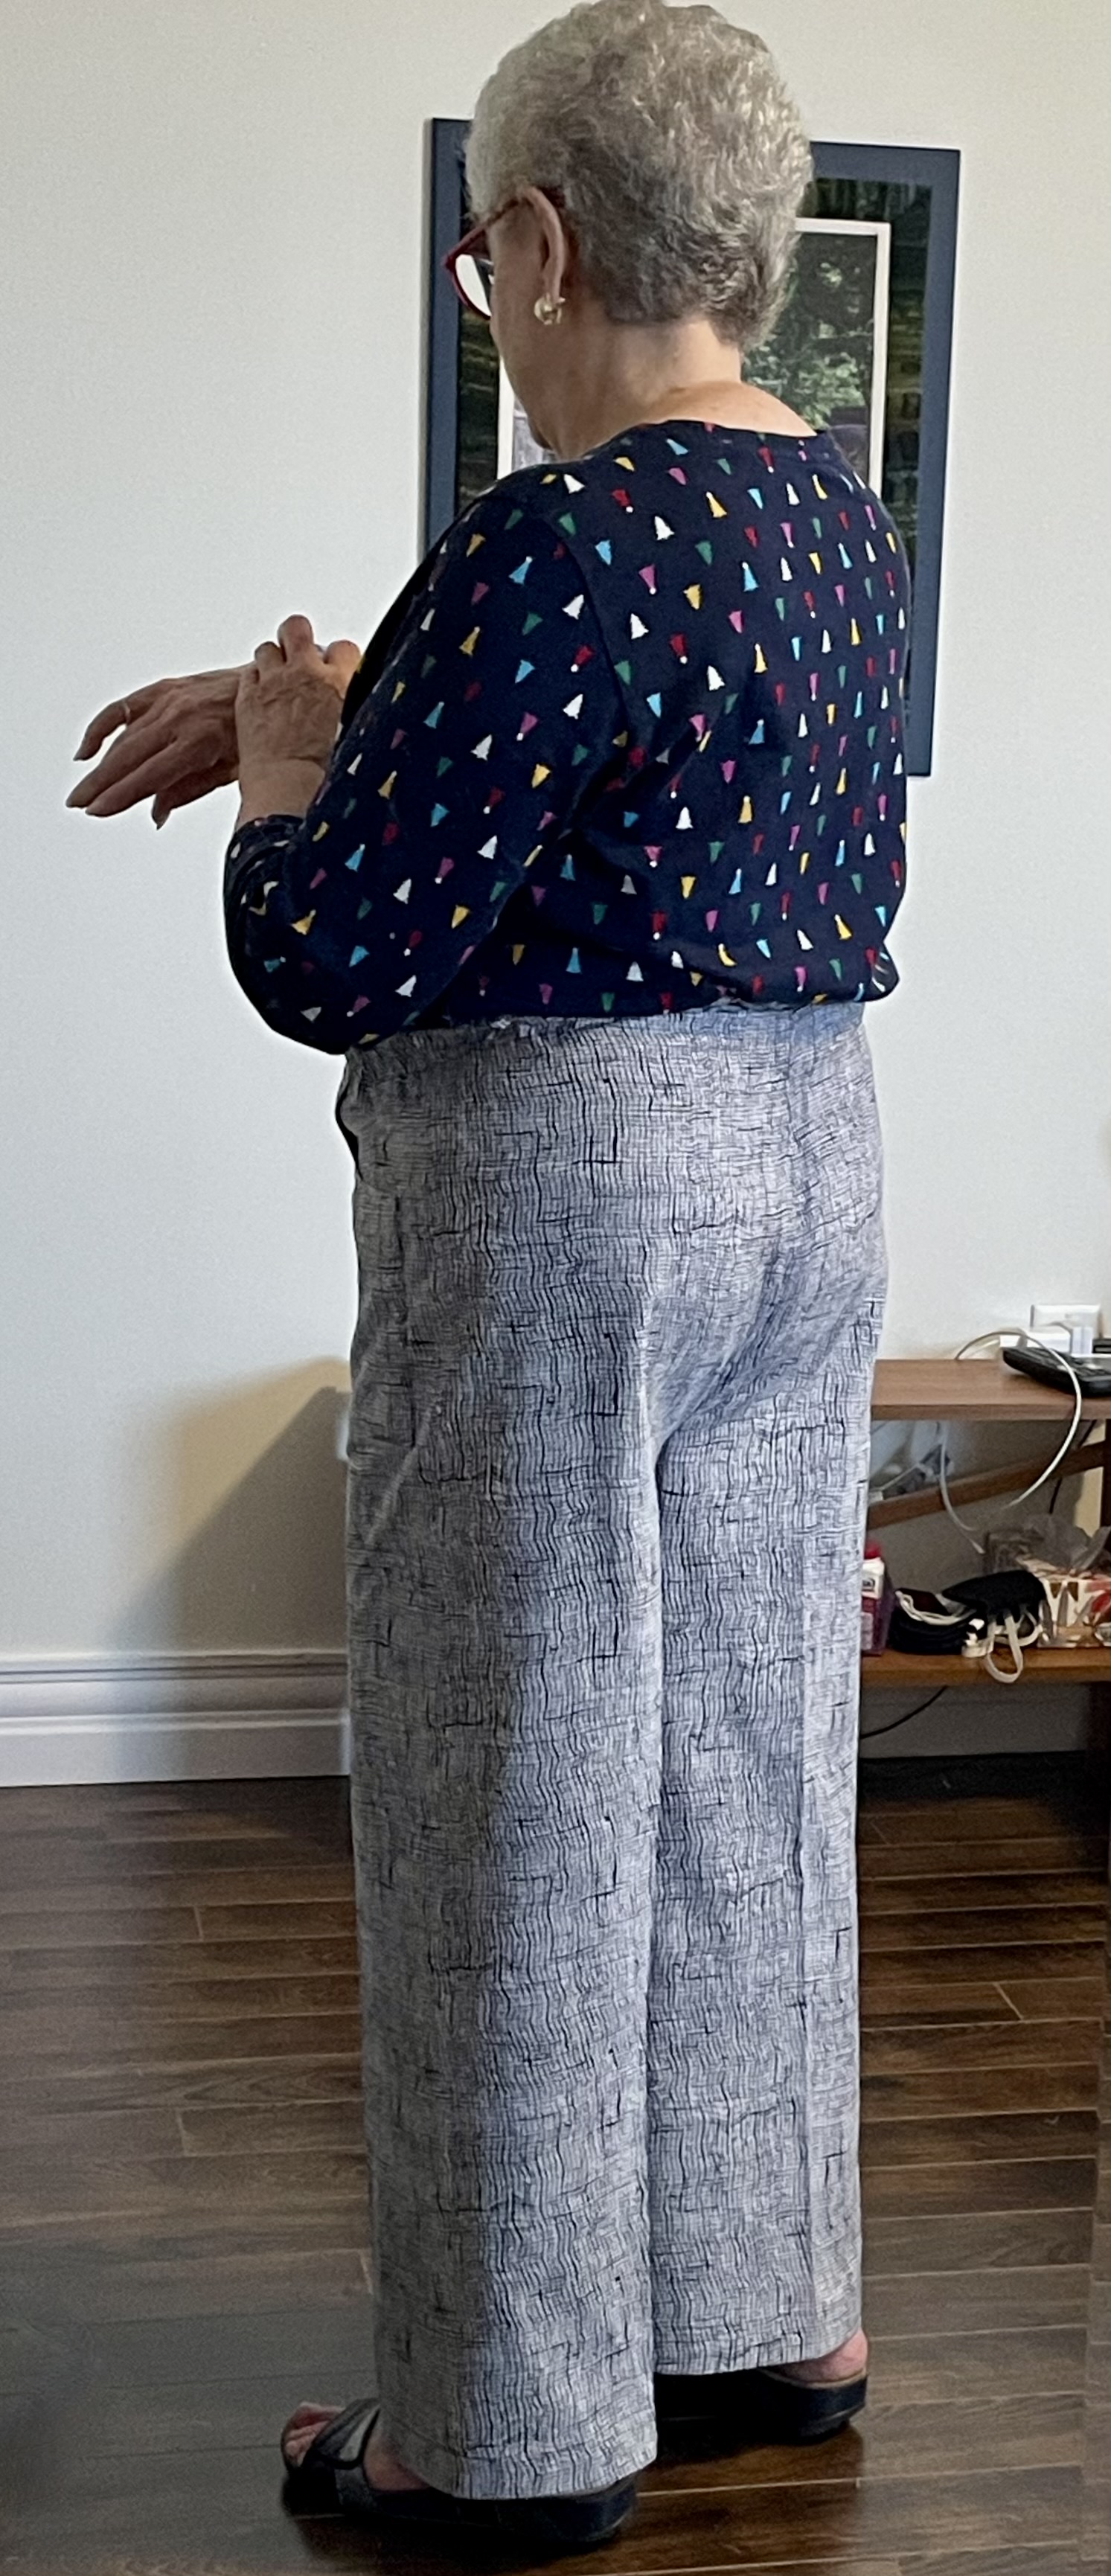
The finished pants hang/drape quite well – no pulling at the front crotch, the side seam is straight, the back hangs nicely from the bum. I purposely hadn’t pressed the centre front/centre back to allow the drapey fabric to fall where it wanted. However, it turns out there is absolutely no give to the cupro fabric so when I sat in the pants they pulled tightly across my lap and wrinkled a lot.

This is, after all, just another experiment – I’ve ended up with a wearable muslin (although I can only wear the pants one day then they have to be washed – pressing alone doesn’t eliminate the wrinkles).

So how do I change the pattern to reduce that amount of wrinkling? Obviously by adding a bit of fabric across the front. That’s what I plan on doing next – I will add 3/4″ to the body portion of each side seam, along with a fly front as well as shaping the side seams so the top fits without elastic (although I may still want/need elastic in the back).

I’ve already pulled from my stash a piece of rayon I bought in Bali in 2014. It’s another drapey fabric which should result in a comfortable loose-ish garment. What I’m aiming to accomplish is a reasonable fit so I can make corduroy and wool (yes I have several gorgeous lengths of flannel I bought at Britex in San Francisco in 2015!) pants for winter.

On to the next experiment.

Monpei Finished

Just finished the pants. Simple to make, and I can tell these are going to be VERY comfortable!

I was careful to make the crotch gusset long enough that the inseam is straight. The pants are cut from two rectangles; two triangles (which become the crotch gusset) are cut from the top/sides – I couldn’t do that because my waist is the same as my hips. So I cut the two rectangles (leaving them as is) – I merged the front and back leg into a single panel – so no side seam – but making sure the centre of the panel was on the straight of the grain. I also merged the two crotch triangles into a single long triangle with the vertical of the triangle on the straight of grain so I end up attaching a single gusset, rather than two triangles (a narrow one on the front inseam and a wider one on the back). The widest part of the gusset triangle is positioned at the crotch depth position in my case 12″ at the back/11″ at the front. [Click here for full instructions on how to make a montpei. (Click here for the original instructions.)]

When I tried on the basted panels (with crotch gusset sewn in) I could tell the centre back was going to be too short (I could have adjusted it by dropping the crotch gusset but instead I added a back yoke (2″ at the centre back grading out to the sides); I left the front crotch depth as it was. (I also took in the waist 2″ at the centre back – I didn’t need the extra fabric to pull the pants on.)

Because I wanted to add front pockets to the top of the panels I added them at this point; however they should have been sewn on while the panels were flat – to stitch them I measured 3 1/2″ from the centre crotch line marked it with a Frixion pen, turned the pants inside out so I could stitch the pockets with the panel “relatively” flat. Because the monpei have no side seam, I stitched down the side that would have been included in a side seam.

I created a facing for the waistband, attached it, strung elastic through the sleeve that created. I finished by top stitching the doubled over hem.

Done.

Here are the pants with my shirt tucked in so you can see how the top fits and the pocket detail which is hidden when the top is on the outside.

Although these pants have an unfitted straight leg, they fall nicely from my bum. The wider leg is easier to sit in, and the hip, while snug, is plenty wide enough to permit bending over.

BTW, I finally figured out how to get a reasonable photo of myself – I have a tripod which I set up so I didn’t have to focus the camera on my phone, I just had to press the shutter button on my watch – letting the camera remain focused and steady! (Duh… Don’t know why I didn’t occur to me to use the tripod before. Makes getting side and back pictures much easier!)

Because these montpei fit so well, I’m going to take the time to draft a sloper with the two crotch gusset triangles integrated into the inseam thereby eliminating the gusset (as they are on a regular pants pattern). I will adjust the centre back taking it in at the waist and extending the back crotch depth. My inseam seems to be about 26″ in these pants. I will set leg length at 26″ + 1″ for the hem. I’m curious to see how these would turn out in something like a light weight corduroy.

The finished fit is definitely the best I’ve encountered so far! This may be the starting point for any pants I want to make for fall!

Ahead Of The Curve

I’ve been making clothes for myself for decades. I stopped being able to buy pants that fit without alteration since my early 40s; hence my long-term quest for pants patterns and techniques for fitting pants that would yield me something that fit me. My top measurements are closer to a single size although for the past decade I’ve avoided fitted shirts, t-Shirts, etc. because my waist has slowly, but surely, increased and that affects how any top I might make will fit.

I was laughing a couple of weeks ago with MaryAnn (a sewing pal) about a FBA (Full Bust Adjustment), saying what I need more is a FTA (Full Tummy Adjustment). She got up, went into her sewing room and returned with a book:

Book Cover

Everything you want to know about fitting patterns is here and if your question isn’t answered in the book, it will be found in Jenny’s blog: Cashmerette Sewalongs + Tutorials. Her foray into garment making for largish women is very informative. Her learning to make garments for herself led her into pattern making for curvy women. She’s recently introduced pattern sizes from 0-16 (the original sizing was 12-32). These simple, generally unadorned garments are suitable as a place to start for anybody. She wants women to look good in their clothes and to feel somewhat stylish.

While the book explains the complete range of adjustments in great depth, Jenny starts by describing “grading” – how you use today’s multi-size patterns to fit the different parts of your body. My challenge is I’m right between her smaller sizes and the larger sizes. With a size 12 bust, a size 20 waist, a size 8 bum, I can’t actually work within a single size range. I’m about to write Jenny to ask her advice concerning which size range I should be working in. I’m guessing because I’m a smallish person she’ll recommend working in the 0-16 range and grading my waist beyond the pattern rather than working in the 12-32 range and grading beyond the pattern to fit my bum. I’m going to take the basic pants pattern from the back of the book and size it to fit me (it’s a 12-32 pattern) to see where I get with it. If I’m able to get a fitting muslin using a graded sloper based on this pattern, I’ll be able easily to design whatever features on want on my pants from there.

Let you know how I get on!

Denim Pants

Trying to take photos of the pants I’m modelling is so difficult. Not great photos but adequate to show how the pants fit.

I finished the denim pants (made from the same pattern drafting I used for the white linen ones this morning. This was a test run to see whether I could use the pattern sloper without making any further adjustments. I could. The nips in the waist I’d taken worked out fine. The length was good. The front fits in the crotch without pulling, the side seam is perpendicular to the floor, the back falls straights without being baggy. I can sit in them confortably. The back crease is really a seam incorporating a dart under the bum (which is now in the right place).

I did add elastic to the back yoke because when I sat down the back pulled down. With the elastic the pants seem to be staying in place.

I’ve ended with a cross between Jeans and Trousers – I’ve used a jeans pocket (not a slant or inseam pocket used for trousers), incorporated the back yoke used to fit jeans at the waist, a fly front for easy access; but I’ve added the back dart down the centre of the pants, a straight leg, with limited top stitching that’s de rigueur for jeans, finishing the hem with a single top stitching, giving me a simple look more like trousers.

With my fingers crossed, in a couple of months, I will use this sloper to make some corduroy pants for the fall. That will let me purge some of the winter pants in my closet; some of which have been fitted and refitted many times as the years pass and my shape changes. This fit should last into the fall.

Let you know how I get on!

The Thing About Pants

The thing about making pants is the fit changes over a six month period – my weight distributes just a bit differently so the pattern that worked last year won’t quite fit now even though my weight hasn’t changed much.

I bought some white linen and a medium weight denim several weeks ago. I decided I had to get those white pants done because it’s almost August and I have nowhere to store the fabric till next spring!

Finished pants draped over a chair

I didn’t want to make another pair of pull-on pants. I wanted a fly front which is actually a lot easier to get into. I pulled out my Sandra Betzina jeans pattern Vogue 7608 which I’ve been using since 2015.

My challenge is I have a very flat bum, skinny thighs but a full belly which makes my waist measurement close to my hip measurement. I last used the pattern in May 2019 (the date I noted on the draft) so I wasn’t prepared to trust the sizing of my draft – I figured I should at least lay it against my pull-on pants pattern (most recently used in Feb 2022) and was surprised how close the two actually were. Then I did what I needed to do – I took my body measurements yet again: waist, high belly, hip (at fullest), thigh, and checked them against the pattern. On this pattern I’m a size A through the bum in the back but I need a C from hip to waist. In the front I’m a C from crotch to waist. I checked the grading on my draft against the original pattern to make sure I was close to a working size.

I intended making the dart adjustment in the pants back but I needed to make sure I was getting it centered so I balanced the pattern, front and back, then added the dart to the centre back. This pattern has a back yoke (no waistband), with a waistband in the front. The smart thing was to start by working “Top Down/Centre Out“. I cut out the 2 yoke pieces, the two front waistband pieces, sewed them together, then tried it on. The fit wasn’t bad, a reasonable amount of overlap in the front, so I decided to go ahead and cut the fabric.

I was using my white linen fabric to make a muslin – if the finished garment fit I’m ahead of the game, but as usual, I was prepared to throw out the whole effort if it didn’t work.

I did all the prep work – fused interfacing where it was needed: back pocket facing, front pocket facing, waistband, yoke, both sides of the fly. I serged edges where I wanted to prevent fraying. I made up the pockets, added them to the front (I simplify the pockets by adding them to the top, rather than inserting them from behind the fronts). Now here’s where I deviated from Top Down/Centre Out construction. If this was going to be a wearable garment, I needed to set up the fly front. So I went ahead and put in the zipper, added the fly facing and top stitched the fly in place (Here are instructions for this simple fly front) (Here’s a link to a video.) With the fly completed I added each front waistband piece.

With the front done, I worked on the backs. I sewed the yoke to each back side, then sewed the back dart in each back piece, serged it (1/4″ seam allowance). Added the back pockets to each side. Now I returned to the Top Down/Centre Out technique – I sewed inner leg seams (no serging), sewed the outer leg seams (no serging), stitched the crotch seam( no serging), then tried on the pants. I could see I wanted to take in the side seams 1/2″, I wanted to remove about 1/2″ from the back crotch inner leg to flatten the bum a bit more, I also wanted to bring the back dart higher so it would finish under the pocket, finally take in the centre back 3/8″ at the waist.

I made those adjustments (marked them on my pattern draft), then I serged the seams. Tried on the pants again. I was satisfied with the fit, so I added the waistband and yoke facings (having matched them to the waistband and yoke on the pants), top stitched around those elements on the right side of the garment. I marked the inseam (27″), folded and pressed the hem, then finished the hems with a cover stitch. Last I added a button hole on the front waist tab, and a button and tried the pants on again. Overall the fit was good – but the pants were too long.

I took out the hem, shortened the legs by 1/2″. Cover stitched again – still a smidge too long. I shortened them another 1/2″.

The front fit is close but the added length interferes with how the legs fall – this was before I shortened, and reshortened the pants. The back is close – I just need to raise the dart to remove the slight bit of fullness under my bum. I’m not going to do that with these pants, by the time I’ve sat in the linen for a few minutes the back will be stretched out – I marked that adjustment on the pattern for the denim which I will make next.

All in all, after shortening the legs, I have a pair of wearable pants. A good couple of days effort.

Fat Quarter Placemats #2

“Bright” Fat Quarter Placemats, Assembled

I wasn’t sure, yesterday, whether the purple fat quarter placemats counted as “Bright”. Today I decided to try wild – I selected an orange batik from one drawer of my stash, paired it with the leaf print, chose a green “fossil fern” piece, ended with a medium yellow “grunge”. They go together – definitely colourful. Probably not “dining room” but certainly “kitchen”, wouldn’t you say?

I’ll show the two sets to Sally next week and see what she thinks. This set would definitely catch someone’s eye hanging on the wall in Sew With Vision!

For cutting and sewing instructions: Stack ‘n Whack Fat Quarter Placemats

Seatbelt Covers

When you’re short, no matter how you try positioning your car seatbelt, the belt cuts into your neck when you’re wearing a t-shirt, or low cut top of some sort. In winter it’s not a problem but when I’m wearing light clothing I definitely have a problem.

A gazillion years ago a friend brought me a pair of seatbelt covers from Hawaii, of all places. I guess because they wear light clothing year round it was a solution to a pervasive problem, there. In any case, when that set of covers wore out, I made myself a new pair. Other people wanted some, so I did a small production. Each time I replace my old seatbelt covers, I make a batch for gifts.

8 Sets of Seatbelt Covers

The set I made for myself used a large floral print in red (I have a bright red car). Print fabric doesn’t wear as well as batik but I liked the colour. However, I’d bought these three batik fabrics on sale several weeks ago precisely with seatbelt covers in mind.

They’re easy to make.

  1. Cut a 7″ strip of fabric from the width of fabric (WOF), then cut that strip in half giving you two pieces – 7″ x 22″ each. Cut a piece of batting 6″ x 21 1/2″; lay it down the middle of the fabric aligning it with the cut fabric end, leaving the selvage edge with the fabric extended beyond the batting a wee bit. Fold the cut end about 1/3 of the way over the batting, bring the selvedge edge over that end and stitch at the selvege edge to secure both the fabric and batting. (Those are the two seams you see in the middle of the cover.) In other words, the overlapping seam which joins the ends of the fabric ends up in the middle of what will be the “under” side of the cover. The finished length of the cover should be close to 11″.
  2. Cut Velcro hooks and loops paired strips 10 1/2″ in length. Sew the loops (loop side up) to one long edge on the “top” side of the cover, turn the cover over, fold in the loop tape, tuck the top edge of fabric beneath the loop strip, then sew the other edge of the loop tape in place, turning under the bit of fabric extending beyond the Velcro when you get to the end. (That’s the seam you see along the length of the cover.)
  3. Attach the hooks strip to the second long side of the cover, again sewing first on the “top” side, then folding the tape to the under side and stitching it down.
  4. Fold the cover in half, and press the loops and hooks together. That’s it. You’re done!

Here is a link to instructions with photos that I provided the last time I made seatbelt covers.

BTW, this is all procrastination – I’ve got to get going on a new quilt and I have no idea what to make. I’ve been looking at photos on Pinterest looking for something interesting to tackle.

There are lots of interesting possibilities for improvisation:

I don’t have patterns, just ideas. Laid out like this, the Blocks and Stripes, and colourful Drunkard’s Path seem to be calling. Next step – go through fabric scraps and see what I can find there before going through the larger fabrics in my stash. I just gotta get started on something….

Kantha to Jacket

I’m getting organized to do a day long workshop in February on taking a Kantha bedspread and turning it into a jacket. I’ve probably explained what a Kantha is before but I’ll do it here again:

Kantha (meaning: “patched cloth”) refers both to the tradition of producing unique, quilted blankets (making something useful and beautiful out of discarded items), as well as the craft and stitch itself (a small, straight running stitch in Bengali embroidery). Here’s a link describing the work: https://www.shopdignify.com/pages/what-is-kantha

I got my inspiration from Meiko Mintz’s wonderful Kantha garments!

Here is my latest Kantha – a heavily embroidered pieced silk bedspread (with beading I’m going to have to watch carefully as I cut and sew the fabric):

A Silk Embroidered Kantha

The Meiko Mintz jackets are large and flowing

I’d love to wear something like that but I look better in a more tailored shape. In any case, I have pulled a bunch of jacket patterns from my pattern collection to share with the gals enrolled in the workshop.

I wouldn’t make any of these jackets as they are, but they provide ideas (and sizes) for necklines, front openings, pocket placement, sleeve shape and fit that give us a place to start. I’ll be suggesting the gals check out the Peppermint “West End Jacket”– it doesn’t look like anything but the pattern has lots of potential. It’s actually free but you can make a donation to Peppermint (which I did). You can download an A0 version as well as the tape-together PDF download. I was able to have the A0 version printed on large paper. Much easier to work from.

Now I have to modify and trace the Peppermint pattern pieces. I intend making the collar wider and pointed, I will keep the front drop shoulder but delete the back yoke (keeping the placement of the shoulder seam), change the patch pockets to welt pockets, make the jacket a bit longer and compensate by adding a couple of extra inches to the front so the jacket hangs straight, add a bit of flare to the front (not the back – I want the back to hang straight). Next I will trace the modified pattern pieces in my size, cut them out and start to play with placement on the Kantha – I want to showcase as much of the elaborate embroidery as possible, avoiding beading where I can (removing beads if I can’t miss cutting or sewing into them).

I’ve sent the gals a blurb about supplies and other information they need so they’re prepared for our Feb 25th day. I’m looking forward to seeing what they end up creating!

Another Heirloom Project

Two weeks ago I was asked by a local sewing guild to offer a day-long workshop for the members. “What are you wanting to learn?” I asked. “Whatever you’d like to do,” the gal answered. No help whatsoever. I gave her four suggestions – she wanted me to describe them for her in an email, which I did. She emailed me a week later asking me to consider doing heirloom embroidery with the group.

The challenge was this: I spent over an hour online trying to find suitable patterns with a reasonable size front yoke that would work well for displaying heirloom techniques. I could find none.

The Hawaiian muumuu pattern I have used for close to 50 years doesn’t exist any longer, can’t hardly find a photo of it on the internet! It has 5 different sizes (from XS to XL) and I’ve traced the pattern for each size on Swedish cloth so they’re copyable but I don’t want to spend a lot of time at the workshop tracing and adapting the pattern. So I spent a couple of hours earlier this week trying to find a suitable pattern and finally came across this Bowen Dress

Bowen Dress (Peppermint)

It has a yoke that extends into the sleeves (ditch the sleeve ruffles! and add a “cuff” with a lace join and some decorative stitching either side of the join) – the yoke has an overlap that can be worn front or back (I’m eliminating that), the dress is humungous but the fullness can be scaled down easily by narrowing both yoke and skirt. I will remove the button opening at the top and lengthen as well as curve the bottom of the skirt in the front to offset the pulling up by the bust – all straight forward modifications.

I printed out the PDF and assembled the pattern and have marked it up although I haven’t yet traced the modified pattern pieces (I’ll do that later).

What I did was measure the width and depth of the front yoke, cut a piece of white batiste and started working on an heirloom panel.

Heirloom Panel Start

So far I have a centre piece of lace, with tucks, hemstitching, and pin tucks on either side. I plan on extending the heirloom work into the top of the sleeve area, although not all the way to where I’ll add the cuff.

For now, I’ll carry on with the heirloom work. Once I have the yoke panel done, I’ll trace the modified pattern pieces, cut out and sew the upper part of the dress then figure out how narrow and long to make the skirt!

I figured if I was suggesting this pattern as a starting point for an heirloom nightgown, I should try making one myself to see where the pitfalls might be. Once I’ve figured out the modifications I want to make, I’ll prepare instructions for the gals. They can choose to make the dress as is, or to change it in whatever way they wish. I’ll be prepared with recommendations.

iPhone Case – Revised

I’m scheduled to teach a class at Sew With Vision in a couple of weeks on constructing a smartphone carry case. I’ve written about the simple version I started with that had a single zippered side pocket. This version has two zippered front pockets as well to hold credit cards and other cards like health card, driver’s license, car insurance – the stuff you need to have on hand (not just photos on your phone). With these two additional pockets I no longer need carry a purse.

I made this case 3/8″ wider than the previous version to make it easier to slide cards into the zippered pockets. Both of these cases are “right-handed” – that is the zippers are positioned to be easily opened using your right hand. To make these cases “left-handed” reverse the closed position of the front zippers and place the side zipper on the opposite side.

I fully intended documenting the process while making the leather case but the process took over and I didn’t have the photos I needed to describe how to make the case. I made a second from linen (using fusible batting to stabilize the linen). I thought about adding embroidery but because the case is for demonstration purposes I decided it wasn’t worth taking the time. The only “decorative” feature are the bi-colour front zippers (the side zipper is a single colour because I used zipper tape and a pull).

The basic construction is still the same as the earlier version with the added work needed for creating the zippered front pockets. Here’s a link to the instructions for

iPhone Case With Two Front Pockets + Side Pocket.

Give it a try. Let me know how it goes. My measurements are for an iPhone 12 Pro (3″ x 6″). Measure your phone and modify the specifications to work with your phone.