I played with the arrangement and the colour flow off and on yesterday – I’m stopping with this layout:
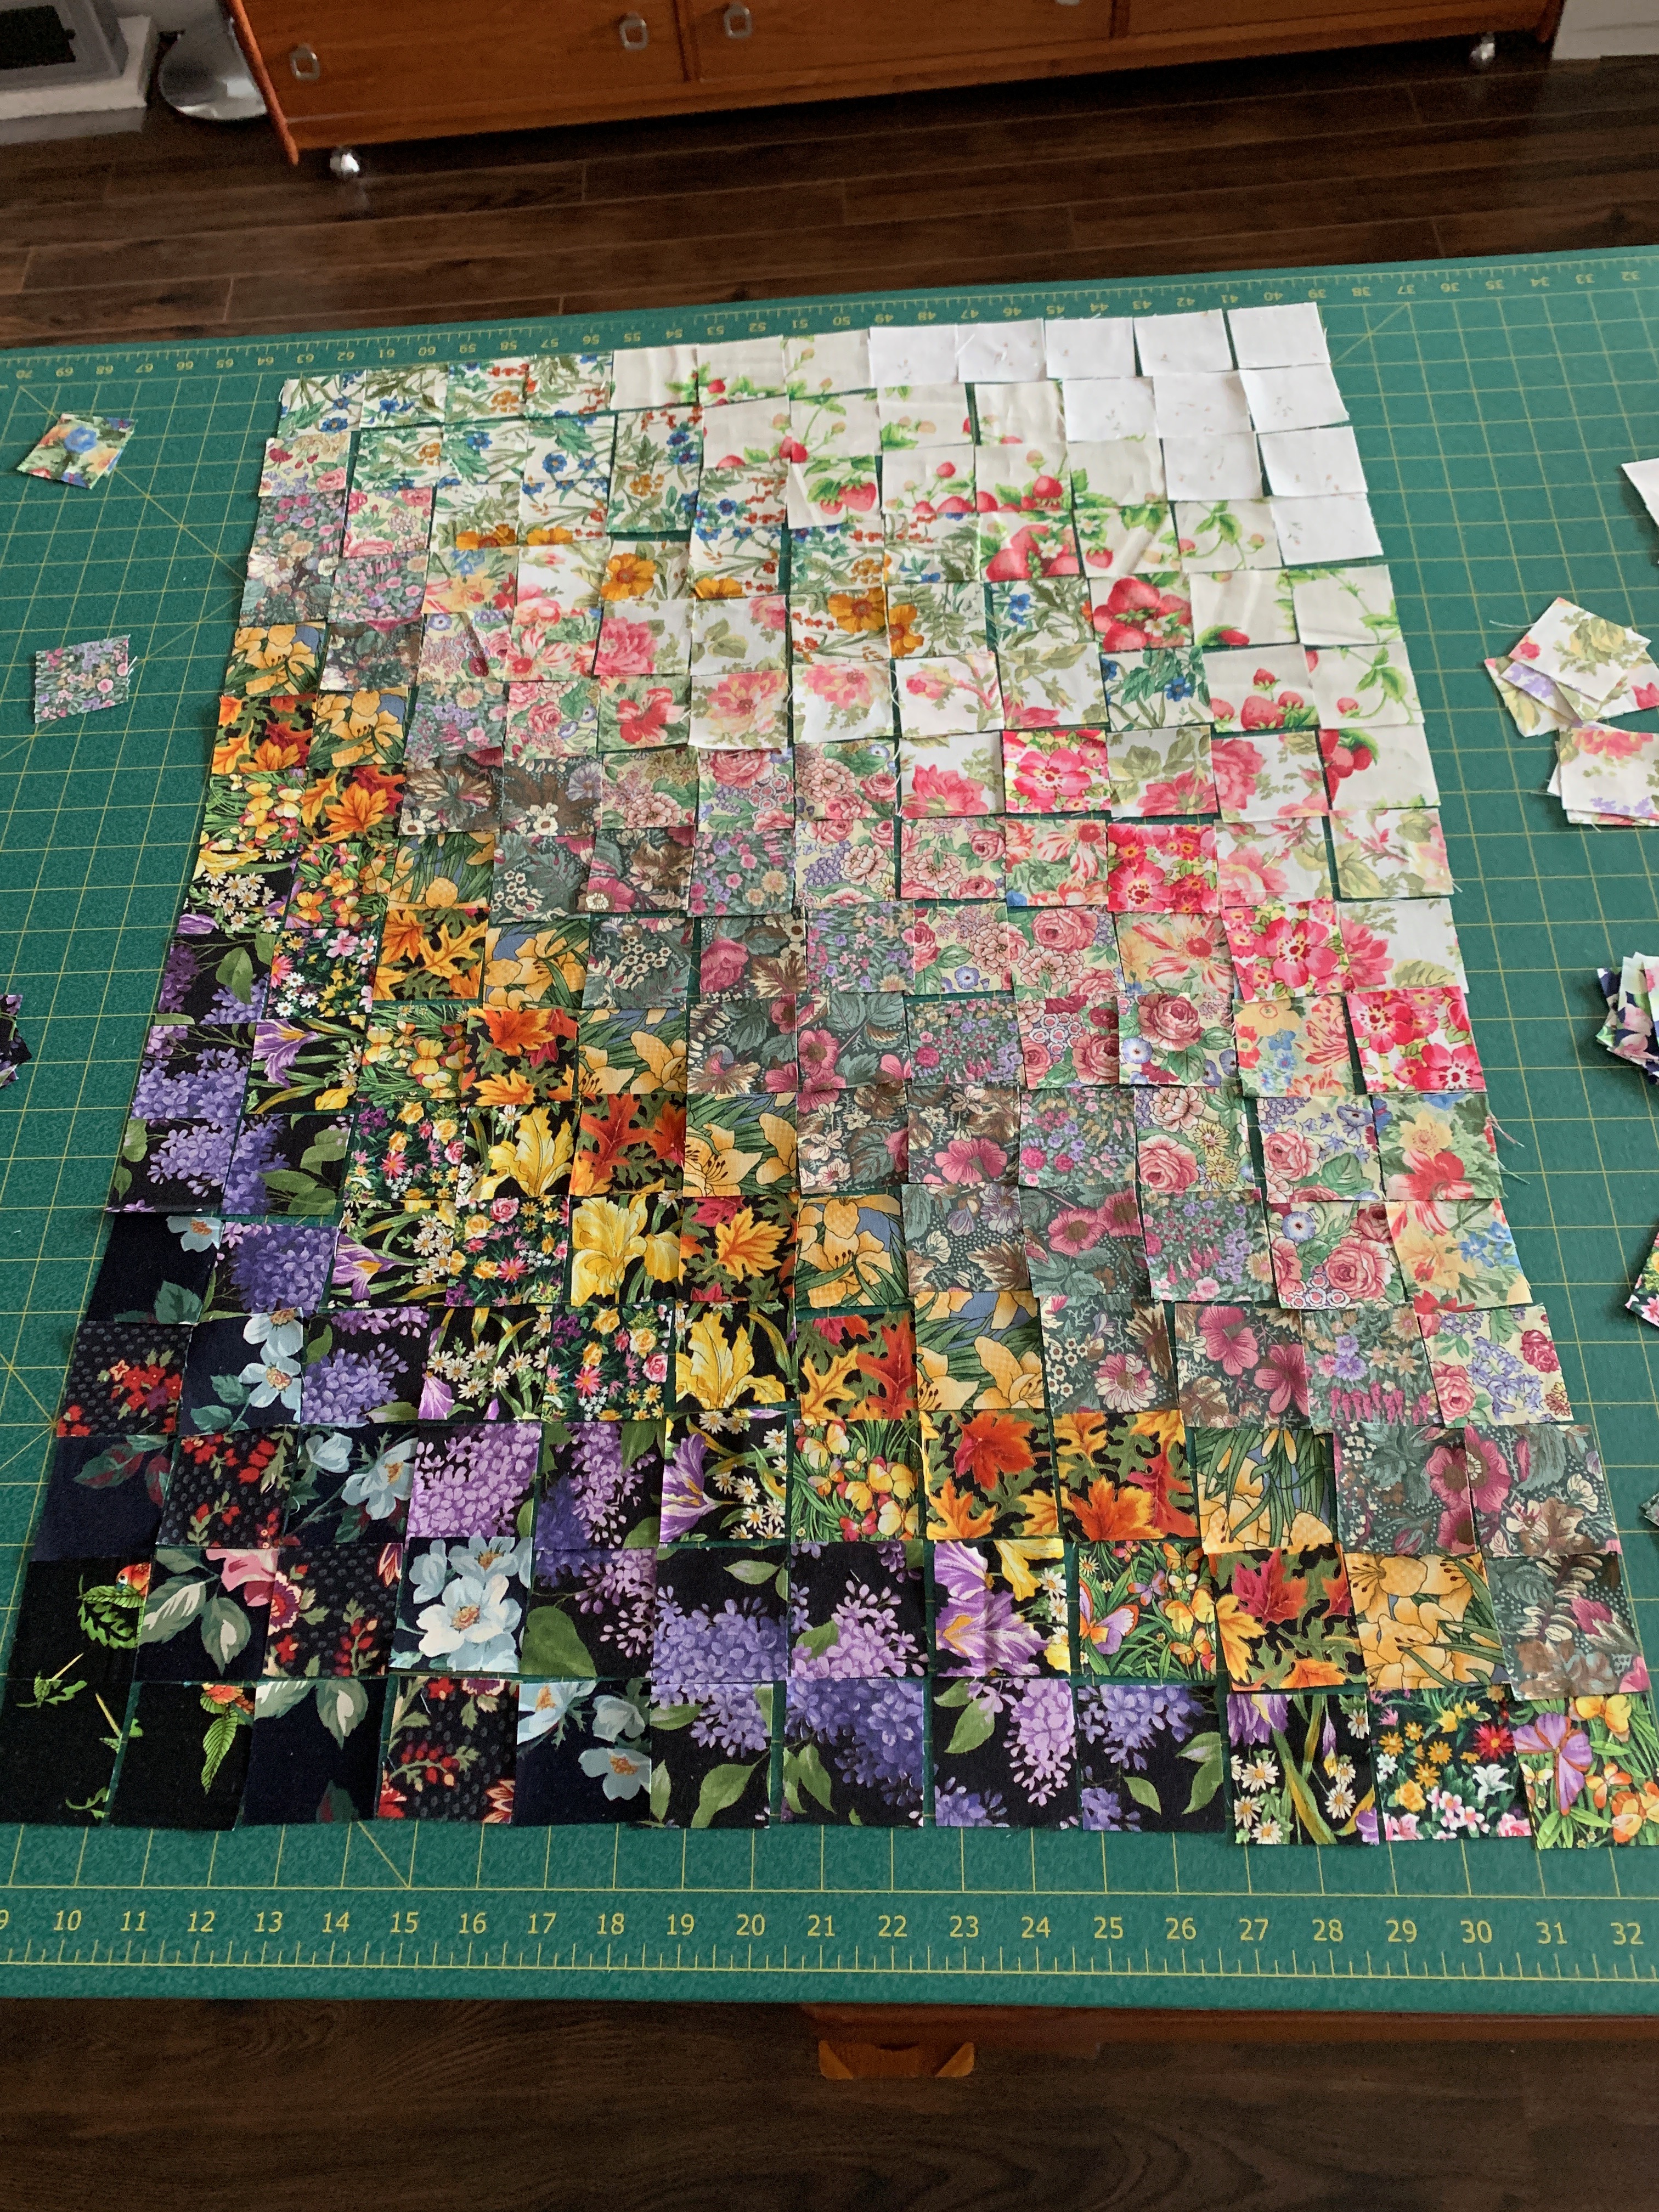
Laid Out
I worked at changing the block placement from linear on the diagonal to a more parabolic flow and also tried bringing in brighter colours toward the top.
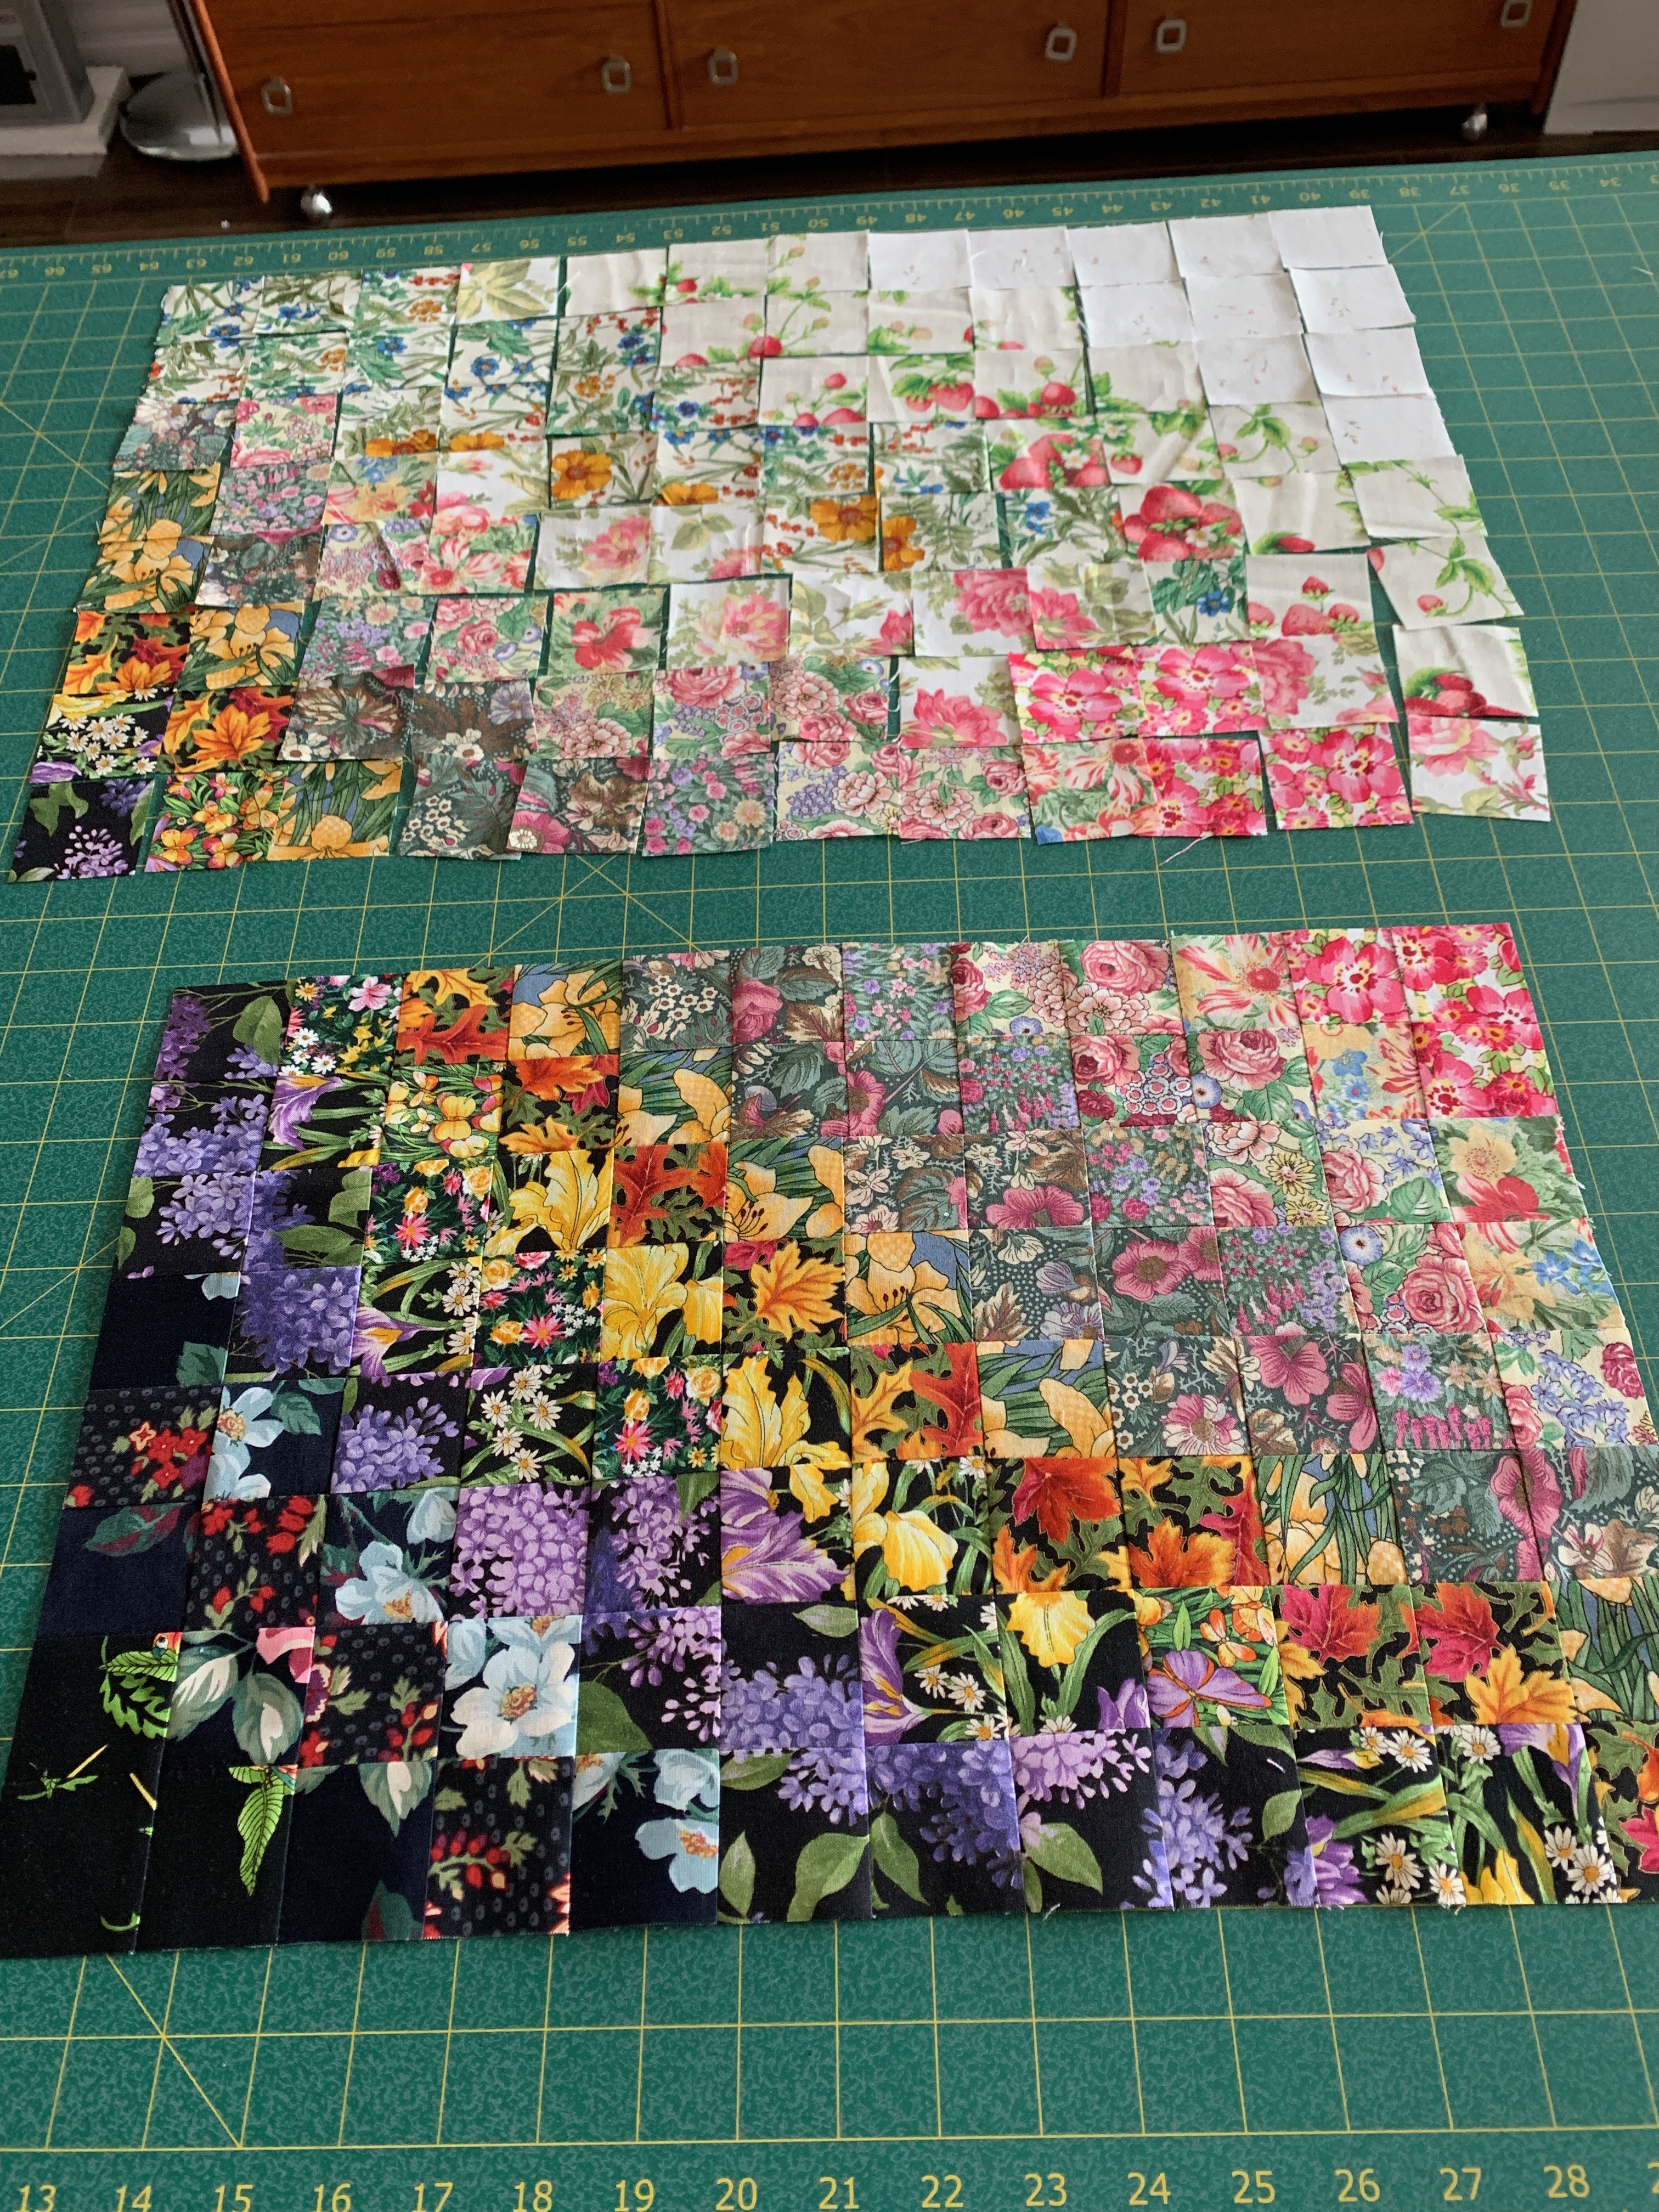
Half Assembled
The curved colour flow is stronger with the stitched blocks because they end up 3/4 the size (1.5″) of the raw 2″ blocks.
Assembling the blocks is a careful, slow process – I decided to work in pairs of rows, laying the row above on top of the blocks in the row below and rotating them 90˚ so I would be stitching the horizontal edge (12 pairs at a time). Next I pressed the pairs open, assembled 4-block units, finally stitched those together to form a 2-row strip.
I’m needing to be extremely focused while doing the pairing to make sure I’m reconstructing the block layout precisely. So far I’ve succeeded without having to take any stitching apart. I’ll have to be just as careful when I get back at the sewing later today!
I still think I want to add an appliqué of some sort because the panel seems unfinished – at least at this point. I still have no idea what I can add – I googled “watercolour quilts with appliqués” for ideas but everything I’ve seen doesn’t achieve the elegance I’m looking for. So once the panel is completed I may have to put it away and sleep on it for some time. I don’t think the panel wants a silhouette and a photo image printed on fabric won’t do either because the background is very busy. So I will just have to leave it for a while.

it’s beautiful as is, you did a lovely job. I cant get over the lilac fabric…I LOVE IT!! My eyes go there first n i want to take a whiff i love lilacs ♥️
Glad you liked the piece, Joan. Do give the technique a try, yourself!
A few purple butterflies in the upper, right-hand, lightest corner?
Too crafty, I thought, which is why I left the piece unadorned.
I like the flow and agree with you on a border or two. Perhaps a tone on tone batik? There is no need for insects. Lol
Love the colors but I’m curious, is this made from a panel?
No. I had a gazillion 2″ strips of floral fabric (WOF) which I’d cut into 2″ squares. There were dark fabrics, light fabrics, and everything in between. I probably have close to 100 ziploc bags each containing 2″ squares of a similar colour. To “paint’ using the fabric squares, I selected squares and laid them out until I thought the array was pleasing. No Panel.
It’s beautiful just as is. If you want to add maybe one or more butterfly’s would work with your design. I don’t think they should stand out but just look soft against the garden of flowers. It’s so beautiful I think something too strong would disrupt the feel.
People keep suggesting butterflies – there is nowhere to put them so they would show!
Hi, love this watercolor piece. I also have trouble keeping my layouts in order so I take a good picture of the winning layout with my tablet and then keep it by the machine for reference.
As you can see, I also have photos of my layouts as they progress.
Really lovely Judith! It truly looks like a gorgeous watercolour painting 🥰
A beautiful butterfly or hummingbird might give something you are looking for.
This piece is about colour flow. I intentionally didn’t leave blank light space to include anything else.
What about 3 black/blue butterfly’s in various sizes on the lighter colour squares
Have you finished this quilt? It is sooooo beautiful! Can you please send me completed pictures and of it?
Thank you!
Here is a photo of the completed wall art piece: https://jmn111.files.wordpress.com/2019/06/img_0845.jpeg
That is absolutely stunning! Good arrangement!
Have fun with finishing it. How to see the final product!
Patty here is the finished wall hanging (finished with a hidden binding): https://jmn111.files.wordpress.com/2019/06/img_0845.jpeg
Do you have a pattern written down so we can follow it?
I don’t. The whole project was an improvisation, I’m afraid. You’ll just have to look closely at the photos.
How about butterflies?
I made a similar one from a kit
I cannot wait for the next step. 2″ blocks seems very small. Do you think one can make the blocks slightly bigger?
You could work with whatever size blocks you wish, obviously. I was making a wall art piece and wanted to “paint” with small blocks.
Here is the finished piece: https://jmncreativeendeavours.ca/2019/06/04/garden-in-bloom-a-colourwash-quilt/
Beautiful! I get confused easily by complex layouts too so put a design board on the wall beside my sewing machine (black quilt batting on the wall) to use in concert with my big wall, where the whole quilt is laid out.
Wish I had space for a design wall but, sadly, I don’t
Cindy, there wasn’t enough open space to do anything else. When I did the Iris piece, however, I planned for the appliqué and allowed enough light area so I could showcase it. In this piece, I decided the colour flow was adequate interest.
Beautiful. A white picket fence on bottom or a humming bird in top right ?
Beautiful
I love this work of art!! Where did you find the purple’s?
I dug around in my stash. It seems purple is a colour I collect.
Have you thought about a flower pot, maybe terracotta and make it look like the flowers are flowing out of the pot? I Maybe put some of the squares over the pot or cut out some of the flowers to cover part of the pot. It’s just a idea
I was going to ask the same question about a pattern. But could you please tell me the final size of your quilt and if you plan on binding it. And how you plan on quilting it (stitch in the dtich). I think it is gorgeous but I know I’m an imprecise quilter so perhaps it’s not for me.
Shelly, the piece you’re looking at isn’t a “quilt” (although it’s constructed as a quilt with batting…) – it’s a wall panel 18.5″ x 24.5″.

I bound it with a “hidden binding” that is the binding is on the back but doesn’t show on the front.
I did stitch in the ditch using three different thread colours – black, medium beige, off white – so the thread would blend with the colour wash; that meant I had to stitch slowly in a zigzag diagonal pattern matching the predominant colour of the adjacent blocks. What helps with stitching in the ditch is using the proper foot – a stitch-in-the-ditch foot with a centre guide, or an open toe foot
I prefer an open toe foot or an open appliqué foot which lets me see precisely where the needle is stitching but I have also used the stitch-in-the-ditch foot letting the centre guide follow the seam. BTW you can’t stitch-in-the-ditch if you’ve pressed your seams open – it only works if you’ve pressed your seams to one side so that you have a “ditch”. So I encourage you to try a colourwash panel, take your time, and see what you can learn.
Joni I decided not to do something like that because the only place I could have added an appliqué was in the right upper corner and I didn’t think there was enough room. In the end I decided to leave the “garden” as it was. Later I created another piece where I planned the appliqué I wanted to include: Iris
This would be beautiful with a hummingbird appliqued above one of the flowers
This is absolutely gorgeous. I’ve always admired this type of quilt top but I’ve been too intimidated to try to do one myself.
Ann the actual technique isn’t difficult. The challenge comes from having enough 2″ squares to “paint” with. If you want to shortcut that process I recommend purchasing a “watercolour jellyroll strip” as a place to start. That will give you a basic range of colour and you can add to that from your stash. As for assembling – I learned a lot along the way.
1. Another Watercolour Quilt Experiment
2. Watercolour/Colourwash Pieces Completed
3. Watercolour Quilt Workshop
4. Yet Another Watercolour Quilt Piece
5. Iris
6. Finishing Wall Art
Perhaps you will find my experiments helpful.
How pretty! Very creative.
I don’t know what kind of image you want to applique, but if this your direction, consider using a solid color. You could choose a color from your panel, or white or black.
Kathy, in the end I left the panel as it was. I did another with an appliqué which was much more appropriate: https://jmncreativeendeavours.ca/2020/01/19/iris/
What is your website I can not find it
Linda, I’m not sure I understand your question. My website is Creative Endeavours (this blog your’re reading). One of the pages on this blog offers some knitting and sewing techniques that I’ve found helpful. Hope this is what you’re looking for.
Amazing, I wish I was more artistic, the color choices and the flow are simply perfect. Thank you for sharing.
No reason why you can’t do this – look at what the gals in the class did – all different and all interesting: https://wordpress.com/post/jmncreativeendeavours.ca/6094
I wish you would share the picture of the panel before you cut it apart.
Karen, I didn’t have a single panel which I cut apart. What I had were ~4″ pieces of 100+ different print fabrics! I collected light coloured fabrics, medium fabrics, dark fabrics… I cut those fabrics into 2″ strips, and each strip into 2″ squares. I have a shoe box full of small baggies containing off white squares, beige squares, pink squares, red squares, black print squares, dark blue squares, bags with shades of green, bags with purples and mauves…. You get the idea? I started with a panel of fusible grid interfacing, say 32″ x 24″ (when sewn together that will finish at 24″ x 16″. I cut the fusible grid into 8″ pieces – gives me 4 strips (I explained in one of the blog entries [https://jmncreativeendeavours.ca/2020/01/02/another-watercolour-quilt-experiment/] why I do that – it’s go I can carry the lose squares to the ironing board without them all falling on the floor.) I place squares on the interfacing in some kind of order, constantly moving them around until I have a flow I’m happy with. The whole thing is an improvisation from buying fabrics, sorting them into baggie, choosing which squares to use, laying them out, sewing the panel together.
Do give it a try. it can be challenging, but I know you’ll find the results interesting.
Oh, and do stay away from other people and be well.
Karen, I finally understand what you’re asking me. What you’re looking at is a half-constructed panel. Here is a link to the finished panel
What about embroidery?
Liz, I thought about that but the blocks are small 1.5” and I thought embroidery would overtake the colour flow. In the end I stitched-in-the-ditch
Is there a pattern for this?
Norma, the short answer is “no” – I didn’t have a pattern. “Watercolour quilting” is an improvisational art – the only given is that you’re using 2″ (or even 1 1/2″ or if you’re really obsessive 1″) squares of fabric as “paint” to cover your “canvas”. The layout is entirely up to you. I’d seen a bunch of examples online (Pinterest, for example) and then went to work to create something of my own.