Thread Painting

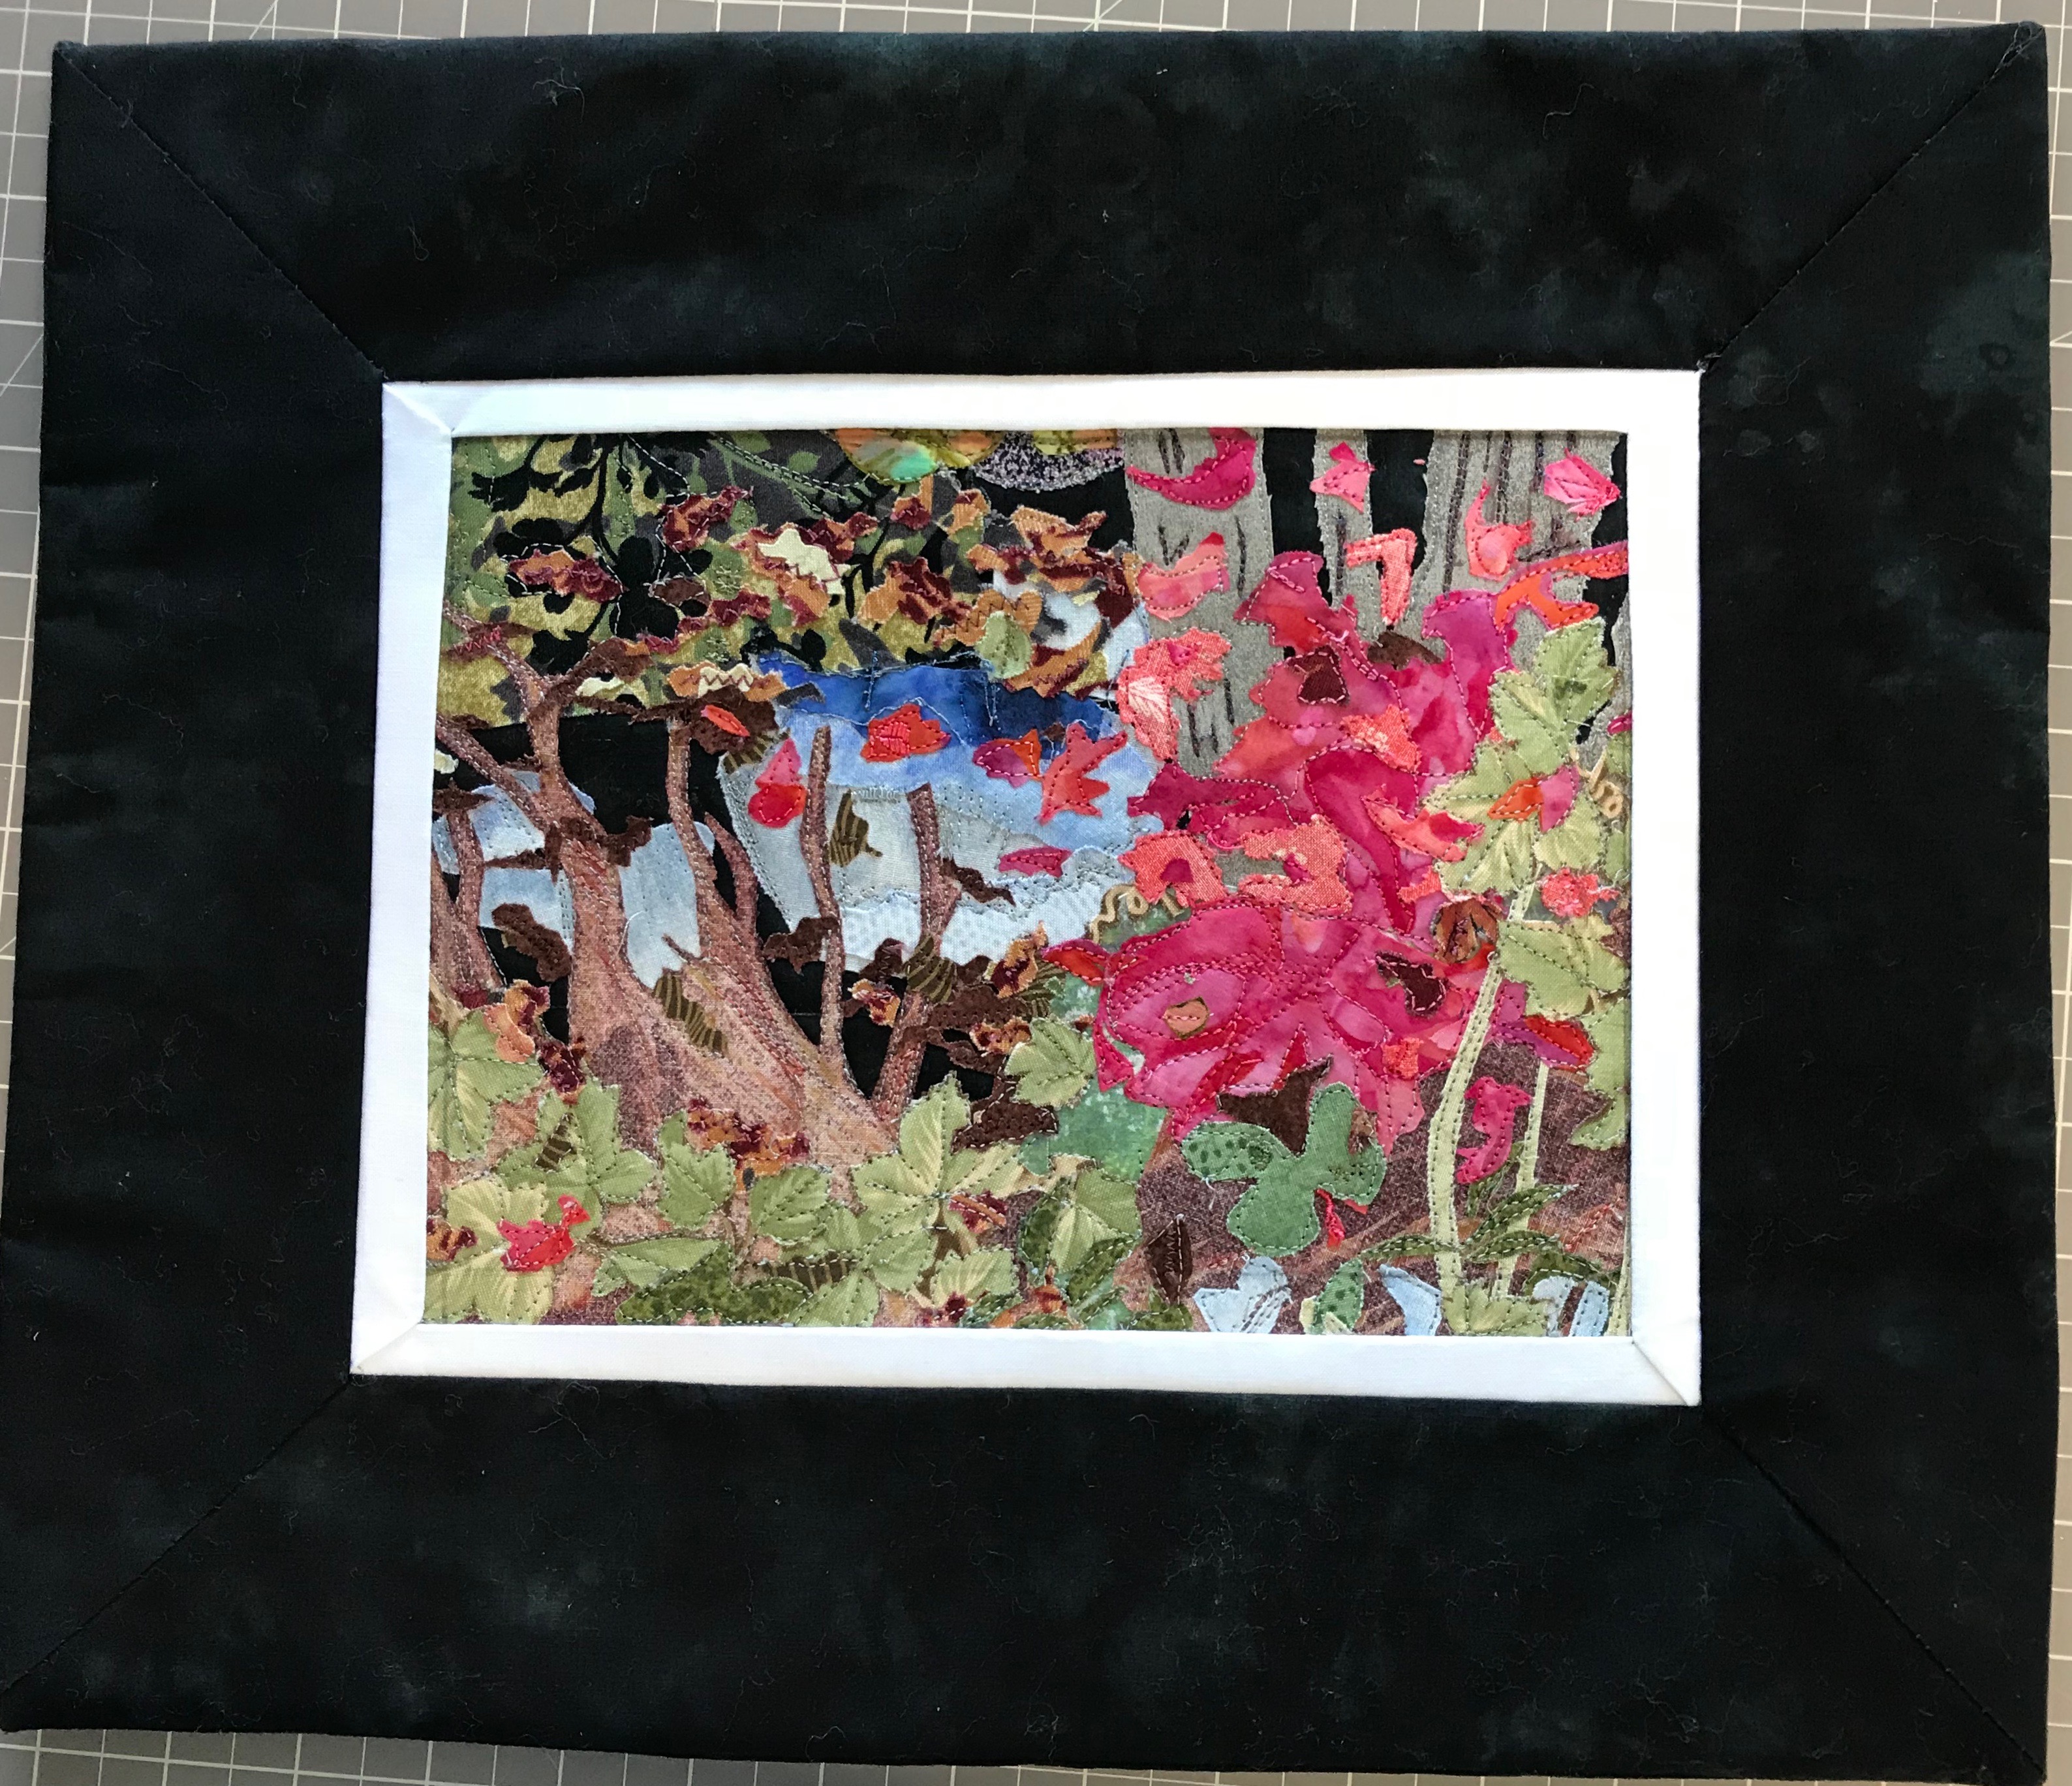
I started thread painting the bark cloth cutout flowers and leaves the other day. It goes surprisingly quickly and yet it seems to take a lot of time. The first thing I did was stitch the edges of the fused cutout using a modified blanket stitch (w: 1.5mm) with a smoke coloured monofilament thread in the needle (a white rayon embroidery thread in the bobbin). As I’m thread painting, I’m stitching over the cutout edges with embroidery thread to obscure the loose warp/weft threads that are peeking out.

One leaf is done, parts of the larger leaf begun and the dark thread on the anthurium has been stitched – lots more to go. Next will be the brighter green elements on the larger leaf and the “grey” elements will be some shades of bright green, not sure what precisely, yet.

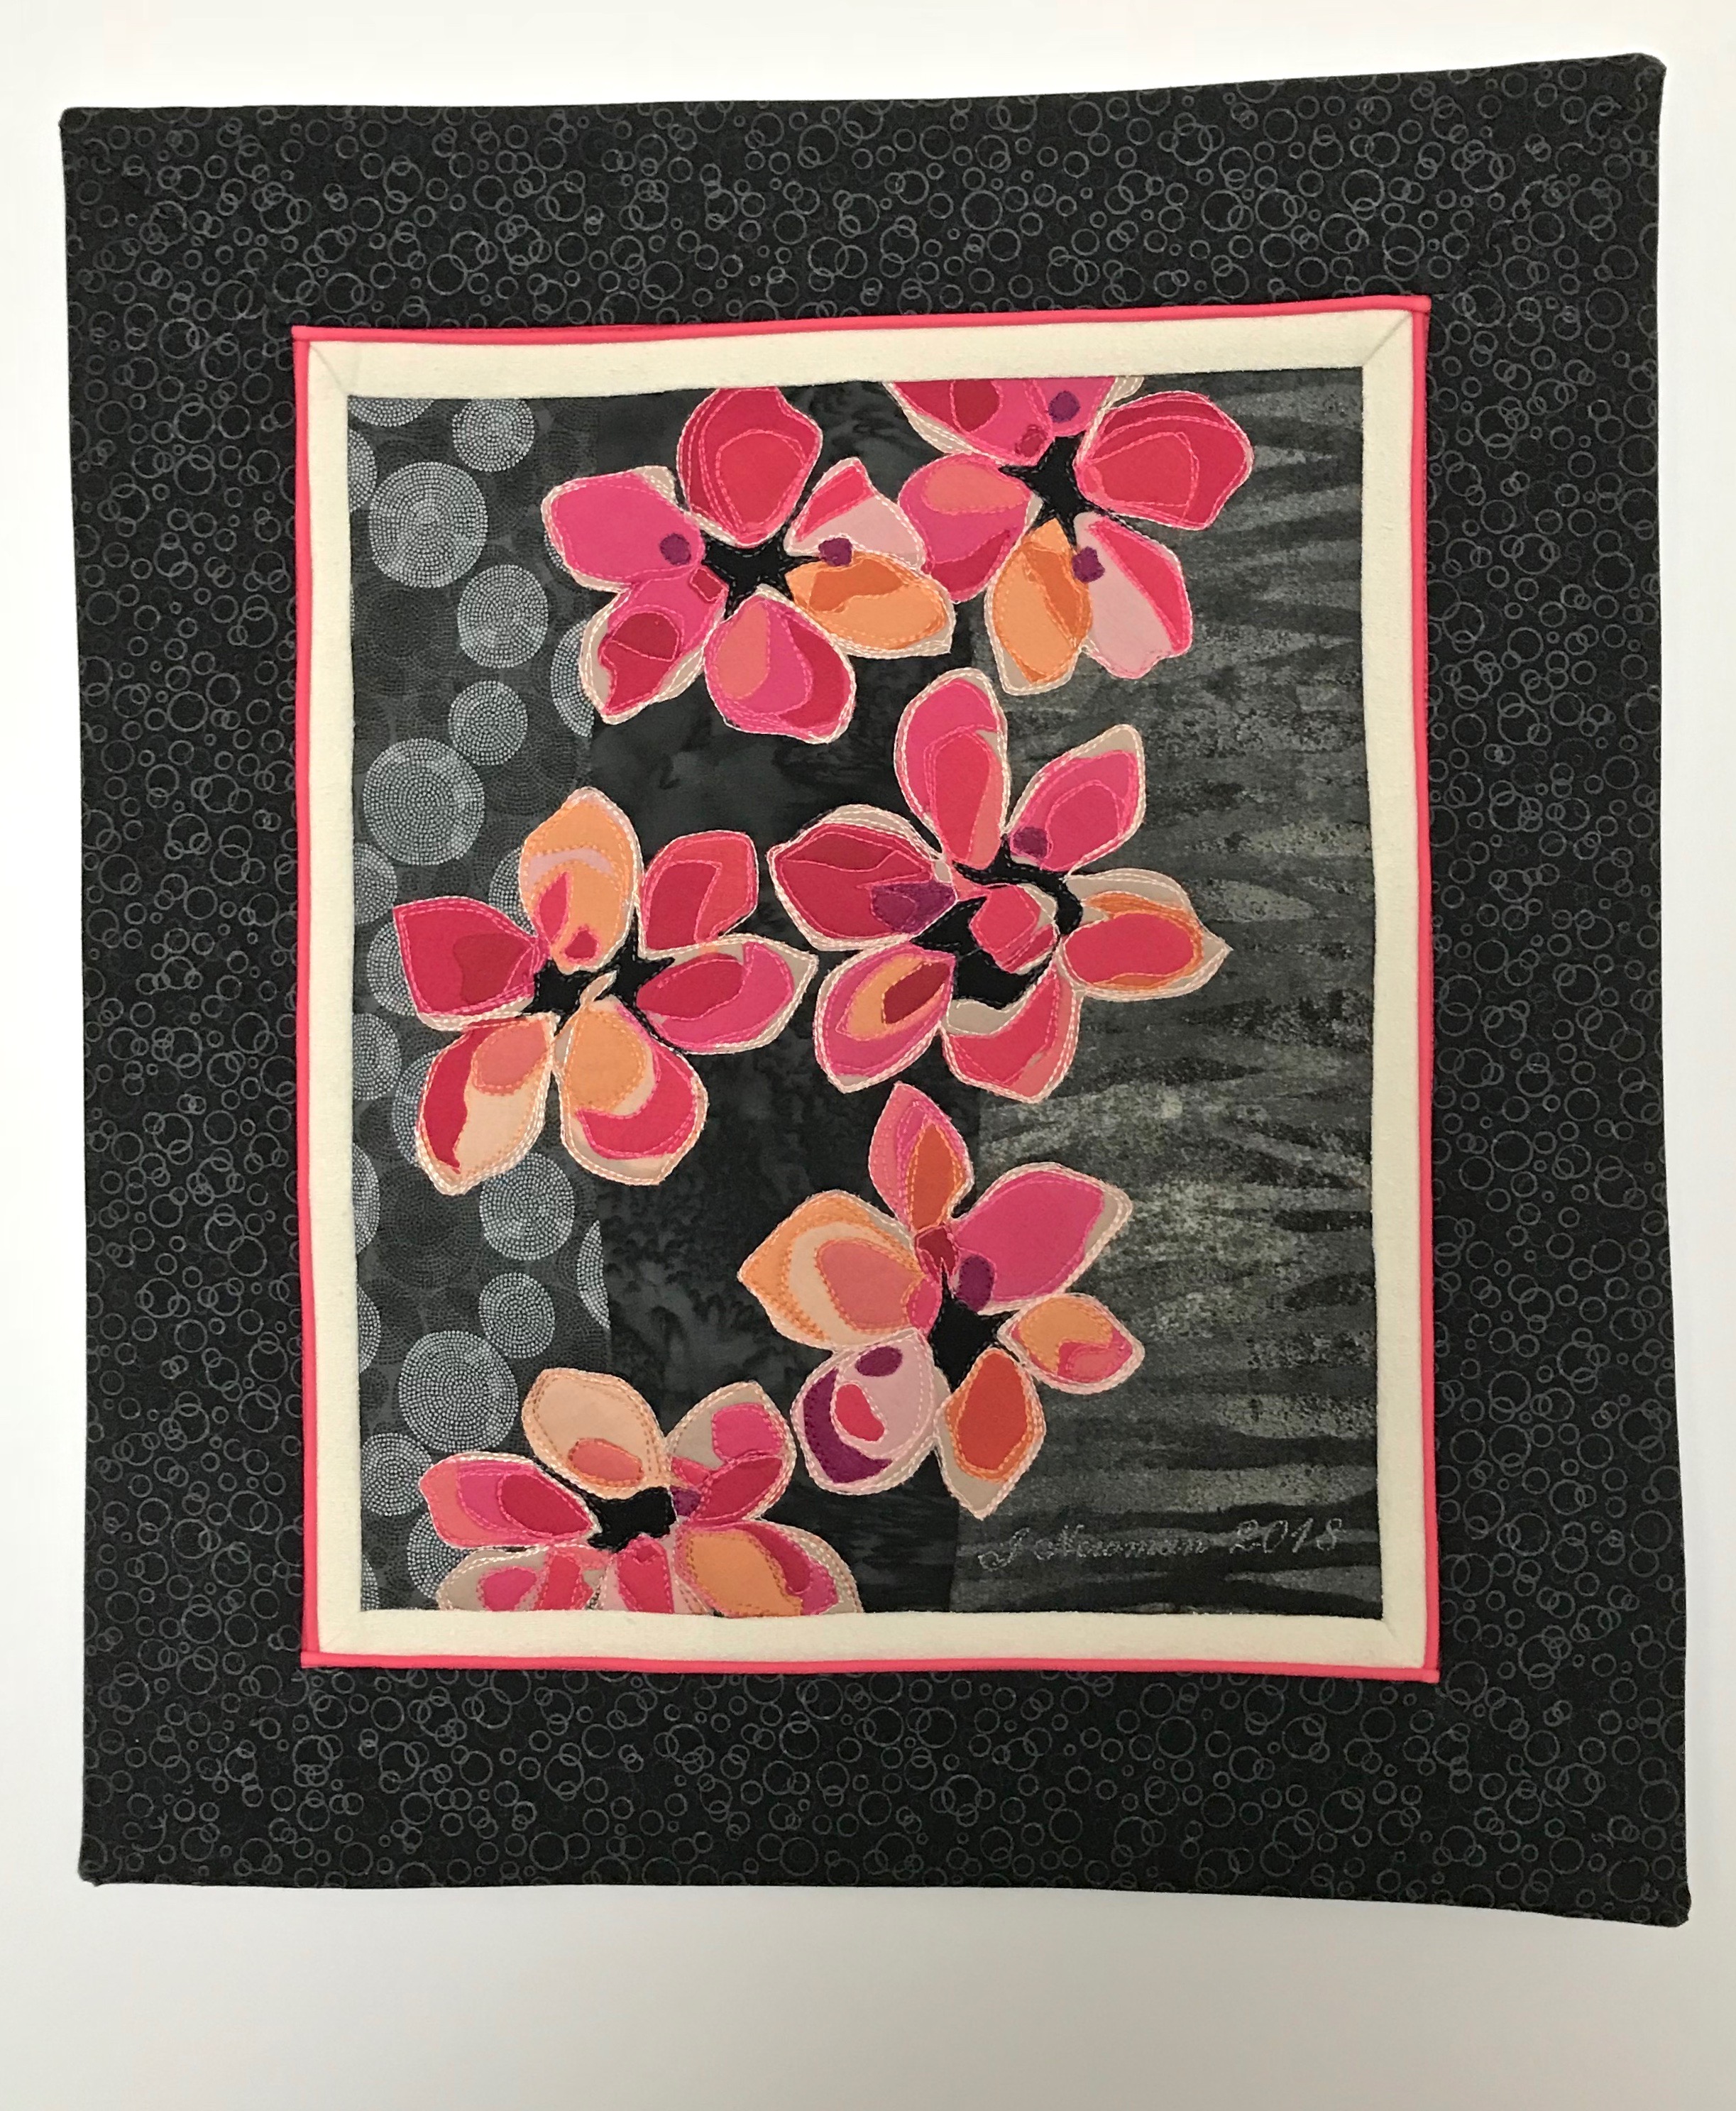
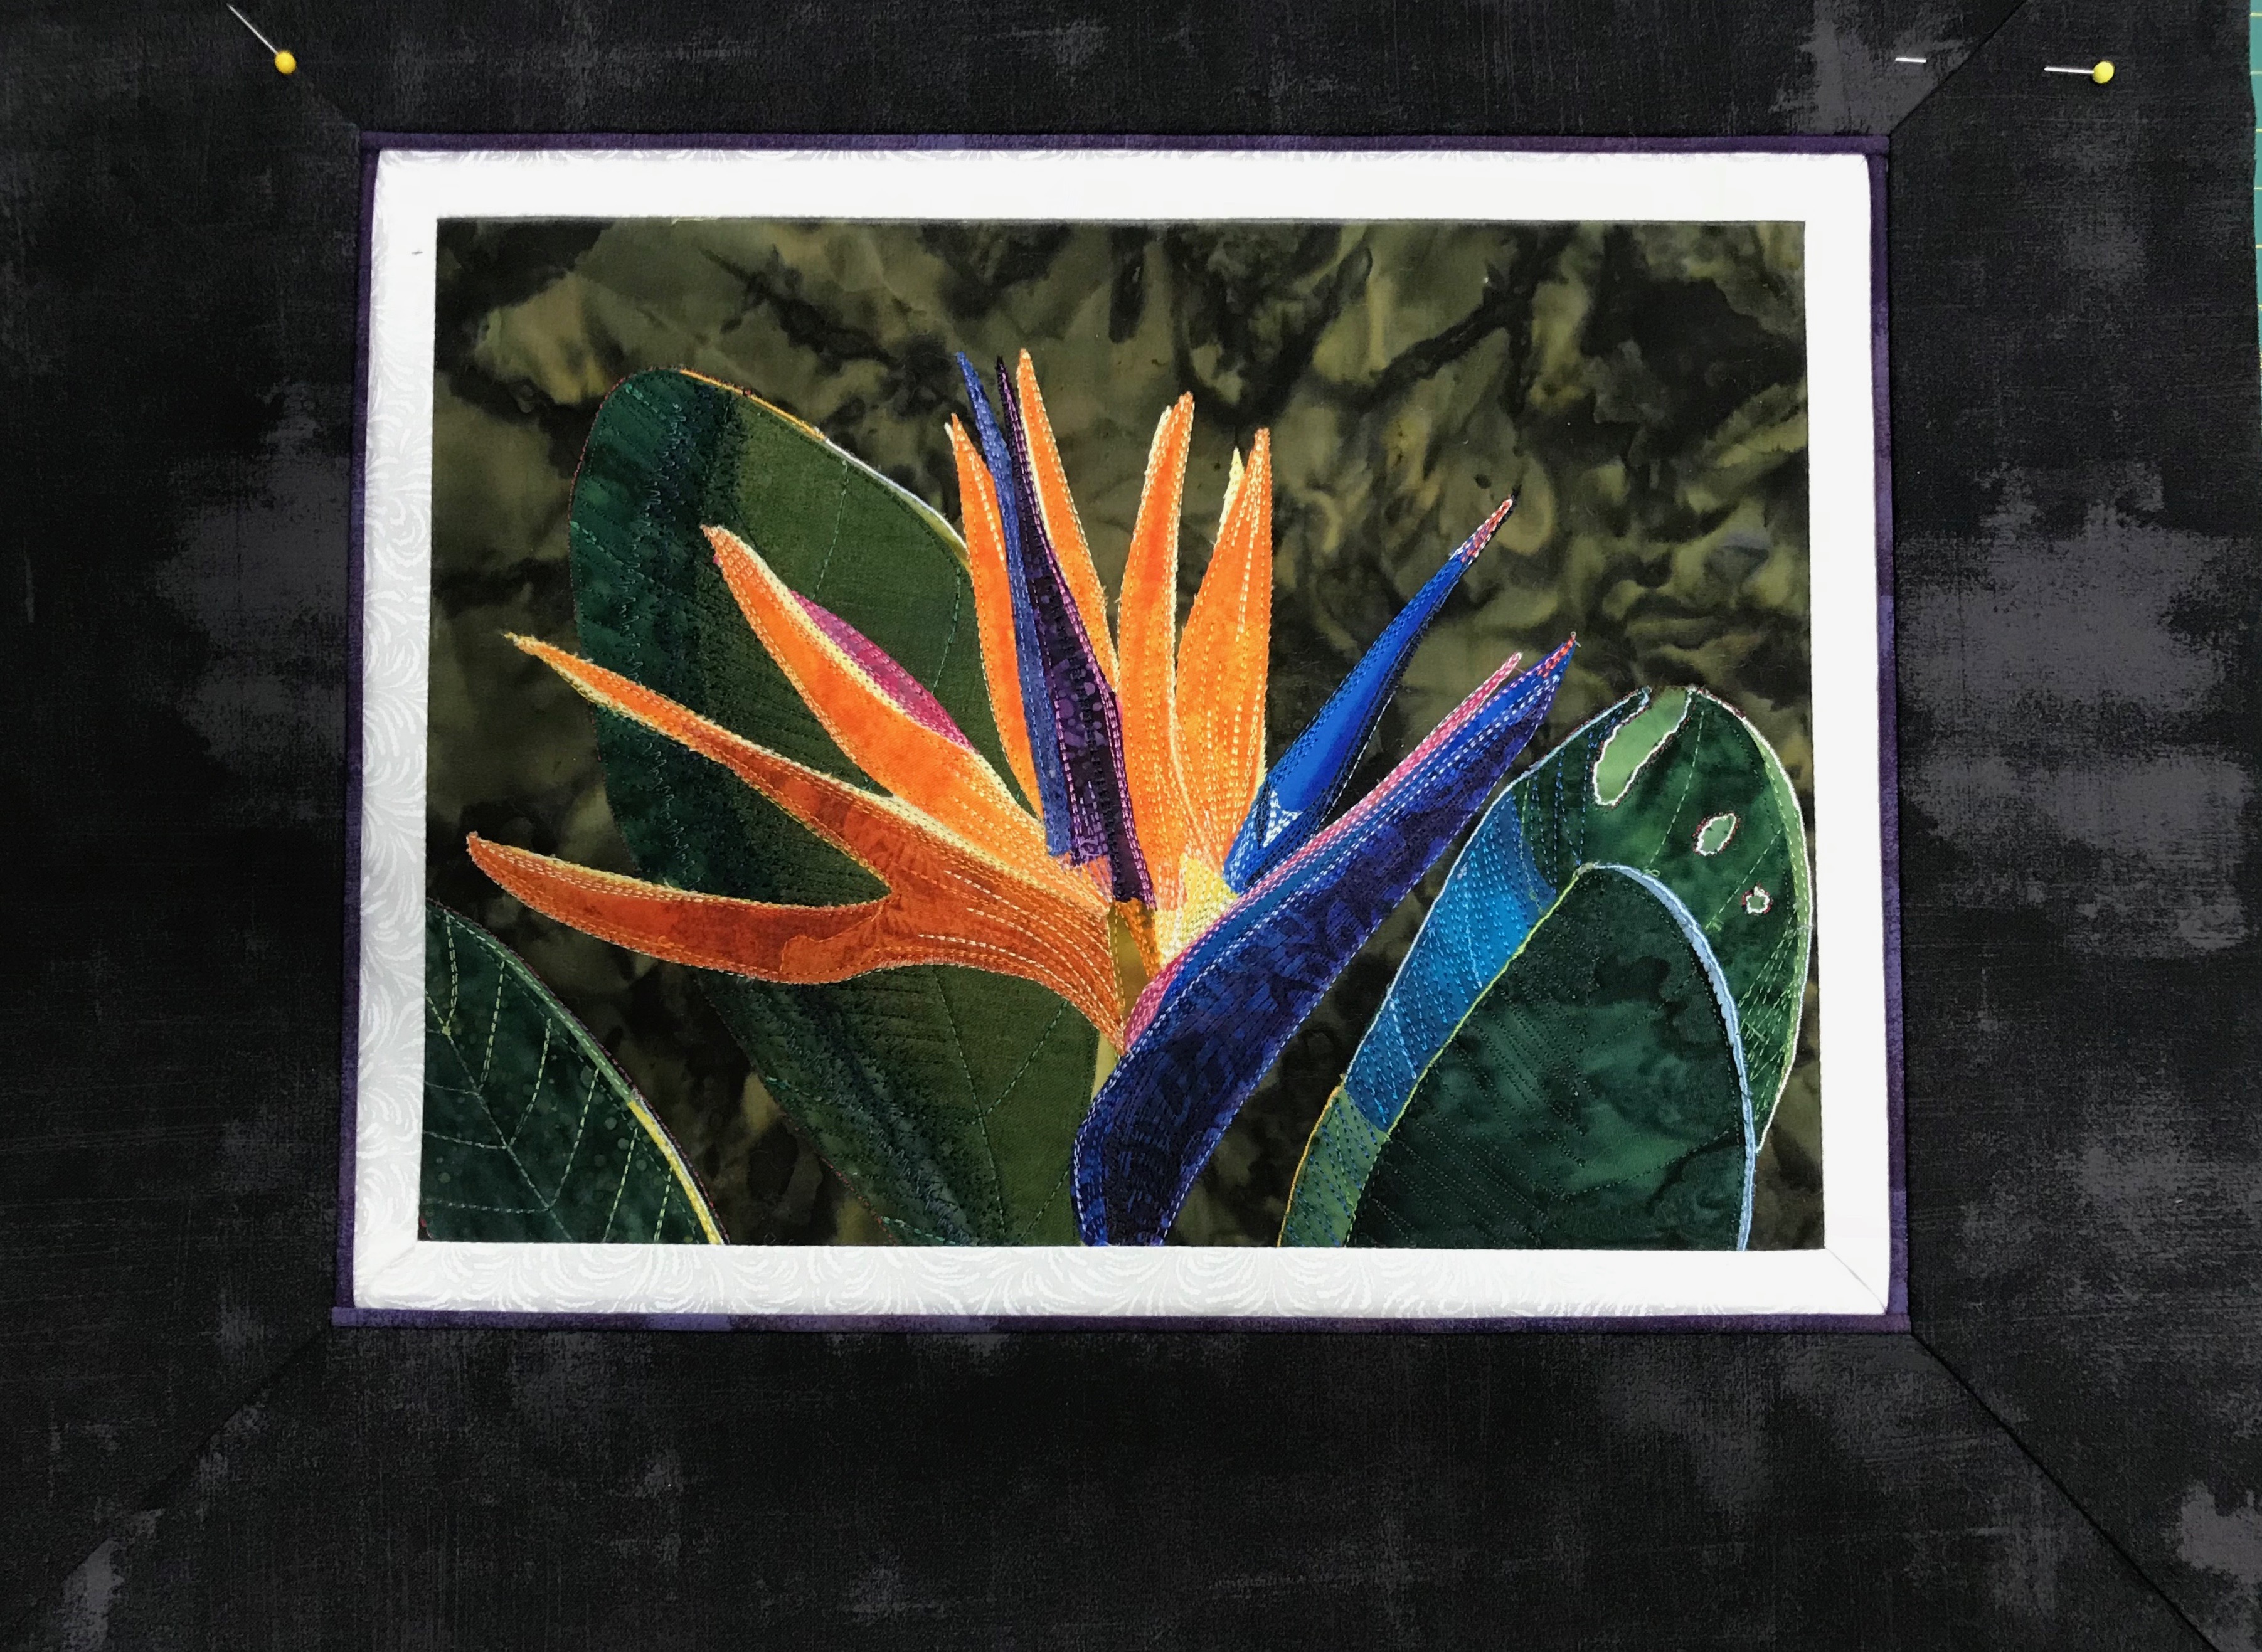
Thread Painting The Bark Cloth Flowers & Leaves

I’m using the embroidery thread doubled – two close shades – both threads through the single needle eye. It’s working well, I’m not having any tension difficulty. I’m not trying to cover the fabric with stitching – just enough to provide some texture and sheen.

Here’s where my collection of fine permanent markers is proving handy – I filled in the grey on the dark leaf with a bright green which livens up the whole. I will do the same on the larger leaf.

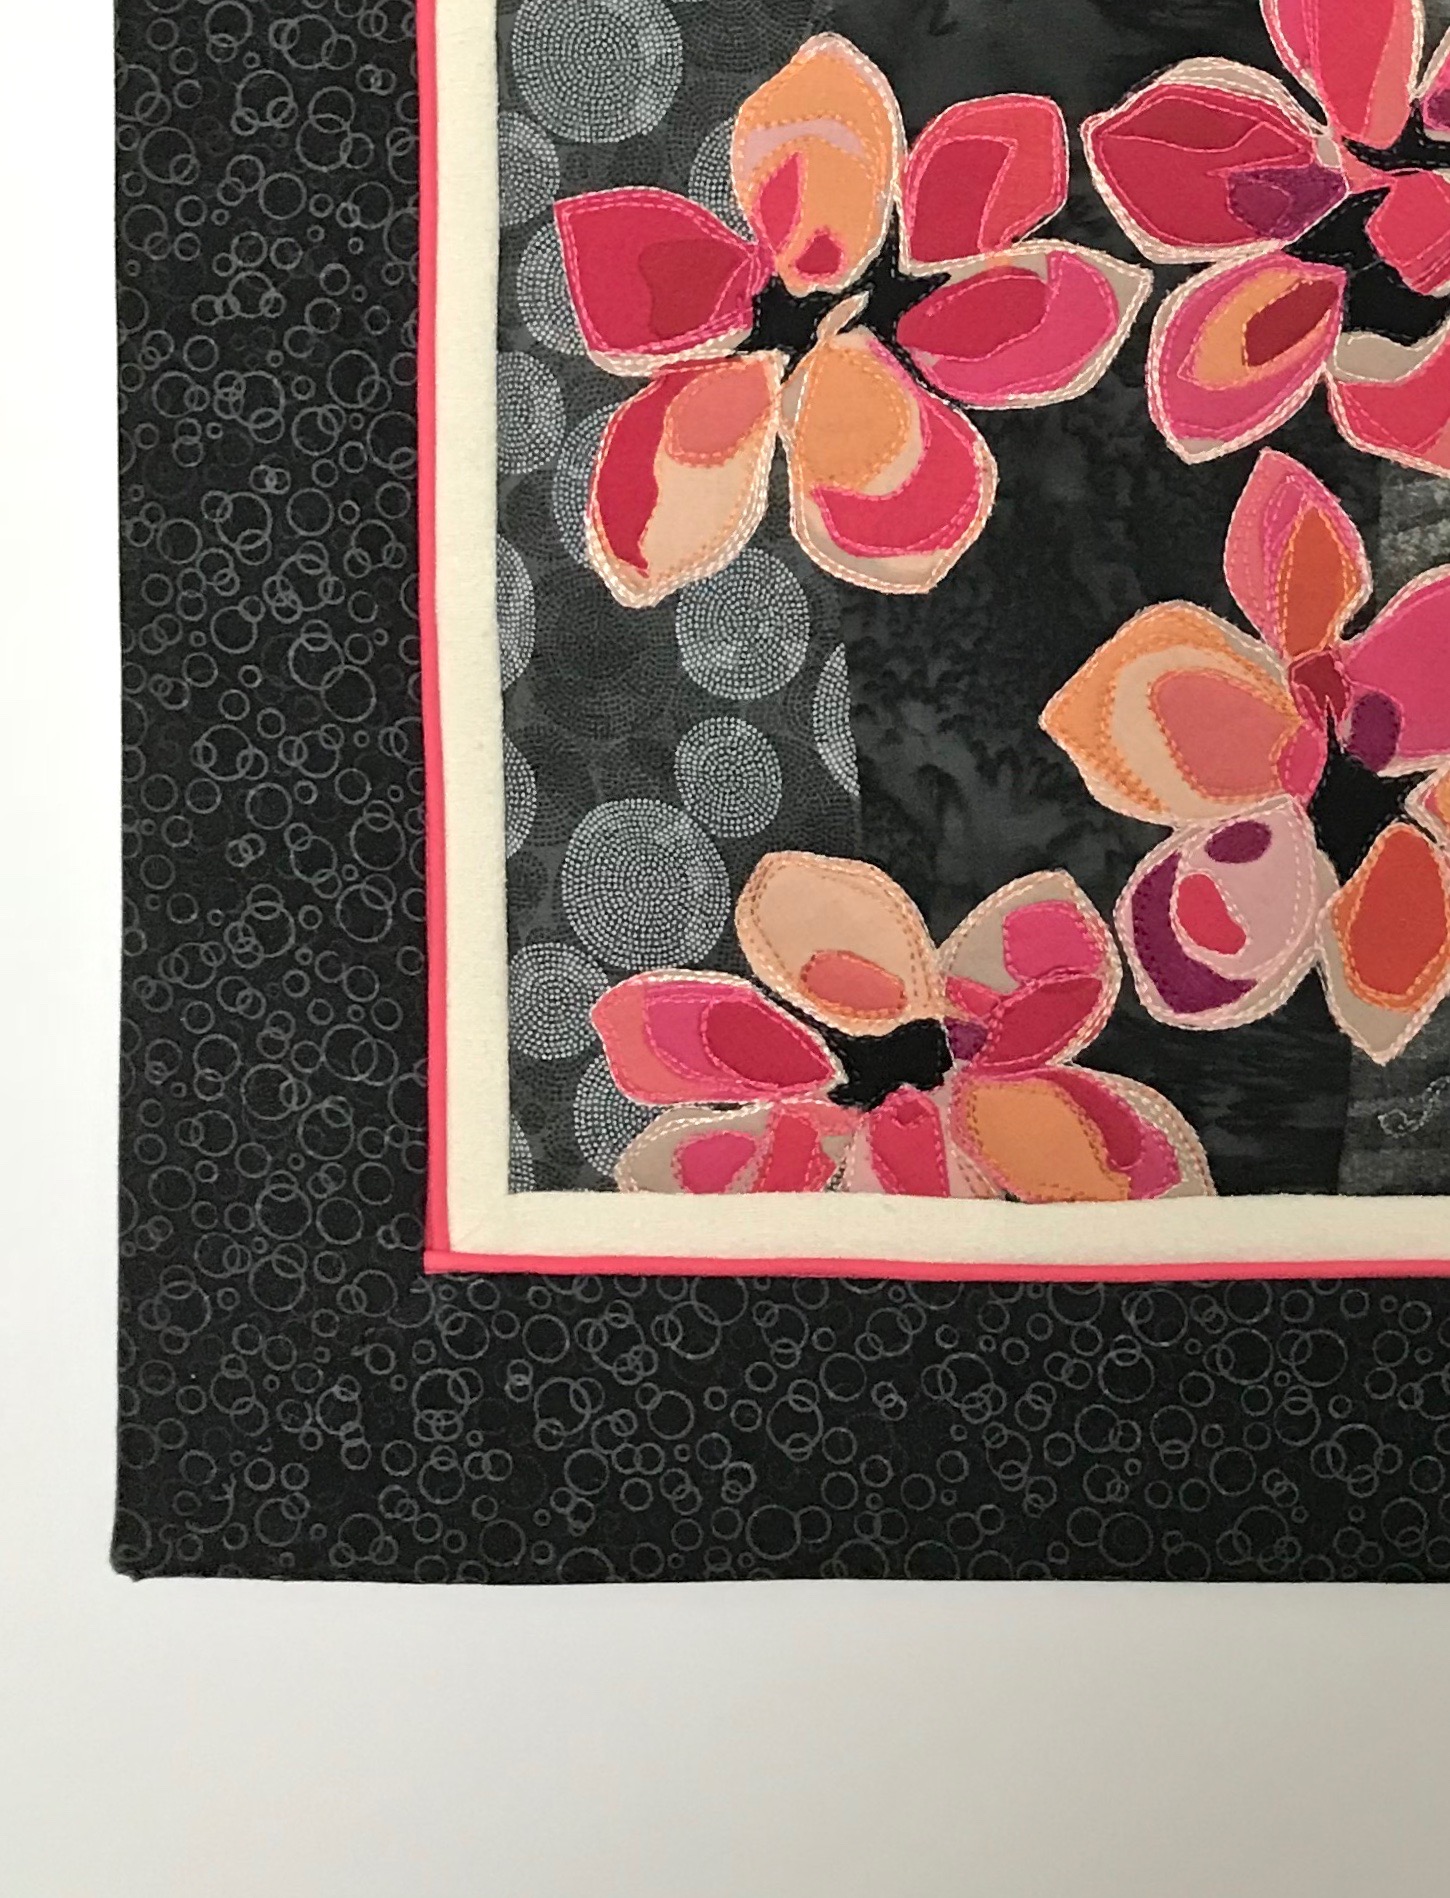
Thread Painting – Detail

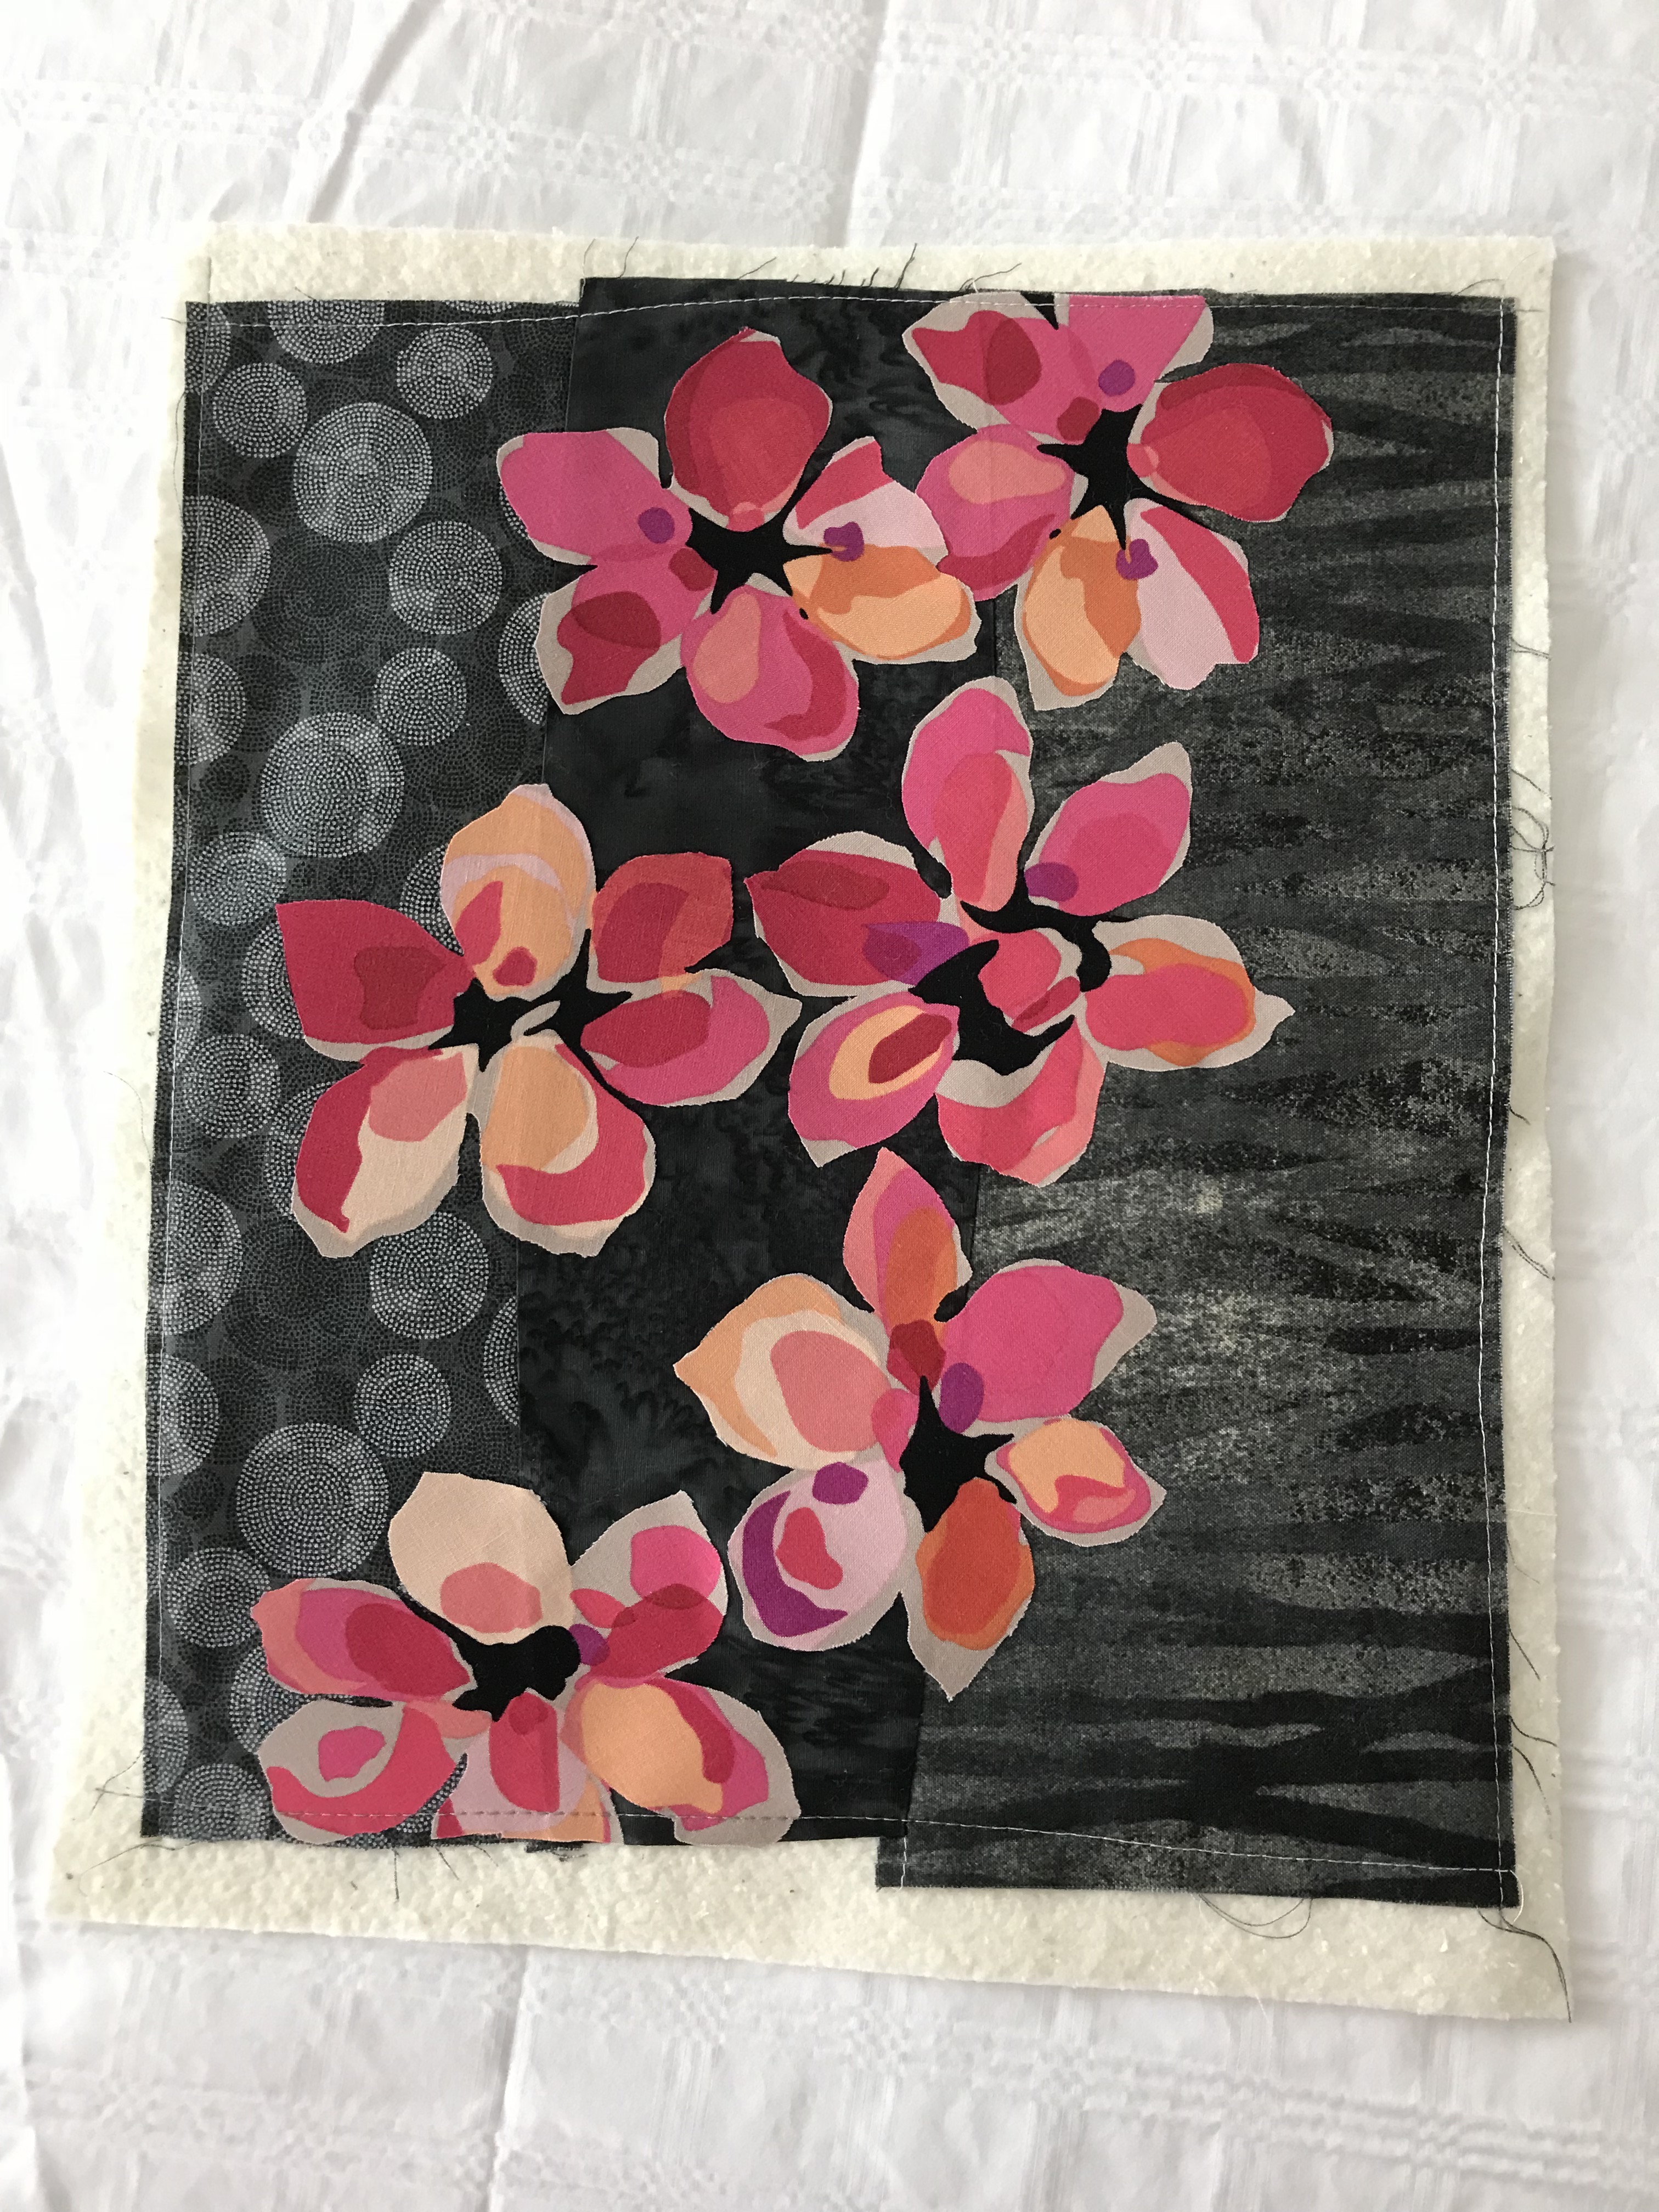
This piece is a test run for the larger one with the natural raw silk background. The graceful movement of the printed design is making the thread painting straightforward – the flowing lines are easy to replicate, even though I have both the feed dogs and the Pfaff IDT engaged! (I’m doing that to maintain a consistent stitch length – I don’t come close to an even stitch length with free motion sewing). Using the needle down position, the presser foot lifts a wee bit when I stop which allows me to freely manoeuvre the fabric as I sew. So the long flowing lines are happening without difficulty.

Time to get back to work on the larger leaf.

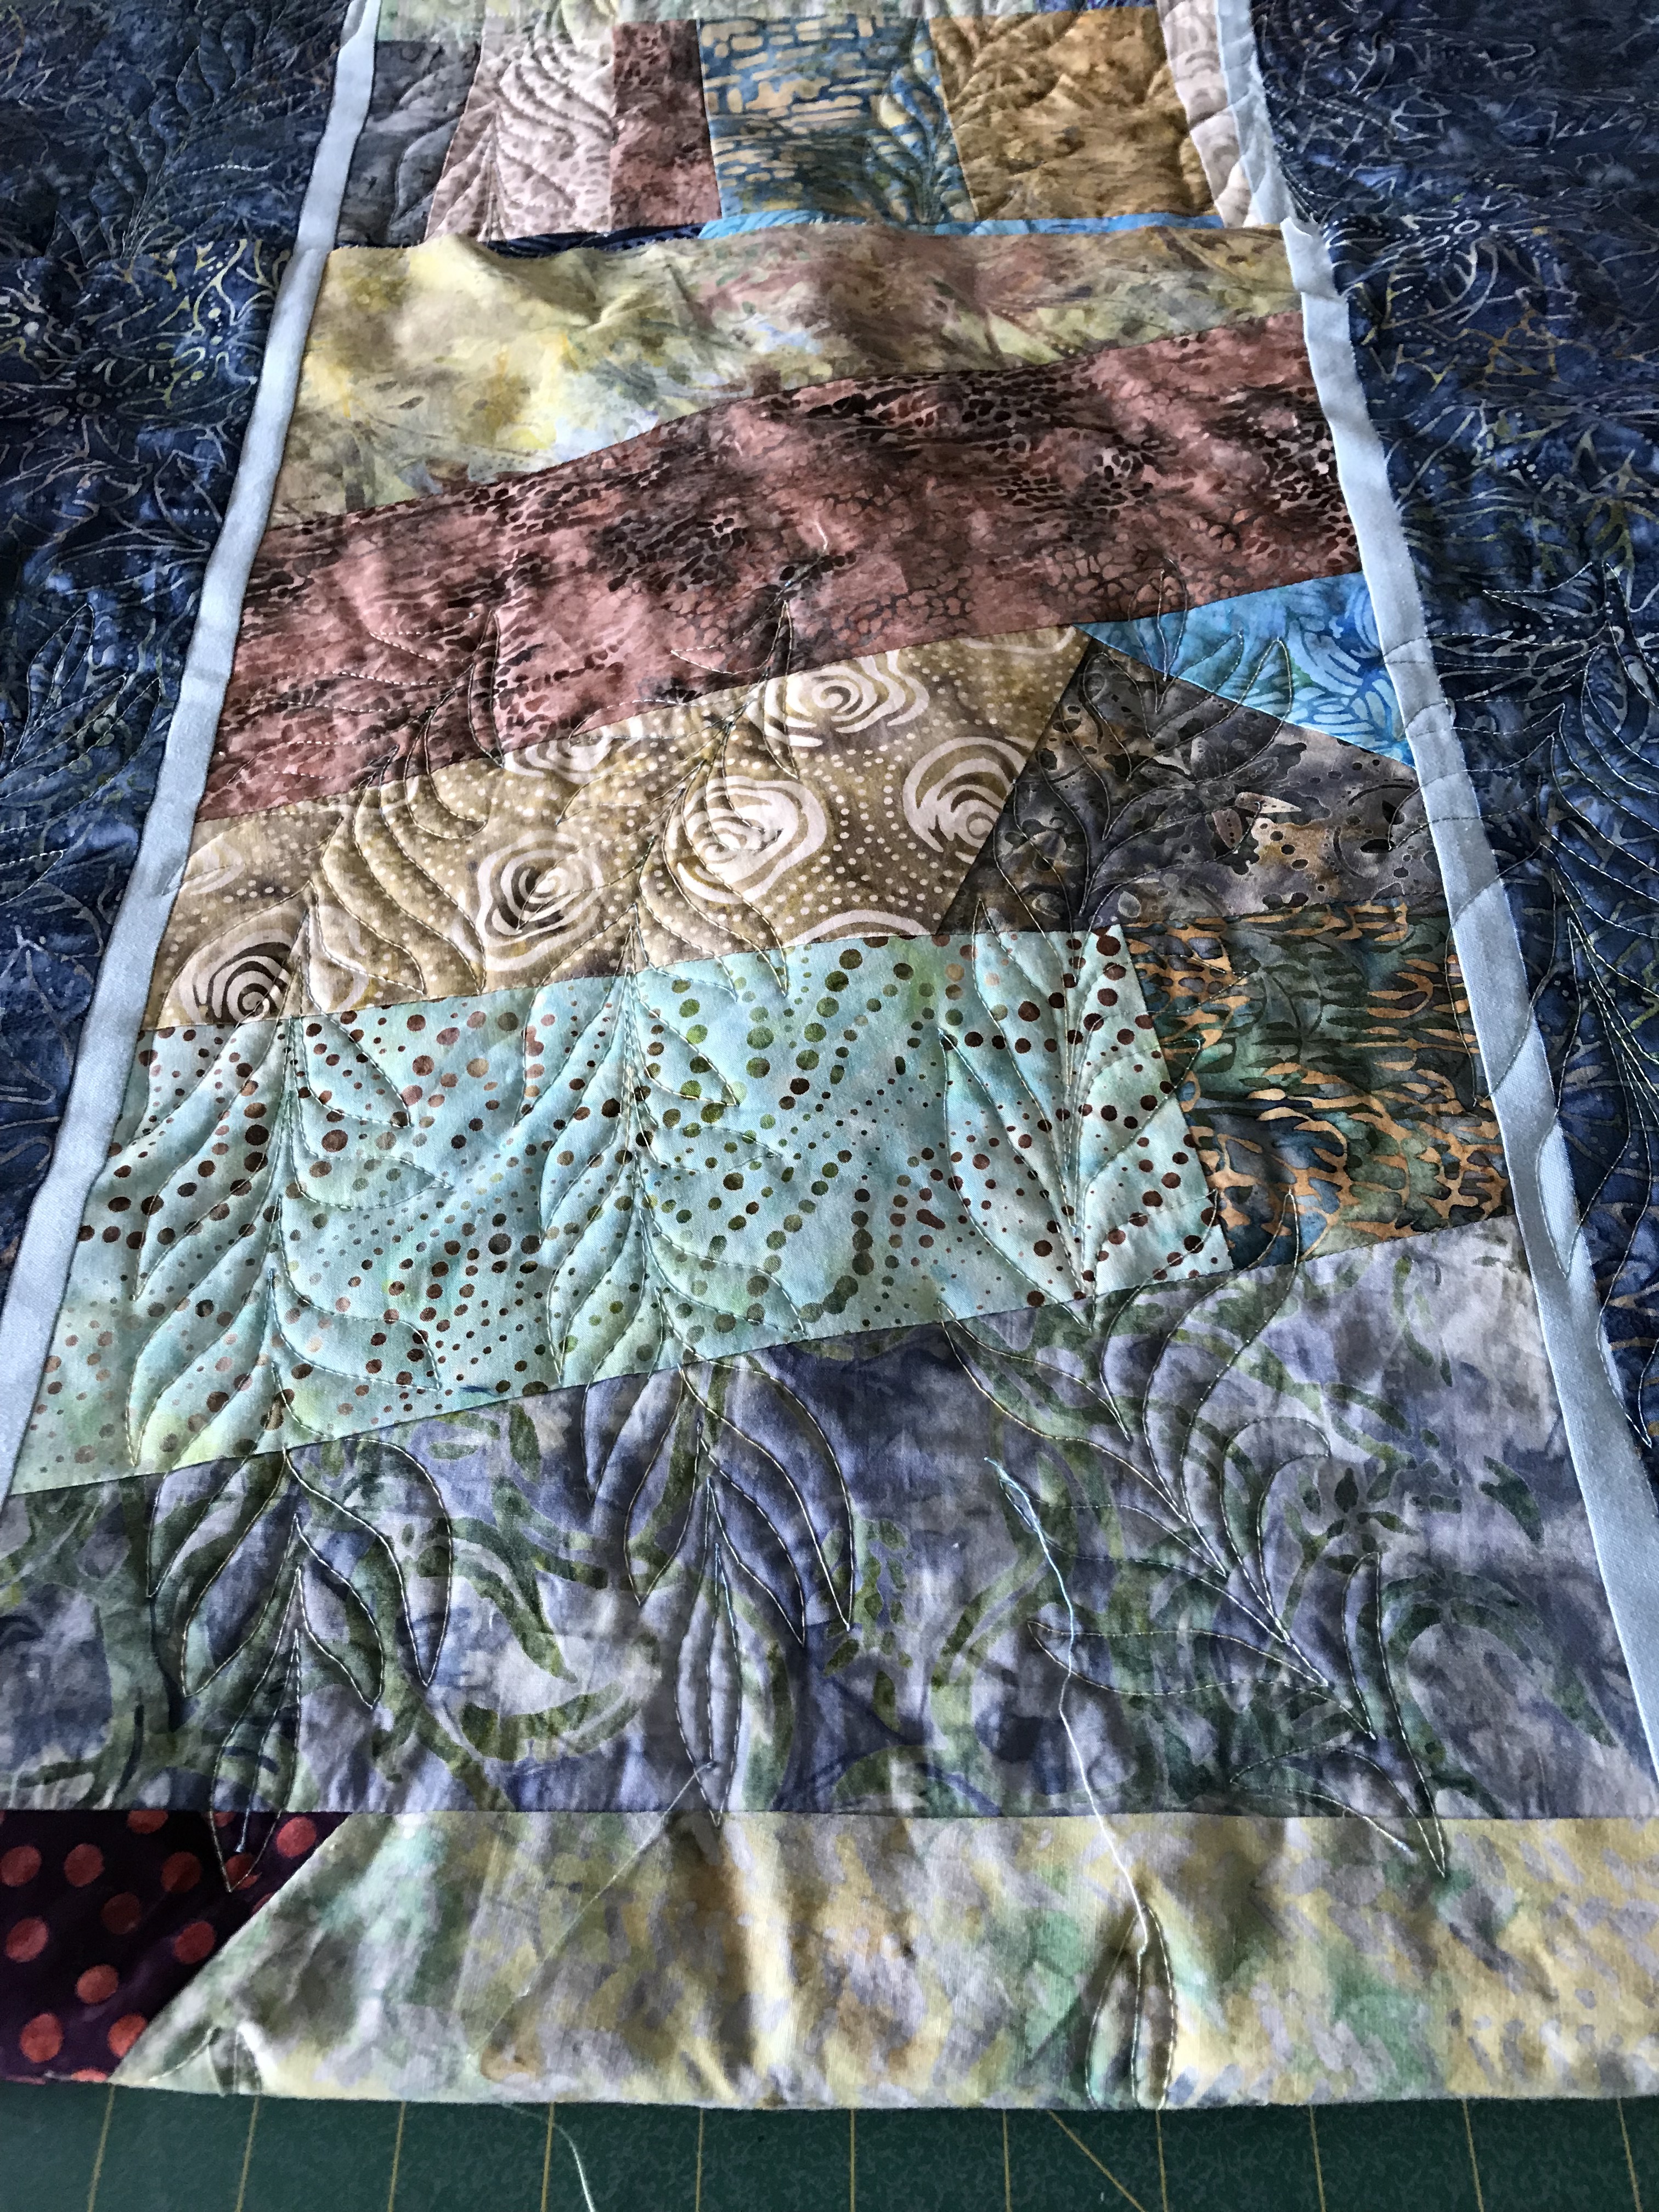
Second Leaf – Finished

This is the second leaf stitched and tinted using the permanent markers – much more lively colour than original “grey”.

Next – the anthurium.


Pink Flowers – Finished

I just put the finishing touches on this wall art piece – Pink Flowers. In the photo it looks a bit out of kilter, but I that’s an artifact of where I was standing when I took the photo – the piece is 15.5″ wide x 18″ in height.

Pink Flowers

I did quite a lot of stitching using rayon embroidery thread – two colours at a time through the one eye of the machine needle which gives a tiny bit of depth to the colour of the stitches. I elected not to stitch in the background – mainly because I had no idea what sort of design would have augmented the piece rather than detract from the flowers. The piping is there to heighten the colours in the flowers, and the printed border/frame extends the “texture” of the background.

Stitching Detail

Now on the next one using the fussy-cut flowers from the bark cloth. The fabric colours are somewhat subdued – I’m planning on using strong bright shades of rayon embroidery thread for the thread painting.

New Wall Art Underway…

This morning I finally stopped procrastinating on the wall art – I found myself starting on two unexpected projects. Yesterday I was going through fabric in my stash looking for fabric for the Federer piece and came across some Hawaiian bark cloth with large floral patterns which I thought could be turned into an interesting raw-edge appliqué piece on a raw natural silk background fabric:

Raw Edge Appliqué using Hawaiian Bark Cloth Floral Cut-outs

I cut the fabric in thirds, isolating one repeat of the pattern, fused Heat ‘N Bond Featherlite fusible web to the back of the fabric, fussy cut the flower/leaves elements, then fused them to a panel of natural raw silk (backed with Warm ‘n Natural quilt batting).

Now I need to go through my embroidery threads and pick out colours to use for securing and thread painting the raw-edge fabric elements.

I also got a second piece underway – I had a small leftover scrap of a modern floral which I’d used years ago to make a wide-brimmed summer hat. I thought the cut out flowers, placed randomly on a pieced background, would be an interesting vehicle for thread painting – I started that this afternoon. This piece will finish around 10″ x 12″ – it’s a test run to see where this idea can take me.

Raw Edge Appliqué – Modern Flowers on Pieced Background

So I’ve got two pieces to work on and maybe I’ll make some progress by the end of the weekend!

Wide-brim Summer Hat

[Here are instructions for making this wide-brim hat, if you’re interested.]

Update – And Back to Creative Endeavours

Arrived back in Halifax early last evening, dumped everything in the apartment and headed straight to the walk-in clinic. I was able to secure a visit for a couple of hours later. Came home, had some soup, then returned to see the doctor. No pneumonia, no other serious communicable diseases – just a very over-reacting reactive airway due to the many irritants encountered in Italy. The doctor prescribed a 5-day course of prednisone (an oral steroid tablet) to see if that will help reduce the swelling in my bronchi; we’ll see if it does. I started taking it this morning. In the meantime I’m continuing with the pulmicort I’ve been using for the last six weeks (I’ve used it off and on for 27 years). Coughed continuously this morning but I think I’m starting to feel the steroid kicking in (about 5 hours after taking the first dose) – the congestion deep in my chest is rattling less so the uncontrollable coughing is subsiding.

I unpacked this morning, put stuff away – I find putting stuff back much easier than preparing to go away. I’ve done several loads of laundry much of which is hanging to dry.

I’m not feeling up to it today, but tomorrow I plan to return to the partially quilted quilt I had on the go when I departed.

Back of Quilt – Quilting Detail

This, after all, is a blog about my creative endeavours – the knitting, sewing quilting, etc. that I do. I need to get to work again – I have a showing of  small textile wall art pieces already in my collection in June, and a larger exhibition of quilts end of July – beginning of August (I’ve got six new quilts completed and will fill in with two from the quilt stash) and new wall art (which I haven’t even begun to work on).

On Deck – 2008

This photo of the women on the ship deck is one I want to do – removing the lifeboat and putting her on the other side – she will also need to be lightened and sharpened – I worked on that a bit before I left for Italy.

A second work I want to create is of Roger Federer playing at the Aussie Open 2018 – this closeup was taken from the overhead spider cam but shows him practically in the air – both feet are a fraction off the court surface and you can see him tracking the ball.

Federer – Aussie Open

My intention is to have the figure smaller in relation to the court by filling in the background as in the image below – with the timer clock (obscured by Federer in this image) and probably cutting out the spectators.

Court Background

This one needs more playing around but I want to get going on it soon.

So finish quilt and work on these two art pieces – full steam ahead.

Sailboats In The Fog – II

I finally finished Sailboats In The Morning Fog – in time for the Tuesday class this past week. That involved the thread painting on the boats and their reflections in the water,and a bit of movement in the water on the right side of the harbour. Next I added a matte done in white muslin, followed with a dark grey piping, and finally a wide border/frame. I tried several different fabrics, some quite muted but in the end went with this one which brought out the greys of the reflections as well as the wooden insides of the boats. I used the two remaining strips of border fabric to create a hidden binding.

Sailboats

At class the gals all got their work close to finished (except for the hand sewing which they were going to do at home).

Linda had done the thread painting on her Nasturtium before she came. On Tuesday she added the white inner border, the yellow flange, and then the outer navy border. She added a hidden binding in the navy fabric she used for the outer border.

Nasturtium

Deb’s Bird of Paradise also turned out beautifully. Although nearly invisible, the purple piping does pick up the purples within the flower and hinted at in the foliage.

Bird Of Paradise

Pam did a lovely job on her wall piece Barn With Quilt – the thread painting, appliqué work on the tree on the left, created a very tactile bark.

Barn With Quilt

Faye’s Fall Walk captures the feel of a cool Nova Scotia fall day. The background was pieced and thread painted, the two figures were printed on fabric and applied to the scene. The red piping draws attention to the woman’s red jacket.

Fall Walk

Linda’s A Fall Day In The Woods brings the vivid fall foliage to life. Her framing of the scene strengthens the texture of the fall colours.

A Fall Day In The Woods

The gals were (as was I) delighted with their work. I wanted them to get the finishing touches on their art pieces in class. We didn’t quite make it, but the remaining hand work was going to be no barrier to them completing their projects.

Quilt Backs

Yesterday, Melanie McNeil (Catbird Quilt Studio) posted a piece on pieced quilt backs.

That got me thinking about the piecing I do for quilt backs. She says she prefers a solid back (her quilts are bed size) – I prefer the adventure of piecing (I generally make lap quilts). The challenge for me is to get away with a single length of quilt backing fabric and filling in the width with leftovers from the top, retaining something from the character of the top but at the same time creating a new piecing. Most of my back piecing involves a wide strip, although occasionally I’ll do a block of some sort surrounded by backing fabric – it depends on just how much backing fabric I actually have to work with!

Here are some quilt backs:

#1 – This is the latest quilt (Improv Quilt) – a strip/block because my strip wasn’t long enough and I fortunately had just enough backing fabric to border the strip converting it to a block.

Improv Quilt – Back

#2 –  An opportunity to try some flying geese. The original blocks were all in shades of indigo but I decided to insert one gold triangle in each and it made a huge difference to the strip.

#3 – From the red/black/white strips quilt. The quilt top looks like three Venetian blinds with a red background. The grey backing reflects the fabrics used in the piecing from the top, with the red accents.

#4 – This back was for the Starburst Quilt: I had no fabric leftover from the quilt top so I decided to use  other indigo fabrics highlighted with the turquoise and green elements.

#5 – The inspiration for this quilt back came from a quilt by Weeks Ringle – it backs the Pick-Up-Sticks Quilt:

#6 – This is the back of the Medallion Quilt: I had just enough of the border fabric leftover to create these four mitred blocks. I decided to rotate them rather than keep them all facing the same direction. Spaced them out, offset top to bottom, with backing fabric because I had a lot of it.

Quilt Back

#7 – This back is from the Grey-Yellow Quilt: I had a lot of half-square triangles left over from the front. I decided to array them as a spiral. The panel is offset top/bottom, and left/right. My quilts are all modern quilts – they need asymmetry to look “right”.

#8 – This back is from Improvisation #6 – Asian fabrics, drunkard’s path quilt. I had several slightly smaller blocks left over. I decided to do a more conventional drunkard’s path layout with single complete circle near the top of the strip.

#9 – The back of the Asian Strips Quilt: I did the piecing of the on-point squares, added the filler and realized I still needed border/sashing to offset the insert strip from the backing fabric.


Obviously I have many more quilt backs I could showcase here, but these are enough to illustrate how I see a quilt back. All of my quilts are “double” quilts – they can be used either side – for me, that’s part of the challenge/adventure of improvisational quilt making.

Sailboats In The Morning Fog

I was on a walk along the Halifax Harbourfront at 10am on a July morning in 2010. There were a couple of sailboats moored alongside the Acadia (a WW1 warship, now part of the Museum of the Atlantic collection) with the fog lifting in the harbour and the Dartmouth shore a pale form in the distance.

Moored Sailboats

I captured the moment – recently I added the photo to my collection of potential landscape/art quilts.

Partially Done

With the Art/Landscape class underway for a second time, I thought I’d give the sailboats a try. Sky with a bit more cloudy texture (because I had the perfect fabric), the opposite shore (heavily stitched), the water in a very soft blue-grey. I did some preliminary thread painting and texture building in the water on the left, then positioned the sailboats (printed on fabric, backed with fusible web, fussy cut) and pressed them in place. Now I have to add the reflections in the water to tied the image together. I elected to eliminate the small dock next to the Acadia and the just visible stern of the ship. I preferred just the two lone sailboats for my wall art piece. Although barely visible, I’ve used silk organza on the left of the image to represent the fog, added after the initial thread painting to blur the textile and stitching beneath.

I will work on the piece tomorrow in class so I can show the gals how I solve various technical issues – including creating an inner mat, making piping, and selecting fabric for the framing. They’ll also get to see how I go about thread painting with my feed dogs in the engaged position (I can’t free motion and obtain an even stitch length at all well, but I’ve figured out how to keep my feed dogs in position and do a “free-motion like” sewing). I want them to see how I do that.

I am probably also going to add a bit more movement to the water on the right, but not  until I’ve finished the reflections of the masts, the mooring lines, and rigging on the boats.

More after tomorrow – our second class (one more after that on framing and finishing an art piece).

Medallion Quilt – Completed!

Completed Quilt

Here, finally, is the completed, bound quilt. Just finished stitching the curlicues in the center of the medallion. In the end I straight stitched them on the machine, a couple of stitches at a time, in order to stay on the edge of the curlicue. I had set up a single run design to stitch them out as embroideries, but each of the four corners was slightly different, and I couldn’t align the first embroidery to stitch precisely where I wanted it, so I switched to plan “b”. It took lots of twisting and turning of the quilt (thank goodness it wasn’t any larger) to get each curlicue done.

Quilt Back

I used leftovers from the outer border strips to create blocks for the back. Their off center placement is intentional. I could have placed them somewhat closer to one another, but once the back was pinned in place I decided not to bother taking the whole thing apart to make that small adjustment.

Close-up detail of one corner – showing the embroidery in some of the “empty” blocks.

Corner, Showing Detail

The embroideries worked out well – I did seventeen in all (one a test run to make sure the design stitched out correctly). Doing the embroidery proved challenging, not because they were particularly complex designs, but because my embroidery machine decided, at that moment, to be temperamental – the touch screen stopped working properly and precisely positioning each embroidery took patience. (The embroidery machine is now in hospital being repaired and I’m working on a borrowed machine.)

The quilt still needs a label but that can wait until I get my machine back.

Improvising A Quilt

Yesterday, I dropped into Sew With Vision (my local Pfaff/Husqvarna dealer) to check on stuff in preparation for two classes I’m offering this fall. I also needed some variegated thread for quilting the Medallion Quilt. Sitting on the checkout counter was a 2m piece of Benartex fabric for sale at such a ridiculously low price it screamed “take me home”. So I did. Next step: go through the stash to see what might go with it – lots of dark and lighter greys, but nothing in the right shade/print style of the turquoise.

Benartex Cosmopolitan + Stash

So I checked the selvage – found out I had fabric by Benartex: Cosmopolitan. I checked online: Turns out there were I think three colour ways: turquoise, yellow, and lime. There appears to still be some of the lime prints available but almost none of the turquoise.

Benartex Cosmopolitan – Fabric Online

I did find a turquoise from the original collection at Fabric.com – 2 yds for $4.71/yard – it was the shipping that was horrendous! I walked away. But after shopping this afternoon for something that could possibly work (I found a Kona in almost the exact shade of turquoise as well as the turquoise with gold leaves at a local shop, both in the top photo) I came home and ordered 2 yds. To hell with the expense. That fabric is going to let me pull all the others together.

BTW, this is definitely NOT going to be a medallion quilt! Something simple and modern – an improvisation for the Improvise A Quilt class in a couple of weeks.

Medallion Quilt – Top Done!

Medallion Quilt Top Complete With Border

I adjusted the final corner within the block so that it was better balanced without affecting the outer dimensions. Then I added the outer border, complete with mitred corners. Quilt still square, Yeah! I’ve intended the quilt to be a lap quilt. However, while the finished size (63″ x 63″) is not a full double/queen size it could certainly be used as a colourful spread to focus attention on a bed.

Now I have to think about the back of the quilt. I have a complementary fabric double width so I could just cut the size I need and be done with it, but before I do that I will go through the scraps and other leftover fabric to see if there is some kind of strip I can cobble together to add interest to the back of the quilt. But that’s for another day – likely tomorrow.

Melanie McNeil asked if I was pleased with my efforts – now I can definitely say I am.