“Stacks” Quilt

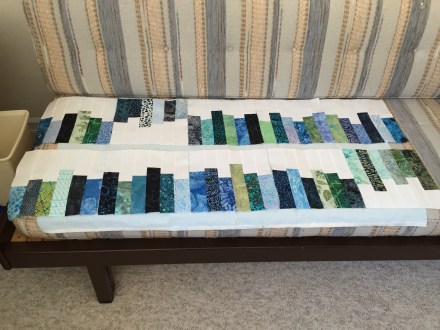
21 blocks done so far. Each block consists of six 2″ strips of a colour joined to a white; making a 9.5 X 9.5 block (finished size will be 9″ square). The strips for the remaining 14 blocks are stacked beside my machine ready to be assembled – this will be a 35 block quilt – finished size at least 45″ X 63″ – that’s without a narrow border which I may do.

At the moment I’m thinking about reversing the direction of one block in each column for contrast, but if I do that I will want a narrow sashing (probably in white – not sure about that yet) between the columns. Until I am able to lay out all 35 blocks I can’t begin creating columns – since the design is still fluid.

More to come. Haven’t given any thought to the back yet!

New Quilt

Take knitting – I can’t leave the needles idle – finish one pair of socks, I have to start the next.

It’s become the same with quilting. One quilt finished, the next starts.

Here’s the one I’ve just begun: 

I had a  jelly roll of forty 2.5″ strips of batik fabrics in shades of blue / turquoise, I went to the stash to pick out some complementary fabrics in the same hues as well as some greens that would blend – from these I cut 2″ strips from the width of fabric. 

Why 2″? Well, my idea was to build blocks from six strips of batik with a complementary background – I auditioned several solid colours, decided white created the liveliest contrast.

For a lap quilt I want a finished width of about 45″ – six standard 2.5″ strips would give me 12″ blocks (too large for my purposes). I wanted to end up with a 5 block X 7 block quilt so I needed blocks no larger than 9″. Six 2″ strips result in a 9″ finished block. So I trimmed the jelly roll strips to 2″, cut a bunch of 2″ white strips and started improvising.   

10 blocks  done – first I arranged them in rows with all the stripes in the same direction, but tried flipping a couple.

Then I took a photo from the end on: 

Now that’s an interesting idea!  Still a 5X7 quilt but with the columns having horizontal stripes and now maybe a contrasting vertical sashing.

That’s where I am at the moment – 10 blocks created, 25 to go….

Modern Quilt II – Finished

Finished the quilt today. I wasn’t sure how to quilt it – initially I was planning on echoing the curves at 1/2″ intervals but the shape of the curves in each block is quite different and I thought the finished stitching wouldn’t resonate from one block to the next. So in the end I set up an open embroidery design (240 mm x 240 mm) which had to be embroidered using my 360/350 hoop which stitches half of the design, then gets turned 180 degrees and the second half of the design is stitched. By changing the top thread colour (I used a “blendable” thread) to blend with the predominant block fabric I was able to have the stitching present but not too dominant. 

Happy with the finished quilt. Definitely got a lot of practice sewing curves – which is what I was going for.

Still enough fabric left from that set of batiks to make one, and maybe two, more quilts. 


Modern Quilt – Completed


So many decisions – what colour for the background, how to arrange the coloured blocks, what width for the sashing, where to position the “floating” small blocks, what kind of design to use for the quilting, whether to quilt all the blocks or just some, what coloured thread – solid or variegated, same for all blocks or different, matching or contrasting, what colour for the binding, one colour or with an accent or two?

Improvisational quilting needs lots of decisions at each step of the process – that’s after deciding on the overall dimensions which affects the size of the individual elements, and how many will be needed.

That’s what I love about improvisation – I have no idea how my idea will turn out. The fun is building the quilt and seeing it unfold.

This quilt ended up with 154 quilted “blocks” quite a number of them partial blocks at the edges because having rotated the whole quilt 30 degrees the edges were on a 60 degree diagonal. Because I quilt in the hoop (using my embroidery machine) that was a lot of repetitive hooping – it took quite a bit of time. 

I finished the quilt this morning. I’m happy with how it turned out – it’s a keeper. The colours  coordinate with my bedroom decor, and it’s long enough to cover my toes when I pull it up to my shoulders.

Now to come with an idea for the remains of that fabric collection – I figure I have enough for at least three more quilts!

Oh, and here is the back:


Modern Quilt

IMG_4361

Just finished piecing this top for a “modern” quilt. What makes a quilt “modern”? Bold colours, improvisational piecing, layout, asymmetric design….

These are the fabrics I originally bought for the 2015 Craftsy Block of the Month quilt that I was going to make along with Nancy (@ Sew With Vision) but truth be told, I don’t particularly like that BOM quilt and the thought of working on it for a year wasn’t appealing. So I started looking at photos of non-traditional quilts and decided this one would do for a start.

I pulled more fabric from my stash so I was working with 20 fabrics in all. The intention was to create a colour flow on the diagonal, with the entire set of coloured blocks also on a slight slant. To make the coloured blocks pop, I sashed them with the background fabric so the whole has the appearance of a stained glass window. The combination of large and small blocks also added contrast to the whole.

Now to come up with something interesting for the back. I’m thinking a crazy quilt strip would work with this piecing. We’ll see once I sit down with the fabrics (I have enough left for several more quilts!) what actually comes out. That’s the fun part of this kind of quilt-making – I never quite know what I’m going end up with – that’s what I think was wrong with the BOM quilt – I really don’t enjoy following a recipe – I will continue to download the instructions for the blocks to see what new techniques I might pick up, but I’m not going to make those pieced blocks.

Quilt for Noah – Finished

IMG_4136

I finished the quilt yesterday. After I got it back from being quilted I still had to add the binding and a label. Did both yesterday afternoon.

So here is the finished quilt, complete with two pillow cases in matching fabric – I didn’t make shams; I hate putting pillows into shams and figured pillow cases would be easier to use. The cases are pieced on the serger so the inside seams are all finished which will allow the pillow cases to be washed without fear of fraying. I also made two dark green pillow cases for Noah to use as actual pillow cases – the two pieced ones are decorative accessories – not to be slept on but to complete the look of the quilt.

IMG_4137The back doesn’t look bad – although I realized, after I’d taken the quilt to be quilted, that I could have offset the stripe by another 12″ had I cut 12″ from the slightly wider side and added it to the narrower side with a single dark stripe! Oh well, I don’t suppose this side of the quilt will ever be used on top. It doesn’t look bad this way, but the off-centre symmetry would have worked better had I offset that stripe more.


A Quilt for Noah

IMG_3190.JPG

This is the collection of fabrics I bought to make a double bed quilt for Noah. I took pictures of the painted walls in his bedroom so I had something to work with. The selection of green batiks at Keepsake Quilting was large – many times the number if bolts I’d have been able to choose from locally! Bought backing fabric as well. It’s going to be a simple strip quilt like the one Ben has in his room:

IMG_3180.JPG

I plan on starting it this week – shams and pillow cases, too.

My Visit To Keepsake Quilting

I stopped off at Keepsake Quilting in Center Harbor NH yesterday. I’ve purchased fabric online and from the catalogue and so I decided to return from my family visit to Toronto via NH.

I bought fabric for a double bed quilt my great nephew Noah and some fat quarters for me. But I had to stop at that.

Oh my! Heaven for a quilter!

IMG_3182.JPG

IMG_3187.JPG

IMG_3188.JPG

IMG_3184.JPG

Pick-up-sticks Quilt

I finished the quilt last evening. It got put aside for a while so I could work on the deck deciding what to keep and what to purge, and then deciding where to put the plants I retained and weeding them. They’d all been neglected for 6 weeks while the old deck was torn down and the new deck was built. They were all crowded into my neighbour’s yard (I was lucky she was willing to plant sit for such a long time).

A couple of days ago I got back to quilting the blocks, by yesterday I had just 7 double blocks to quilt. Got that done in the afternoon. Pressed the quilt to get rid of the markings (I use Frixion pens which disappear with heat – although the marks return if the fabric gets close to freezing, I’m told). Then I trimmed and bound it. Added the label last evening.

The front of the quilt consists of 63 (6 1/2″) blocks of fabric (which started out as 7 x 7 blocks), slashed either twice or three times, reassembled – while this looks like an easy quilt, turns out it was surprisingly difficult to do – each block had to be carefully crafted, the parts adjusted, pinned, and repinned until the underneath strip looked continuous! Three strips, if they crossed one another, was particularly challenging! However, I only made one block that in the end I discarded.
IMG_3151

The back of the quilt was inspired by an image of a white on red quilt (‘Lace”) by Weeks Ringle that I came across. I thought this would be the perfect quilt to try it on. Constructing the pieced strip took longer than I anticipated it would – although it was simpler to execute than the blocks on the front side.IMG_3152

Lattice Quilt – Kaffe Fassett IX

20140722-192048-69648435.jpg

20140722-192049-69649264.jpg
Yesterday I finished this Lattice Quilt using Kaffe Fassett / Philip Jacobs large pattern fabrics. (The back used a Philip Jacobs fabric with an inserted crazy quilted piece.)

Cutting and assembling this quilt wasn’t the challenge; figuring out how to quilt the “blocks” was. In the end I set up an 8×8 design – 20 blocks in all (leaving some of the sashing unquilted), thirteen 3×8 blocks, two 3×3 blocks and then a design for the border.

This quilt has turned out a wee bit larger than my usual lap quilts – the design forced that – had to use an even number of blocks to make the lattice symetrical.