After I had the third diamond quilt underway I came across what’s called the “Escher” Quilt.
There are a lot of examples of this quilt online – I don’t know who developed the idea originally. The assembly creates the illusion of impossible interlocked elements. The quilter who’s photo I’ve shown below (whom I know only as “chiquitatarita”) posted photos of her quilt top in progress (she’d bought a kit using Kaffe Fassett Collective fabrics)- here she had two columns assembled where you can see the construction clearly. I even have quite a few of those particular fabrics!
I could make this simple and enrol in a class or I could buy a kit (which includes fabric, a pattern and instructions), but I decided to try on my own to see what I can construct using a relatively simple block.
Next I came across another blogger who also described how she worked with the kit she’d bought:
First we made a chart, and laid out all the fabrics, from one to eight down, and L/M/D across. After cutting, we needed to then pair up the pieces according to the chart. Each piece has a light, a medium, and a dark bar, but they’re different depending upon their relative location in the row.
I organized my fabric into eight sets of three groupings – light, medium, dark. I cut 2″ strips from each and cut the trapezoid shapes (16 from each fabric) plus the small dark triangles for other centre of the block.
This helps me figure out how to go through my fabrics and set up an 8 x 3 array as Sue describes above.
So I set out to create the basic block – it took several attempts to establish a size for the block using paper and pencil. Then I cut out bits of fabric to see if my calculations worked – they didn’t – not at first. However, I did finally manage to work out a reasonable size block which went together pretty well.
Triangle Unit 1
This block is one of a pair – the second one assembles in the opposite direction which lets you put the triangles together to form a connected “diamond” where the same fabric abuts to form a wide angle – you can see two in the photo below – one in brown, the second in green (I’m just working with scraps to see if I could set up a couple of blocks):
Three Triangle Units Sewn Together
The precision issues won’t be with my cutting – I now have the dimensions I know will work. It’s my sewing that will create issues – I will have to be extremely careful to sew a “scant” 1/4″ seam. When I attach the triangle to the first trapezoid I need to stitch a partial seam – which is completed when I add the third trapezoid. Then I need to carefully press each resulting triangle so the centre triangle seams are pressed outward. Finally, I will need to press the block-joining seams open, so the assembly will lay flat. I also have to remember to create my blocks in pairs – one block having the small triangle at the left of the first trapezoid, the second having it at the right end!
Now it’s time to go through my fabrics – I want 24 – set up in eight sets of Light, Medium, and Dark. I don’t have complete colour ways sets of three but I’m sure I have enough variety in my collection of Kaffe Fassett Collective fabrics to make something that will work.
Mar 29 2023:
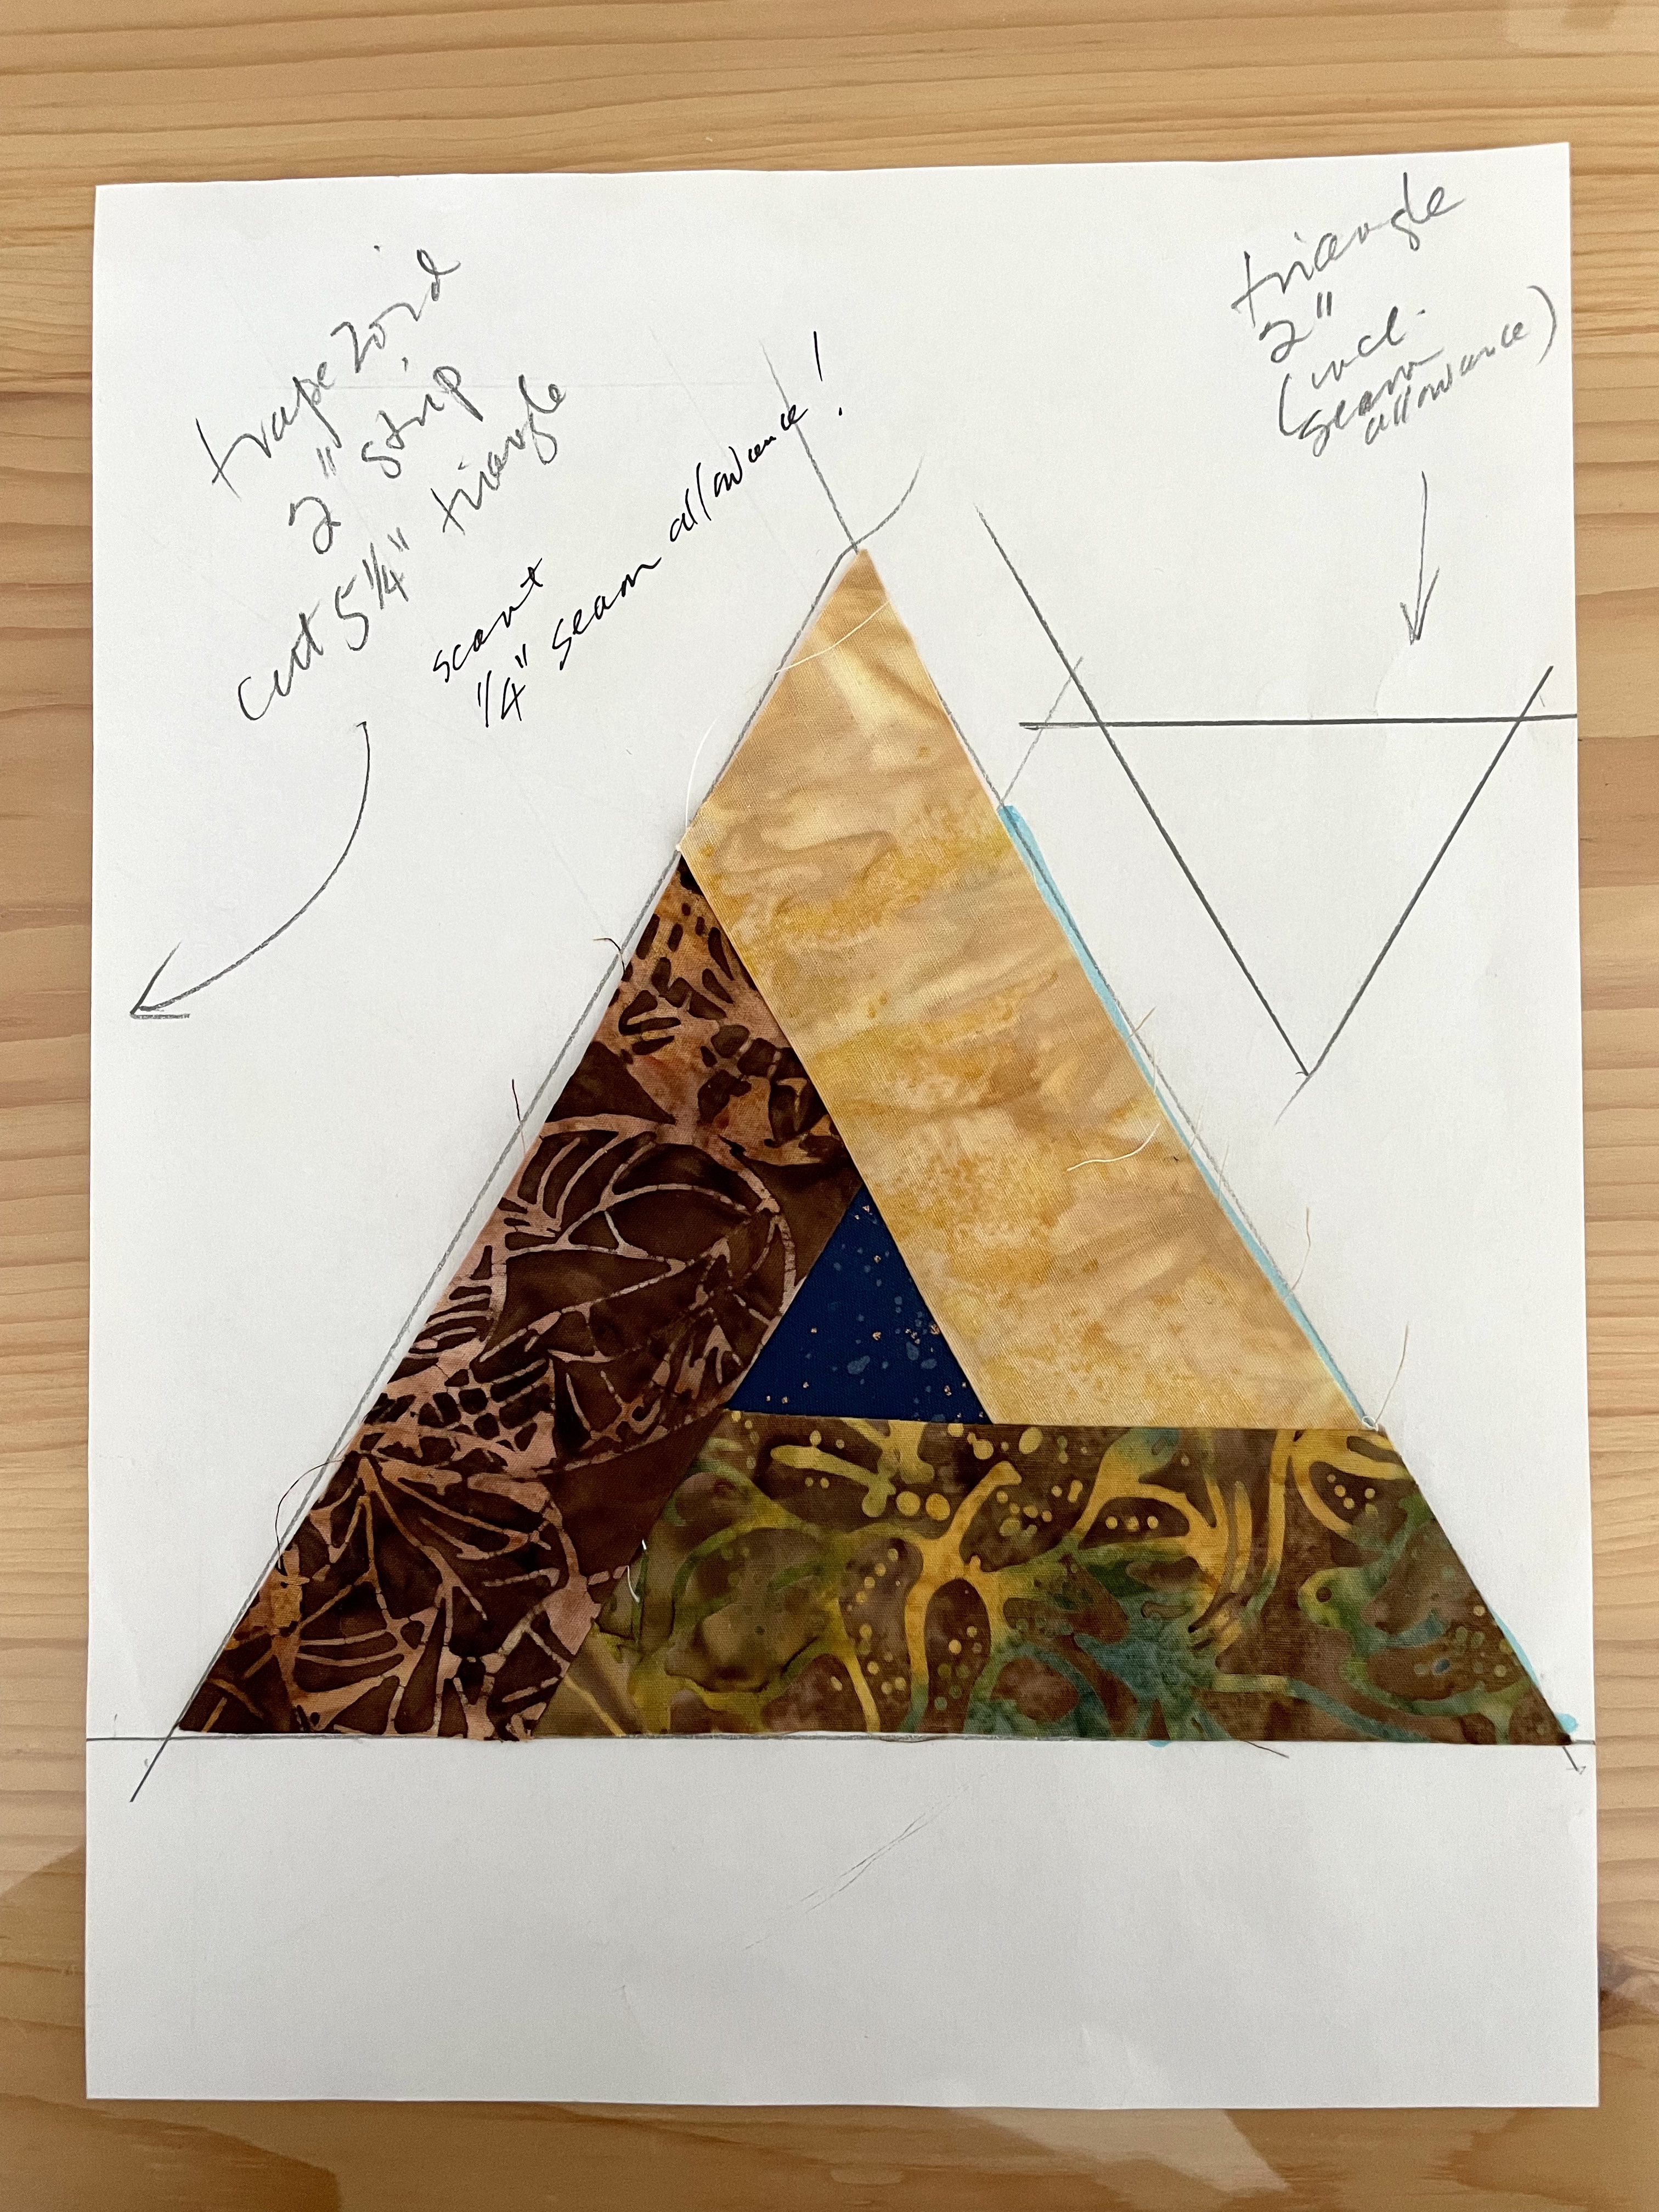
Ina Veurink wanted more information about the size of the trapezoid elements. I just constructed one so I could answer her question.
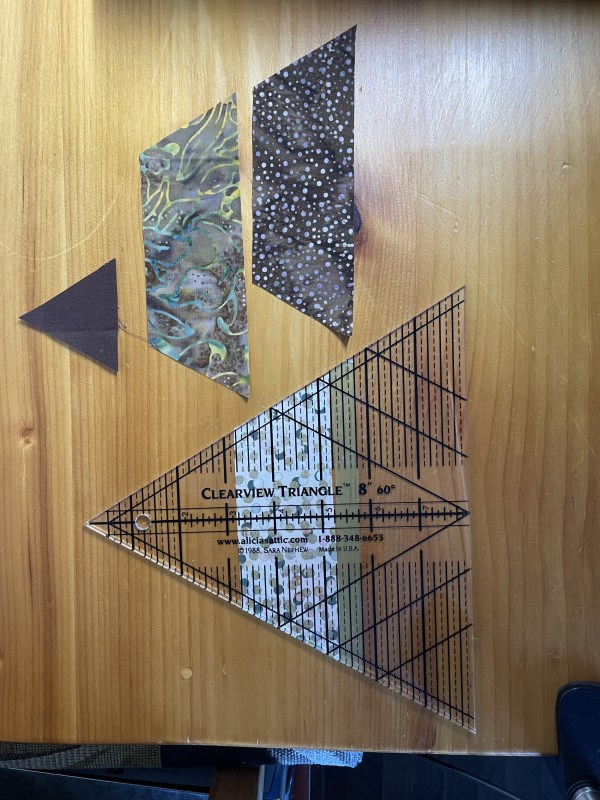
I cut 2″ fabric strips to start, from the fabrics I was going to use for the trapezoids. Next I trimmed the angles on each side using an acrylic equilateral triangle template which I’d marked with green tape at the 5 1/4″ line:
Trimmed Trapezoids From 2″ StripBlock Partially assembledAssembled Block
I laid out the 4 pieces: a 2″ triangle (in the quilt all the triangles are cut from the same dark fabric), 3 trapezoids (each 2″ tall, 5 1/4″ on the long, bottom side). I partially sewed the triangle to one end of one trapezoid
(NOTE: half the finished triangle blocks begin with the small triangle on the right, half on the left – I talked about that somewhere in the posts as I went along). It’s a partial seam because to fit the final trapezoid in, you have to be able to lift that first side of the small triangle to sew that seam. Next I attached a second trapezoid, then I fit in the third trapezoid, last I finished by completing the partial seam. Pressed and trimmed.
Finished triangle size: each side should end up at 6 3/8″ (although if your sewing was more accurate than mine on this test triangle you might actually end up closer to 6 1/2″). Whatever your final triangle size, all the triangles should finish the same size.
This is an advanced intermediate quilt (definitely not for a beginner, even with instructions).
Another note you wouldn’t pick up if you didn’t read through the comments is this one:
Just keep in mind you need 25 fabrics – one solid for the “background” triangles and any borders you plan on adding; 24 patterned fabrics – 8 light, 8 medium, 8 dark (https://jmncreativeendeavours.ca/2021/05/08/the-escher-quilt-2/)…. You’ll likely do a lot of auditioning to build a collection of 24 fabrics. As for the background, I suggest a navy (which is what I used given the colour blend of my fabrics) but black is certainly a good option (that was the background colour in the original photo I saw). All the best with this quilt. One other thought, because trying to pull together a collection of 24 fabrics can be daunting you might consider a kit that has selected fabrics for you (these quilt kits are reasonably priced: https://www.quilt-agious.com/shop/Kits/p/Escher—Batik-x46838321.htm).
Oct 28 2024
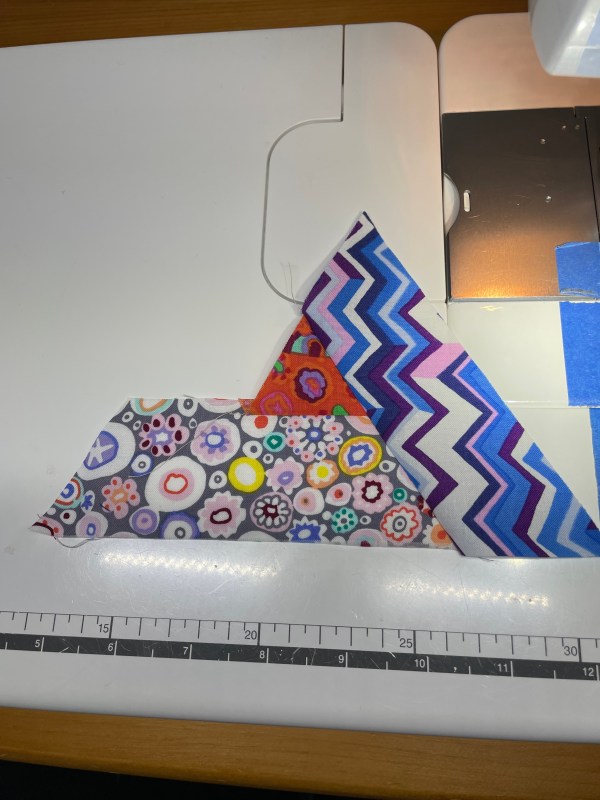
In reply to Jackie Fitch who had trouble making the triangle block (I’m doing this quick and dirty to illustrate how to assemble the block – my cutting/stitching/pressing is not absolutely perfect).
Here are the pieces: They’re all cut from 2″ strips – the trapezoids are cut with the 2″ strip positioned at the 5 1/4″ line on my triangle template (top at 2 1/4″ line). The triangle is cut from the tip with the base of the 2″ strip @ 2″.
You need to use a “scant” 1/4″ seam allowance – play around with the seam allowance until you can get the triangle outer edges to align for you (more or less).
The Pieces for the Triangle Block
You start sewing by placing the triangle on one end of the light trapezoid (half the blocks place it on the left and half on the right – when you add the next trapezoid in the second set of triangles you’re rotating in the opposite direction) [NB: I can’t remember, off hand, when adding the second trapezoid in the second set of triangles, whether you attach the medium or the dark as the second trapezoid – I’m sure I must have mentioned that.
Here it is: https://jmncreativeendeavours.ca/2021/05/09/i-was-being-so-careful/ “It turns out that four of the five finished stacks of triangles which build with the triangle on the right were sewn together counterclockwise – light strip attached to triangle, medium strip to that seam, dark strip to the remaining side – NOPE – should have been light attached to triangle, DARK next, and finally the medium – to give a clockwise rotation.”
1. Place the triangle on the left end of the light trapezoid. Sew a partial seam (click on image #1 below to see the partial seam).
2. Press triangle away from the trapezoid – NOTE: I’ve pressed the seam allowance the WRONG way – its should press toward the trapezoid!
3. Place the medium trapezoid against the side where you’ve sewn the triangle to the trapezoid [Note: When constructing the second set of triangles you sew the triangle to the right end to the light trapezoid, and add the DARK trapezoid second!]
123
4. Sew this trapezoid in place – notice the dog-ears extend beyond the top edge of the trapezoid you’re adding.
5. Press this trapezoid seam allowance toward the trapezoid.
6. position the third trapezoid (you’ll notice it does fit).
456
7. Stitch the third (the dark) trapezoid in place – notice the dog-ears extending beyond the top edge of the trapezoid, be careful not to sew into the first trapezoid. Flip the trapezoid and press it (seam allowance toward the trapezoid.
8. This next seam is a tricky seam! Click on the image to see where the seam begins – at the end of the partial seam you sewed in #1.
9. Click on the image and you will see the finished seam which closes the trapezoid.
789
I can see now I missed one photo! The one showing how to fold the fabrics so you can see where you sew the final closing seam – you can infer how to do this by clicking on #8 and looking closely at how the pieces are laid out on the sewing machine bed.
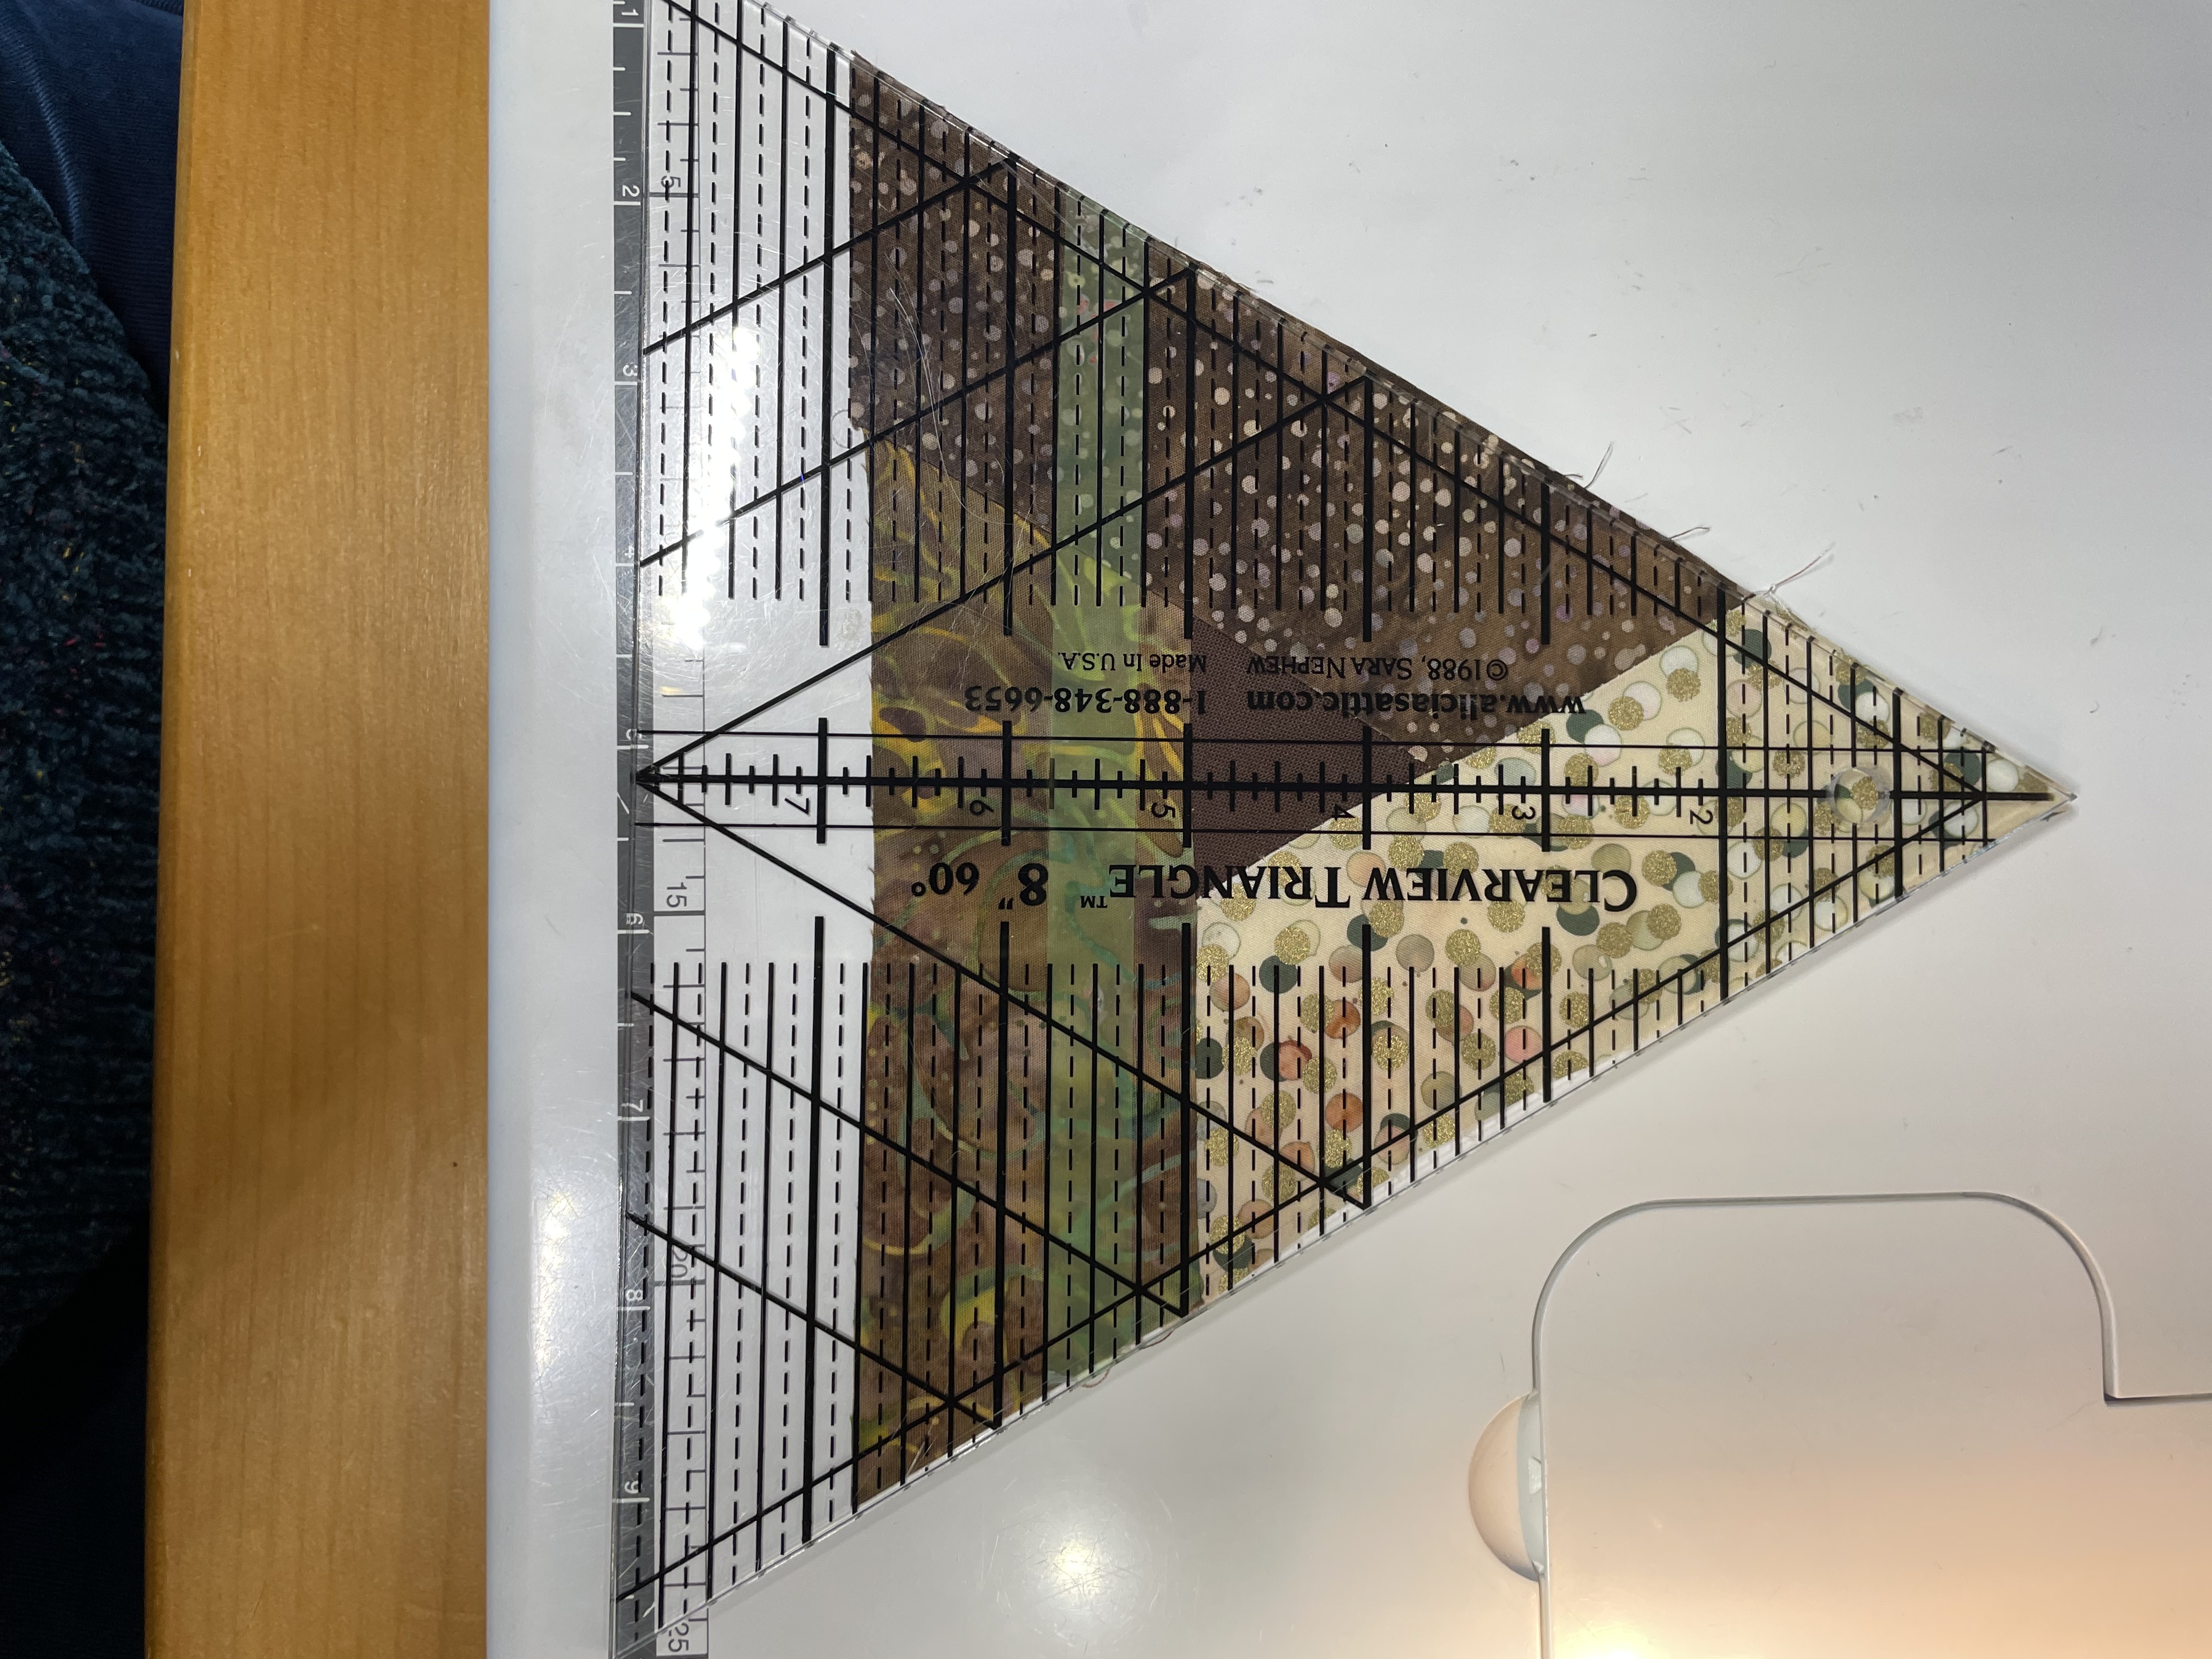
This last image should be rotated (I told you this was quick and dirty!) #10 shows the finished pressed block with the template on top. With a smidgeon of trimming, my block will end at 6 3/4″ (it’s shy a wee bit on the light trapezoid side and a smidgeon long on the medium trapezoid side).
This brown block is a bit larger than the more colourful triangle I created above – because I used a scant 1/4″ seam allowance here rather than a regular 1/4″. I advise making several practice blocks before you work on the triangles for the quilt top just to sort out what you need to do to get as close as possible to a consistent size.
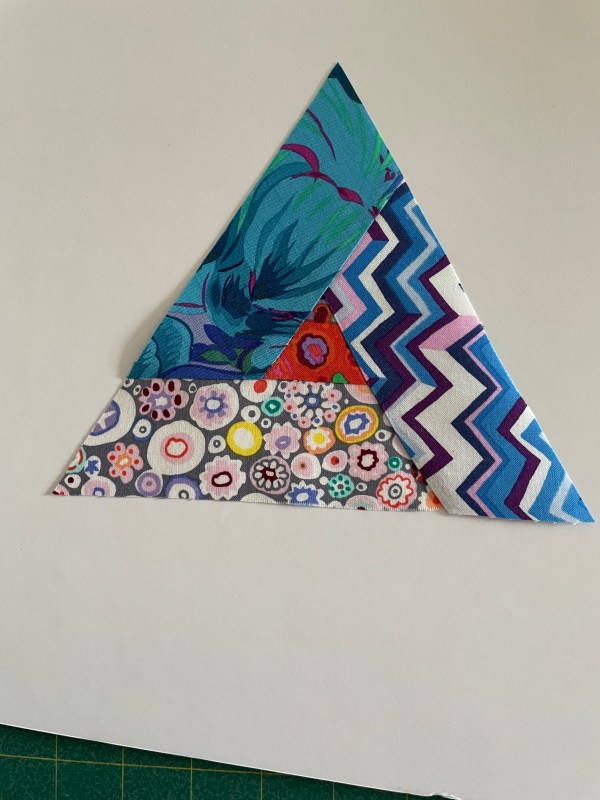
10
Here’s what the finished triangle should look like on the wrong side (seam allowances pressed away from the triangle):
Back of block to show pressing
I hope this is helpful, Jackie. I can’t do you a video because I don’t have a setup to create them. Sorry.
I cannot figure this out. I have the 8 rows of LMD cut out .and grouped into 3. do i piece every set of 3 identically . 8 with left set triangle and 8 with right side totally 16 blocks that are identical colours .Looking closely at the quilt it doesn’t seem that A B blocks use just the three fabrics. is there a random selection from LMD and then work it out when all blocks are sewn? Thanks
This is the block: https://jmncreativeendeavours.ca/2023/03/29/more-escher-quilt-information/.
There are three photos showing the assembly of the block. In this test block the assembly is going counterclockwise. Half the blocks are assembled that way – notice the block (each block) contains one L, one M, and one D! The other half are assembled by going clockwise; they, too, are one L, one M, one D.
Here was my layout: . Read this description of what I did: https://jmncreativeendeavours.ca/2021/05/08/the-escher-quilt-2/. It’s now been several years since I made the quilt so I don’t remember precisely what I did – this may be as close as I can get for you.
THanks Judith for your reply . Was delighted waking up in Australia just now to see it. Have read through your 8 part posts a few times and after your reply and finally understanding the colour selection process. Going to tackle it today and hopefully get somewhere with it. I’m doing it in Australian indigenous fabric so I hope it turns out as lovely as yours. thanks again TRacy
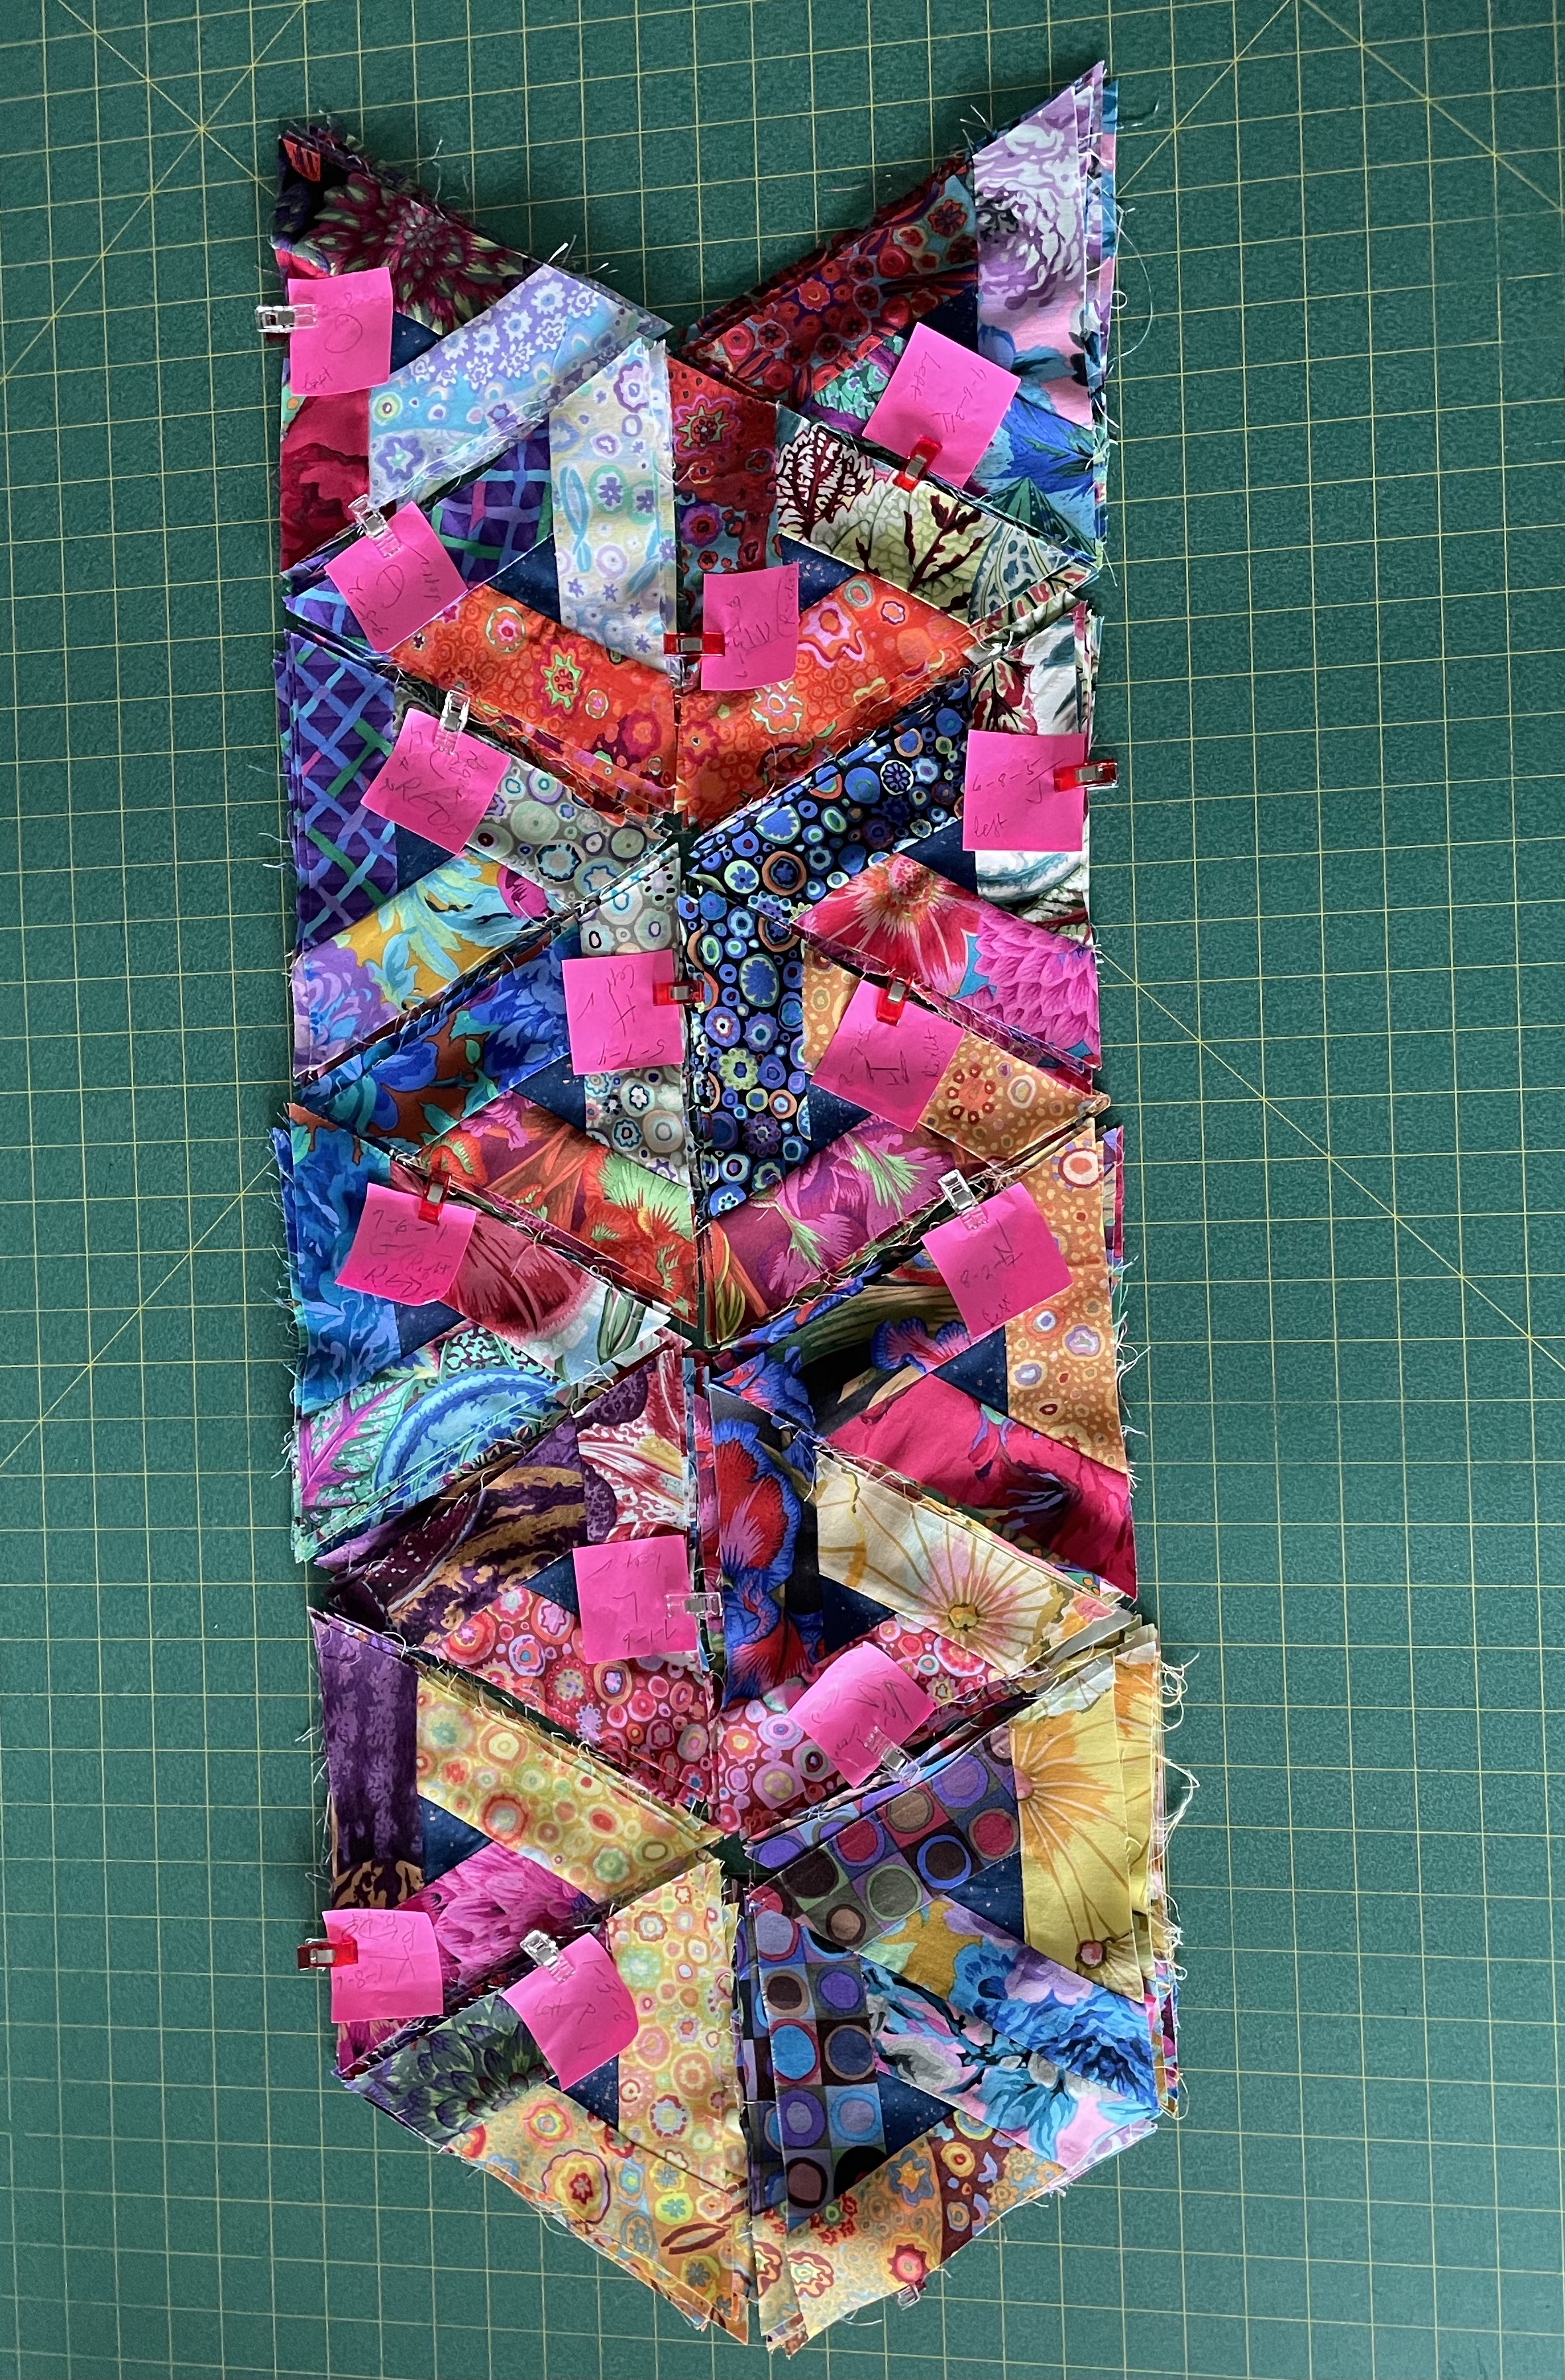
Tracy this is how I assembled the columns: https://jmncreativeendeavours.ca/wp-content/uploads/2021/05/escher-quilt-info.png
This is the chart that shows how the triangles are assembled into diamonds, into columns.
Here you can see how the coloured elements combine: https://jmncreativeendeavours.ca/wp-content/uploads/2021/05/img_0767-1.jpg
On the left side of the vertical elements I had the light, on the right side of the vertical I had the dark. At the top of each vertical column the horizontal (M) matched up across the two blocks (left and right).
Now in my case, the pattern repeats in that column – elements 1-4 form the first layout, and it’s repeated from 5-8.
When the next column was added, you can see the “pattern” emerge, but up two elements. The next column is a repeat of the first, and the last is a repeat of the second. That pattern is easier to see if you follow the vertical light pieces.
This should help you lay out the triangles/diamonds to make the effect work.
It’s the lights on one side of the vertical with the darks on the other side that give the overall 3D effect.
Judith
Thanks Judith for explaining it in more detail . Just couldn’t get my head around the colour selection process but after numbering all the blocks and following your chart I hope I goes to plan. I appreciate that you made this a while ago, if it was me i would probably have totally forgotten my process. Wish me luck!
I wish you luck! Send photos of your work in progress if you run into trouble and I’ll see what I can do to figure out what’s going on.
Thanks I’ll post you a photo as I progress . (hopefully)
I’ve been quilting forever and I can’t get this block to come out using 5 1/4″ trapezoid. Is there a mistake in the measurements? A video showing how to piece together would help.
I’ve spent the past hour creating a triangle block for you and taking pictures as I went along. I’ve described how I constructed the block – click on this link (for this page): https://jmncreativeendeavours.ca/2021/05/06/next-quilt-the-escher-quilt/Scroll to the bottom of the piece – Oct 28 2024 where I’ve explained how I made the block.
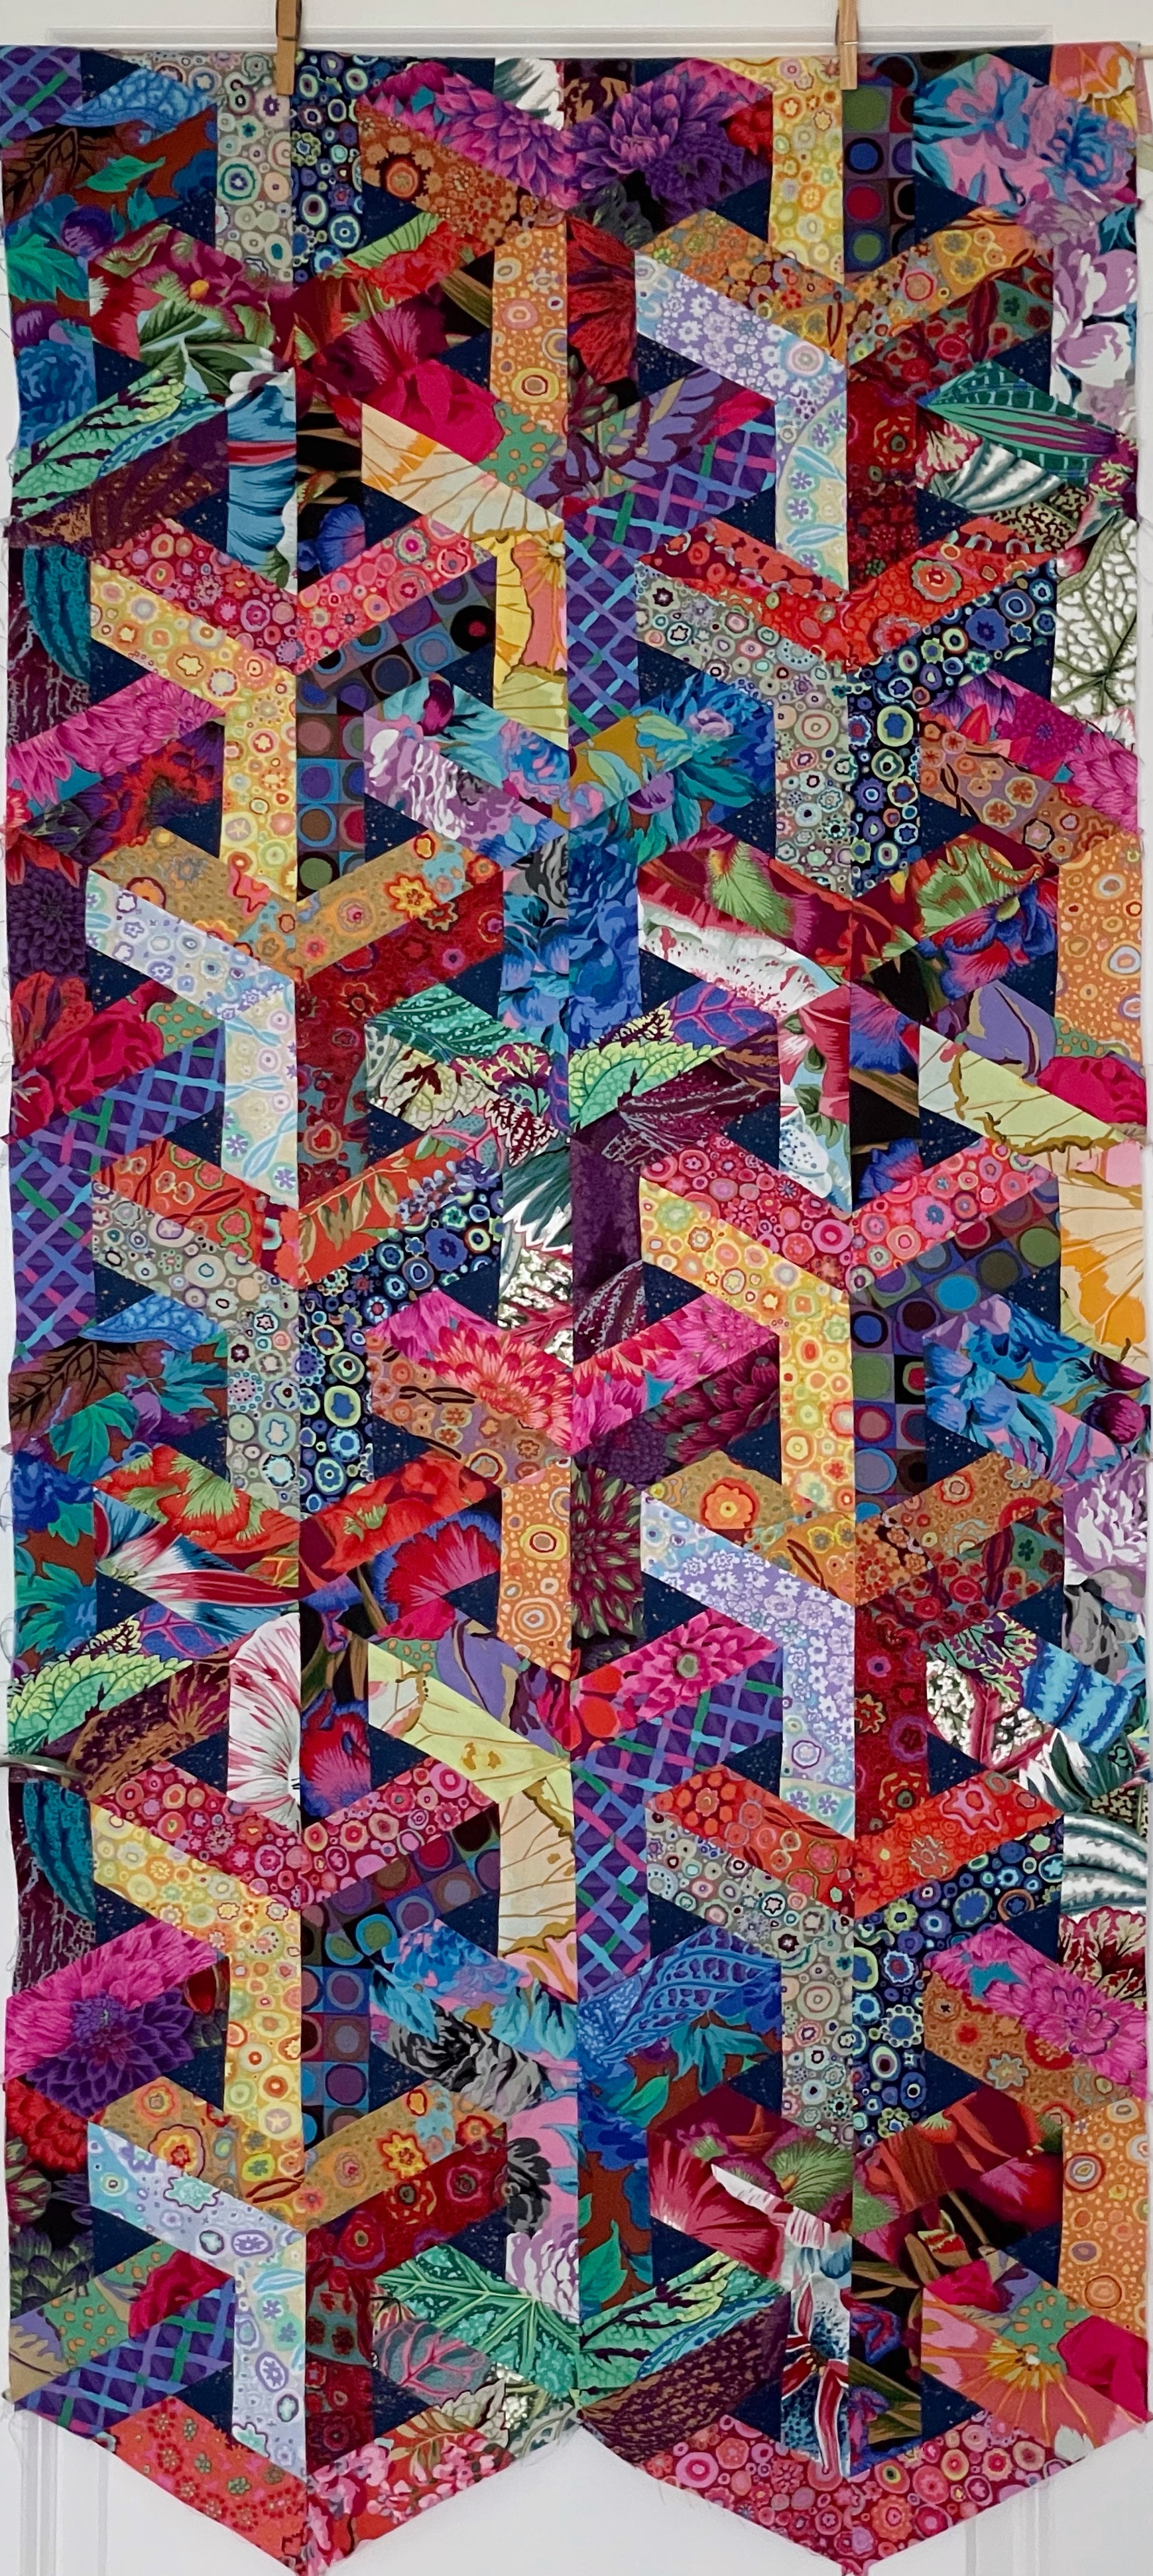
I am very interested in getting the ruler needed to make the runner pictured above, The one that looks like its made in triangles. It looks as though it’s all weaved together. Please let me know if its for sale or not.
Really a work of art! Thank you for sharing!❤️❤️❤️😍😍😍Our host and organizer of St. Mildred Prayer Quilt, Ms. Marie posted it on our group chat! ☘️☘️☘️😊😊😊
Thank you for sorting it out! I was looking for a materials list and cutting instructions. I can usually figure out the rest. I didn’t want the one that was made out of only triangles because it didn’t look as clean as this pattern. I think I’ve got it now…..now to pick out 24+ fabrics!
Your picture has been pirated and is being passed off as their own. It is in the FaceBook group Quilting For Beginners and was posted by member Amanda Santos
Thanks for the interest, Mary. I did a bit of digging around – I was able to find Amanda Santos and the photo she has posted is the same one as I posted. If you look closely, I put a link as caption of the photo to attribute it to the person whose quilt it was – I didn’t make the strips in the photo – I was using to describe the idea I’d come across. Interesting while the image I posted had 2 columns, the photo by “chiquitarita” has 4 columns on the same muslin background. I tried looking for the original photo I used (and thought I’d attributed) but can’t now find it. I’m assuming the original was also assembled by chiquitarita. So, I don’t think my photo was pirated – it could well be that Amanda Santos was actually deconstructing a quilt of hers as she describes in her post on Quilting For Beginners.
Was glad to find your helpful information. I have been looking at these beauties for some time but worried it would be too challenging – my youngest daughter’s recent engagement (and your explanation) gave me the needed push to start this as her wedding quilt. I look forward to your updates (may help keep my seam ripping to a minimum!)
Thank you so much! Your insights are really helpful – your amazingly quick timeline is something to aspire to!
You explain this well! I would love to try this. It looks like fun and not too mindless. I like doing quilts that take some thought and it’s not too difficult.
Interesting. Have you tried paper piecing the triangles
I’ve never done paper piecing – don’t have the patience to do it! Besides, the “triangle” elements of the Escher quilt are constructed from three rectangles arranged around a small triangle. It was easier just to keep doing ordinary piecing.


Hi JMN
I cannot figure this out. I have the 8 rows of LMD cut out .and grouped into 3. do i piece every set of 3 identically . 8 with left set triangle and 8 with right side totally 16 blocks that are identical colours .Looking closely at the quilt it doesn’t seem that A B blocks use just the three fabrics. is there a random selection from LMD and then work it out when all blocks are sewn? Thanks
This is the block: https://jmncreativeendeavours.ca/2023/03/29/more-escher-quilt-information/.
There are three photos showing the assembly of the block. In this test block the assembly is going counterclockwise. Half the blocks are assembled that way – notice the block (each block) contains one L, one M, and one D! The other half are assembled by going clockwise; they, too, are one L, one M, one D.
Here was my layout: . Read this description of what I did: https://jmncreativeendeavours.ca/2021/05/08/the-escher-quilt-2/. It’s now been several years since I made the quilt so I don’t remember precisely what I did – this may be as close as I can get for you.
Judith
THanks Judith for your reply . Was delighted waking up in Australia just now to see it. Have read through your 8 part posts a few times and after your reply and finally understanding the colour selection process. Going to tackle it today and hopefully get somewhere with it. I’m doing it in Australian indigenous fabric so I hope it turns out as lovely as yours.
thanks again TRacy
Tracy this is how I assembled the columns: https://jmncreativeendeavours.ca/wp-content/uploads/2021/05/escher-quilt-info.png
This is the chart that shows how the triangles are assembled into diamonds, into columns.
Here you can see how the coloured elements combine: https://jmncreativeendeavours.ca/wp-content/uploads/2021/05/img_0767-1.jpg
On the left side of the vertical elements I had the light, on the right side of the vertical I had the dark. At the top of each vertical column the horizontal (M) matched up across the two blocks (left and right).
Now in my case, the pattern repeats in that column – elements 1-4 form the first layout, and it’s repeated from 5-8.
When the next column was added, you can see the “pattern” emerge, but up two elements. The next column is a repeat of the first, and the last is a repeat of the second. That pattern is easier to see if you follow the vertical light pieces.

This should help you lay out the triangles/diamonds to make the effect work.
It’s the lights on one side of the vertical with the darks on the other side that give the overall 3D effect.
Judith
Thanks Judith for explaining it in more detail . Just couldn’t get my head around the colour selection process but after numbering all the blocks and following your chart I hope I goes to plan. I appreciate that you made this a while ago, if it was me i would probably have totally forgotten my process. Wish me luck!
I wish you luck! Send photos of your work in progress if you run into trouble and I’ll see what I can do to figure out what’s going on.
Thanks I’ll post you a photo as I progress . (hopefully)
FYI your link – http://sewinginwisconsin.blogspot.com/2018/06/the-escher-quilt-progress-made.html is no longer an active link. Therefore your example of the chart you created is missing.
Link no longer exists – the person took it down – no replacement.
I’ve been quilting forever and I can’t get this block to come out using 5 1/4″ trapezoid. Is there a mistake in the measurements? A video showing how to piece together would help.
I’ve spent the past hour creating a triangle block for you and taking pictures as I went along. I’ve described how I constructed the block – click on this link (for this page): https://jmncreativeendeavours.ca/2021/05/06/next-quilt-the-escher-quilt/Scroll to the bottom of the piece – Oct 28 2024 where I’ve explained how I made the block.
Judith
Pingback: Escher Quilt Free Pattern - Quilt Missouri Tutorials
Pingback: Optical Illusion Quilt Patterns - Creative Designs For Stunning Quilts ⋆ Hello Sewing
I am very interested in getting the ruler needed to make the runner pictured above, The one that looks like its made in triangles. It looks as though it’s all weaved together. Please let me know if its for sale or not.
I used a standard equilateral triangle acrylic ruler which I bought at a local fabric store.
Really a work of art! Thank you for sharing!❤️❤️❤️😍😍😍Our host and organizer of St. Mildred Prayer Quilt, Ms. Marie posted it on our group chat! ☘️☘️☘️😊😊😊
Has anybody tried the quilt? If you plan the fabrics carefully, the actual sewing isn’t all that difficult.
Pingback: More Escher Quilt Information | jmn
I LOVE this pattern! You give a length for cut piece’s but not the width, could you please give that! Thanks
M C Escher was a twenty century artist with “new” ideas on art.
I didn’t explain who Escher was because having known of his very interesting work from the mid-sixties I thought people would know who he was.
I love this quilt. I want an Escher and would gladly pay for one.
I have done this quilt for my daughter it was hard but it was worth it
I wasn’t working from a pattern so I had to quite a bit of experimenting to sort it out!
Thank you for sorting it out! I was looking for a materials list and cutting instructions. I can usually figure out the rest. I didn’t want the one that was made out of only triangles because it didn’t look as clean as this pattern. I think I’ve got it now…..now to pick out 24+ fabrics!
Your picture has been pirated and is being passed off as their own. It is in the FaceBook group Quilting For Beginners and was posted by member Amanda Santos
Thanks for the interest, Mary. I did a bit of digging around – I was able to find Amanda Santos and the photo she has posted is the same one as I posted. If you look closely, I put a link as caption of the photo to attribute it to the person whose quilt it was – I didn’t make the strips in the photo – I was using to describe the idea I’d come across. Interesting while the image I posted had 2 columns, the photo by “chiquitarita” has 4 columns on the same muslin background. I tried looking for the original photo I used (and thought I’d attributed) but can’t now find it. I’m assuming the original was also assembled by chiquitarita. So, I don’t think my photo was pirated – it could well be that Amanda Santos was actually deconstructing a quilt of hers as she describes in her post on Quilting For Beginners.
Excellent explanation, to figure out how we can arrive to the Escher quilt. Thank you very much for sharing your plan of building it.
I’m trying tomorrow thank you for the directions
Just lay pieces out systematically. Also one mistake I made was not being careful enough building the triangles around the central triangle – sew clockwise but pay attention to the left/right pairs – https://jmncreativeendeavours.ca/2021/05/09/i-was-being-so-careful/
Was glad to find your helpful information. I have been looking at these beauties for some time but worried it would be too challenging – my youngest daughter’s recent engagement (and your explanation) gave me the needed push to start this as her wedding quilt. I look forward to your updates (may help keep my seam ripping to a minimum!)
Beth, there are 8 posts as I work my way through the Escher quilt. This will help you find all of them: https://jmncreativeendeavours.ca/?s=escher&submit=Search
Thank you so much! Your insights are really helpful – your amazingly quick timeline is something to aspire to!
You explain this well! I would love to try this. It looks like fun and not too mindless. I like doing quilts that take some thought and it’s not too difficult.
no moss growing on you!
Wow, amazing optical illusion! love that you figured it out by yourself- of course you did!
Intriguing!
Interesting. Have you tried paper piecing the triangles
I’ve never done paper piecing – don’t have the patience to do it! Besides, the “triangle” elements of the Escher quilt are constructed from three rectangles arranged around a small triangle. It was easier just to keep doing ordinary piecing.