Kaffe Fassett Quilt Along

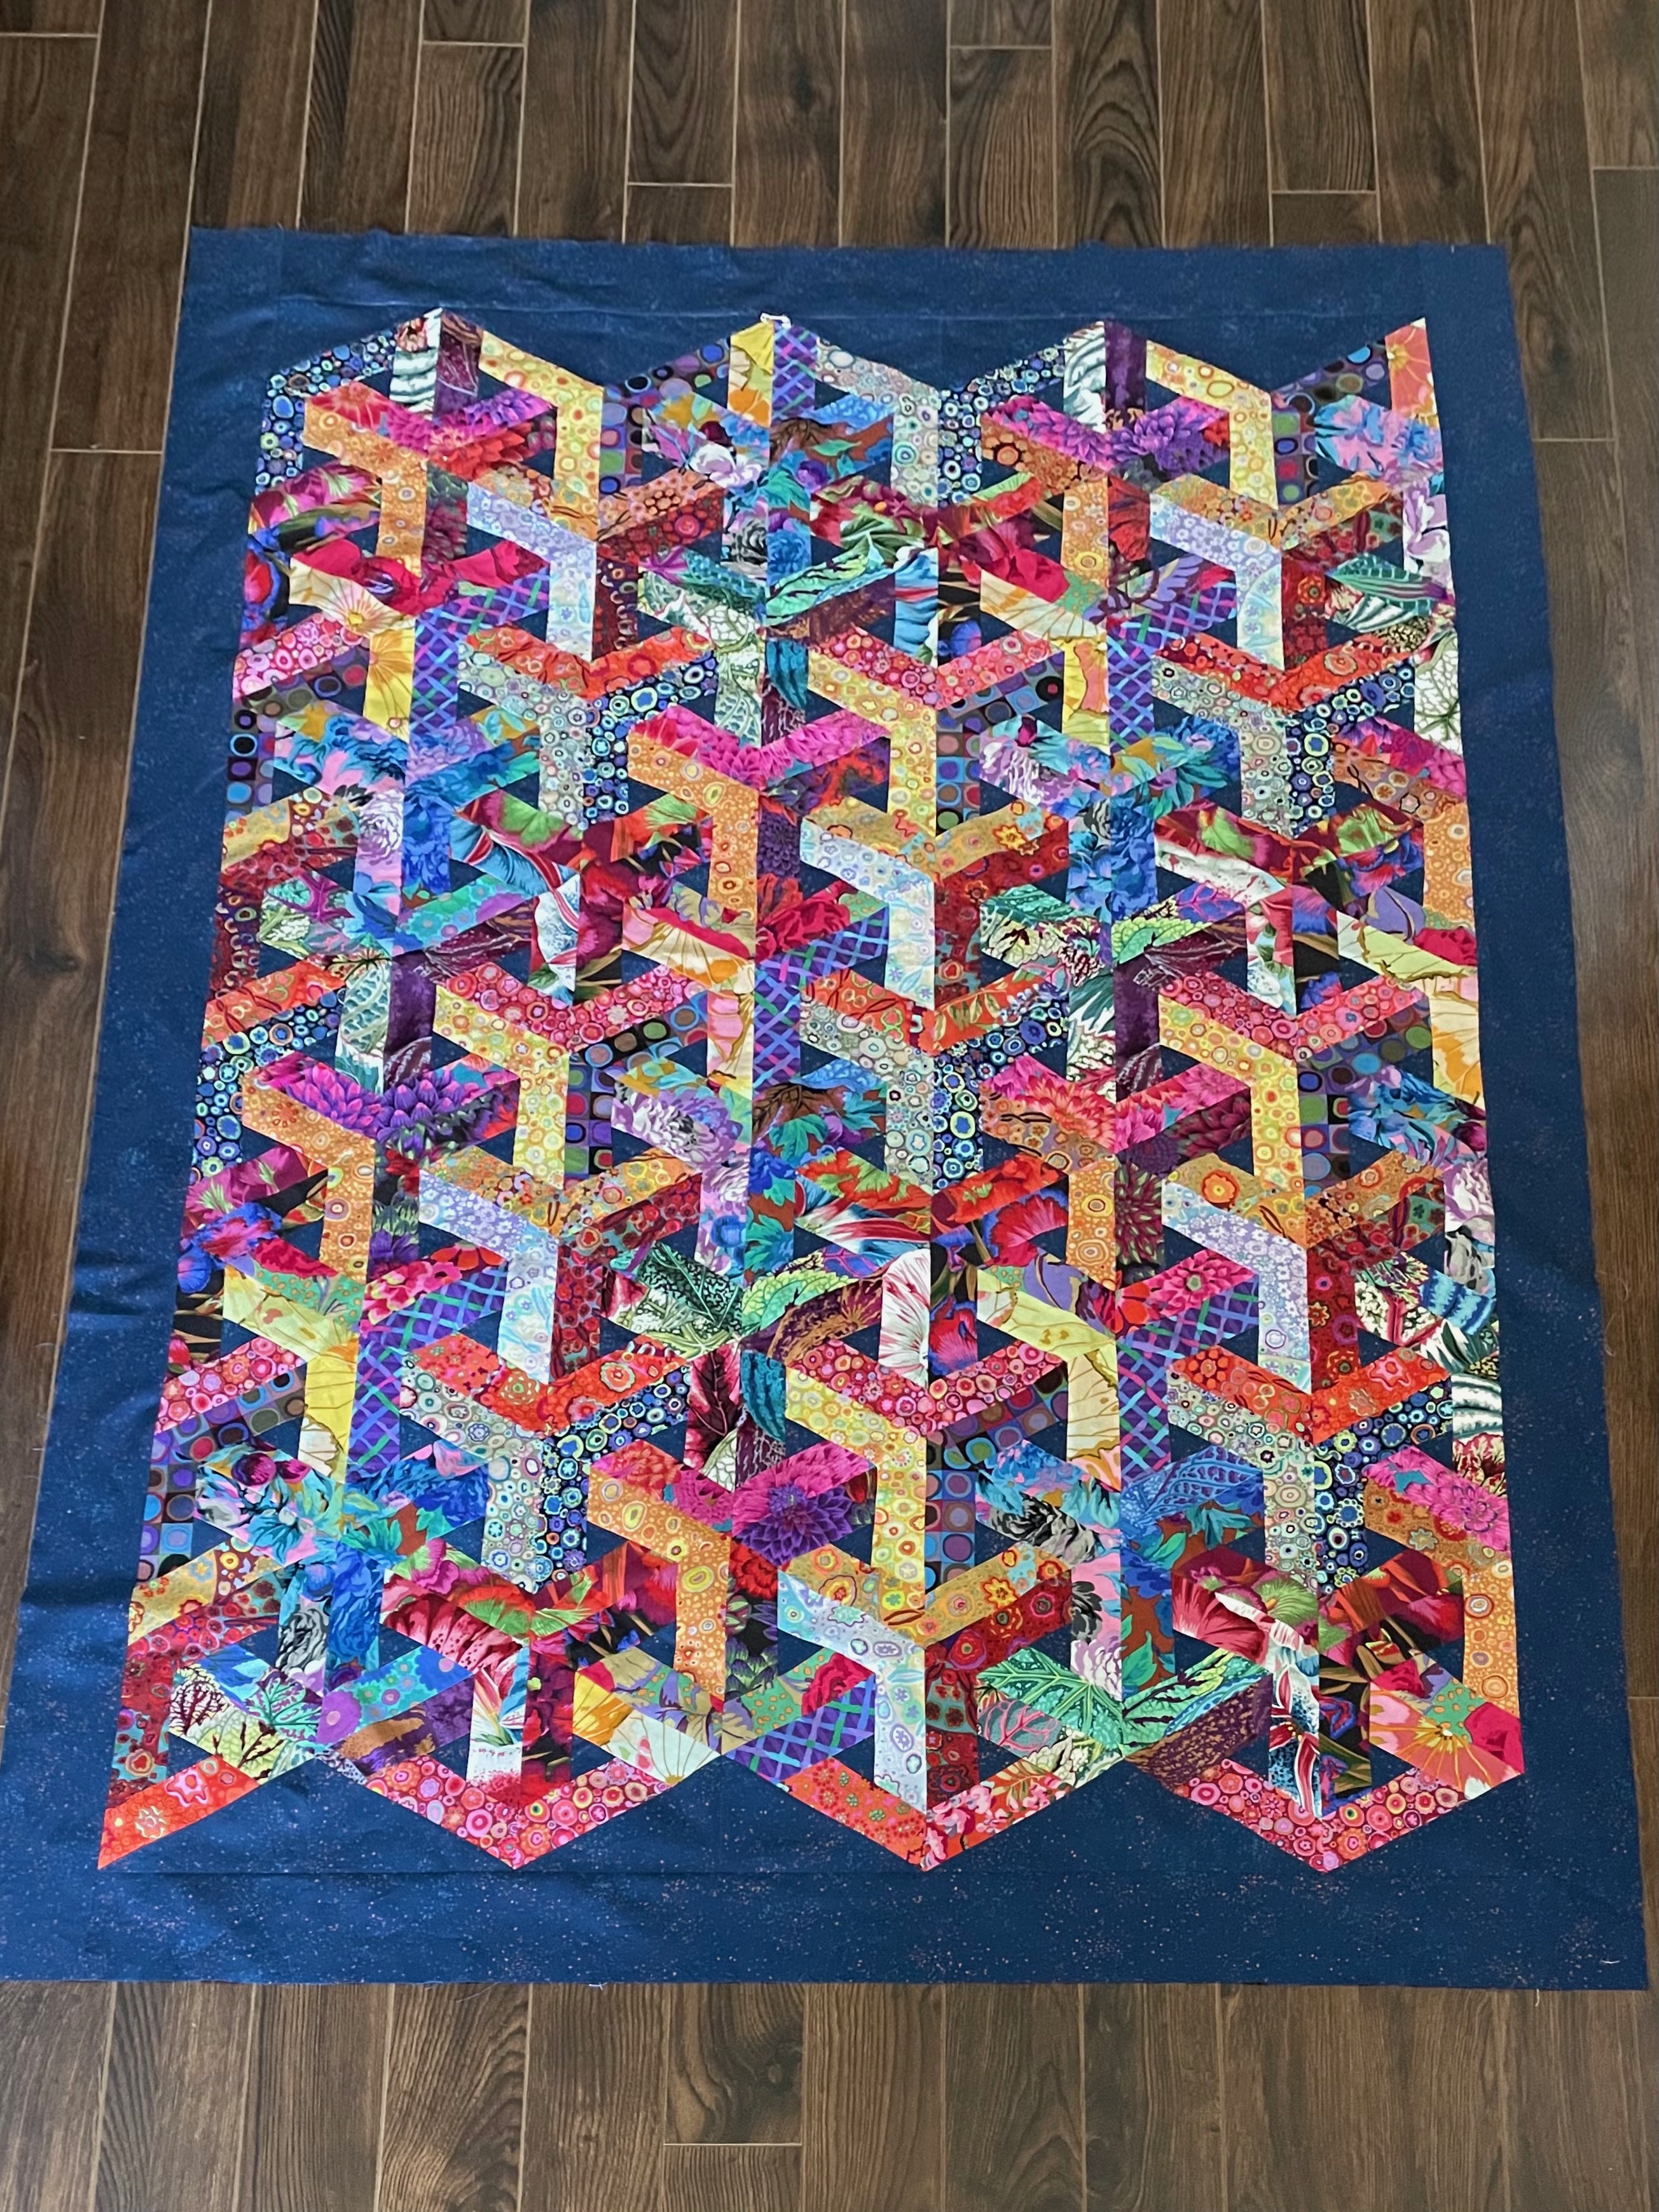
In January I did something I have never done – I signed up to do a quilt along – this one with Kaffe Fassett. He (and the rest of the collective) have created a quartet of queen size quilts – same pattern but available in four different colour combinations. The quilt block resembles a cog wheel hence the name of the quilt: Gathering No Moss.

The project began when I received an email from Hyggeligt Fabrics in St, Mary’s Ontario advertising the quilt along. Over the years I’ve collected Kaffe Fassett fabrics – my diamond quilts, the Escher quilt all used fabrics from Free Spirit which produces and sells the Kaffe Fassett Collective collections. In years past, I’ve attended a lecture or two of his which I found underwhelming, but I’ve also watched Fassett lead a weekend workshop several years ago on YouTube from which I learned a lot.

I liked the “Delft” fabric collection well enough that I decided to buy the Gathering No Moss fabrics and join the quilt along. The zoom lectures begin on Wednesday – Aug 4 – on Facebook (why there of all places – I try to stay off Facebook). In any case, my fabric bundle from Hyggeligt Fabrics arrived last week. It’s a lovely collection of fabrics. The instructions are for a 77″ x 92″ quilt – a 5 x 6 array of blocks. I decided to keep the array, but downsize the blocks.

The intended quilt block is a 13 1/2″ square:

The 13 1/2″ block / an 8 1/2″ adaptation

I did a mock-up of the intended block but I wanted to make a smaller throw size quilt so I downsized the blocks which turned into a block a bit smaller than I wanted. [ A finished 9″ block x 5 = 45″ plus 1.25″ x 6 for the sashing = 7.5″ will give me a finished width of 52 1/2″ – a largish throw quilt.]

A 9 1/2″ block

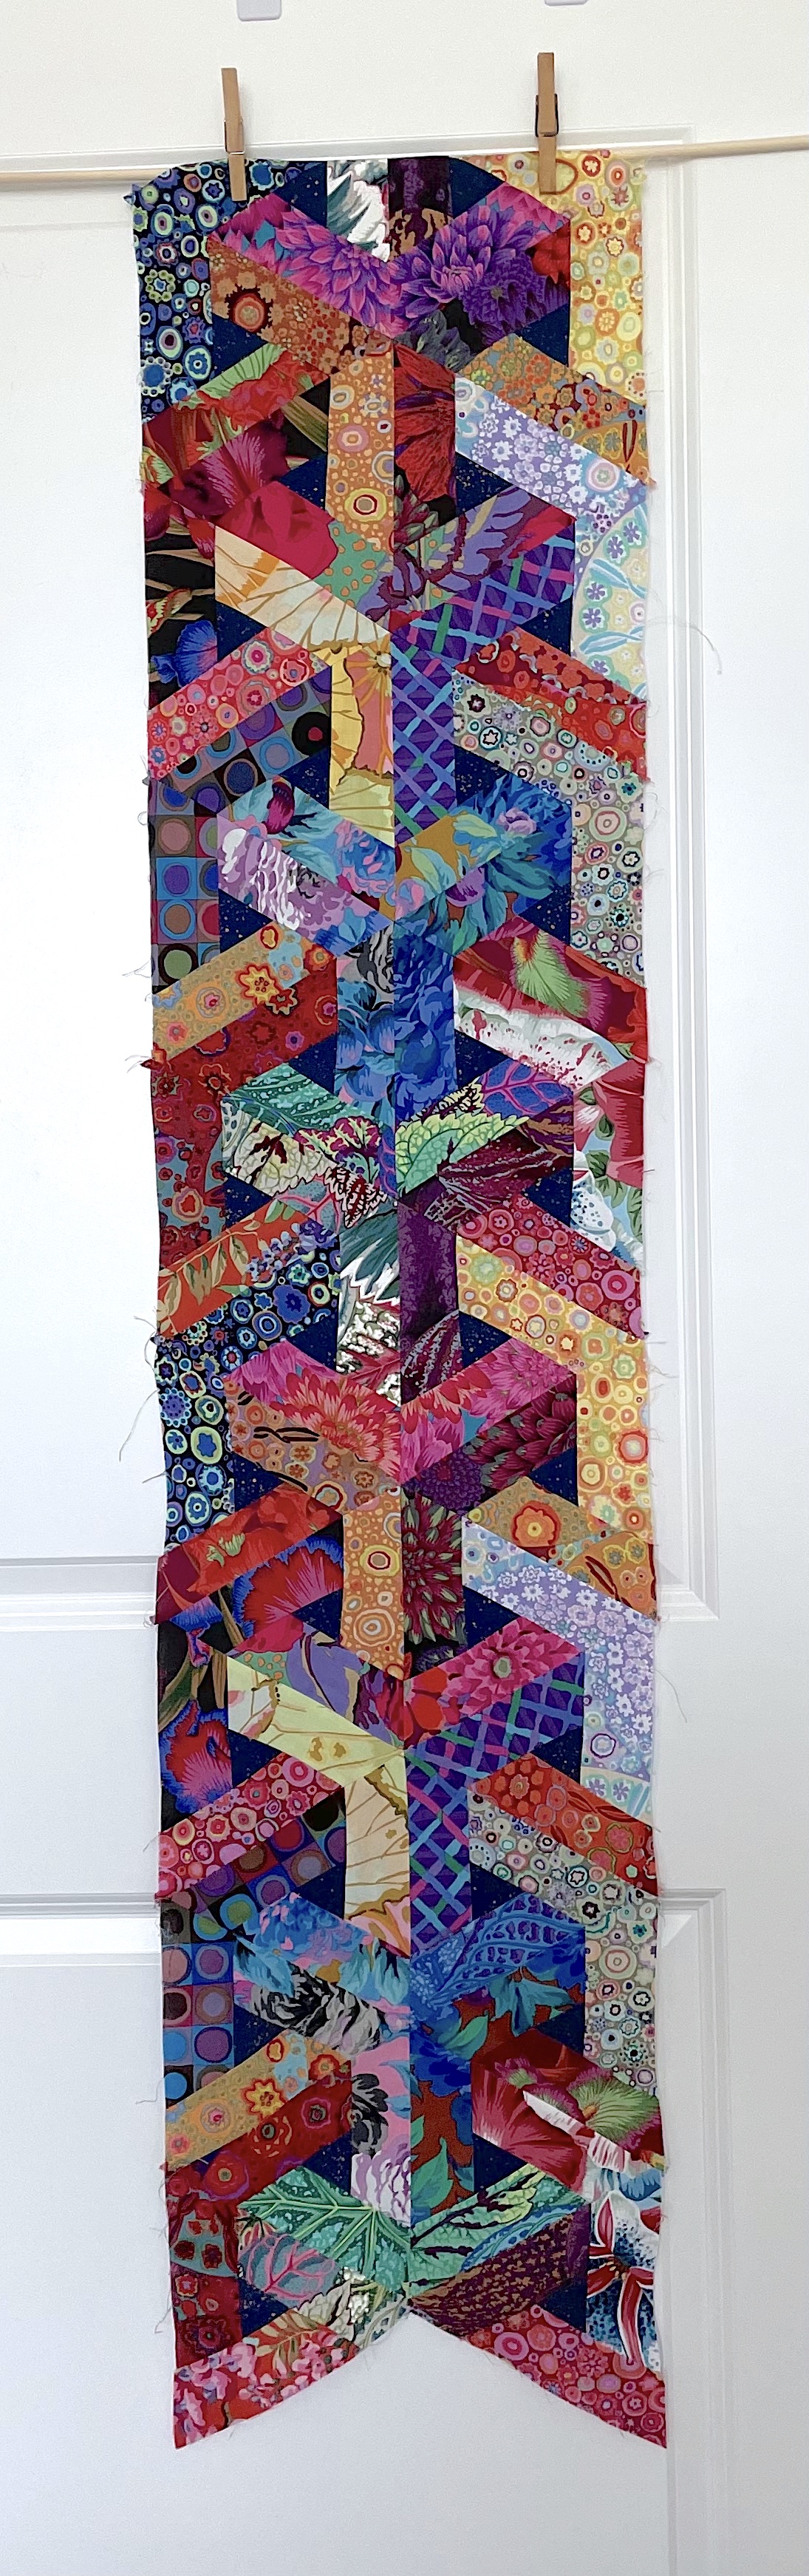
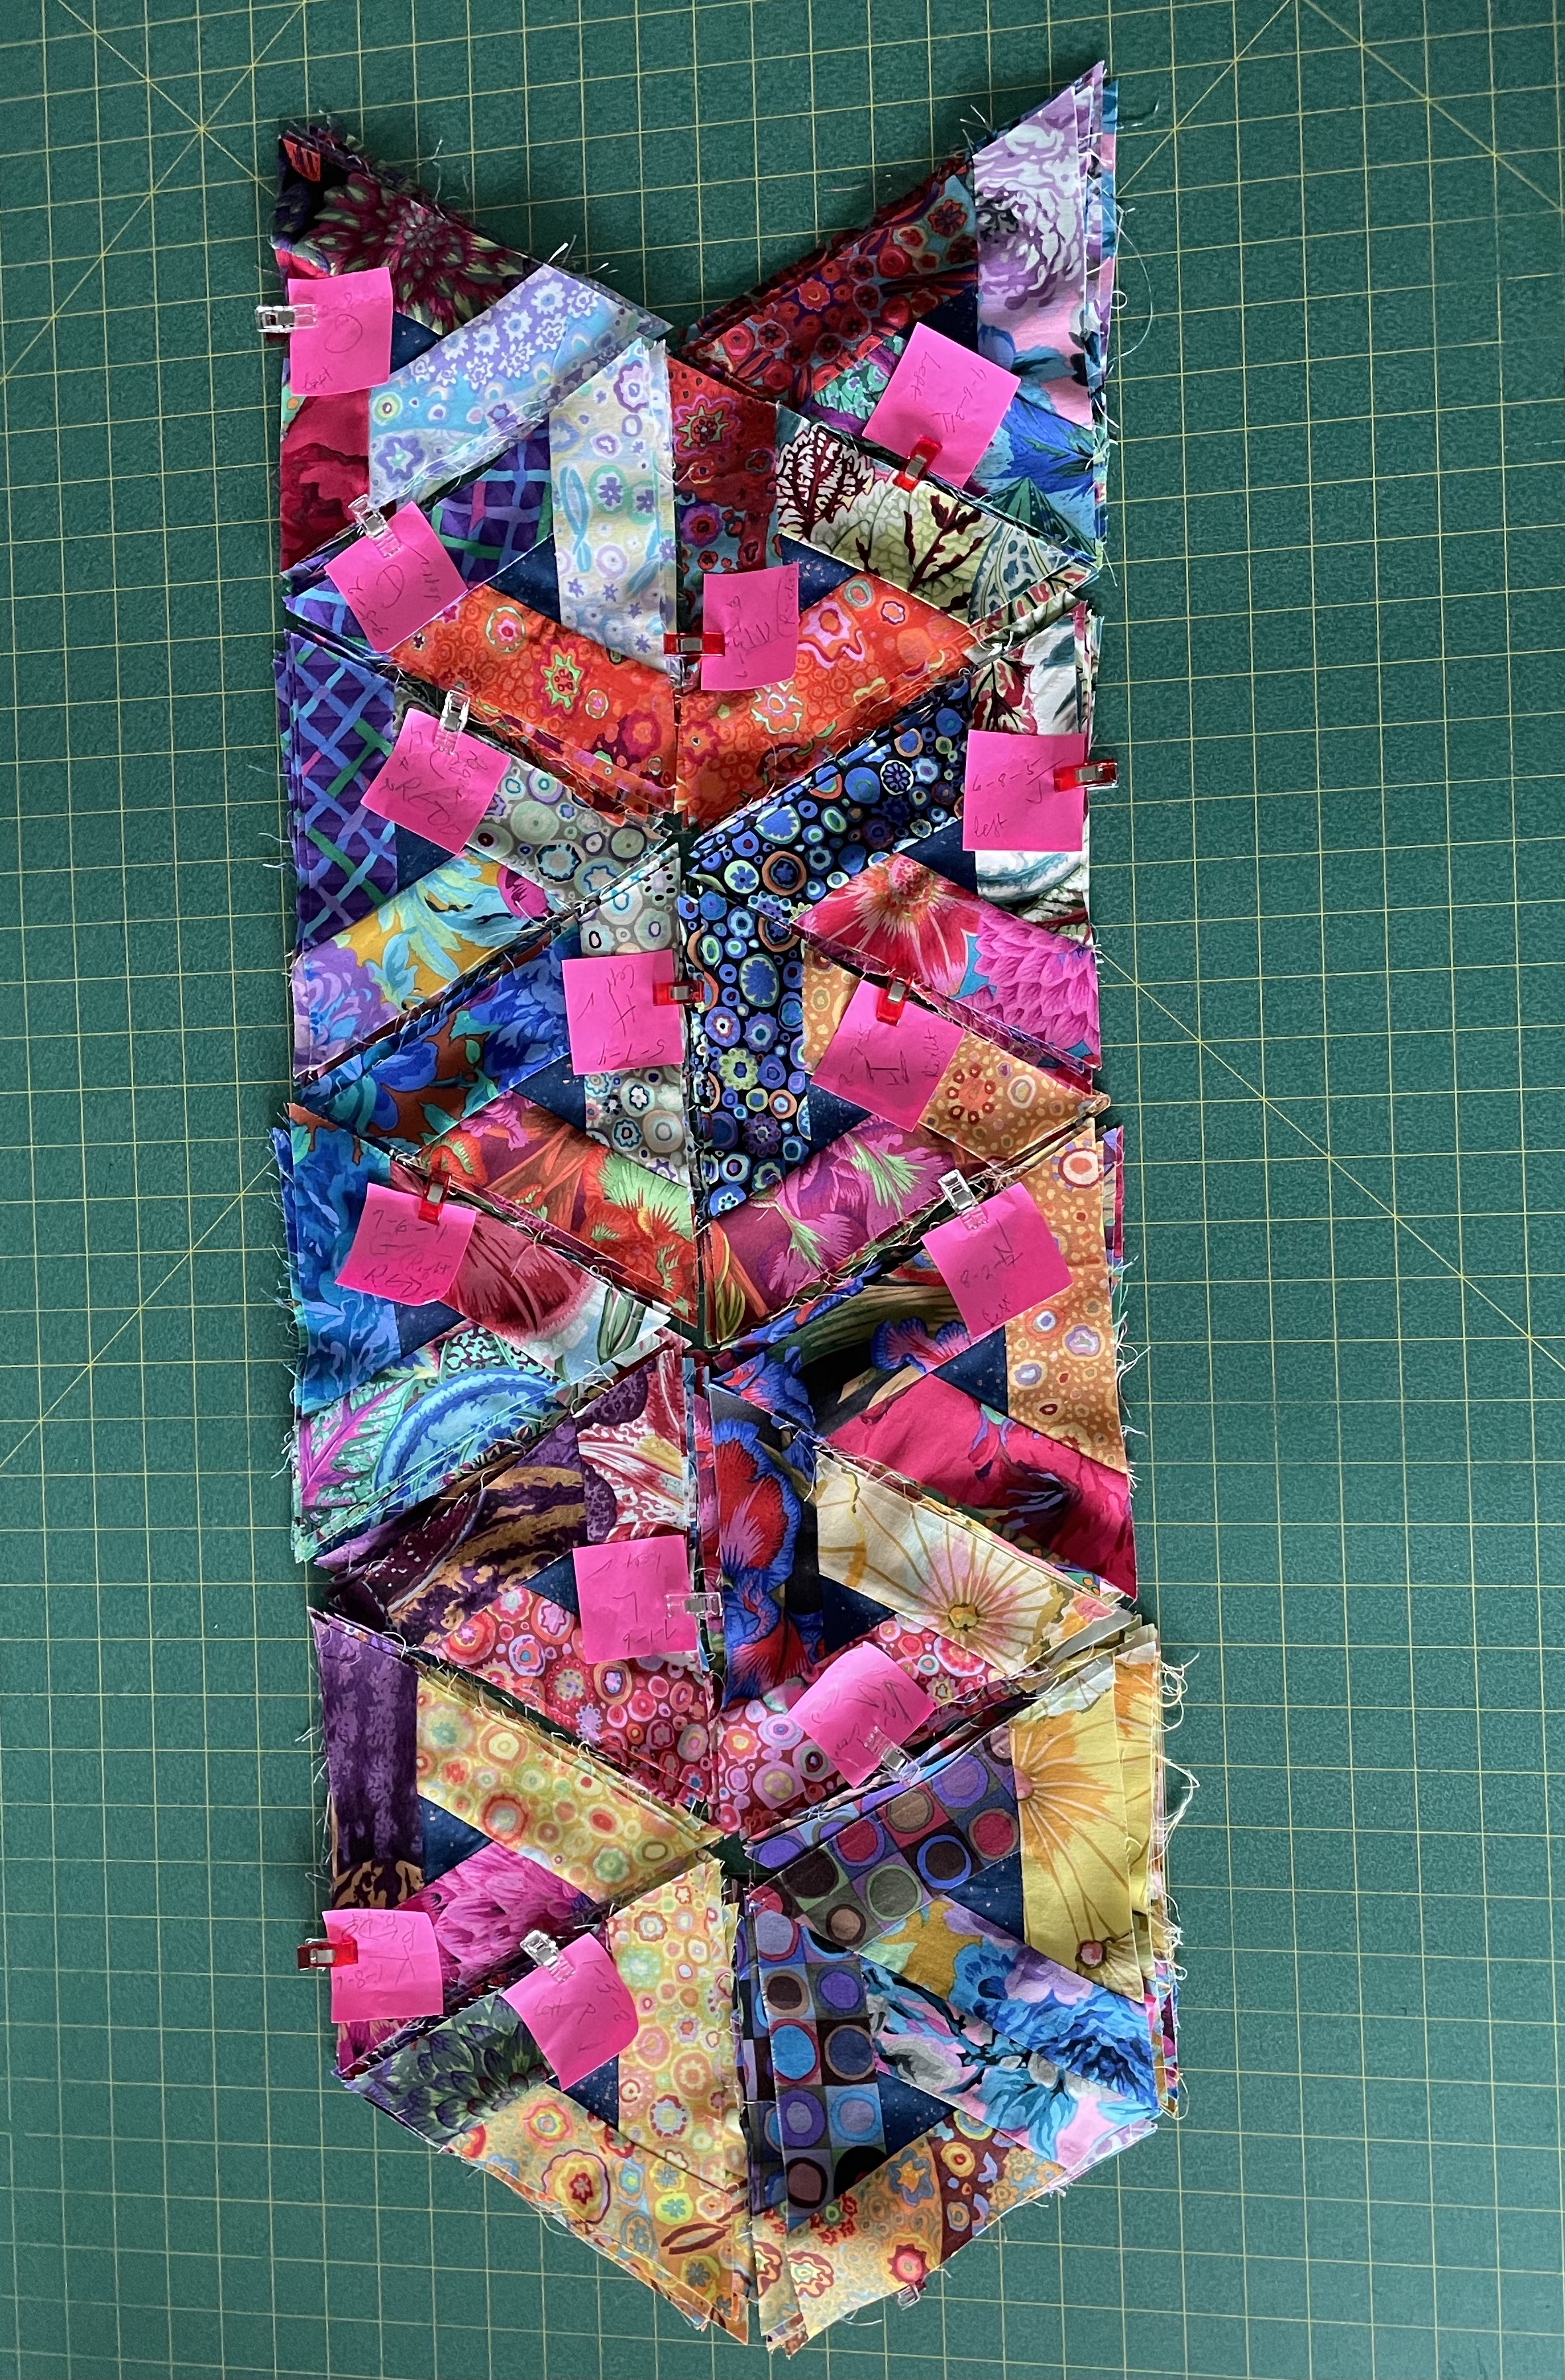
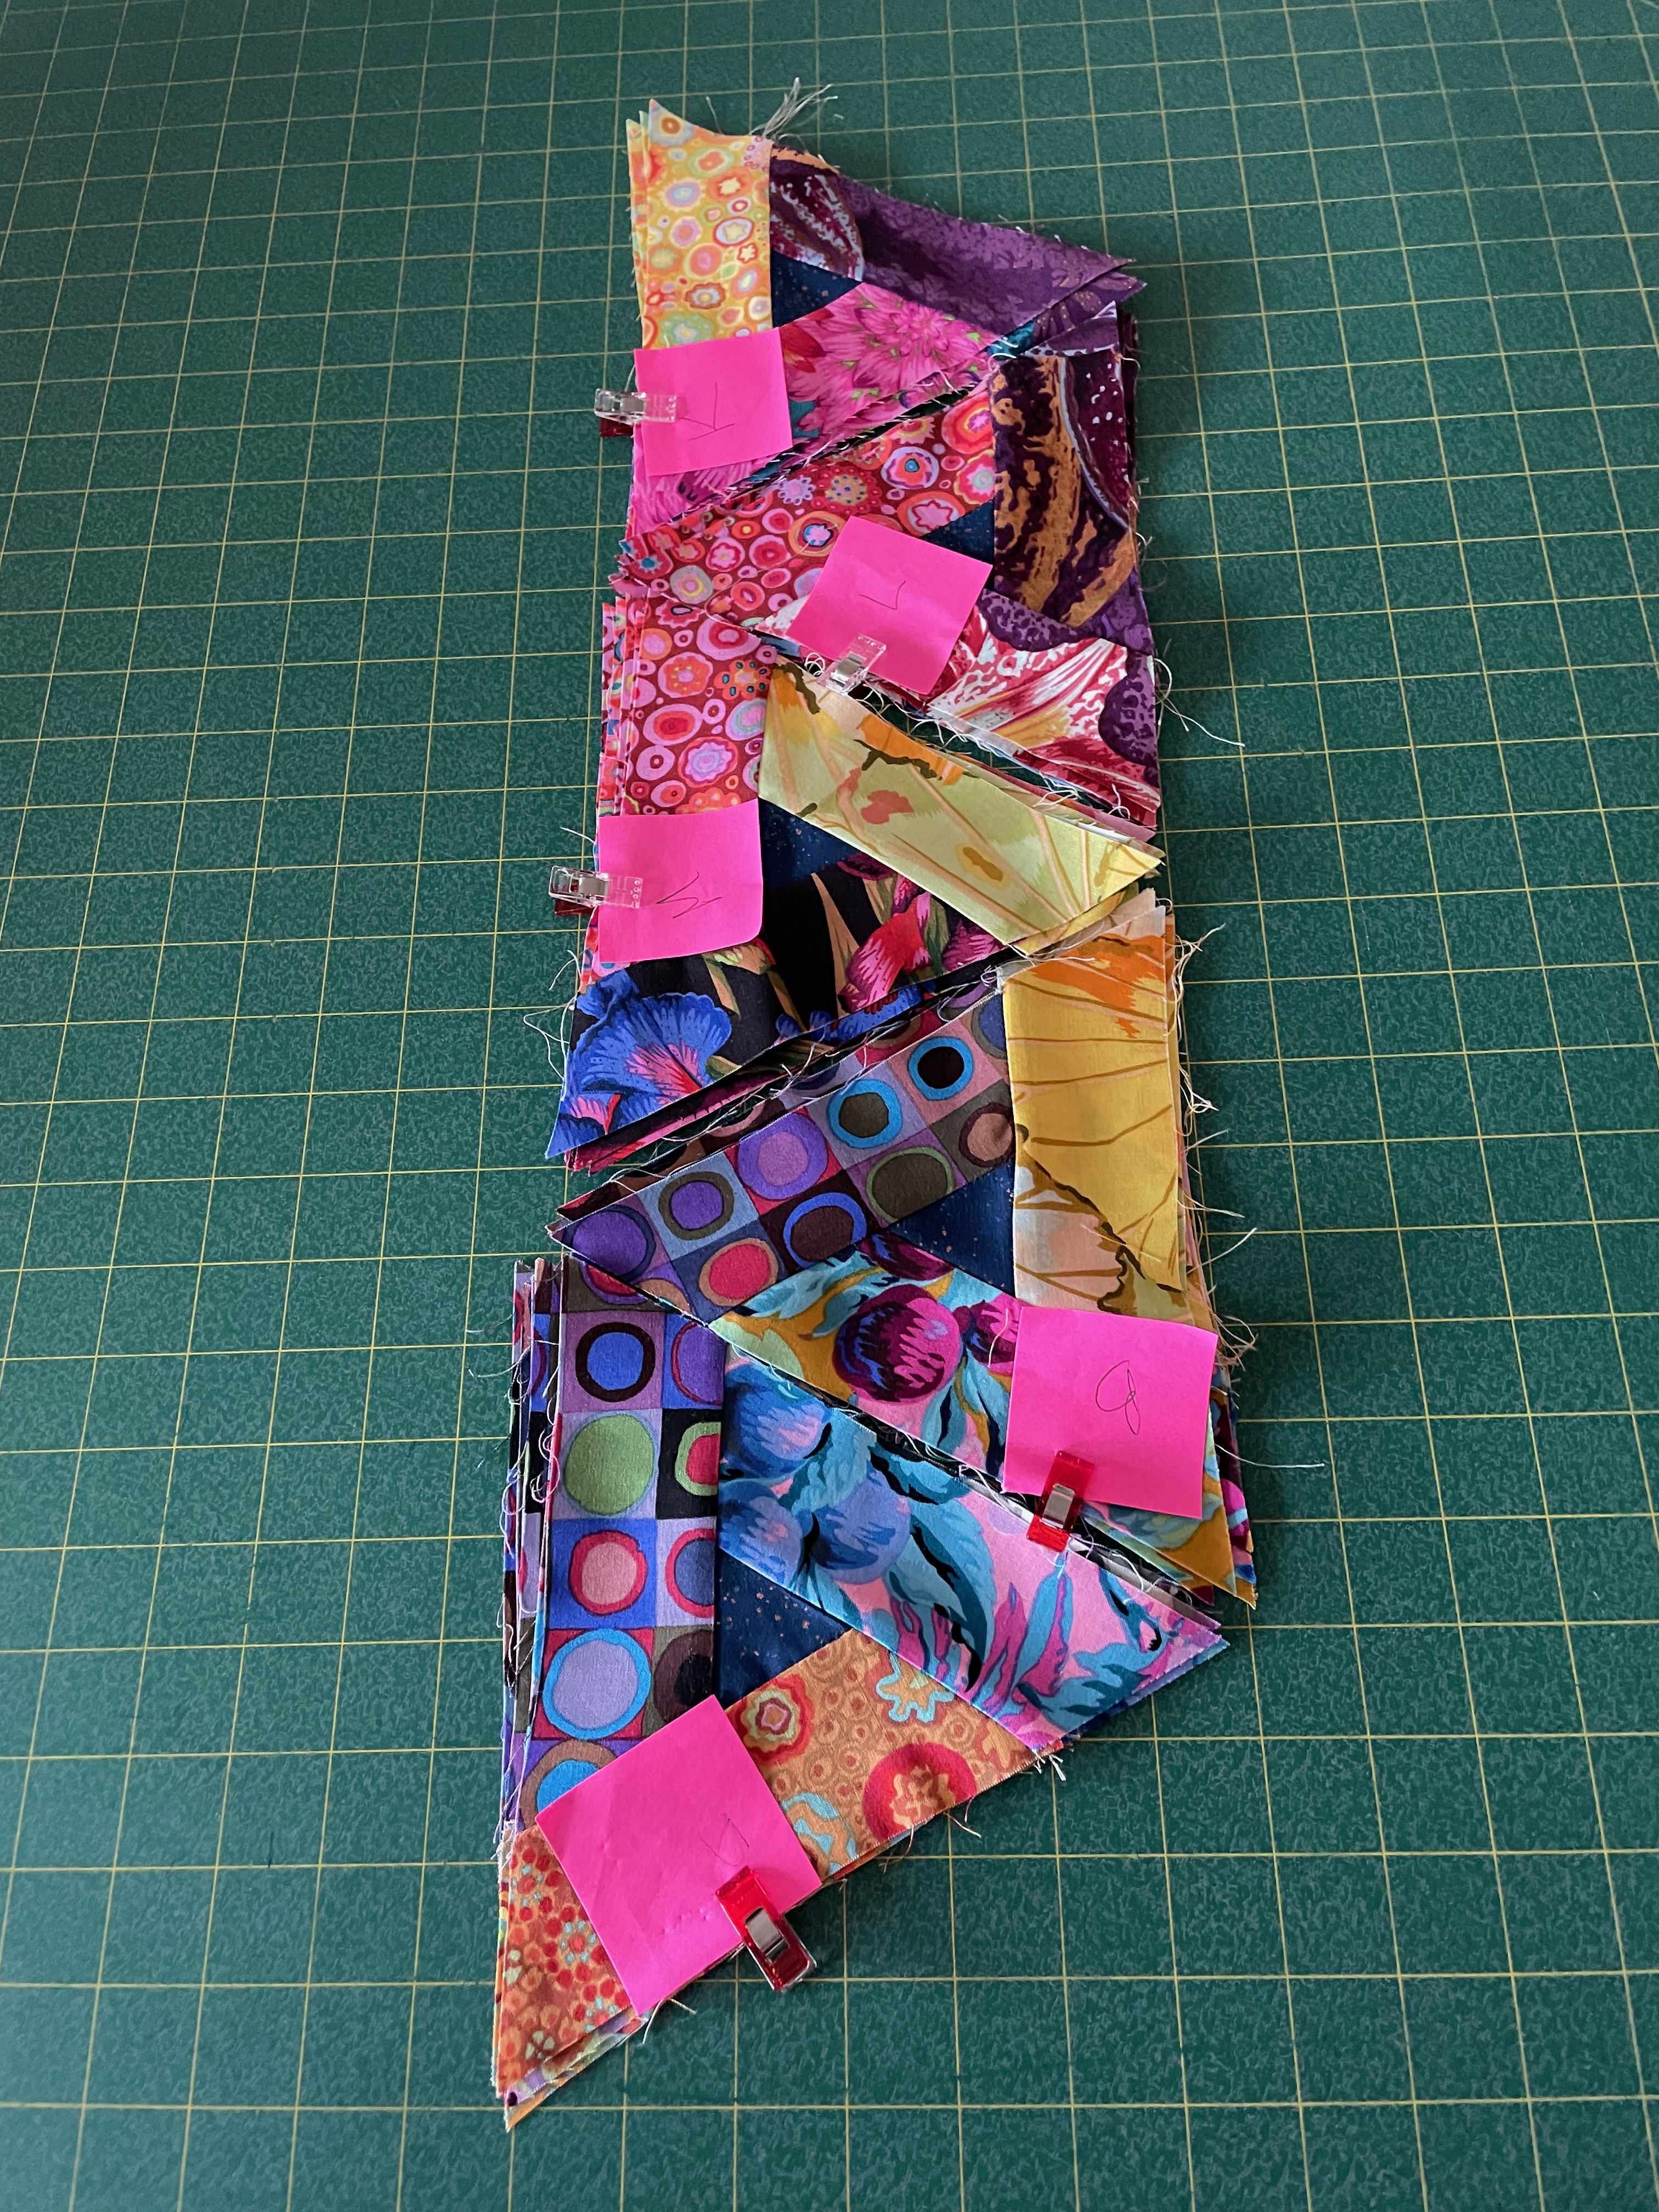
Once I’d figured out the block construction and had dimensions for the 9 1/2″ block I was going to make, I got to work on the Delft fabrics. I simplified the instructions – rather than work with the chart describing what to cut from which fabric, I sorted the fabrics into light/dark and medium. The centre blocks I cut from the small medium colour fabrics; then I cut rectangles and squares for the corner blocks from the darks; finally I cut rectangles and squares (which I cut into half-square triangles) from the lights. The cutting went reasonably quickly.

I carefully laid out the centre blocks in a numerical order – Row 1: 1,2,3,4,5; Row 2: 2,3,4,5,1, etc, until I had six rows of five blocks. While I liked the colour of the Delft fabrics I thought the quilt could use a bit of additional colour – I went through my stash of Kaffe Fassett fabrics picking six bright ones, cut a centre square from each which I then substituted into the array on my table – one in each row.

Next I laid out the pieces from the dark fabrics B,C,D,E,F and the light fabrics G,H,I,J,K in an array and began placing dark/light pairs on top of the centre squares – using a similar shifting pairing so that in the end each block will be unique.

Quilt Construction Begins

You can see the lovely blue and “white” fabrics in the collection. I have so far completed six blocks. The remaining 24 are laid out in position on my cutting table. It takes me about 20 minutes to construct a block so I will need to work on these for the next few days. There’s sashing to insert between the blocks which will tie the whole quilt together – I just haven’t decided what width to use – I’ll make that decision when I have all 30 blocks laid out.

I knew from the beginning I wasn’t likely to follow the instructions. I like the block, so I decided to use it instead of creating something else. Deconstructing the block from the images of the Gathering No Moss quilt was straightforward. I will tune in on Wednesday to see what Fassett has to say – I’m sure I can learn some interesting things from him about colour flow and placement. I’ll report back as I make progress on the project.

Art Labs – August 2021

Friday I took eight quilts and 12 wall art pieces to Parrsboro to show at the Art Labs Gallery. I knew it was a shared exhibition with two women who do rug hooking – but I had been told most of their pieces would be stand-on-the-floor works – laundry baskets, chairs, stools… Well, they were, but several were “hung” which cut my showing space in half. I was able to hang 5 quilts and 4 wall art pieces. A disappointment because the wall art pieces I’d chosen showed the evolution of my “printed on fabric” appliqué technique – the pieces all had people in them which I wanted to showcase.

At Five Islands; Wind Waiting

The most recent piece with one of the earlier pieces. I’m still very fond of the mood of these three guys at Fox River wishing the wind would moderate so we could launch our paragliders.

Escher Quilt

This is the piece you see from the doorway – it’s straight ahead of you as you walk into the gallery space. At that distance you see the 3D illusion clearly.

Diamonds

This quilt also is striking when you see it hung. The shaded border, the asymmetry of the piece, the colour movement are all apparent.

Skyline #1
Skyline #2
Skyline #3

I forgot to take a photo showing the three Skyline quilts hanging side by each on the wall. They make a strong triptych which was my intention when I created these pieces.

Into The Future

Not for sale, but it’s one of my stronger pieces using the fabric photo appliqué technique. I was so lucky that the sunlight on the children blended so well with the setting I put them in – on Spring Garden Road beside the Public Gardens – the photo of the children was taken at the Toronto Zoo!

On Deck

These were all the pieces I had room to hang. I returned home with three quilts and nine wall art pieces. I could have crammed in a few more small hangings but when I stood back I decided less was more.

The show is on until August 19 when I go back to Parrsboro to take down the show and return the art to my closet. I need an agent in Toronto or New York – anybody got connections to someone who might be interested in representing a textile artist in a market that would understand the art and the work required to create it?

Making Progress

I started the morning by cutting a gazillion 2″ squares of fabric from the many strips and scraps I’d collected which I hoped would help me fill in the background on the wall art piece. I needed a lot (although I didn’t count what I needed but I’m guessing it must have been close to 140 squares (the panel is 16 X 12 = 192).

Then I began laying them out, a few at a time, trying to create some kind of flow to the background.

As you can see the pieces are pinned to the fusible interfacing – I didn’t want to fuse them until I was certain I had the colour flowing as I wanted it – nothing jarring. I still have to walk around it some more before I start pressing the squares in place. Likely on the weekend I’ll get to that.

I didn’t plan it, but I like is the way the dark fills in a slightly off-centred “U” shaped space at the bottom, and when the panel is sewn together and the blocks end up at 1 1/2″ the light colours should blend reasonably well.

So how do I plan to fill the empty space? With a couple of California poppies!

The image looks small but its height is 14″ – the panel will finish at 18″ X 24″ (it’s currently 24″ X 32″) so the flowers in relation to the background will be a better fit. I would print this image on fabric (using my inkjet printer), then fussy cut it carefully before fusing it to the background, and thread painting it in place.

There is another possibility I’ve been working on – I’ve created a machine embroidery of 4 yellow poppies which are also ~ 14″ in height which I could embroider in position directly on the background:

I printed it out, roughly cut it, to see how it would look on the background

Impossible to tell which might be best until I get the background sewn. The current limitation I have is my largest hoop will create an embroidery 360mm in height (just over 14″). If I decide to use the embroidery, I may have to rework it by splitting it in two in order to enlarge it – not sure how well that will go but if the 14″ is too small it’s something I may have to try.

Next step is to fuse the squares in place, then construct the background panel.

Escher Quilt – Finished

Escher Quilt – Finished size: 53″ x 67″

Just finished. I wasn’t sure it was all going to work but it has.

If you click on the image above you will see the quilting detail. I thought about some kind of detailed quilting design but there were two problems. First, I didn’t have a hoop large enough to manage any kind of large block and there isn’t a really clear hexagonal shape to work with, even if I did. I defaulted to a diamond shape which is all I could accommodate. Second, any kind of detailed quilting, like I used on the previous diamond quilts, was going to detract from the effect of the rising, interconnected, vertical elements of the quilt design.

In the end I quilted the “diamonds” using a straight line design alternating the direction of the diamonds to fit into the overall array of interconnected elements.

Quilting Detail

Then what to do with the borders? I decided to use a rather dense floral quilt design; I set up a modified version which I used to fill in the half-diamond elements top and bottom. That decision turned out well.

Quilt Back

I assembled a double strip of pieced strips to allow me to widen the backing enough to fit the quilt top. I bordered the insert strip with unequal strips of a light batik which blended nicely.

I finished the quilt with a narrow 1/4″ conventional quilt binding using 1 1/2″ strips from some Skyline fabric still in my stash which let me get away without having to piece a gazillion tiny leftovers from the Kaffe Fassett Collective fabrics. The binding finishes the quilt hinting at the colours in the main panel.

So, the quilt is done. I started playing with the idea on May 6 – so 2 1/2 weeks is the time it took me to construct, quilt, and complete the project. I’ve had a lot of uninterrupted time to sew since we’ve been on COVID-19 lockdown here in NS since April 25 (we expect to remain locked down until at least the middle of June – maybe longer because while new case counts aren’t going up to any degree, they’re not going down, either!).

Now it’s time to turn my attention to sewing some summer clothes – a couple of dresses, maybe a jean jacket, some linen pull-on pants. I have the fabric on hand. I’ll start by washing it all tomorrow.

Escher Quilt – 7

Redone – I removed the side border, extended the top and bottom borders, and added the 8th column.

Escher Quilt Top – Redone

I’m much happier with the balance. I understand why most people who make this quilt top choose to straighten the top and bottom edges but I find the zigzag edge an interesting detail.

So the top is now complete.

Next, the quilt back. I have to pull out the Kaffe Fassett Collective fabric leftovers and see what I can do with them. I have lots of the backing fabric (Ruby Star Society Speckled Metallic Navy 2021). I was able to pick up 3m on Wednesday at my local fabric store.

So now full steam ahead….

Escher Quilt – 6

I thought I had the top finished – I’d added the 7th column, finished off the ends with border fabric, and sewed a border all around.

Escher Quilt Top – Almost Completed

I liked how the border accented the flow of the colour in the panel, I was fine with the finished size (~48″ x 66″). EXCEPT I was NOT happy with the partial points on the bottom left and top right!

That’s solvable one of two ways: either by cutting off the top and bottom point elements; or by adding the 8th column on the right:

Escher Quilt Top With 8th Column To Be Added On Right

I’m leaning toward the second option – I’d like the quilt top to be larger rather than smaller; I also like the top/bottom points – even if they don’t match they are complementary.

So my plan is to add the 8th column tomorrow – it means redoing the top and bottom borders because they will need to be wider to accommodate the extra column width (the length of the side border remains the same).

I didn’t want to add the 8th column – it makes the overall panel close to square (remember I don’t have enough fabric scraps to add a row (or two) to the bottom). I will do that, though, because the unattached points top and bottom are just too jarring – the top and bottom need to be symmetrical (if different).

It also means I have to come up with some kind of idea for a strip for the back – if I’d not used the 8th column on the top, I would’ve inserted it into the back. Now I need to go through the Kaffe Fassett Collective leftover fabric and come up with something that complements the quilt top.

Escher Quilt – 4

I just finished the first column pair using all 16 triangles (twice):

I will end up with an almost square quilt top – 48 wide x ~ 52 long. I can’t add more elements to lengthen each column because I’ve run out of some of the fabrics. So this is it. I could change the width/length ratio by assembling just 7 columns instead of 8; that’s a possibility – and then add a dark 3 1/2″ border to extend the size. I’ll make that decision after I have the 128 triangles sewn together.

I’m more pleased than I thought I would be – the Escher illusion works better than I expected it to, given I wasn’t completely lucky with my fabric colour placement – but the interwoven branching columns stand out clearly.

So, just carry on.

Escher Quilt – 3

I just finished the last set of the 16 triangles for this quilt top. The connections now all work – after taking apart four block sets yesterday and rebuilding them clockwise this morning!

IMG_ 0764
16 Sets of Completed Triangles

It’s hard to tell from the photo how the connections flow (I just realized looking at the photo closely, that I will have to redo that final set on the top left – it’s going counterclockwise! #$^%!)

I was expecting the triangles to align in a single long strip, but instead the connections form a double set of four pairs which will repeat twice to form the strip – the fabrics at the top matching the ones at the bottom.

I’m now seeing some significant differences with what I was trying to do and what I now have. The original Escher Quilt by Chris Weinhold, uses Kaffe Fassett small prints – my fabrics are mostly large scale prints – makes a difference – the small scale prints show the matching better. Also, while I’ve figured out the blocks and how they go together, I didn’t take into account the actual colour flow well enough. We’ll see how this all looks once I’ve sewn the top together but the illusion may not work as well as I expected it to.

Now it’s just a matter of sewing triangles together in columns, then sewing the columns together.

I’ll start that tomorrow – AFTER I take apart the last triangle and remake it!

I was being So careful!

As I worked away at the triangle blocks for the Escher quilt I ran into a snag – I could line up the first few blocks but then I had trouble finding the next in the series. I’m pretty sure my numbers will work – but I certainly had a problem somewhere.

I could align the dark circle fabric from the first to the second triangle, I could also align the join with the yellow fabric on the right (the 2nd and 3rd stack), and even match up the red fabric above that on the left, but I reached an impasse after the 5th block! The next matching block took me back to stack A at the bottom – which it shouldn’t have done. The stacks should line up in a continuous line – all 16 of them.

Stacks Of Stitched Blocks

I finally figured out, after spending a large part of the morning pouring over pictures of the Escher quilt and checking that I’d set up the stacks according to the table I’d been able to create from what another quilter had posted, that the third set of blocks from the bottom was pieced counterclockwise instead of clockwise!

It turns out that four of the five finished stacks of triangles which build with the triangle on the right were sewn together counterclockwise – light strip attached to triangle, medium strip to that seam, dark strip to the remaining side – NOPE – should have been light attached to triangle, DARK next, and finally the medium – to give a clockwise rotation.

quilting blocks
Two (of 4) Stacks Taken Apart Ready to Redo!

Out came my seam ripper. I disassembled four sets of (8) triangles; I restitched one. I’ll get to the remaining three tomorrow. I have my fingers crossed the numbers in the table I generated from photos are correct, and once I’ve resewn those three sets of triangles with the correct rotation, the remaining unsewn blocks (6) will align correctly once I’ve assesmbled them.

Here’s hoping!

The Escher Quilt 2

Yesterday I organized my fabric into eight sets of three groupings – light, medium, dark. I cut 2″ strips from each and cut the trapezoid shapes (16 from each fabric) plus the small dark triangles for the centre of the block. (In a couple of blocks I ran out of fabric and had to fill in a couple of trapezoids with as close a colour match as I could – it will be interesting to see where they show up in the layout).

Fabric Cut Into Trapezoids

Next step was to group these trapezoids into groups of three for each block (a dark, a medium, a light). Before I did that I spent quite a bit of time looking at photos of the the quilt in progress which I found online in order to sort out the groupings. Then I set up the blocks – two sets – one which starts with the triangle on the right side of the light piece; the other with the triangle on the left side of the light piece.

Pieces For Each Block Gathered

These are the blocks with the triangle on the right. There is a complementary set with the triangle on the left.

In the afternoon I stitched block “A”, then block “B” and placed them together so the dark fabric forms the wide 120° angle – the two triangles at the bottom of the stack below. I also did the “C” stack but that triangle fits in somewhere else.

Stacks Of Stitched Blocks

The next triangle needed to join the light vertical on the “B” block turned out to be block “M” followed by “L”, then “K”.

To see how this array would look like sewn together I stitched one of each together.

Start Of Column 1

You can’t really see the optical illusion yet – I need to construct the second column and join it to column #1. At the moment I’ll continue constructing all the blocks then lay out the first column (it uses all 16 triangle blocks). I don’t yet know where the second column actually begins – the order of the blocks will be the same, but it will start at another place and until I get all the blocks stitched, I’m not going to know where column #2 begins.

In any case, I’ve set up a chart showing the fabrics in each triangle block – there are no duplicates, but the linkages become apparent. It will be a matter of just laying out the matching pieces to create the structure of the interlocked elements.

Now, it’s just a matter of carrying on with block construction. I’ve got six block sets done – that leaves a dozen to go and then I can set up the columns….