I haven’t given up on Drunkard’s Path yet. Instead of the dull colours I started with, I’ve pulled 44 bright fabrics from my stash, mostly batik (and in the in end I may use only batik – I have lots more fat quarters to choose from), as well as a pile of blacks/whites/greys.
The idea this time – I intend cutting the quarter circle elements from the bright colours using the blacks/whites/greys as background. This idea comes from a quilt I came across on Pinterest
Here’s my plan – a 7 x 9 quilt – using 6″ blocks that gives me 42″ x 54″ which I can extend with borders to a largish throw.
My next step is to cut sixty-three quarter circle elements from the bright fabrics (there will be duplicates), and 63 squares from the blacks/whites/greys (selecting more from the lighter end of that collection), then sew them together.
I won’t know what this is going to look like until I get the pieces cut and laid out on the floor and then play around with layout. The quilt above uses the blocks in a straight layout – I may break that up somewhat to create a layered effect with some circles on top of others as I did with the Skyline Quilt #3.
You know about writer’s block – well, I’m experiencing “quilter’s block”.
I finished my last quilt about a month ago. I would normally start a new quilt right away – with a surfeit of fabric in my stash it usually isn’t hard to pull out a stack and begin something new.
This time there were a couple of subtle pressures interfering with my moving ahead: my reserve of small zippered bags was just about empty, I still have that Kantha jacket to remake for Marlene (that’s been hanging around for months, not quite making it to the top of my list, despite taking some seams apart, basting them together and trying the adjustment for fit – not quite right yet again), two aprons for a friend, and the microwave potato bags I was originally planning as gifts for the Friday knitting gals! (Oh yes, and an heirloom nightgown as a demonstration piece although that weekend workshop didn’t happen.)
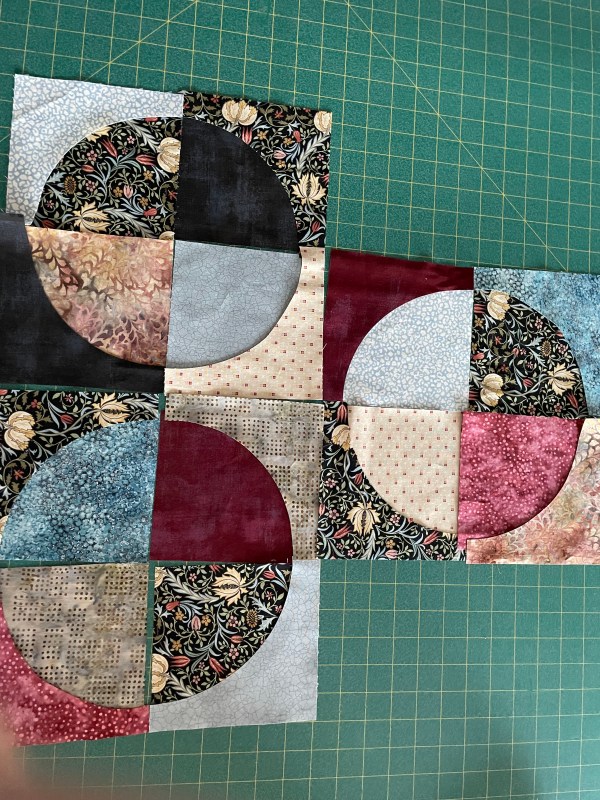
In fact, three weeks ago, I bought a collection of new fabric – only because it was on sale at half price – not because I needed more fabric! I chose the central fabric, a William Morris inspired print, then built a collection around it. I felt inspired to work with a “Drunkard’s Path” block again. I cut 6″ strips from each of the new fabrics plus several more that complemented the others, I cut one set of 6″ blocks (two from each fabric), then cut the paired shapes which make up a Drunkard’s Path block.
I laid out contrasting pairs using some William Morris fabric in each block. I moved the elements around but the fabrics didn’t speak to me at all. I turned the photo into a black and white – there lurked a surprise:
Drunkard’s PathIn Black & White
The majority of my fabrics read as “medium” with the wrong ones reading “dark” and few “light”. The William Morris fabric was actually one of the “medium” fabrics – not a dark. I tried again with fewer colour elements.
Second LayoutIn Black & White
By removing four fabrics the colour values balanced better but I still wasn’t inspired. I realized my problem was with the original focal fabric! While I like the William Morris fabric, it pulled me into a set of rather dull colours. No “pop”. These fabrics would make a nice quilt but not one I was going to enjoy working on.
I walked away from even sewing these Drunkard’s Path blocks – I gathered up the pieces and put them away in one of my scrap boxes.
The “cure” for writer’s block is to write. Write gibberish, free write, keep writing anything whether it comes together or not. Just write.
That’s what I did. I cut the remainder of the 6″ strips of these fabrics into zippered bag rectangles, found a suitable fabric for lining and got to work making zippered bags!
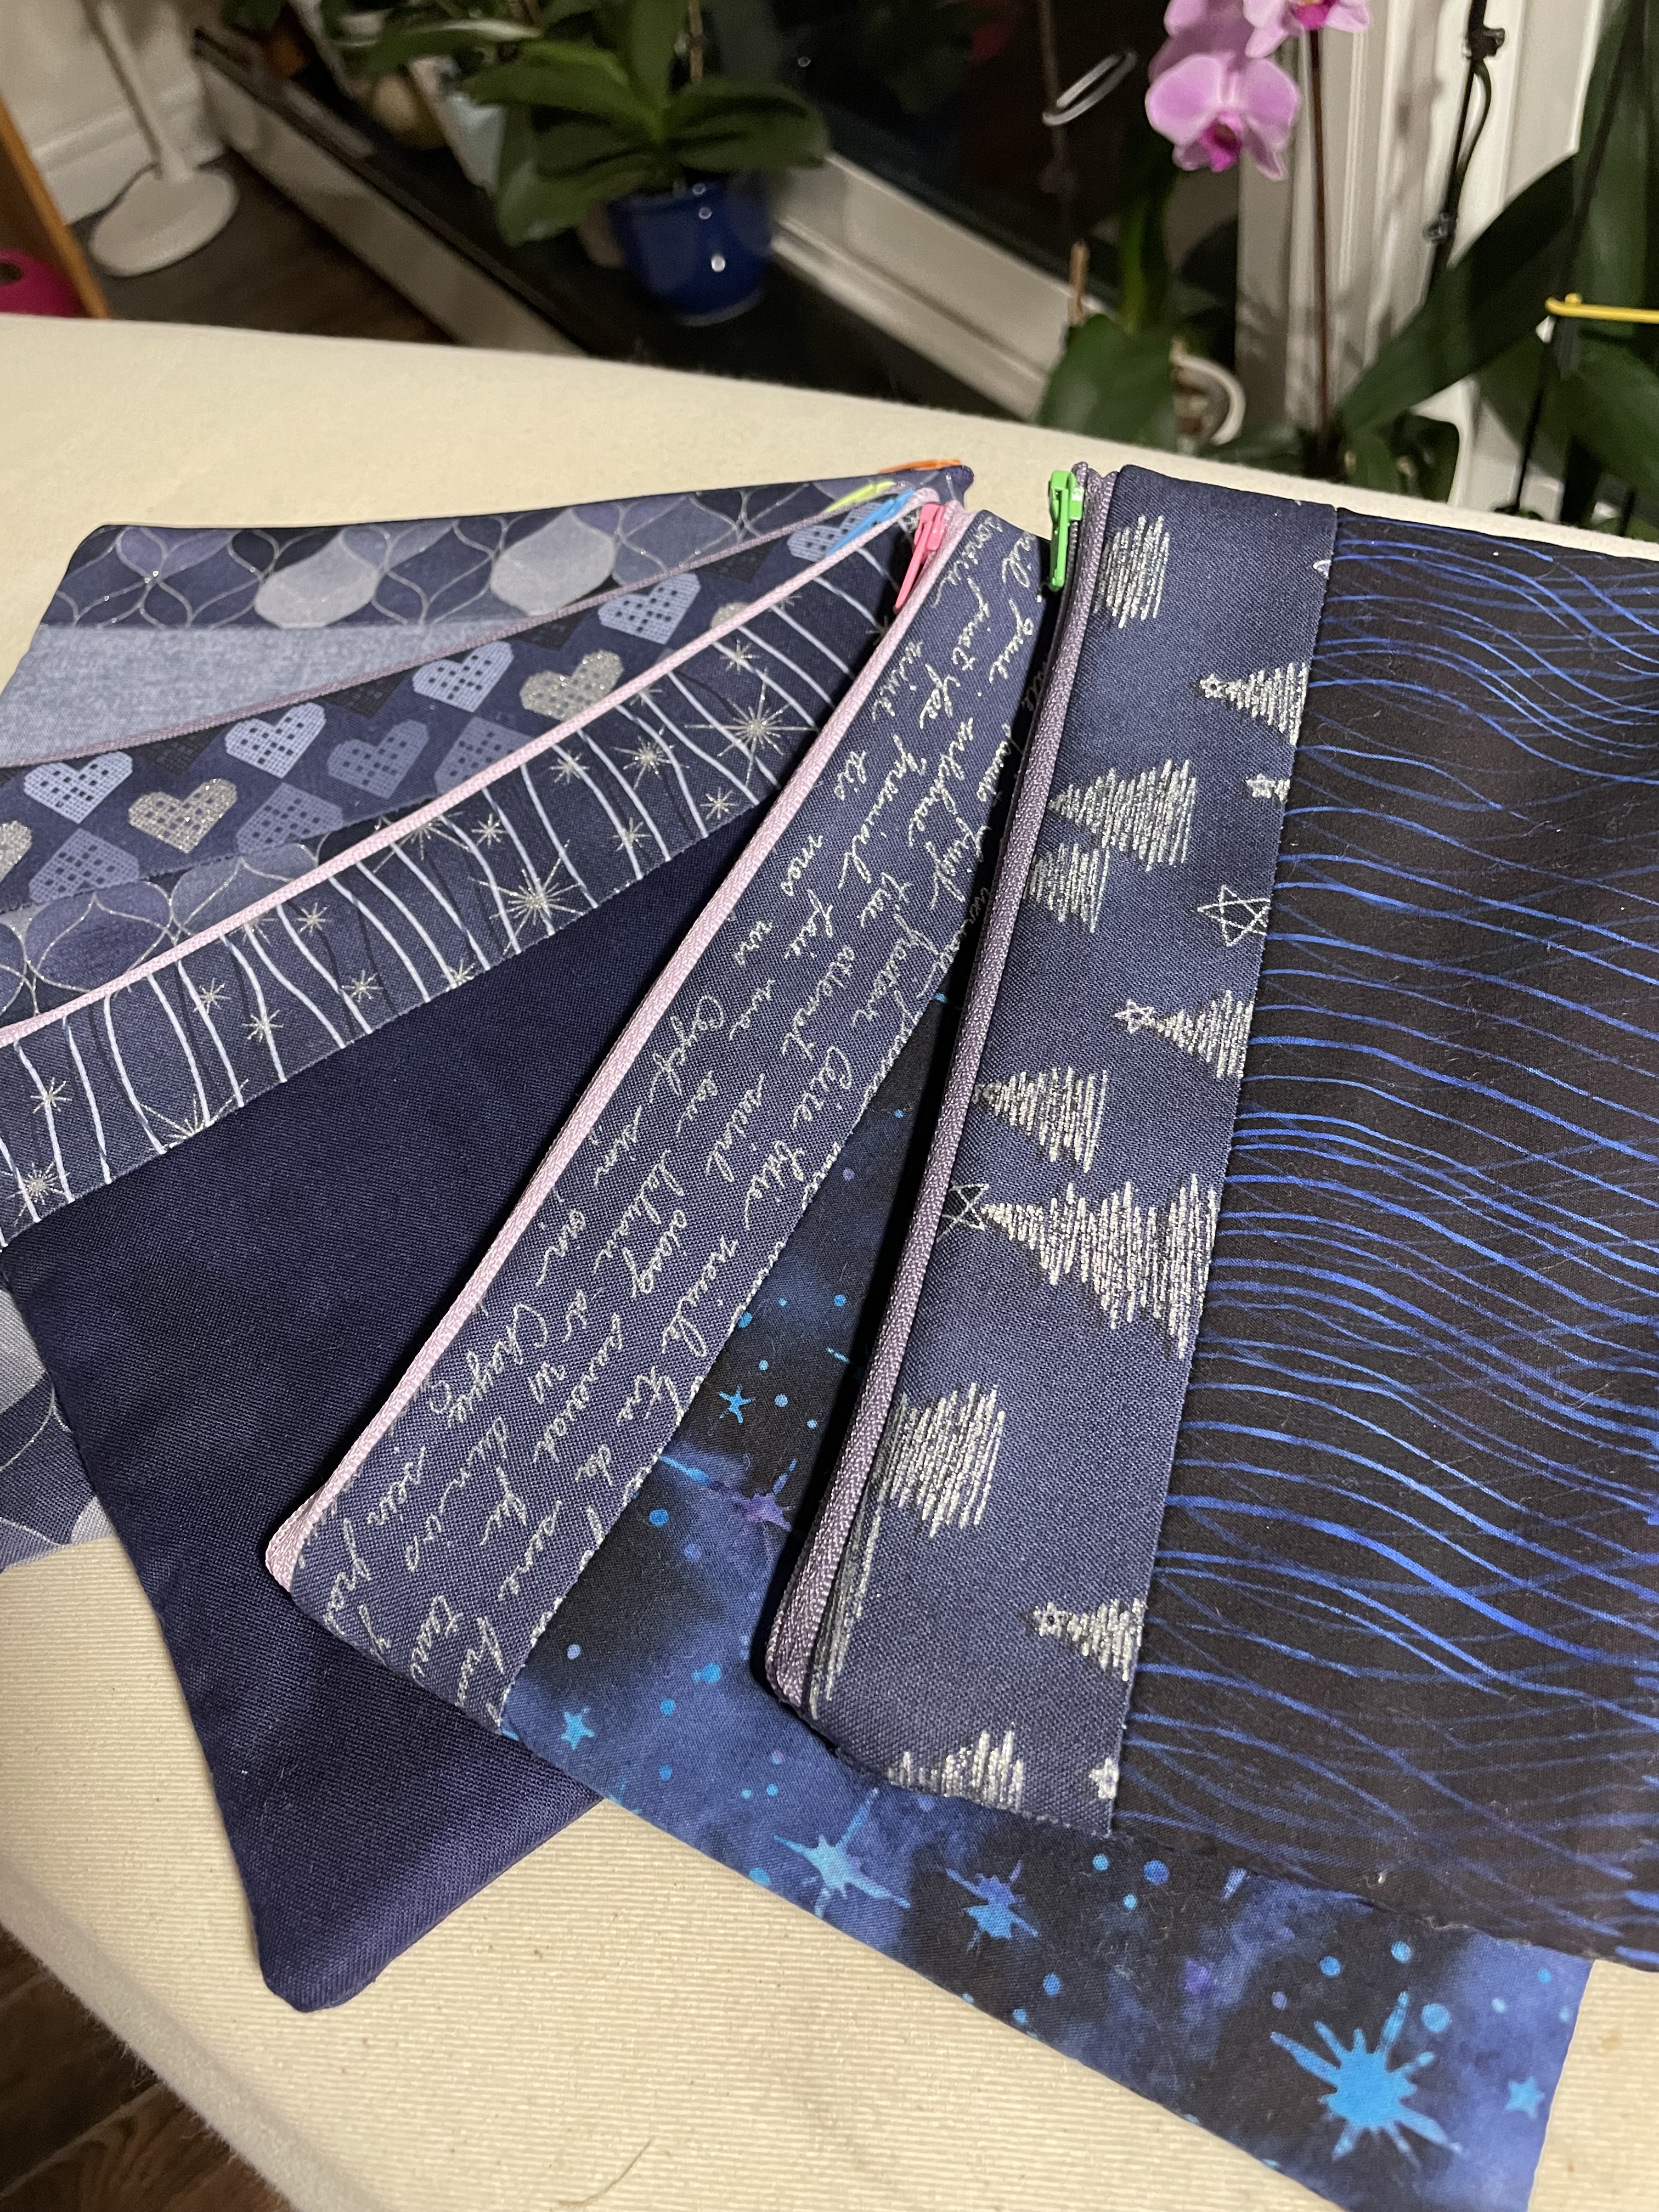
First BatchSecond BatchThird Batch
The first batch used the quilt fabrics with a strong accent fabric and contrasting zipper and pull. For the second batch I dug through scraps for bright complementary fabrics. The third batch used up pieces from a sample set of blue.
In two days I made 34 zippered bags.
My Current Stash Of Zippered Bags
With “small zippered bags” off my list, two days ago I turned to microwave potato bags. A microwave potato bag is used to bake potatoes in the microwave – the potatoes come out fluffy rather than gluey. You use two pieces of fabric and some microwaveable batting. Takes 20 minutes to make one.
Wanting to be economical with my fabric, I cut 10″ x 22″ rectangles from two of the duller fabrics I’d originally intended to use with the William Morris fabric. (That’s the equivalent of 4 bags/meter of fabric.) Added some microwaveable “Wrap ‘n Zap” batting (which comes in a 22″ width very convenient – that, as well, gives you 4 bags/metre).
I layered the fabrics right sides together, placed the batting on top, stitched around the outer edges leaving a 4″ opening on one side, pressed the panel, stitched the opening closed. Then I folded the fabric to make a pouch, stitched down the open sides, and there was my finished microwave potato pouch.
Microwave Potato Bag
It took three tries before I streamlined the process – 1. Leave the opening to turn the bag right side out on one of the short sides rather than along one of the long sides; 2. Make the stitch around gap at least 4″ – widen enough to get your hand in so you can turn the pouch right side out easily; 3. Don’t bother stitching around the outside of the finished rectangle, just edge stitch across the end with the opening; 4. Stitch the two side seams 1/4″ from the edge going more slowly where the two ends overlap – it’s thick there, you need to allow the machine time to pierce the overlapped layers.
I’ve got three microwave potato bags done, five more are cut out ready to sew.
When those are finished, I’ll work on the two aprons – I bought a canvas fabric yesterday that should be a good weight for an apron.
Finally, I will take that Kantha jacket completely apart and recut the fronts, back and sleeves so the jacket will hang better. It’s not a humungous job, but it’s one I find myself resisting. But with the other stuff done I will tackle it.
As for a new quilt. I’m looking for something modern and bright to work on. I’ve taken the pressure off myself to be creative, just be productive.
Yesterday my neighbourhood sewing/fabric shop was holding a 50% sale – how could I resist? I went in early to pick up a few notions I knew were there, but the shop was full of women buying fabric, so I left. I returned around 3:00 to see if there was anything left that might be interesting – not really thinking about buying fabric but the black “William Morris” like fabric caught my eye and I started looking for bolts to complement that fabric. This is the pallet I came up with. When I got home I pulled the beige with cranberry dots from my stash to add to the collection.
Now the question is – what do I do with this? Some kind of drunkard’s path assembly? Is seven fabrics enough to do that – I’ll have to see what I can come up with.
Saturday, the day before, I joined a couple of friends on their annual excursion up the eastern shore Christmas Craft excursion. We made a bunch of stops. We saw lots of well executed woodwork, pottery, sewing, quilting, jewellery, painting. The arts community is alive and well in that part of the province! I didn’t buy anything – I don’t bother with Christmas shopping, nobody needs anything.
Lobster Pots
It was tricky finding a reasonable location to get a photo of this row of old lobster pots without the cars, or the road, or the house. A bit of cropping and editing – this is the best I could come up with.
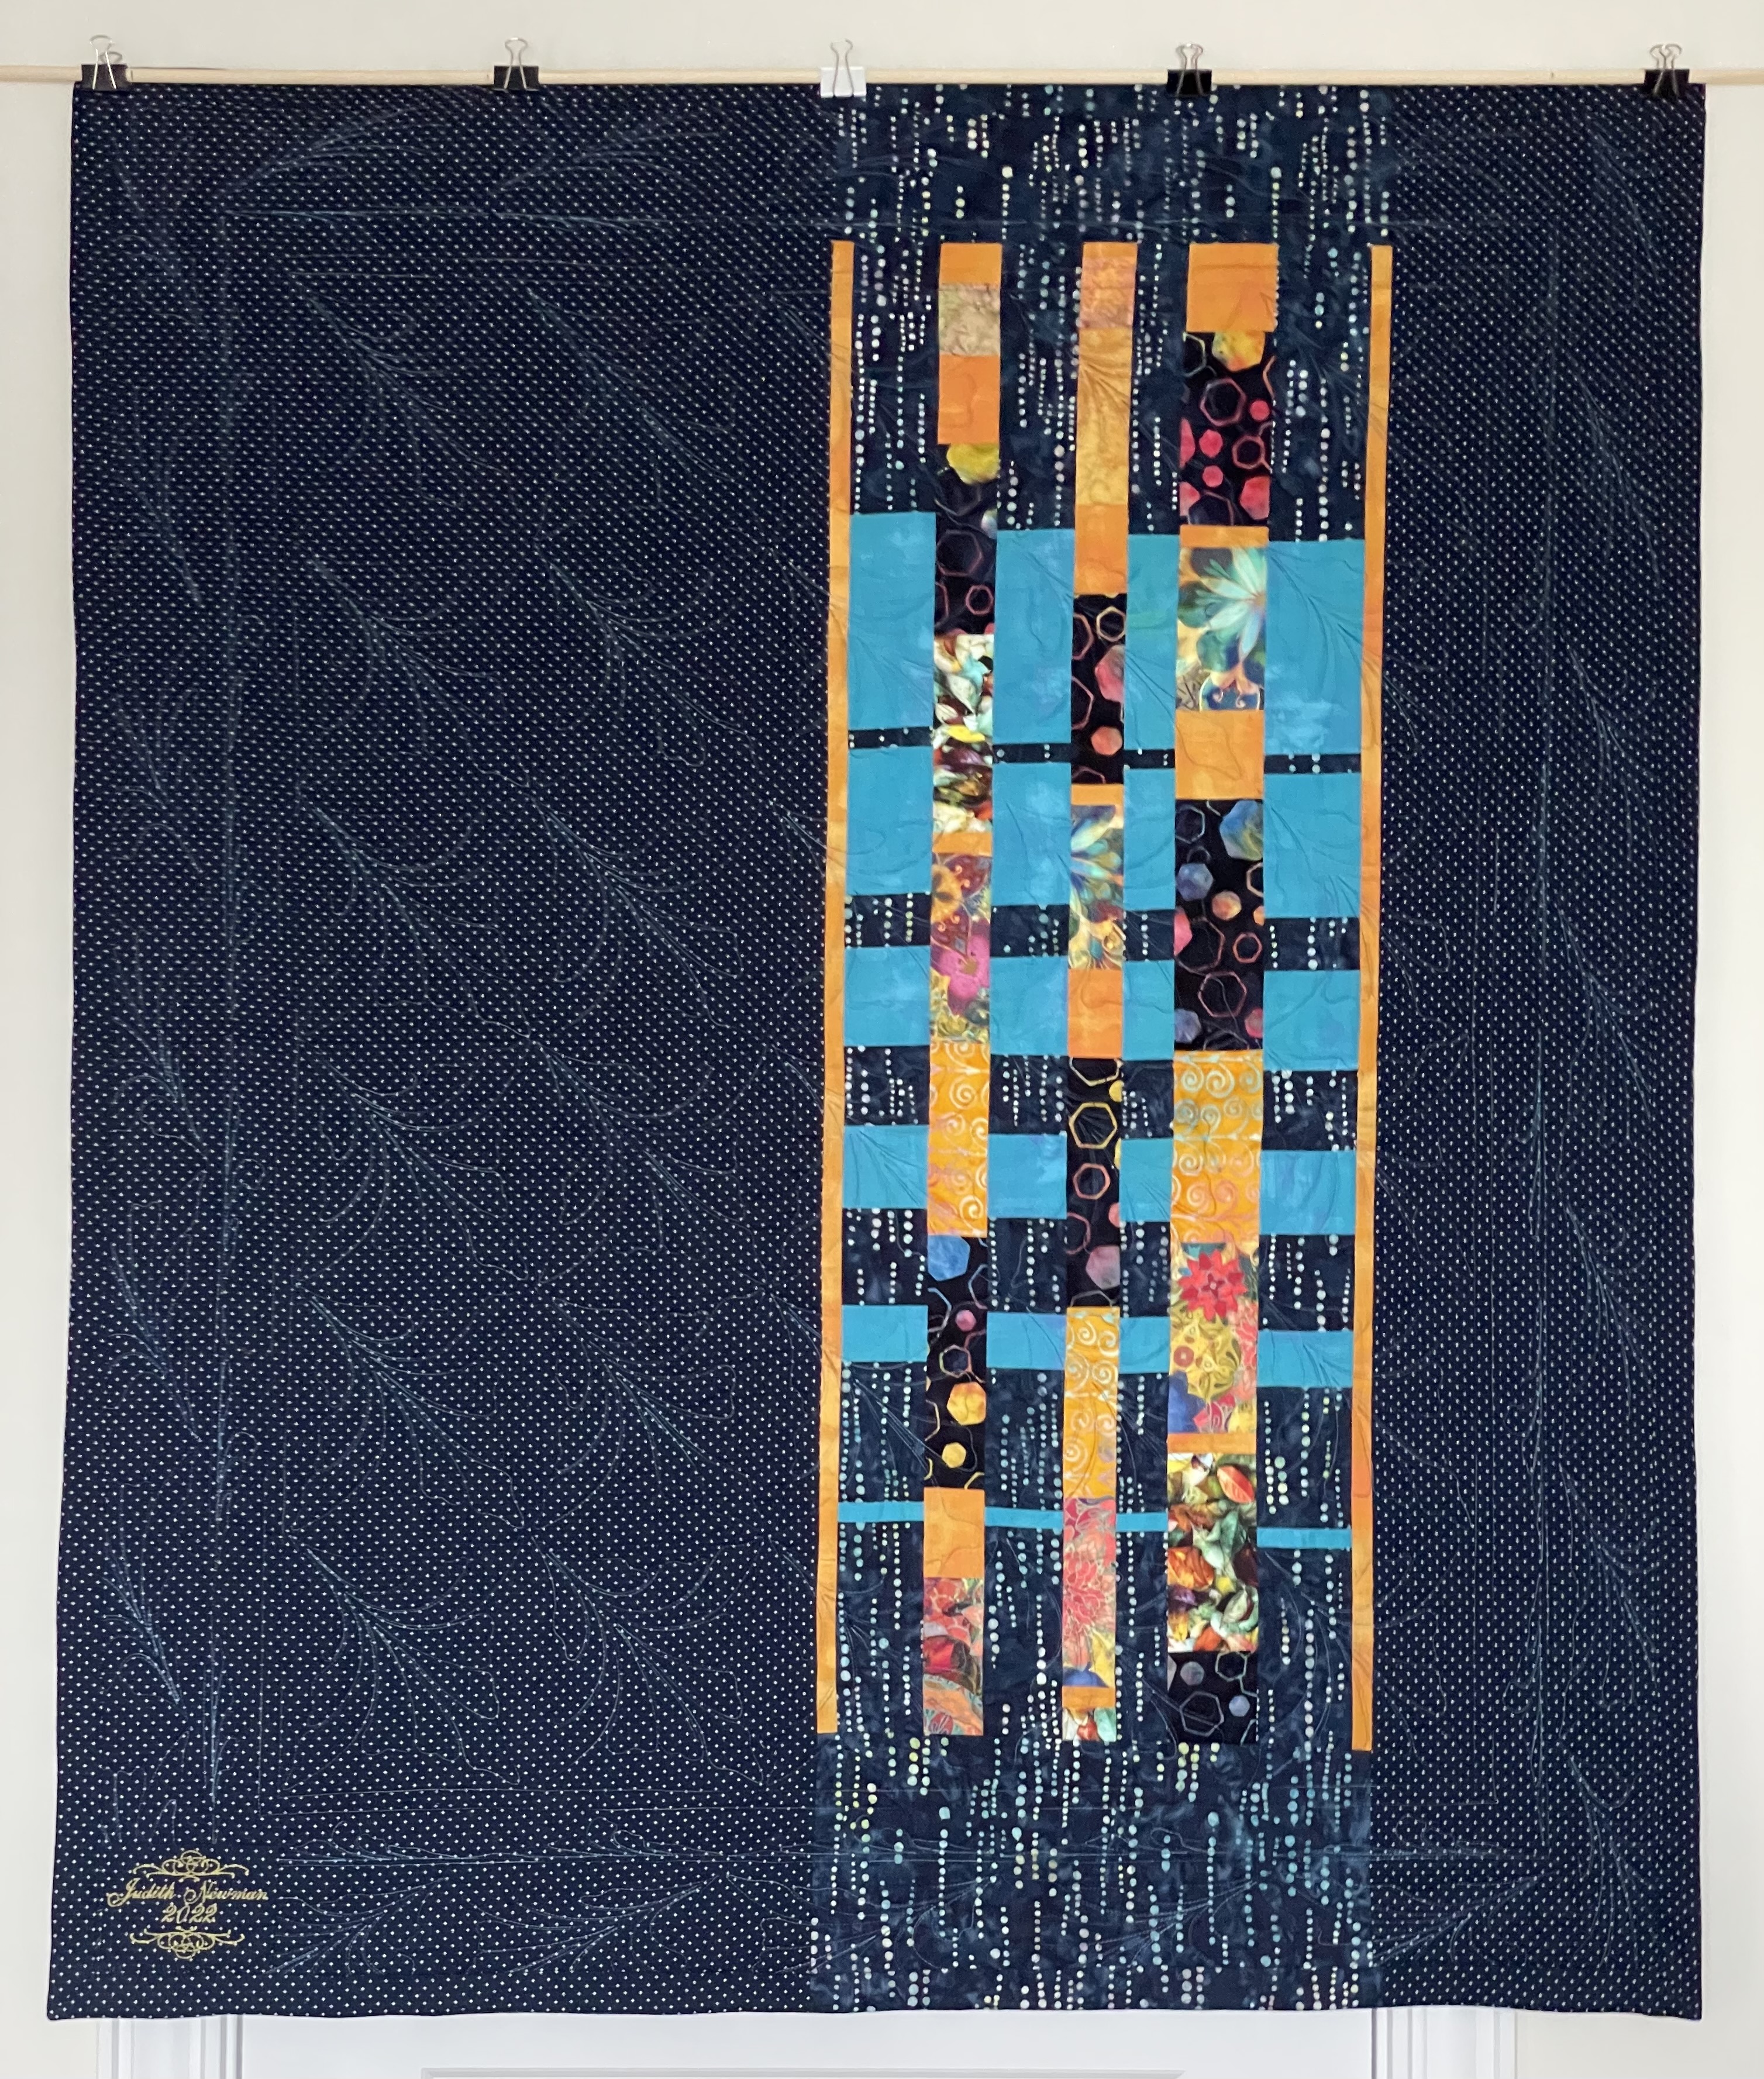
I finally finished the quilt yesterday. It’s taken days to decide what to do within the narrow turquoise border. It was just a tad too wide to leave unquilted but too narrow to mirror the quilt block embroidery. I finally set up a half block I thought would work and got it done. Adding the hidden binding took little time (including the mitred corners). I hand stitched it down last night.
With the two previous Convergence quilts in my collection I will have three possible quilts to show together next summer. I may not use all of them, that depends on what I manage to create between now and then.
I’m happy with the appliqué work – the edge stitching is barely noticeable, you have to look very closely to see it. I like how it extends the bright colours to the the bottom right of the quilt without hitting you in the face, leaving the upper right corner the unadorned turquoise.
Appliqué Detail
I’m also pleased that my extending the square into a rectangle worked. I might play with that again sometime.
Now onto a bunch of unfinished projects sitting in my studio needing attention. First the fleece pants for my friend Joan; next the Kantha jacket remodelling for my friend Marlene, third the stack of six unfinished zippered bags from nearly a year ago – I did two last week, I’ll finish the rest up in a few days. There’s an Heirloom sewing workshop on my calendar but I don’t think enough people have signed up for that – I still want to use the panel I made a month or so ago to complete a nightgown, so that’s also on my ToDo list.
When those projects are completed I want to move on to some new wall art – I’ve just lined up a second summer showing – this one in Truro – I’ll need six or so pieces to display. They won’t be hung, they have to be attached to something firm in order to “stand” on a wide shelf – either some foamcore board or thin plywood. I have no idea how I’ll do that yet, but I’ll figure something out.
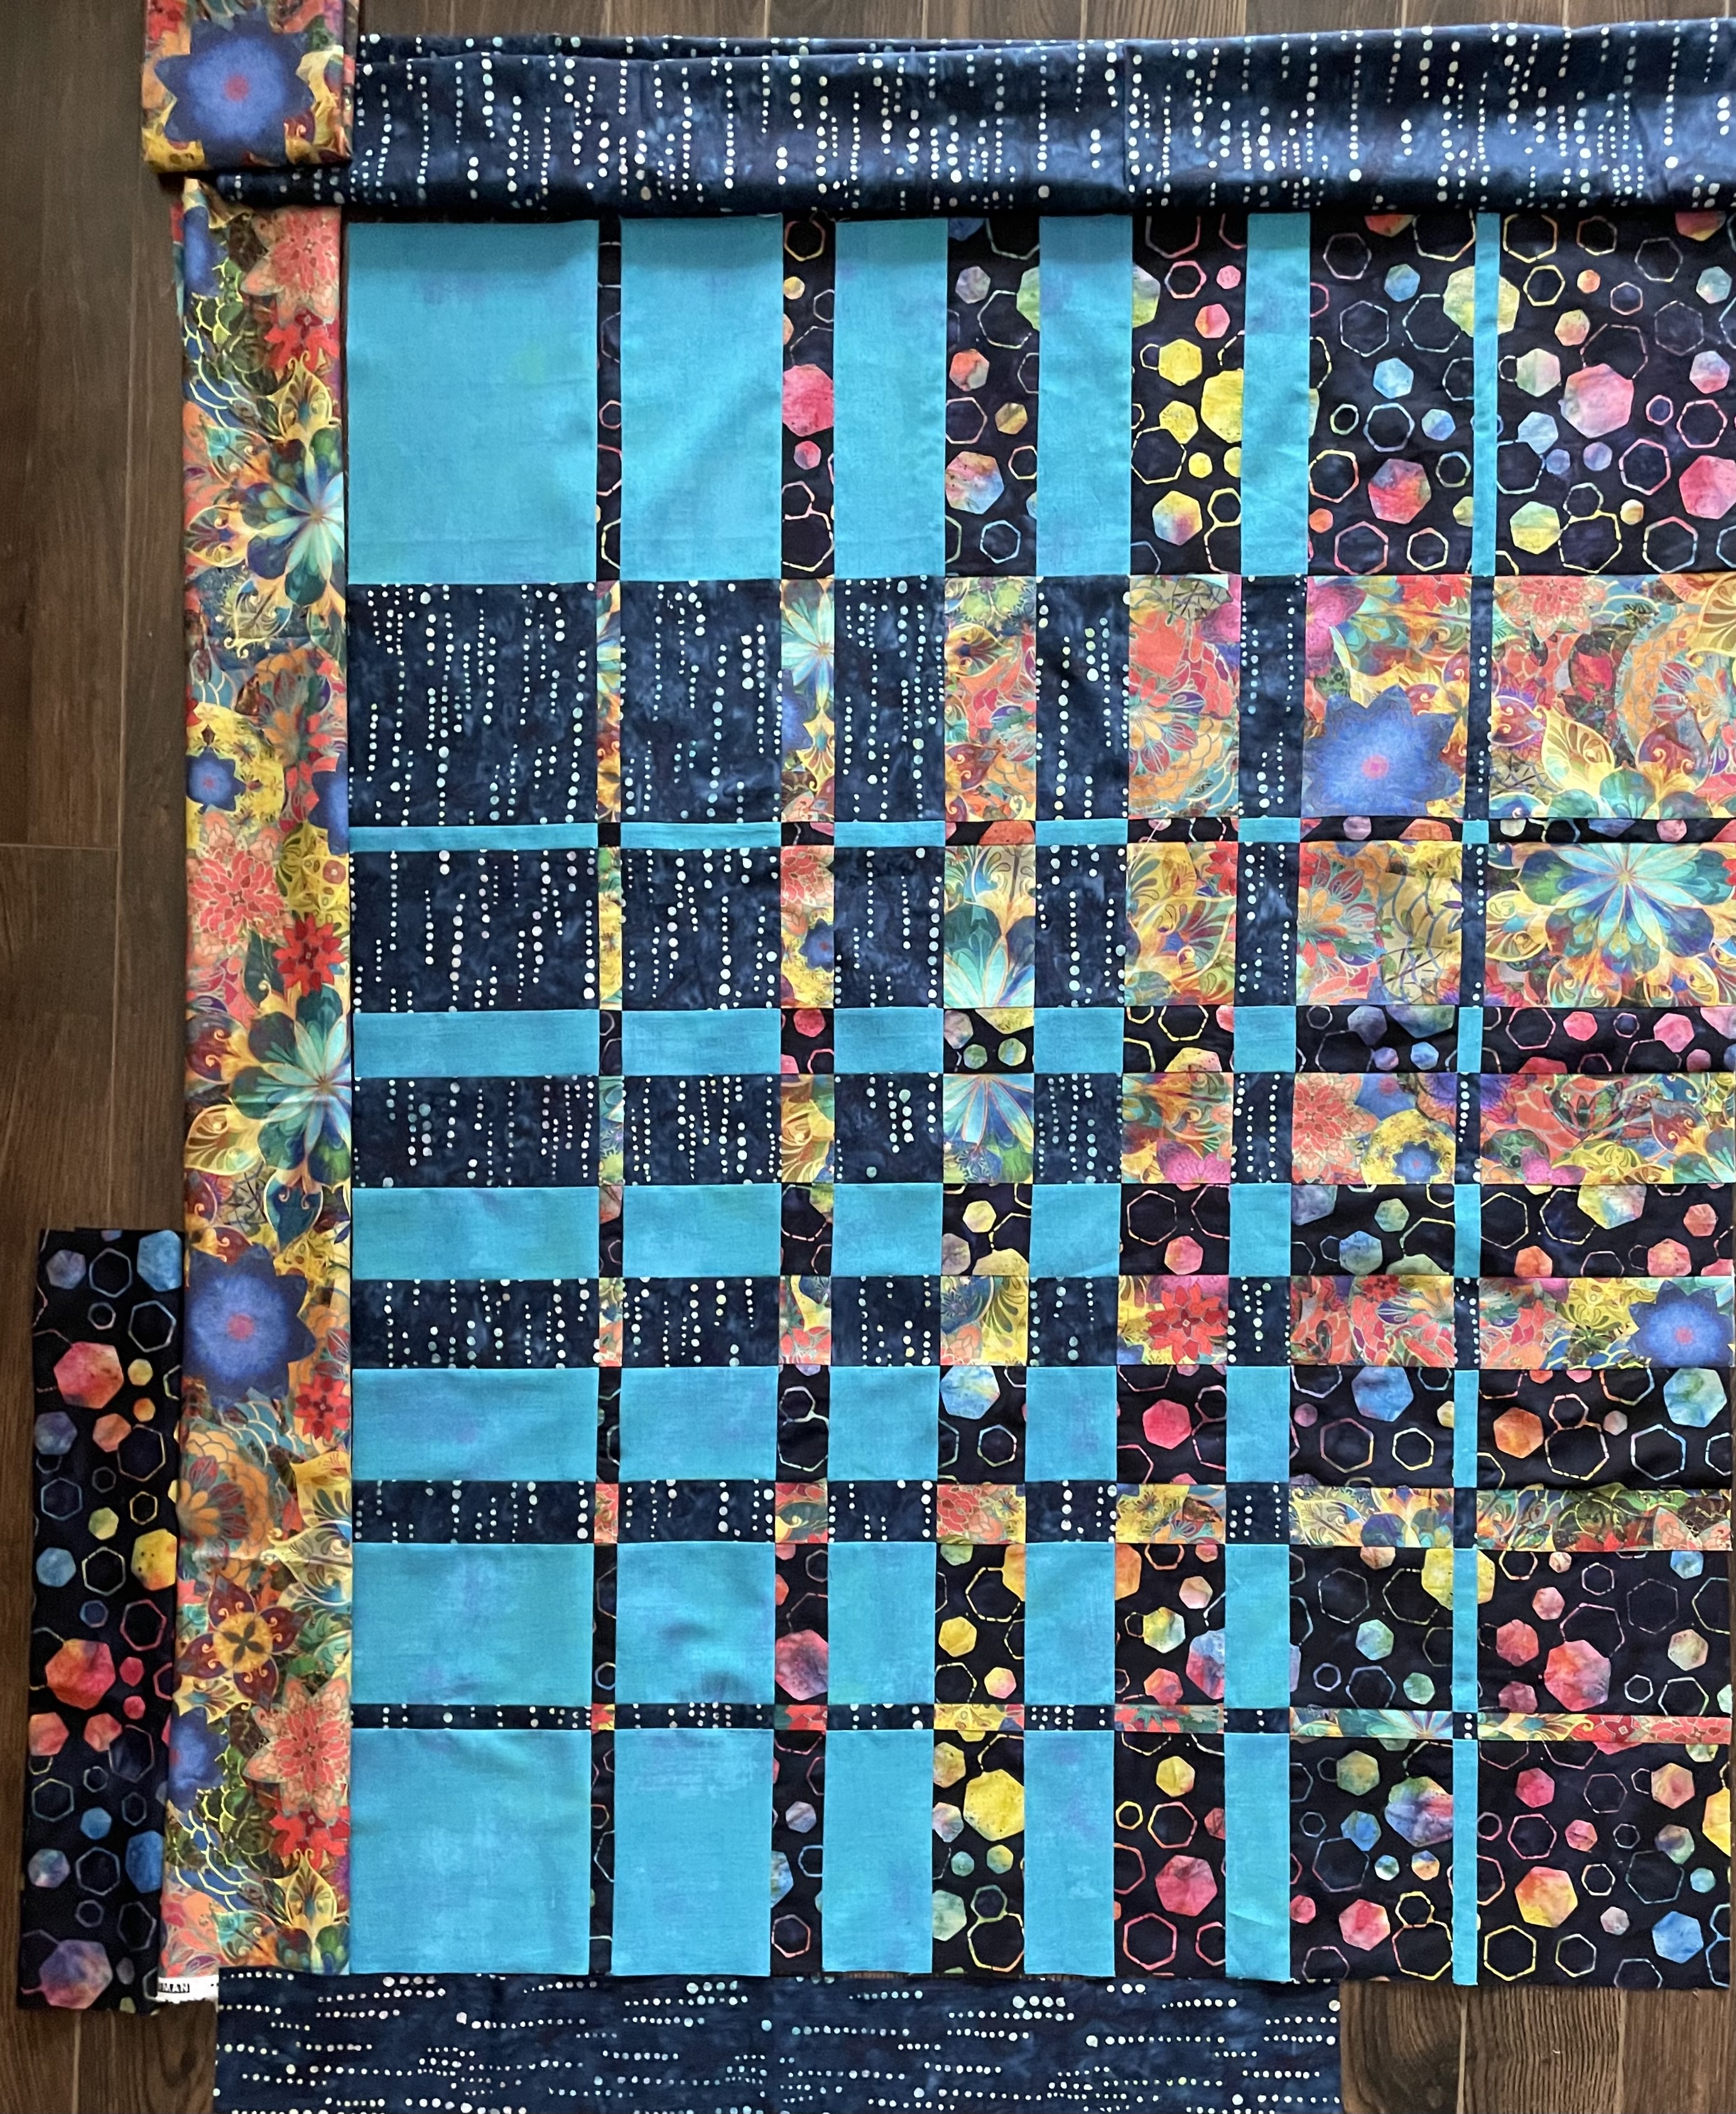
Just finished the borders (with mitred corners) and I’m happy with the colour flow they provide. The hexagons bring out the hexagon blocks / the dropping dots showcase the dots within the panel – and the many fabric joins don’t show and when the borders are quilted they won’t catch the eye.
Next step: edge stitch the appliqué – I’m going to use a pale grey Invisifil thread which should disappear into the fabric. I wish I had a golden shade but I don’t and it doesn’t make sense to order one online (even on Amazon.ca the cost is prohibitive!). So, the pale grey it is with a 60 universal needle – very fine (which I have in my needle collection).
Yesterday, I added the gold and turquoise borders to the panel. Today, I spent a lot of time avoiding the next step because if I wanted the dots fabric to go in the right direction I was going to have to waste a lot of it and I didn’t have a whole lot to work with. I really wanted to border the whole panel with the dots – but I barely had enough to complete two sides and even then I had to do a lot of piecing to get enough length! That fabric is now attached with the mitred corner in the bottom left.
I’ve cut two strips of the hexagon fabric for the other two sides – I need one more to finish the corner. I have plenty of that fabric – not a problem.
I still have to decide at what point to edge stitch (and embellish) the appliqué – I could do it as soon as the borders are complete; I could do it after assembling the quilt sandwich – when I do it depends on how I think about quilting the whole project. The previous convergence quilts I’ve done were quilted overall in the hoop on the embroidery machine. I’m not sure how that will look with the appliqué, however. Stitching-in-the-ditch won’t do it, though because that leaves the larger blocks unquilted space. So I will probably choose to quilt in the hoop which means I should edge stitch the appliqué before assembling the back with what leftover bits of fabric I have.
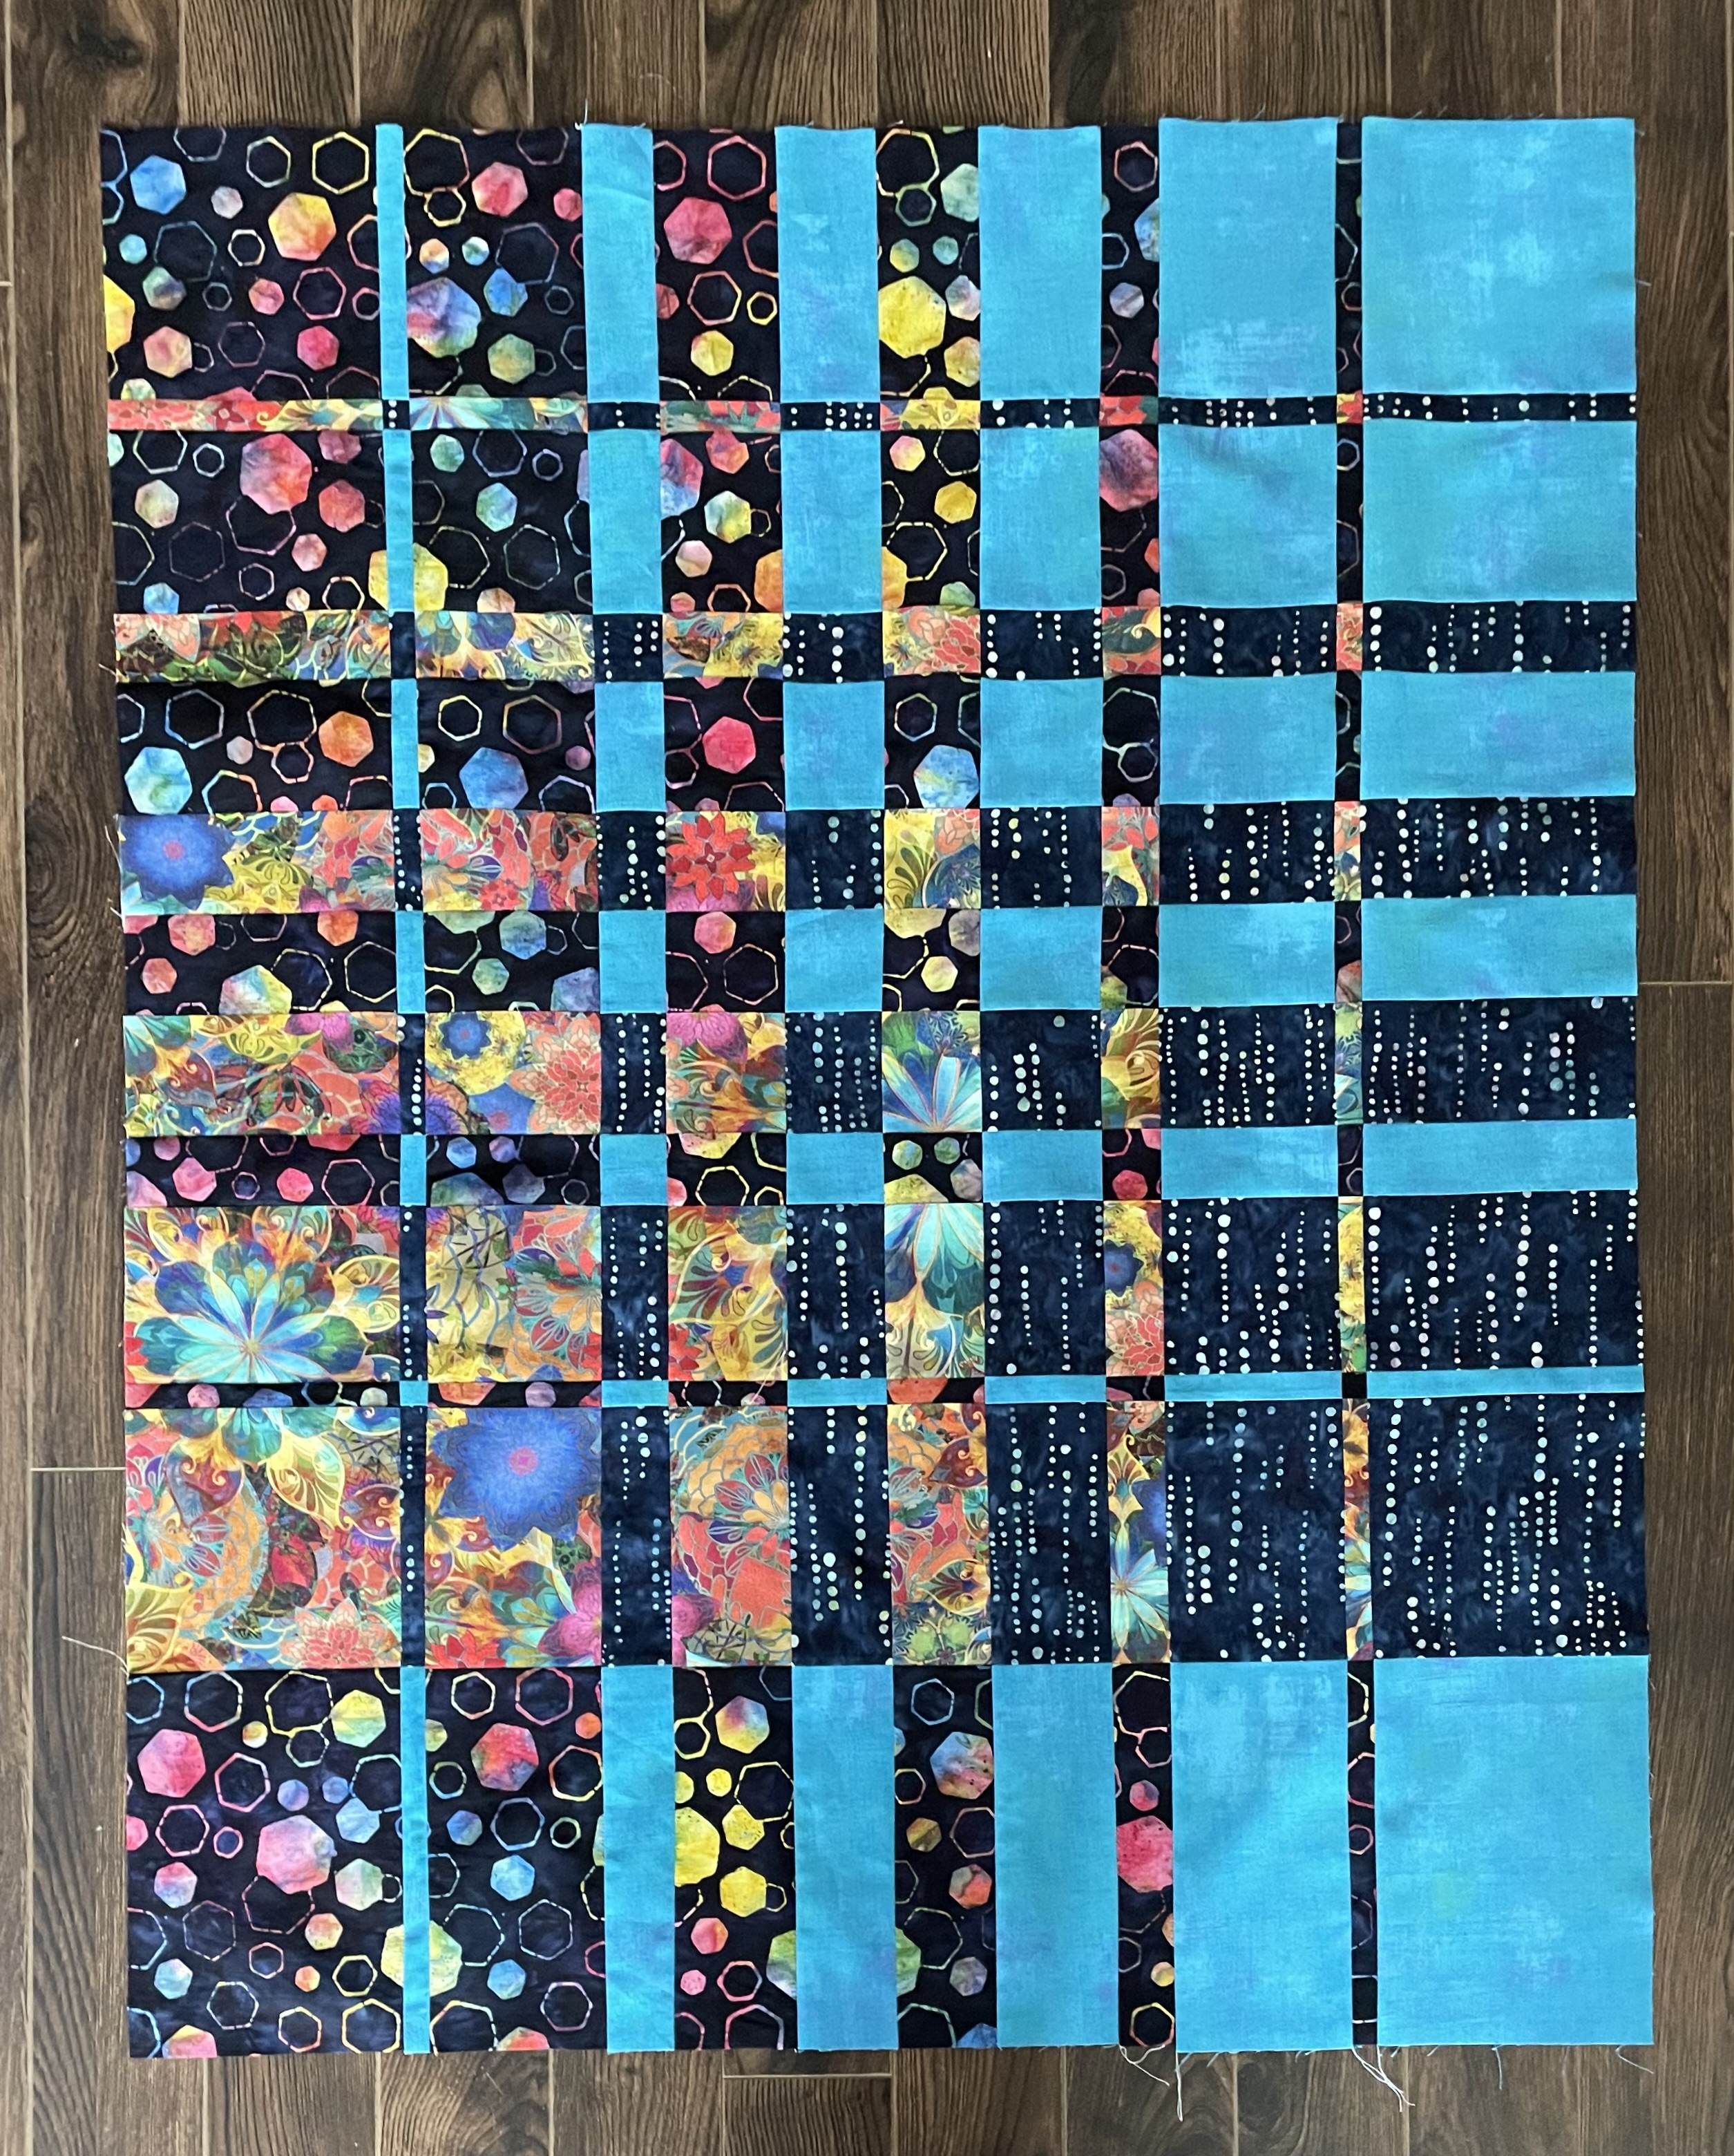
First thing I did today was to recreate the dots/turquoise pairing strips setting them up so when interleaved with the flowers/hexagons the dark fabrics would be opposite one another, not adjacent. My goal was to end up with a rectangular rather than a square panel. I accomplished that by adding a final 9″ row of the dots/turquoise pairing to one end to make the block longer.
I have just finished assembling the panel – 35 x 44 – not quite large enough for a lap quilt. I want to end up with something closer to 48 x 60. I can can obviously add borders – 7″ all around would give me a finished size of 49 x 58. If the borders were a bit asymmetrical I could fudge the final size closer to 60″ in length.
However, first I need to sort out a narrow framing border around the panel to set it off from the borders which I can then assemble by piecing the original four fabrics. So back to the stash to see what I have that might close off the panel in an interesting way.
I’m also going to appliqué some flowers from the yellow fabric over the turquoise blocks at the bottom to bring that colour to that bottom right corner (in the photo on the left – I must have stood on the opposite side of the panel when I took the second photo!).
Afternoon Update
Panel With Fused Appliqué
I couldn’t leave the panel as it was – I applied some fusible web to the back of floral fabric, fussy cut a bunch of elements, then fused them in place. Now I need to edge-stitch and embellish them before I can go further. I’m definitely happier with those turquoise segments at the bottom partially covered – the appliqués extend the bright colours beyond their quadrant.
OK, I’ve played with Ricky Tims’ convergence quilt idea before. There are a bunch of subtleties to consider and I don’t always see them until I’ve sewn the strips together.
In Convergence #1, I didn’t realize how small the constructed block would be, so to make a decent size lap quilt, I used it on-point, filling the corners with the corresponding fabrics and bordering with something compatible but different. While constructing Convergence #2, I misjudged how the two light colours would go together, cut them the wrong way; but fortunately, I had enough of both fabrics to redo the panel and salvage the quilt. I used the miscut strips from Convergence #2 to construct Convergence #3 by interspersing them with a multi-fabric panel, cut in strips and interleaved with the greys. I lengthened the panel in one dimension to make the resulting quilt a rectangle.
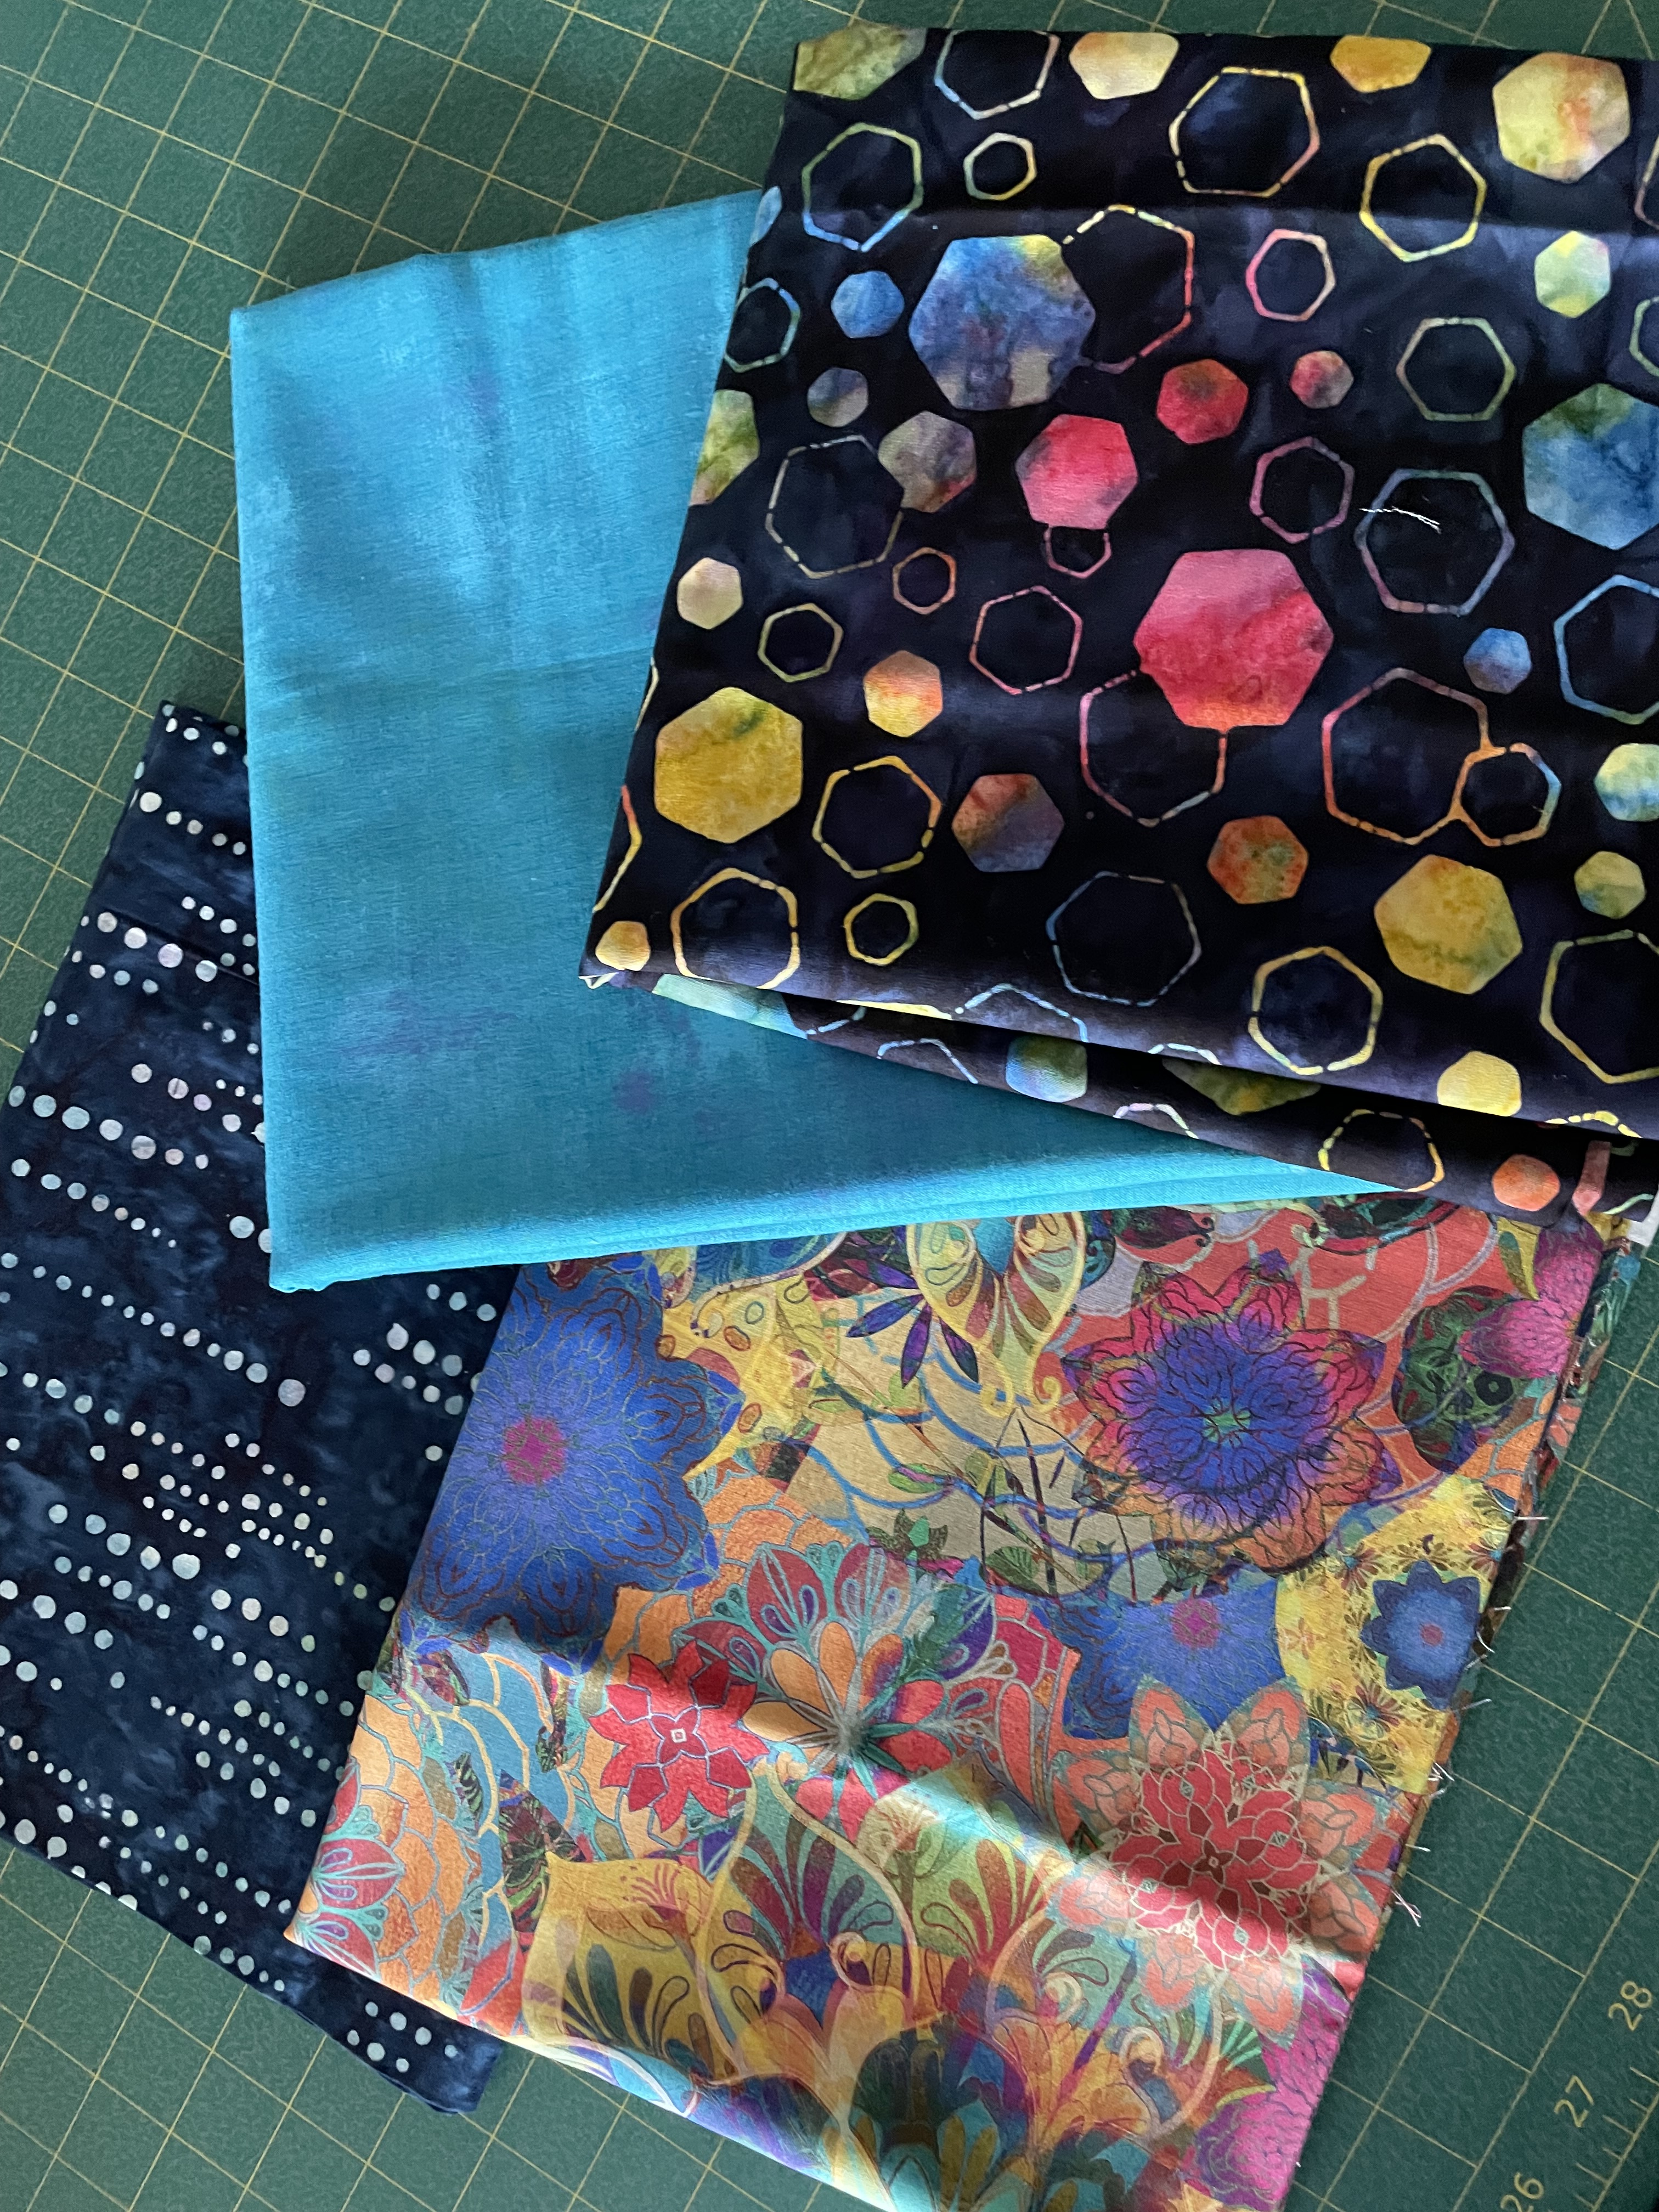
In thinking about another convergence quilt panel I chose four fabrics I thought worked well together (two batiks/two prints):
I thought the convergence array would make a bright panel.
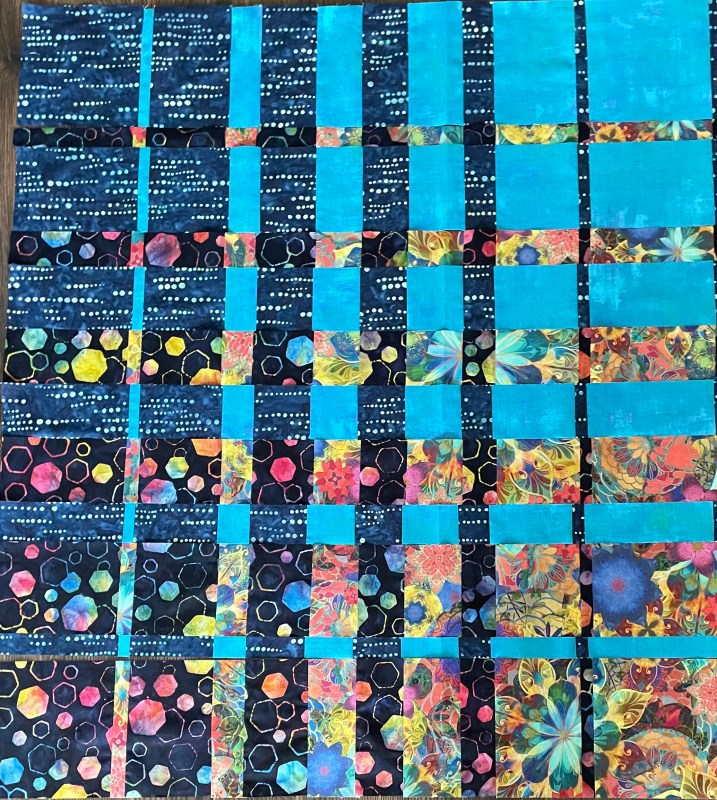
A Square Convergence – Laid Out
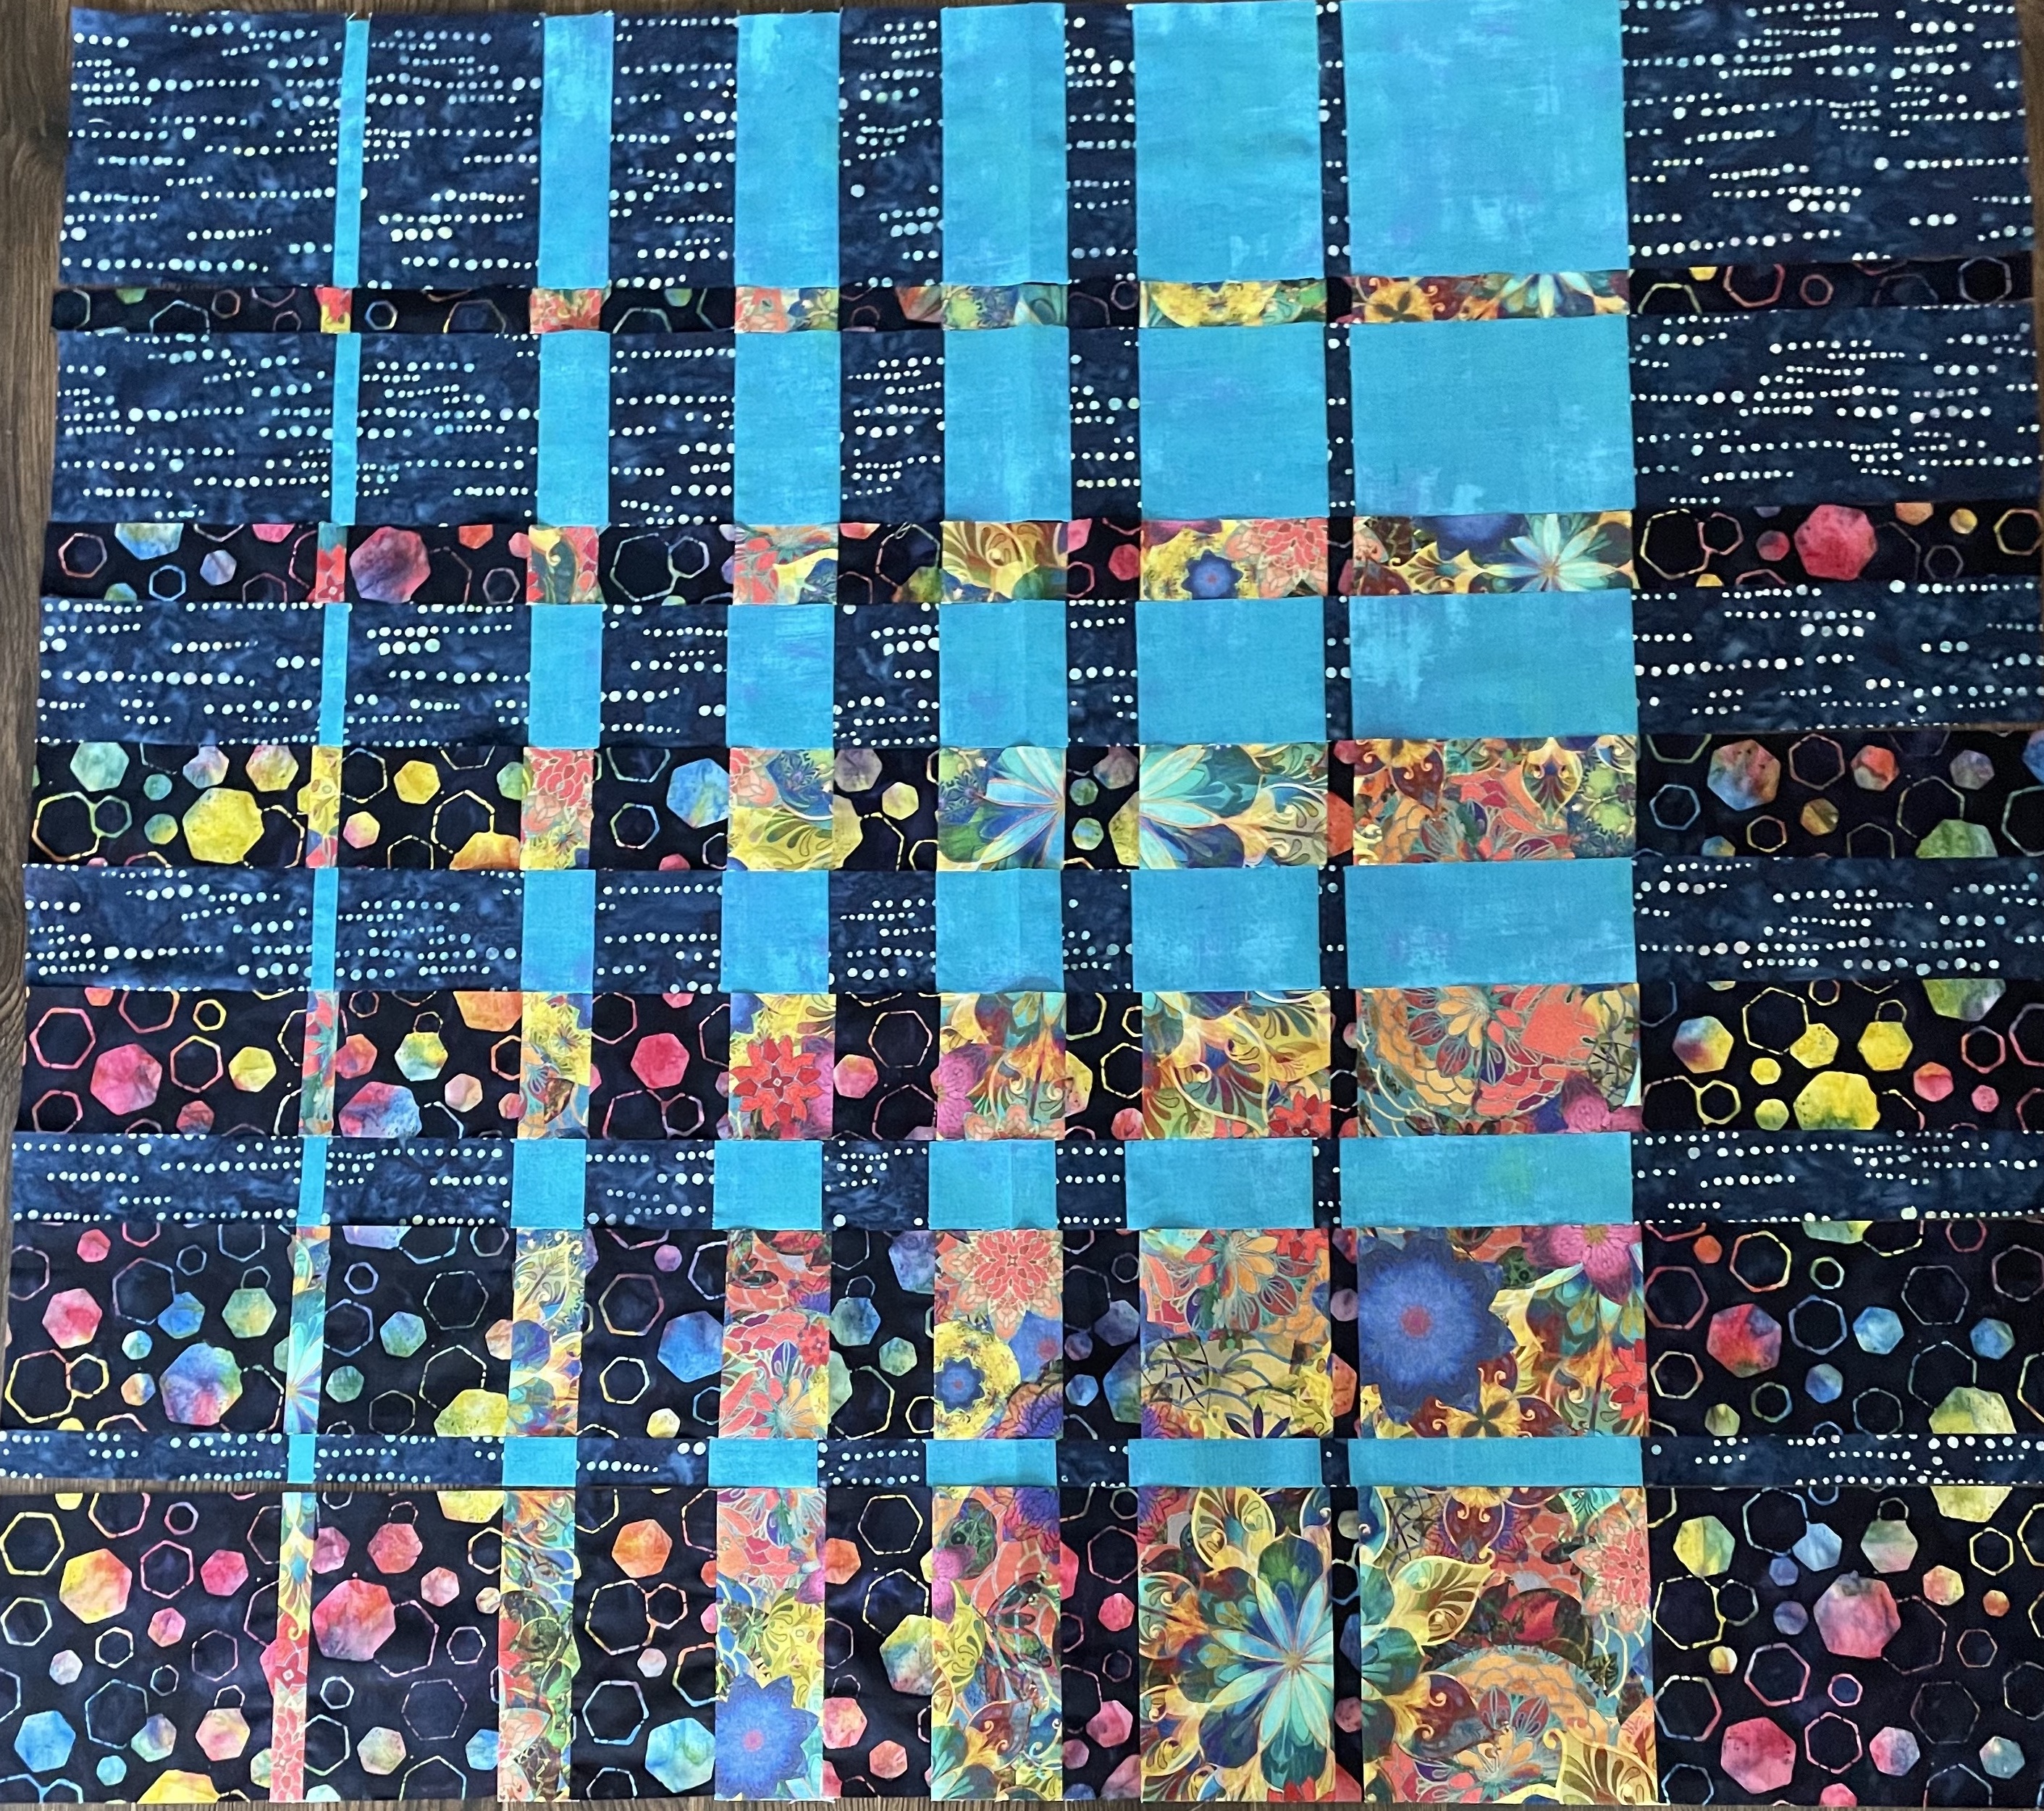
A square block works as you’d expect it to. However, I wanted a rectangular panel so I had added another dark 9″ strip to the contrasting end of each pairing:
Extended Panel – Laid Out
Here’s where I didn’t anticipate the fabric placement – instead of cutting the blue dots/turquoise grunge as I did, I should have reverse the fabrics. I’m going to redo that fabric pairing to see whether the overall panel doesn’t work better. Fortunately I have enough fabric to do that and I’ll set aside the strips I currently have and use them in another quilt top (as I did with Convergence #2 and #3).
I suspect this arrangement could be salvaged were I to choose a good contrasting narrow sashing fabric. I’d intended using the dark hexagonal batik for the outer border but I’m not sure that will work well with this array.
Next task – redo the blue dots/turquoise grunge strips and see what that looks like. Tomorrow!
Imagine my surprise when I checked my latest Pinterest daily digest to find a synopsis with 8 quilt alongs linking to my description of how I worked out The Escher Quilt!
Have fun – I’d say this is an advanced intermediate quilt (definitely not for a beginner, even with instructions).
Another note you wouldn’t pick up if you didn’t read through the comments is this one:
Just keep in mind you need 25 fabrics – one solid for the “background” triangles and any borders you plan on adding; 24 patterned fabrics – 8 light, 8 medium, 8 dark (https://jmncreativeendeavours.ca/2021/05/08/the-escher-quilt-2/)…. You’ll likely do a lot of auditioning to build a collection of 24 fabrics. As for the background, I suggest a navy (which is what I used given the colour blend of my fabrics) but black is certainly a good option (that was the background colour in the original photo I saw). All the best with this quilt. One other thought, because trying to pull together a collection of 24 fabrics can be daunting you might consider a kit that has selected fabrics for you (these quilt kits are reasonably priced: https://www.quilt-agious.com/shop/Kits/p/Escher—Batik-x46838321.htm).
How long have I owned a serger? It’s gotta be close to 25 years. Most of the serger sewing I do works perfectly fine and I’m happy with it. However, when I need to sew in the round (like when attaching the neckband to a t-Shirt, or at the bottom edge of pants), when I stitch past the place where I started, I end up trimming the edge of the beginning stitches. It annoys me – I usually end up zig-zagging across that small part of the edge. The other day, I figured out how to solve that problem (although why it’s taken me 25 years to do that, I don’t know!).
Normal Knife Position
This is the normal cutting position with the knife blade (upper right corner) in the up position beside the presser foot (and the small white knob on the left with no writing).
Knife-down Position
I realized the other day that when I reached the place where I started stitching in the round all I had to do was lower the knife to the down/lock position (below the presser foot, in line with the needle plate, with the small knob on the left showing “lock”), and here’s what I get:
Round Serged Seam Join
No trimmed stitches! I can connect the join and not worry about that centimetre of trimmed stitches in front of where I stopped serging! (The trimming happens because the cutting knife is in front of the needles and trims the seam edge before it gets sewn – in the round it catches and trims the already serged edge.)
I have a second tip. The other day, I was helping a friend set up her new coverstitch machine (that’s a sewing machine that only does a three thread coverstitch – just look at the hem on your t-Shirt – that’s a three thread coverstitch). Threading the needles is straightforward. Threading the looper (on her machine, that’s to the left side) is not intuitive and involves some very awkward threading from back-to-front on the looper itself.
I pointed out to her that she only ever needed to thread the machine once, then she never have to thread that looper again – just cut the thread at the spool, tie on the new coloured thread, make sure she’s raised the presser foot to release the tension on the tension disks, then pull on the old looper thread bringing the new thread through the entire thread path.
It’s the same with a serger – cut the looper threads (on a serger there are two loopers) near the spool, tie on the new colour thread, raise the presser foot, pull the new thread through the machine. I actually do that with all four threads even though I’ve not figured out how to tied a tiny knot that will go through the needle eye – I just cut the needle threads when the new thread reaches the eye and re-thread the needles with the new colour. I use an overhand knot (which I pull snug) – I’ve tried reef knots but they’re no smaller.
Threading the needle paths on a serger or coverstitch machine from spool to needle is easy; it’s the loopers that can be complicated. Tying the new threads on and pulling them through is an easy fix.