At the moment I have four rows of 9 blocks (I’ll probably make it 10; that was what I planned initially). I’ve finished 40 of 60 half-blocks. Now that I have evolved a technique for sewing the small Drunkard’s Path blocks I’m going more quickly.
The array is, at the moment, an audition. I won’t do much moving around until I finish the remaining 24 semi-blocks. Then I will be able to decide what to put where.
With this much laid out, I started thinking about sashing and borders. These three fabrics were in my “backing” collection. I tried several grey printed fabrics for the sashing/inner border but the dense black dots on white will be neutral, yet strong enough, to make the colours stand out. I have a hunch the white with fewer dots might be best as my wide outer border.
Just thinkin’ about it all as a rest from sewing those small blocks!
I have all 60 large blocks sewn together. I’ve begun working on the small quarter size ones. So far I have stitched thirty – leaving me ninety small blocks to go.
The 6 1/2″ Drunkard’s Path block is relatively easy to sew – with the “L” piece on top, three pins, one on each end, one in the middle, the fabric spreads itself out so the opposing curved edges more or less align themselves. Sewing slowly, I get a nice 1/4″ seam on the curve.
The 3 1/2″ block is DIFFICULT! Because it’s small it’s hard to put in three pins to hold the centre and the ends. I think I’ve figured out how to sew them more efficiently. Again, with the “L” piece on top, I just use two pins, one on each end, then sewing slowly, using my fine point tweezers, (with lots of stopping to realign the opposing curved edges), I adjust top and bottom as I go. I’ve just finished a dozen this way – it took me about 12 minutes to sew the batch.
The 3 1/2″ Blocks
Each large block is sewn to two small ones to set up a half-block element. Two half-block elements go together to make a block. I intend to assemble 5 blocks into a strip. The strip width will finish at 9″. For the moment, I think I want five strips (5 x 9″ = 45″), with 1″ sashing I’ll end up with 49″ width; add 2 1/2″ border I finish at 55″. Finished length I will worry about once I have the strips sewn.
Drunkard’s Path Blocks for New Quilt – Large & Small
It’s taken two days to get the cutting done. I decided I to use scraps which meant scouring through my many boxes of small fabric pieces. I decided to stick with “red” as my colour focus for the large blocks (using up the grey 6 1/2″ strips, leftover from my previous quilt, for the backgrounds). I have enough quarter circles and backgrounds for 60 blocks – the quilt I’m imagining will use 50 – the extras will let me to make choices when I lay things out.
Actually, I began yesterday collecting and cutting smaller scraps for the small 3 1/2″ blocks – using up a bunch of 5″ charm pieces I had from a couple of collections. I find 5″ squares are not all that useful. I have incorporated them in a couple of quilts but I prefer cutting what I need from larger fabric pieces; I’m trying to clear out the 5″ squares I have left in my stash – getting close. I ended up with a wide variety of colours both for the quarter circles and the backgrounds (the two piles at the top right in the photo) – I have enough for 120 blocks, plus 24 more light backgrounds (in case I need them to balance out lights and darks when I start sewing blocks).
My plan is to begin with the large blocks which I find easier to sew. I should get those done in a few days. Lord knows how long it will take to assemble the 120 small blocks.
This quilt is an improvisation – I will randomly select a quarter circle and pair it with a grey background – I will do that for all of the pieces and hope the result will be interesting! When I constructed the strip for the back of my last quilt that’s what I did and the effect was more than pleasing. I’m aiming to make five strips which I will join using sashing of some sort or other – that decision I will make when I get there. Right now, my focus is on the blocks – both large and small. I’m expecting the blending of lights and darks (both with the large blocks and the small ones) will create an interesting colour flow!
Back of Planets And Moons
Just need to get started – not today, though. It’s time to stop for lunch and then get out to enjoy the lovely warmish sunny day!
I took the eight completed pieces to the knitting group yesterday – the reaction was favourable – I guess I’m not wasting my time on this 6×6 project.
What was clear, however, is the women had no sense of the complexity of the work – that for ten of the pieces I’m doing a fabric/threadpainting rendering based on my own photos (the remaining two I adapted from fabric floral prints).
I explained to the gals that I started by going through my photos setting aside any I thought might be turned into a 6×6 piece. Next I edited them, adjusting the colour and cropping them to a 6.2″ x 6.2″ square so when I print them they are the right size for mounting and the colour strong enough to permit me to embellish them. Then I print each photo on a letter size piece of cotton lawn fabric (which is backed with plastic so it can move easily through the printer). After the print dries for a day or so, I removed the plastic and back the fabric with a fusible paperbacked glue sheet before I carefully “fussy cut” each flower.
At the start of the project I had prepared myself a dozen 9 1/2″ x 91/2″ squares of silk tussah which I’d backed with Sewer’s Dream stabilizer to keep the silk from fraying. I marked the position of the 6×6 square using a heat-erasable pen so I’d know where to place the flowers. After each flower was cut out I carefully positioned it onto the silk background, and fused it in place. On some flowers I added extra leaves before the final fusing.
Before doing any thread painting I use a heat-erasable pen to suggest the colour boundaries to be stitched. I might also intensify some colour with Inktense colour pencils or permanent markers. Then I begin sewing.
First I pull spools of thread from my thread stash (which at this point is quite large – a couple of hundred spools in every colour imaginable, a mixture of rayon and polyester – on this project the fibre content doesn’t matter, the colour does, so I mix and match). I constantly change thread (and bobbin) colour as I outline or infill aspects of each flower. For some flower renderings I’ve had to create machine stitches. After finishing each flower, I add my signature.
As I explained my process to the women they found themselves looking at the pieces differently, examining the detail more carefully. At first glance these pieces aren’t necessarily complex but the process of arriving at a finished 6×6 textile wall art piece takes me anywhere from 6-7 hours over a couple of days – likely longer than were I to simply paint the flowers on the 6×6 canvas!
This is my second go at the Rudbeckia. This time I printed the flower on fabric, pulled off the plastic backing, added fusible web, then fussy cut out the flower. I dug through dark green scraps, added fusible web, then cut leaf shapes. I fused leaves and flowers to a 9″ x 9″ raw silk square of fabric which I’d backed with Sewer’s Dream interfacing to stabilize it.
Then I began stitching! It took several hours to thread paint the flower – constantly changing thread and bobbin colour – using the “hover” function on my machine to simulate free motion sewing.
This time, I left myself enough space on the background to apply a signature. Having used fusible web, my raw edges are relatively smooth, not fraying as was the case with the first Rudbeckia.
I think I’m rather happier with this version than I was with the first prototype.
I’ve had a couple of ideas rattling around in my head for a new series of ten 6″ x 6″ pieces. I can use them at the summer showing at the NovelTea Cafe in July/August and whatever doesn’t sell there (I’m not expecting much will) will be ready for the 2023 Christmas show in Tatamagouche at the Ice House Gallery (I know Brandt is planning on doing 6 x 6 for a second year – last year’s show looked terrific!).
I have an interesting collection of seascape photos I’ve taken over the years. I have pulled them from my digital photo collections and stuck them in a folder on my desktop. The idea would be to crop each photo to 6.4″ x 6.4″ (that would allow the print to just come sightly over the edges of a 6 x 6 canvas), print each photo on fabric, back it will fusible interfacing to stabilize it so I can thread paint the image. I haven’t tried that yet – but it’s on my to-do list.
Green Bay, NS
I also have a collection of interesting flower photos. At first I thought I’d try printing those on fabric as well, but the paper print I did the other day wasn’t vibrant enough to stand as a background for thread painting. Instead, I decided to try a single flower image, cropped, from which I could piece a flower on a pale background.
Today I cut a 9″ square from some pale linen I had in my stash. I used a heat erasable pen to mark a 6″ square at the centre. I selected some fabrics, then started cutting. I arranged the pieces of fabric, pinned them in place and began thread painting.
Rudbeckia Flower
This piece took me about five hours to make. I took a couple of shortcuts since I was just playing around. I didn’t bother putting fusible web behind the fabric before cutting it out – a big mistake! I’ve ended up with fraying edges because there is no glue to secure the layers to one another. Next, the leaf at the bottom is in a bad location – I must remember to keep enough space free on the background for a signature. Also, the beige linen background is too “flat,” too “dull.” I definitely want to use to what I have left of the light coloured raw silk I used for the previous 6 x 6 works.
I also want to expand the flower to 7″ – a half inch more on each side so the petals and leaves wrap around the sides of the canvas. In this prototype I cropped the flower and leaves at 6″ – which makes it difficult to get a clean line at the canvas edge. I also need to think about embroideries specific for each flower centre. By the time I got to adding an embroidery here I knew I was just trying out the overall idea and didn’t worry too much about placement. I am going to have to be more precise with whatever I do at the centre of each flower.
I mounted the finished flower on a 6 x 6 canvas, then took the finished piece to show my friend Deb. She thought the idea was definitely worth pursuing. Because I like Rudbeckia flowers I will do another one for the collection.
Nothing on for tomorrow – I intend to do a second prototype taking into account what I learned today.
It took a couple of hours yesterday to set up the 12 blocks. This morning I laid them out on a piece of batting, added some stiff interfacing and stitched down the grosgrain ribbon to cover the joins (I didn’t sew the blocks together because I wanted the finished project to be larger rather than smaller – I gained 1 1/2″ on the width and 1″ on height by doing that).
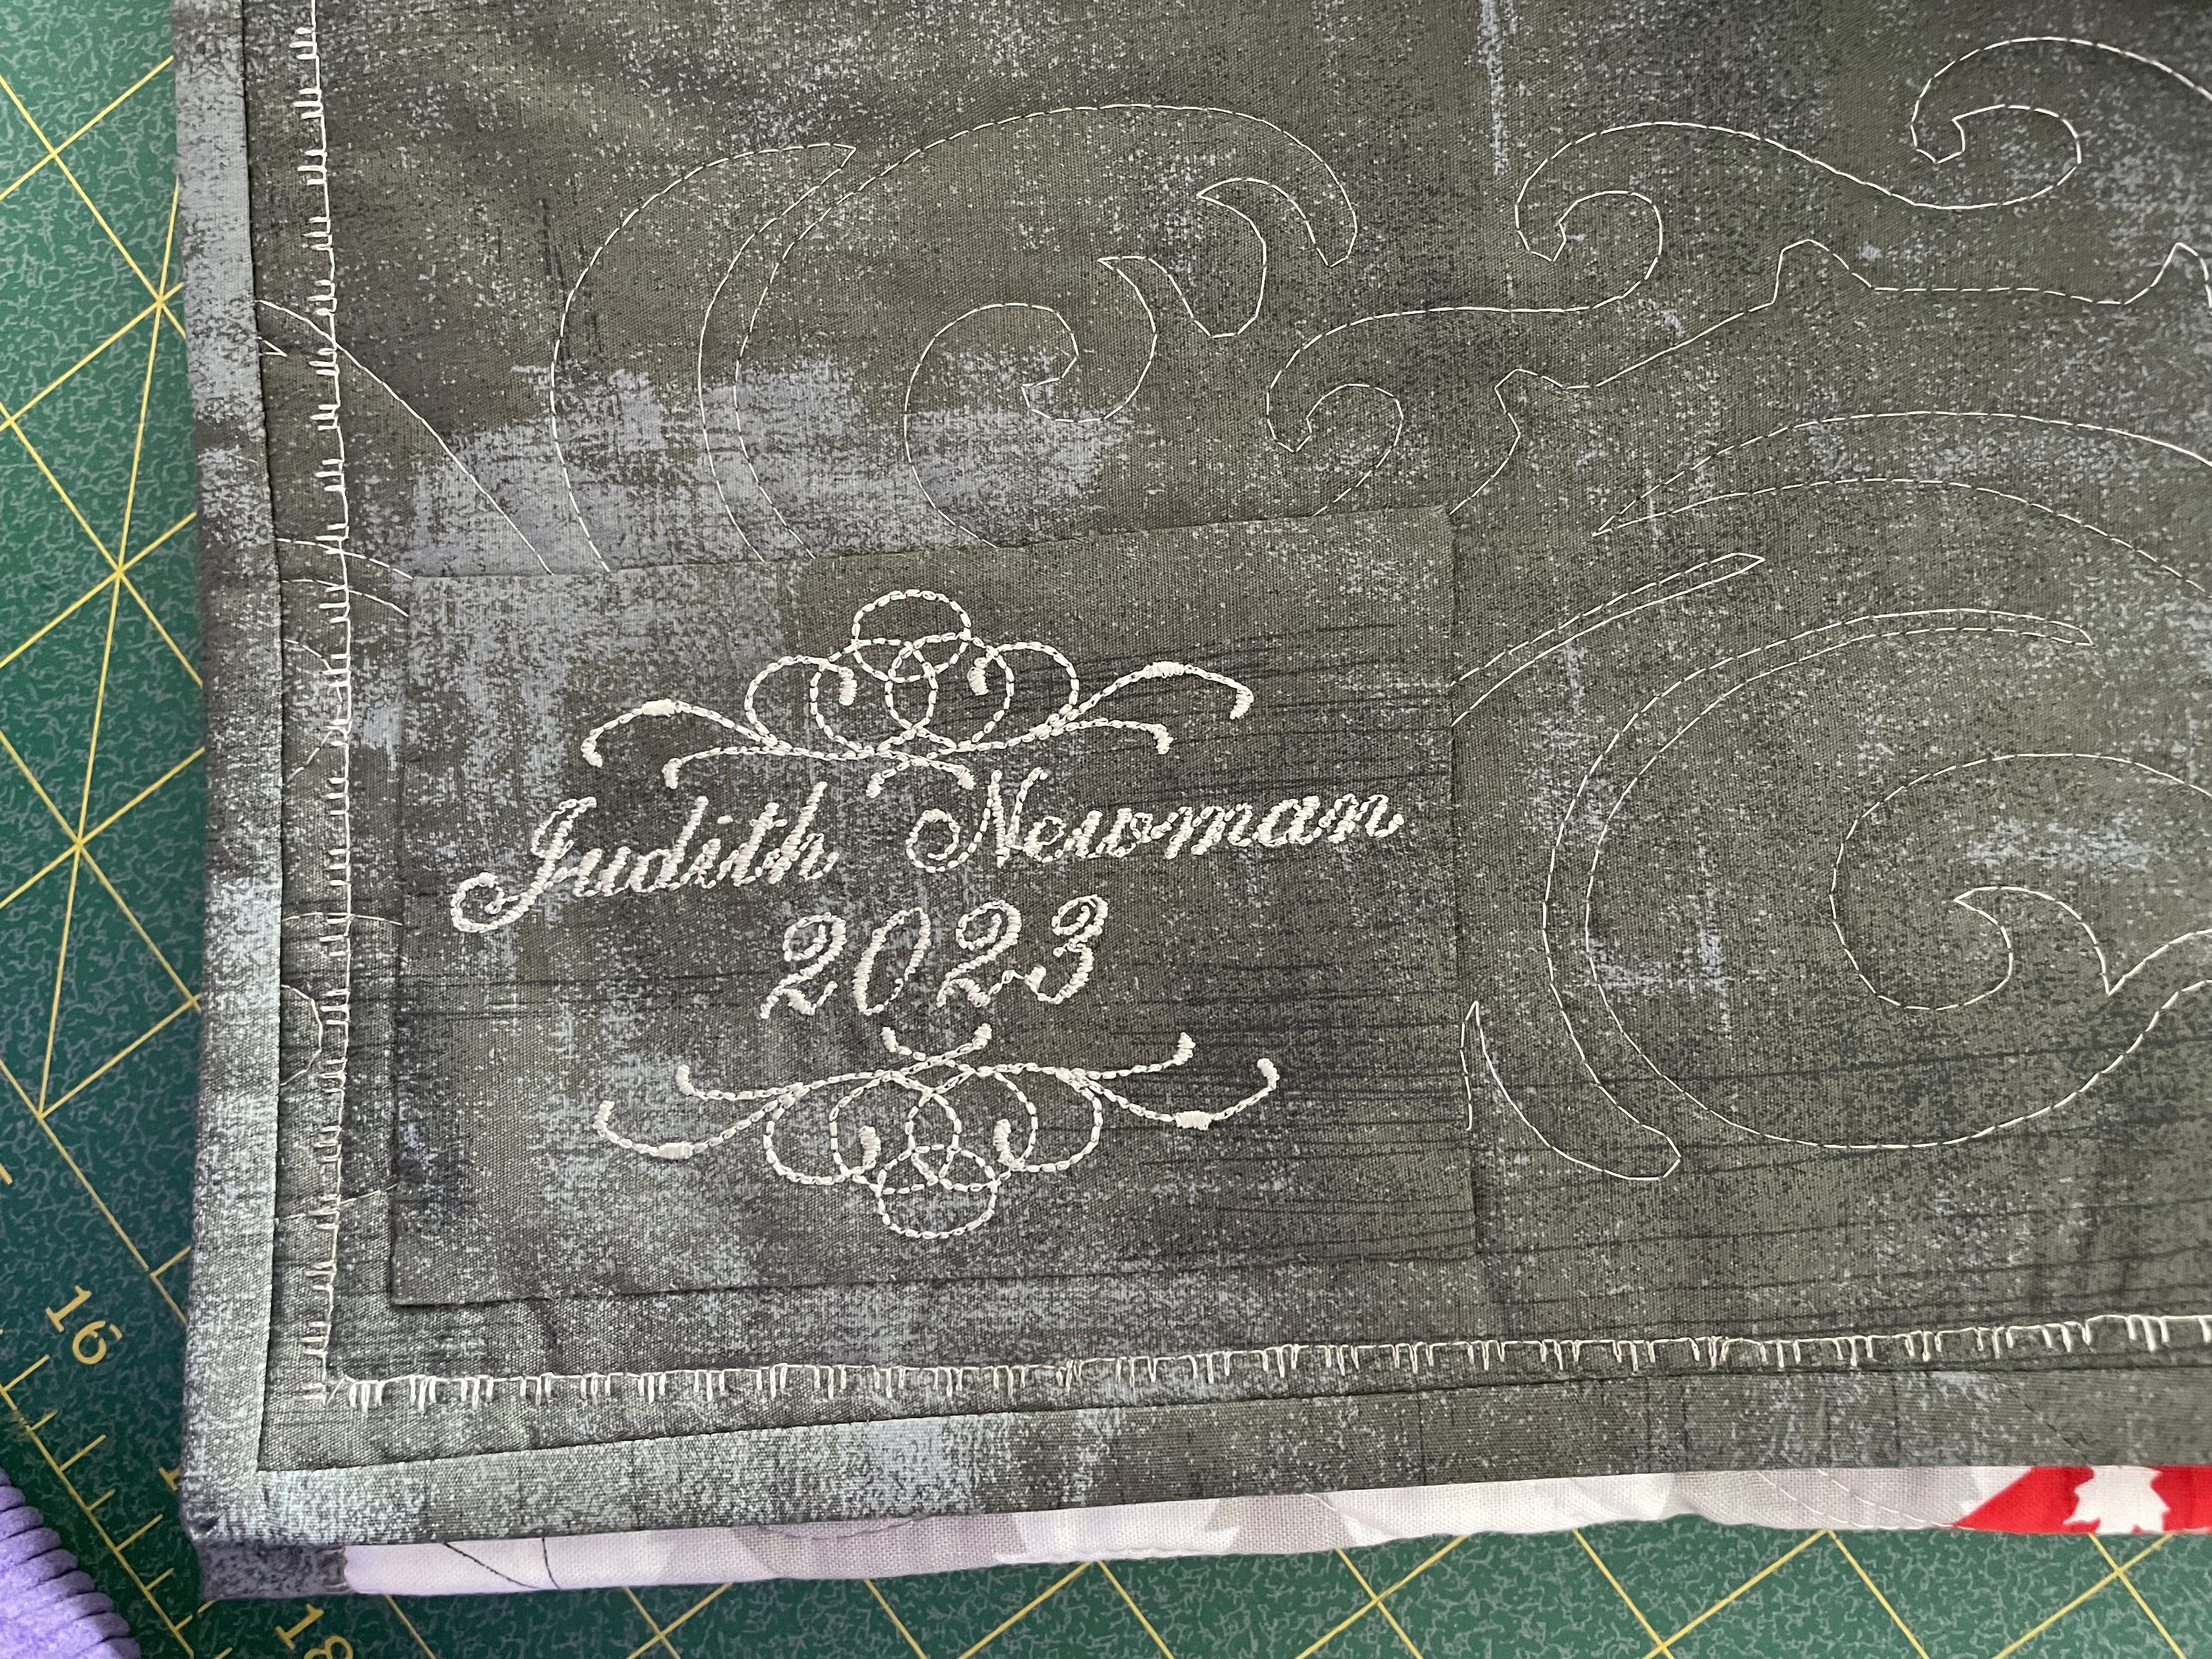
Next, I embroidered my signature on the backing:
Back of Fidget Quilt
After embroidering a signature, I aligned the backing on the other layers, sewed the binding to the back of the project, folded it over the front and decorative stitched it in place.
I discovered when I was finished, that I’d put the backing on upside down! My signature is at the top left on the back of the quilt., instead of bottom right which I’d intended. Wouldn’t have happened had I done what I always do and hand stitched a label in place. Oh well. Lesson learned. Check backing twice before adding the binding (just hope I remember to do that checking!).
This time I focused more on texture with some velvet (which came from some pillow covers I made for my sister 25 years ago). I added a small circle of ripstop which has a crinkle sound when you scrunch it, but stitched flat it just feels “shiny” and makes little noise. I included a square of PUL fabric – that makes a sound when you rub your fingers over it.
I added a velcro fastening; a snap which is tight at the moment, and various beads and loops which move on ribbon or elastic. There is a small zippered pocket (which has a hidden object attached on the inside). The zipper with three pulls has no opening.
I made this second quilt as a prototype. I took the original quilt into my local sewing shop on Friday afternoon and the gals thought it would make a great class. Tomorrow this quilt will go to the shop to be displayed. All I have to do is prepare a description of the project and send that along with photos so the class can be advertised.
Now I need to do some actual experimenting with ideas for some 6×6 pieces. I also want to create a quilt based on the motif of the back of the last Drunkard’s Path quilt – Planets With Moons – a combination of large and small drunkard’s path blocks. I think 5 columns separated by a bit of sashing would be interesting.
There continues to be interest in how I constructed the Escher Quilt. Specifically, Ina Veurink wanted more information about the size of the trapezoid elements. I just assembled one from scraps so I could answer her question.
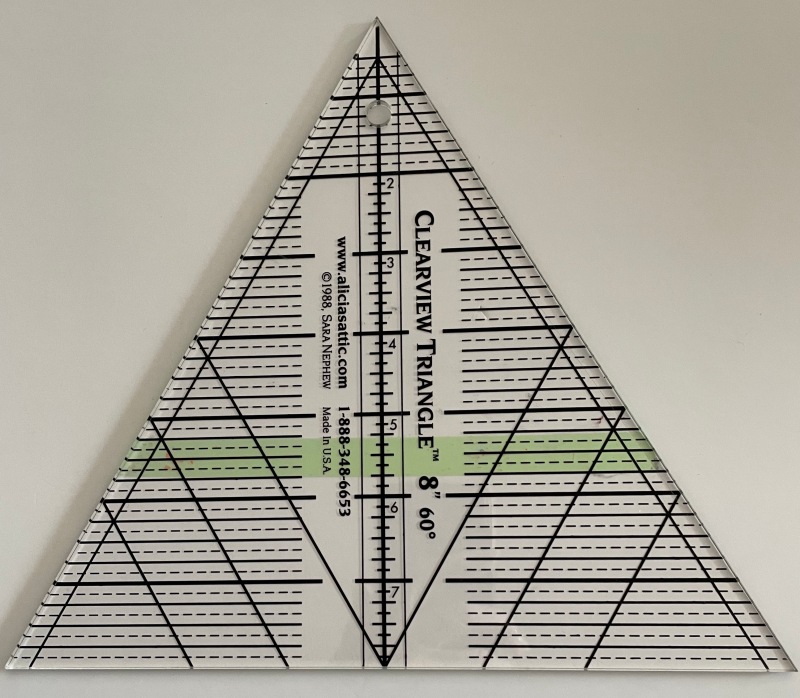
I cut 2″ fabric strips to start, from the fabrics I was going to use for the trapezoids. So each trapezoid starts out 2″ tall. Next I trimmed the angles on each side using an equilateral triangle acrylic template which I’d marked with green tape at the 5 1/4″ line:
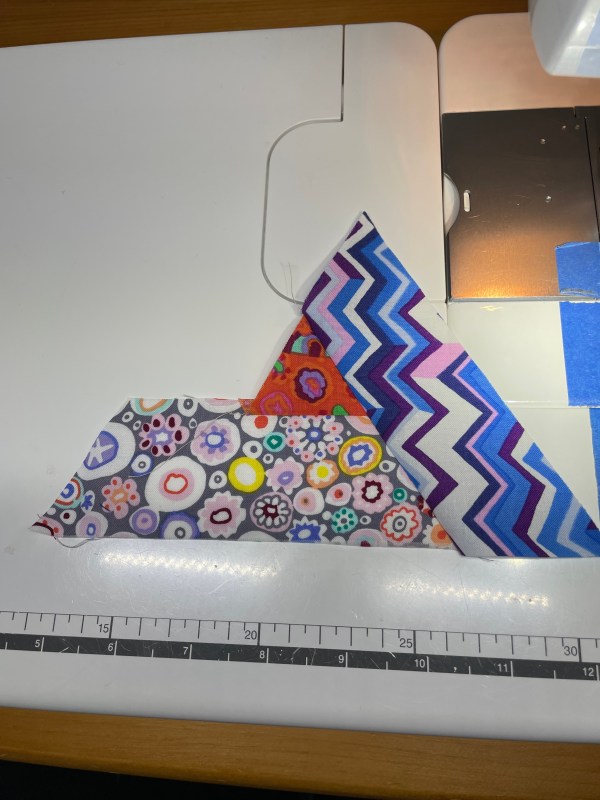
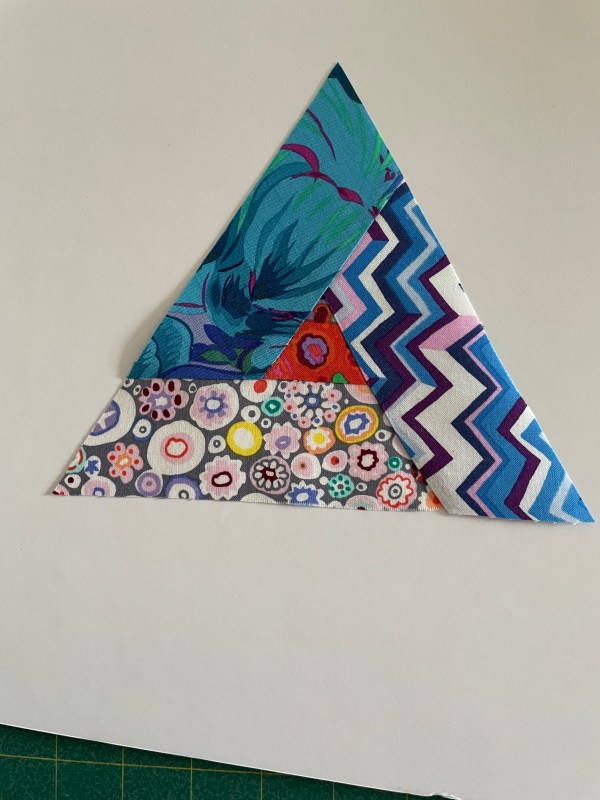
Acrylic Equilateral Triangle Template – Marked at 5 1/4″Block ElementsPartially SewnFinished BlockAssembling The Triangle Block
I laid out the 4 pieces: a 2″ triangle (in the quilt all the triangles are cut from the same dark fabric), 3 trapezoids (each 2″ tall, 5 1/4″ on the long, bottom side). I partially sewed the triangle to one end of one trapezoid
(NOTE: half the finished triangle blocks begin with the small triangle on the right, half on the left – I talked about that somewhere in the posts as I went along). It’s a partial seam because to fit the final trapezoid in, you have to be able to lift that first side of the small triangle to sew that seam. Next I attached a second trapezoid, then I fit in the third trapezoid, last I finished by completing the partial seam. Pressed and trimmed.
Finished triangle size: each side should end up at 6 3/8″ (although if your sewing was more accurate than mine on this test triangle you might actually end up closer to 6 1/2″). Whatever your final triangle size, all the triangles should finish the same size.
This is an advanced intermediate quilt (definitely not for a beginner, even with instructions).
Another note you wouldn’t pick up if you didn’t read through the comments is this one:
Just keep in mind you need 25 fabrics – one solid for the “background” triangles and any borders you plan on adding; 24 patterned fabrics – 8 light, 8 medium, 8 dark (https://jmncreativeendeavours.ca/2021/05/08/the-escher-quilt-2/)…. You’ll likely do a lot of auditioning to build a collection of 24 fabrics. As for the background, I suggest a navy (which is what I used given the colour blend of my fabrics) but black is certainly a good option (that was the background colour in the original photo I saw). All the best with this quilt. One other thought, because trying to pull together a collection of 24 fabrics can be daunting you might consider a kit that has selected fabrics for you (these quilt kits are reasonably priced: https://www.quilt-agious.com/shop/Kits/p/Escher—Batik-x46838321.htm).
Do the photos ever show up the imperfections! You can see the back strip isn’t perfectly horizontal; there are wobbles in the layout of the quilt top. None of this is obvious when you’re looking at the quilt draped on the bed, however. I know nobody looking at it will notice any of what I see.
The quilting I set up as an edge-to-edge design, working in the width of the strips – the embroidery for the animals was one width, the embroidery for the blocks was narrower – again, that something I can see but nobody else will notice.
I finally “mastered” precise positioning while I was working on the quilting. After all this time, I discovered how to set the opening (pivot) stitch and how to rotate the design a smidgeon so the embroidery would end up in the right spot for me to begin the next. This is the best edge-to-edge work I’ve done. I managed to align the start needle position with the finish needle position of the previous stitch out each time. What made this quilting relatively easy is that I didn’t have to worry about nesting the embroideries – I’ve done that a couple of times in the past – a lot of math and measuring to make that work. Here, all I had to do was centre the embroidery in each strip.
I completed the quilt with a folded French binding using 2 1/2″ strips. What I learned (having never bound a quilt like this before) is that if I wanted a 5/8″ binding front and back, I’d need to cut my strips 3 3/4″ wide. Here, I attached the binding with a 1/4″ seam, folded it over so I would end up with close to 5/8″on the front. I stitched the binding in place with a decorative stitch at the very edge of the binding. Because the binding was attached on the back with a 1/4″ seam allowance, the binding in the back ends up at just under 3/8″ wide and the decorative stitching is inside and separate from the narrow binding. I probably won’t finish a quilt like this again – I’ll go back to using the binding open rather than folded and finish both front and back at 5/8″.
I learn something with each new project.
Sunday, March 12 2023
Bernie had questions about the decorative stitch I used to bind the quilt. Here’s what it looks like on the top of the quilt (binding a smidgeon less than 5/8″); and on the quilt back (binding 3/8″ wide). [To have a 5/8″ folded binding top and back would need a binding of 3 3/4″!] The stitch is an edited version of one of the standard quilting stitches on my Pfaff Creative Icon 2.
Binding Stitch on Quilt TopBinding Stitch on Quilt Back
From start to finish the quilt took me 10 days. I just finished hand sewing on a label on the quilt back.
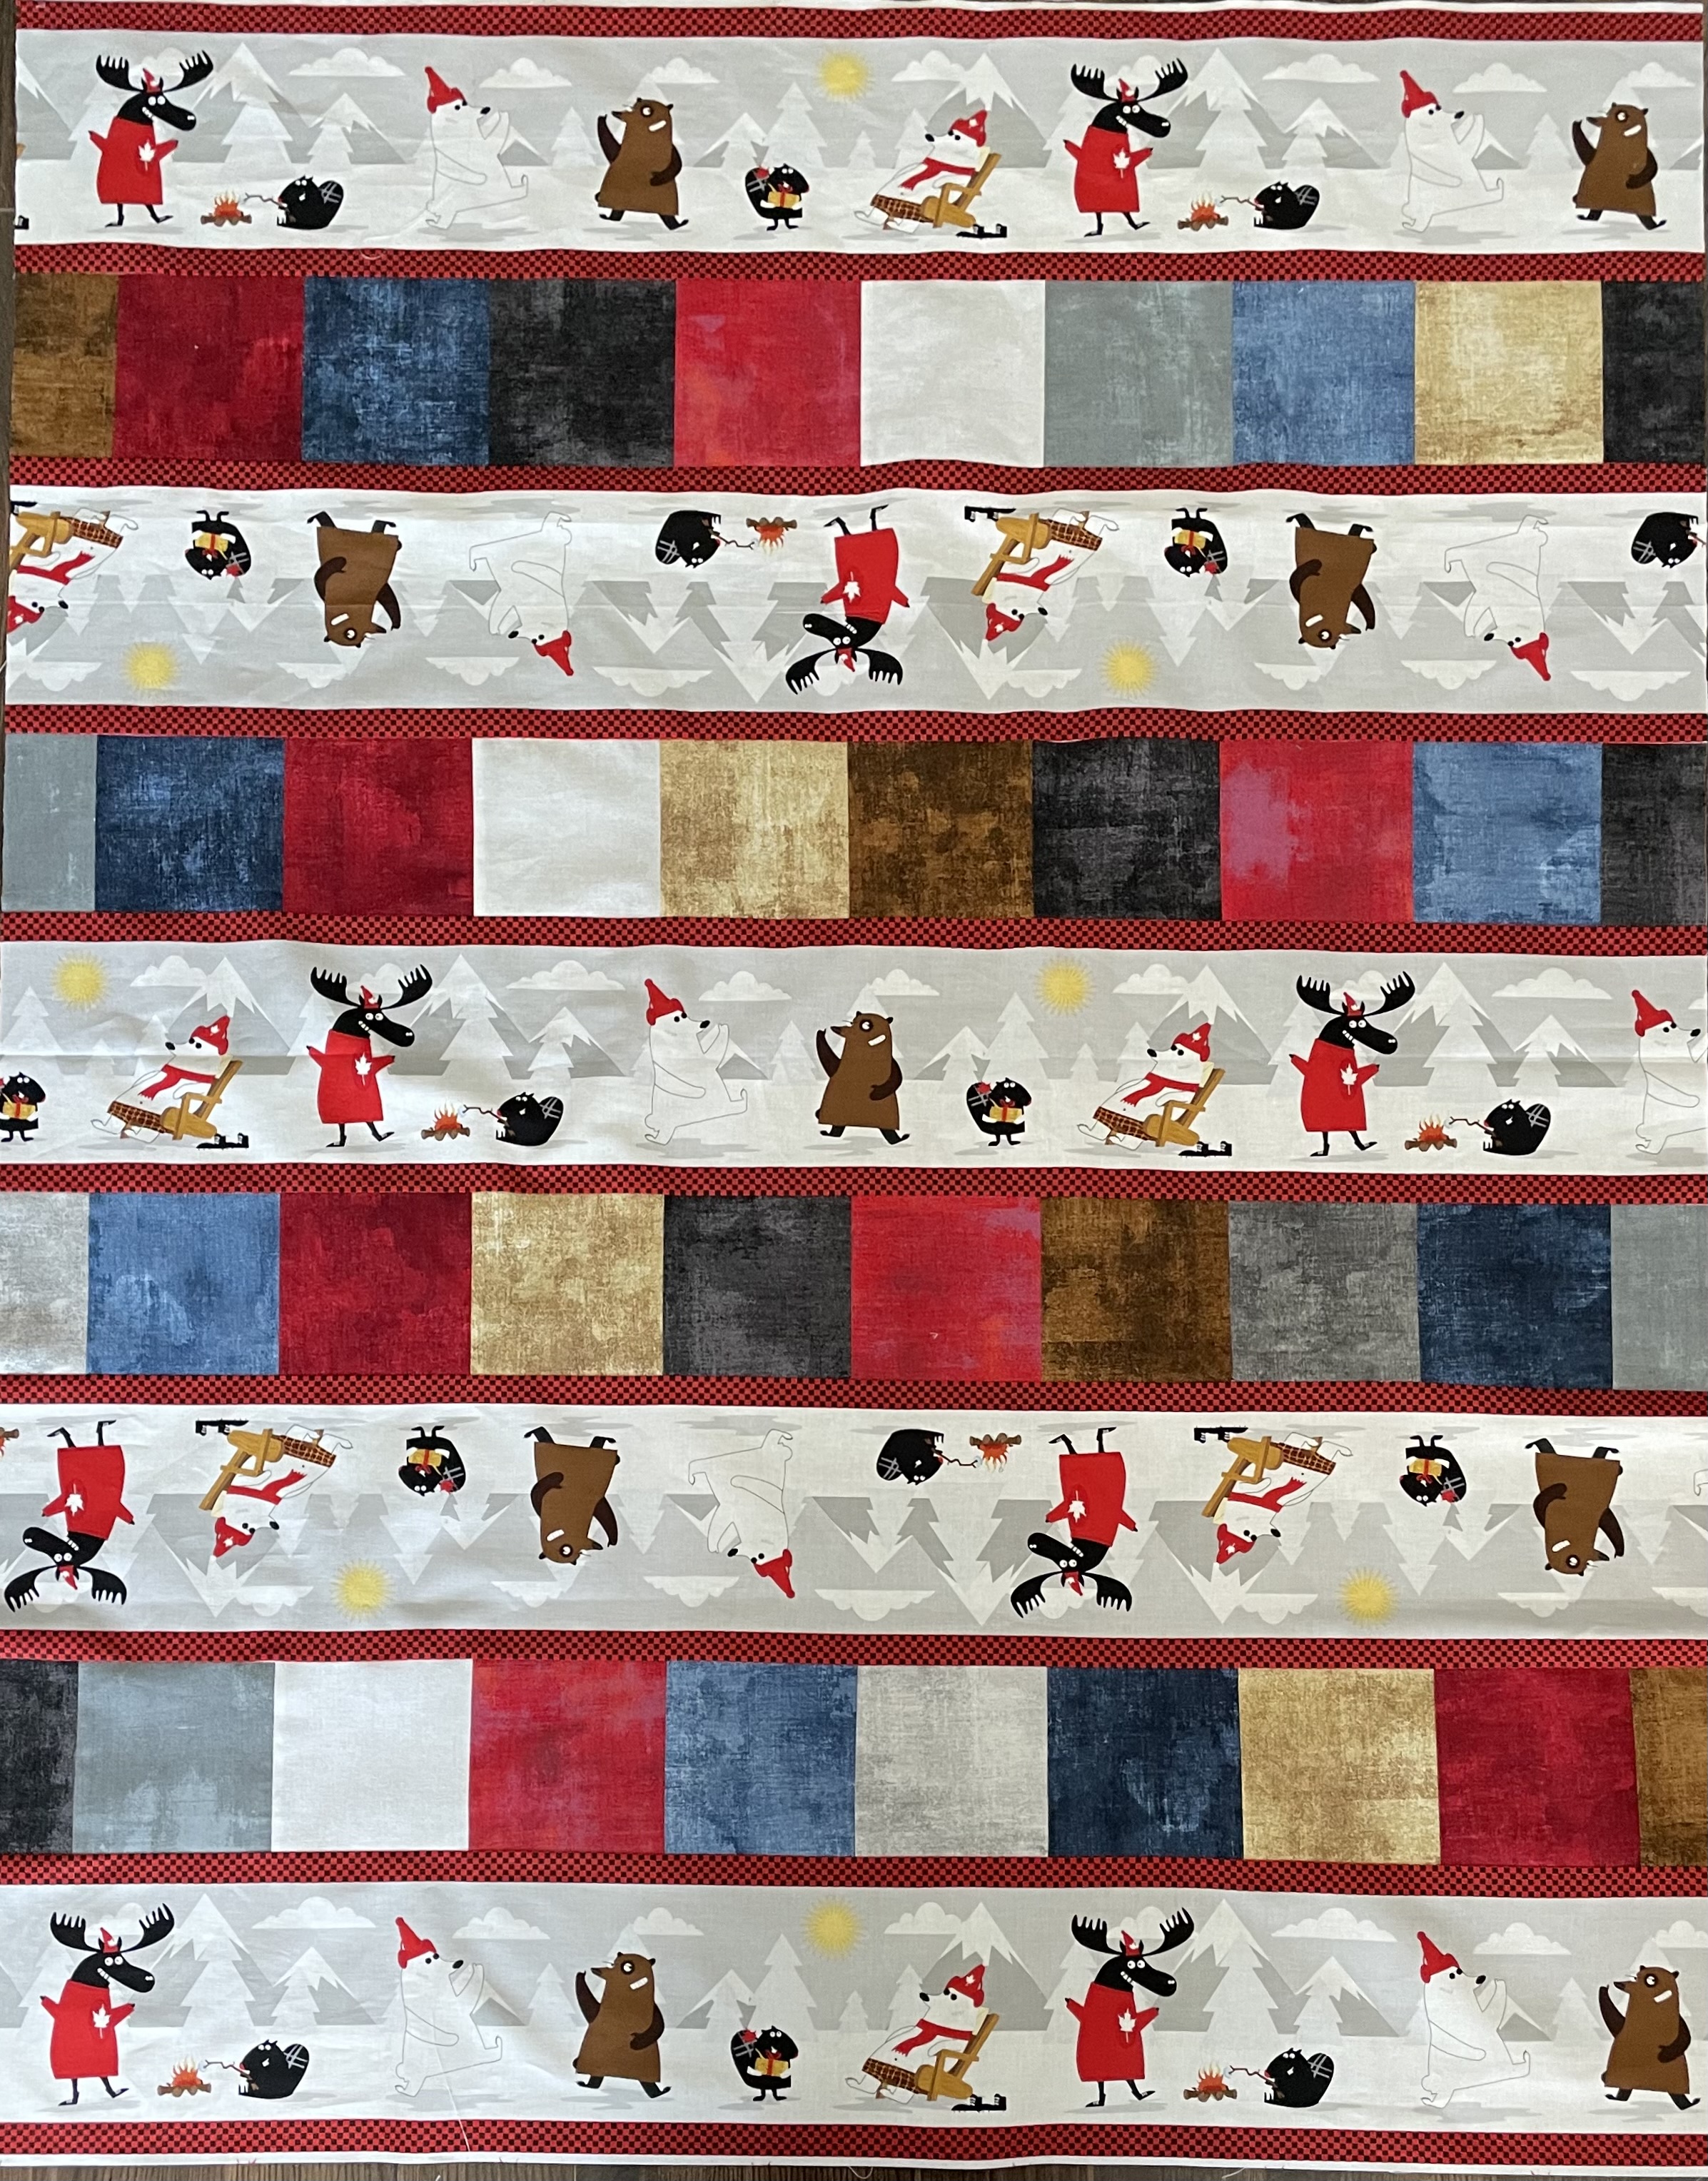
I bought this crazy animal fabric before Christmas on sale. I figured I’d be able to do something with it, whether I cut the strips into blocks or used them intact in some way. I had two layer cakes of mottled background fabrics, I chose the colours from the animal strips, cut the 10″ squares into 5″ squares and assembled them somewhat randomly.
I was going to cut the remaining 5″ blocks into 2 1/2″ rectangles for a border, but the top is definitely large enough as it is. I wasn’t going to do anything on the back side but I still have one strip of the animals left along with two stacks of the 5″ squares so I will assemble them and incorporate them into the second side. I’ll never use this fabric for anything else so I might as well use up as much of it as I can.
I’m planning a dark grey backing fabric. I’ll bind the quilt with it as well which will give definition to the quilt top which it doesn’t have at the moment.
It’s a lovely sunny day today. Time to get showered and dressed. Going for a drive in the countryside to enjoy the rest of the day!